La Marzocco Swift Mini User manual

manual
swift mini
The Swift Mini grinder simplies and streamlines preparing espresso. Making it
possible to grind, dose and tamp a double espresso on demand with no waste
and no mess. The Swift Mini is compatible with all La Marzocco Home machines.
Moreover, the Swift Mini can function as a standard on demand grinder. In this way
it is possible to grind for single espresso, or for lter brewing method.

EN
swift mini
Available certications:
Operating Manual V1.2 - 03/2020
MAN.13.05.1
La Marzocco S.r.l.
Via La Torre 14/H
Località La Torre
50038 Scarperia e San Piero
(Firenze) - ITALIA
www.lamarzocco.com
T: +39 055 849 191
F: +39 055 849 1990
Original instructions veried by the
manufacturer.
These instructions are also available in an
alternative format on a website by means
of a QR Code.
Printed on recycled paper.
page 5
page 5
page 5
page 6
page 6
page 6
page 7
page 8
page 9
page 9
page 10
page 10
Chapters
1. Foreword
2. Common Dimensions
3. Denition of the available Model
4. Packaging
5. De-commissioning and Demolition
6. Use
7. Installation
8. Machine Operation
9. General Warnings for Machine Operation
10. Safety devices
11. General Warnings and Safety Specications
12. Maintenance and Periodic Cleaning Operations

EN
3
When using electrical
appliances, basic safety
precautions should always
be followed, including the
following:
1. Read all instructions.
2. For protection against
electrical shock risks do
not put (state specic part
or parts in question) in
water or other liquids.
3. This appliance is not
intended for use by
persons with reduced
physical, sensory, or
mental capabilities, or
with lack of experience
and knowledge, unless
they are closely supervised
and instructed concerning
the use of the appliance
by a person responsible
for their safety. Children
should be supervised to
ensure that they do not
play with the appliance.
4. Turn the appliance OFF,
then unplug it from the
outlet when not in use,
before assembling or
disassembling parts and
before cleaning. To unplug,
grasp the plug and pull
from the outlet. Never pull
from the power cord.
If permanently installed -
Make sure the appliance
is OFF when not in
use, before putting
on or taking off parts,
and before cleaning.
5. Avoid contacting
moving parts.
6. Do not operate any
appliance with a damaged
cord or plug or in case of
appliance malfunctions,
or if it is dropped or
damaged in any manner.
For information on
examination, repair or
adjustment, contact the
manufacturer at their
customer service telephone
number. (Domestic
customer service telephone
number must be stated in
IMPORTANT SAFEGUARDS
WARNING
SAVE THESE INSTRUCTIONS

EN
4
WARNING
SAVE THESE INSTRUCTIONS
the instruction manual,
literature included within
the product’s packaging,
or must be permanently
marked on the appliance).
7. The use of attachments
not recommended or
sold by the manufacturer
may cause re, electric
shock or injury.
8. Do not use outdoors (this
may be omitted if the
appliance is specically
designed for outdoor use).
9. Do not let cord hang over
edge of table or counter.
10.Always disconnect
the appliance from
power supply if it is
left unattended and
before assembling,
disassembling or cleaning.
11.This appliance shall not be
used by children. Keep the
appliance and its cord out
of the reach of children.
12. SAVE THESE INSTRUCTIONS.
13. The appliance is designed
to be used with cycle 10
seconds ON 60 seconds
OFF. A more intense use
could cause the intervention
of the protection device.
14. This appliance is intended
to be used for household and
similar applications such as:
• staff kitchen areas in
shops, ofces and other
working environments;
• farm houses;
• by clients in hotels,
motels and other residential-
type environments;
• bed & breakfast-
type environments.
IMPORTANT SAFEGUARDS

EN
5
1. Foreword
This operating guide is an integral and
essential part of the product and must
be supplied to users. Users are asked to
read the enclosed warnings and cautions
carefully, as they provide valuable
information concerning safety during
installation, operation, and maintenance.
This manual must be kept in a safe place
and be available for consultation to new
and experienced users alike.
2. Common Dimensions, Weights, and Features
3. Denition of the available Model
WEIGHT [kg]
A
B
C
swift mini
A [mm] 272
14,2
322
449
B [mm]
C [mm]
D
E
166E [mm]
163D [mm]
1Main Switch (below)
2Drip Tray
3Portalter Ring
4Dosing Push Button
5Coffee Grinding Adjustment Disk
6Hopper for Coffee Bean Container
7Hopper Cover
8Locking Slide
3
1
8
Legend
2
4
5
6
7
1

EN
6
4. Packaging
1) Ensure product’s integrity by inspecting
the packaging, making sure it shows
no signs of damage which might have
affected the enclosed machine.
2) Check machine’s integrity after having
carefully removed the packaging.
Packaging (boxes, plastic bags, foam parts
and whatever else) must not be left within
easy reach of children, due to the potential
danger it represents, nor be discarded in
the environment.
5. De-commissioning and Demolition
First of all, set the main switch to “0” or
OFF position.
5.1 Disconnecting from the power outlet
Disconnect the appliance from the
electrical network by switching off the
associated circuit breaker or circuit
protection device. Remove the power
supply cord from power connection.
Remove Pump Motor Power Cord from
water pump motor.
5.2 Recycling notice: Warning for environment
protection
Used electrical and electronic waste
contains hazardous but also valuable
and scarce materials which should be
recovered and recycled properly. We kindly
ask that you contribute to the protection of
the environment and natural resources by
delivering used equipment to the relevant
recycling locations if such locations are
available in your country.
6. Use
WARNING
This machine is designed only for
grinding coffee.
WARNING
The manufacturer declines
any responsibility for any
event leading to liability suits
whenever grounding has not
been completed according
to current local, national and
international regulations and
electrical codes, or other
electrical parts have been
connected improperly.
WARNING
The warranty will be void
in case of:
• Incorrect use, not in accordance
with design purpose;
• Use of non-genuine spare parts;
• Power cord tampered with;
• Components tampered with;
• Repairs made by unauthorized
personnel.
WARNING
This appliance is intended for
household use.
WARNING
The appliance is designed to be
used with cycle 10 seconds ON
60 seconds OFF.
A more intense use could cause
the intervention of the protection
device.

EN
7
7. Installation
- This appliance must be installed to
comply with applicable federal, state
or local electrical and plumbing codes.
Installation also must comply with
manufacturer’s instructions and must be
performed by qualied and authorized
personnel.
- Check to see that the data on rating plate
corresponds to those of the main electrical
supply which the machine will be hooked
up to.
- This appliance must be installed to
comply with applicable federal, state
or local electrical and plumbing codes.
Installation also must comply with
manufacturer’s instructions and must be
performed by qualied and authorized
personnel.
- Incorrect installation may cause injury/
damages to people, animals or objects, for
which the manufacturer shall not be held
responsible.
- Safe electrical operation of this appliance
will be achieved only when the connection
to power outlet has been completed
correctly and in observance of all local,
national, and international electrical codes
and safety regulations, and particularly by
grounding the unit. Make sure grounding
has been done properly as it represents
a fundamental safety requirement.
Ensure qualied personnel check such
connection.
- Furthermore, you must ensure that
the capacity of the available electrical
system is suitable for the maximum power
consumption indicated on the appliance.
- We do not recommend using adapters,
multiple plugs and/or extension cords.
If you cannot avoid using them, make
sure that they are exclusively of the kind
which conforms to local, national and
international electrical codes, and safety
regulations, being careful not to exceed
the power and current ratings indicated on
such adapters and extension cords.
- The hopper must be fastened to
appliance’s grinding system by means of
the relevant screw which must be inserted
in the threaded hole located on the upper
grinding blade holder and in the hole on
hopper neck.
- thoroughly clean the appliance at the
rst installation; follow the instructions
included in this manual.
WARNING
This appliance must be placed
in a horizontal position on a
counter higher than 90cm from
the ground.
WARNING
This machine is intended to be
permanently connected to xed
wiring, and it is mandatory that
a residual current device (RCD)
with a rated residual operating
current not exceeding 30mA is
installed.
WARNING
This machine is not suitable
for outdoor use. Jets of water
should not be used to clean the
machine, nor should it be placed
where water jets are used.

EN
8
8. Machine Operation
8.1. Preliminaries
8.1.1.
Connect the power cord to a power
supply capable of supplying: 230VAC
and 530 Watt (for 220-240V version) or
115VAC and 450 Watt (for 115V version).
8.1.2.
Make sure the hopper is positioned
correctly on the appliance and is fastened
to upper grinding blade holder by means
of the relevant screw.
Close the locking slide and ll the hopper
with coffee beans.
Open the locking slide so that the beans
are allowed to drop into grinding system.
8.1.3.
Turn on the grinder by engaging the
main power switch.
8.2. Engaging the Portalter
The portalter must be engaged directly to
the grinder.
Engage the portalter with only a light
amount of force. If the grinder shifts on the
counter top, you are using too much force.
Engage portalter gently.
There is no need to force it into position.
Once the portalter is engaged, press the
start button located at the front of the
appliance.
Coffee will be ground, dosed and tamped.
8.3. Alternative Grinding
The grinder is equipped with a grinding
system excluding the pressing tower.
Once the portalter is under the grinder,
press the start button located at the front
of the appliance.
Coffee will be ground, dosed but not
tamped.
8.4. Adjusting Coffee Grind
To achieve your desired brew time and
coffee consistency, a manual adjustment
can be made on the grinder to modify
coffee grind (tamping pressure is not
adjustable and remains constant). Rotate
the adjustment disk as described below.
To increase the coarseness of the
ground coffee, rotate the adjustment
disk clockwise; to decrease it, rotate the
adjustment disk counterclockwise.
The disk remains in the chosen position
without the need of locks
Grind small amounts of coffee in order to
determine neness optimal degree.
Before checking ground coffee neness,
grind some doses of coffee to ll the duct
between grinding area and the outlet.
This operation must be done whenever the
grinding setting has been changed in order
to empty the duct of previous ground coffee.
Hopper
Hopper Safety
Screw

EN
9
If coffee comes out of the espresso
machine very quickly, it means the coffee
has been ground too coarse. Vice versa,
if it comes out too slowly, it means the
coffee has been ground too ne.
Note:
There are many variables that can
affect coffee preparation, including
temperature, humidity, espresso machine
settings, the cleaning of the lters and
freshness of the roast. All of them can
cause slight variations in shot times.
The size of the coffee granules is extremely
important for preparing a good cup of
coffee, along with the type of coffee blend
used. Ideal grind can be determined by
making various coffees with the amount of
ground coffee that you would normally use
for each cup (we recommend at least 6g).
The best grind is that which allows coffee
to ow out from portalter spouts neither
too slowly, drop by drop, nor too quickly.
A general rule is that a double dose should
dispense approximately 60ml of espresso in
approximately 25 seconds. This time may
be adjusted by varying grind coarseness.
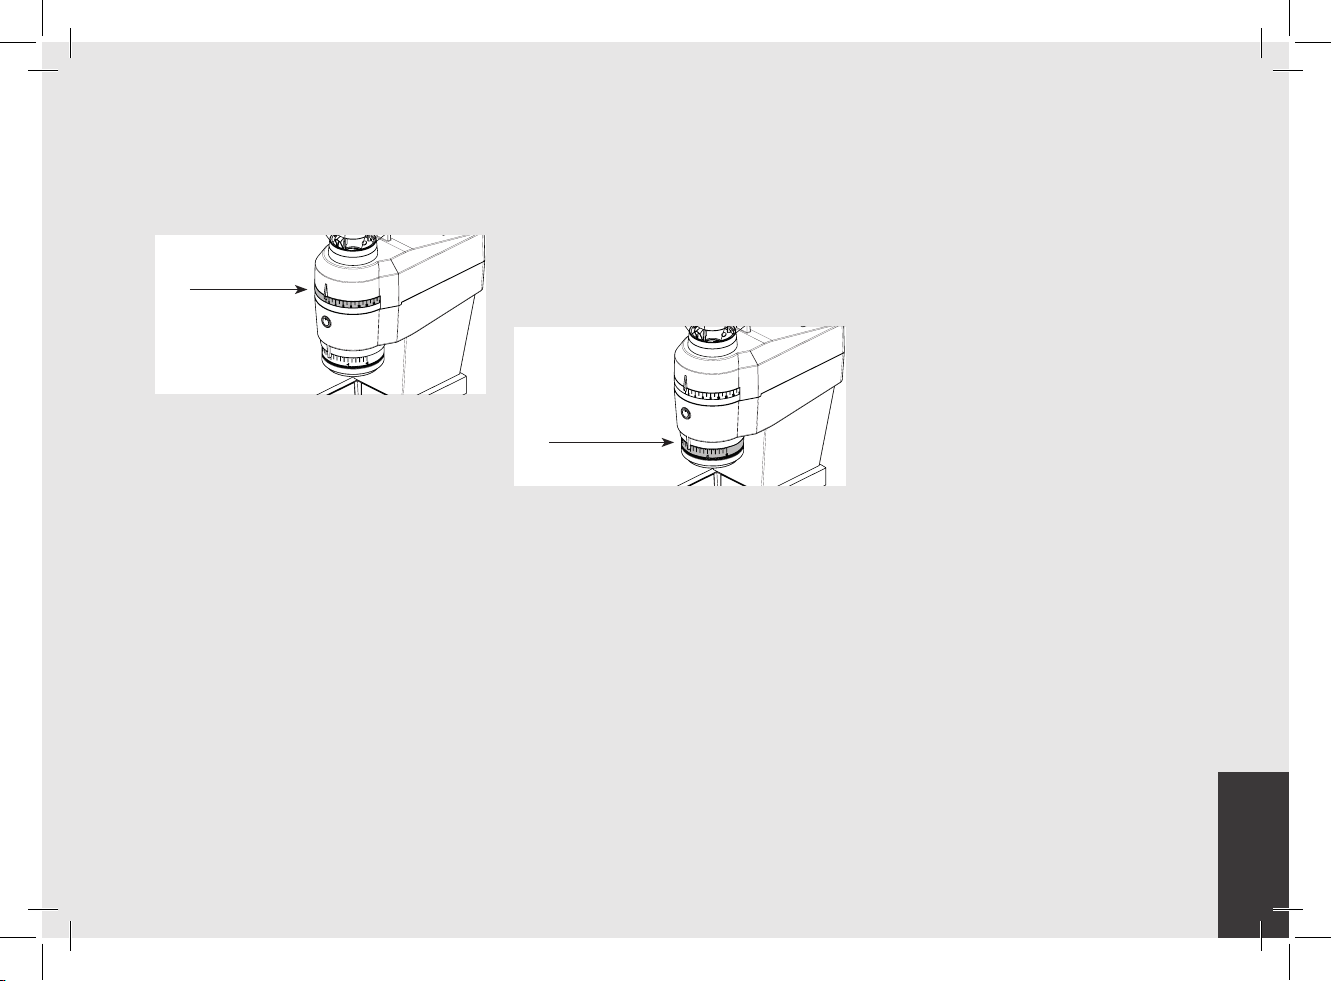
8.5. Adjusting Dose Quantity
SWIFT MINI is set to dose approximately
16 to 18 grams of coffee in a 22mm
basket
.
In order to increase coffee dose, disk
must be rotated anticlockwise; whereas to
decrease, turn disks clockwise.
Disk remain in chosen position without
having to be locked in place.
9. General Warnings Operation
- Do not insert, when lling the hopper
with coffee beans, foreign objects. Handle
with clean hands.
- After any hopper lling and during
appliance normal use, hopper lid must be
positioned correctly.
- For the correct use of the grinding
blades, at the rst installation or whenever
the grinding blades have been replaced,
grind some doses of coffee. Do not use
those rst doses.
For the appliance to function at its best,
on rst installation and every time the
hopper is cleaned, after having ground a
few coffee doses, clean the inner surface
of the funnel with a dry brush.
- In single-phase motor versions, observe
the duty cycle stated in the label located
on the side of the appliance.
10. Safety devices
Appliance’s motor is protected against
overcurrents by means of a thermal
overload protection which, when tripped,
cuts off power supply to the motor.
Should the protection trip as a result of
anomalous operation, such as grinding
blades jamming, the appliance must be
turned off using the ON-OFF switch, then
unplugged from the mains, and skilled
technical personnel is to be contacted.
Never perform any work on the appliance
while it is attached to the mains, in order
to avoid the risk that motor turns on
suddenly.
If the appliance overheats as a result of
a motor stoppage, allow it to cool down
before performing any repair work.
The hopper must always be attached to
upper grinding blade holder using the
relevant screw, which must not be removed
by the user under any circumstances.
11. General Warnings and Safety
Specications
This electrical appliance must be used in
conformity with the rules in force governing
safe operation.
Upper Disk
Dose Disk

EN
10
- When operating the appliance, beware of
moving mechanical parts in the area of the
grinding blades and of the ground coffee
outlet. Before removing the hopper from
the grinding system, disconnect power
supply. Avoid removing foreign bodies from
the grinding system or hopper without rst
unplugging the appliance from the mains.
- Take care, as grinding blades may
continue rotating for a short while even
after the appliance is switched off.
- The user is not authorized to remove
screws or any parts screwed onto the
appliance.
- In the event the appliance is not working
properly or is faulty, contact skilled
technical personnel and do not attempt to
make repairs yourself.
- Before performing any work on the
appliance, including cleaning and/or
maintenance, disconnect it from power
supply by unplugging. Turning off the
appliance using its master switch does not
assure the same safety conditions.
- Do not tamper with the appliance.
- When the appliance is left unattended,
power supply must be disconnected
by using he relevant master switch (for
example, at night, during work breaks,
midweek closing or holidays).
- Do not let liquids of any kind come into
contact with appliance internal or external
parts.
- Never put ground coffee in the hopper
intended only for coffee beans.
- Do not tug at the supply cable in order to
unplug the appliance from the mains.
- Do not touch the appliance with damp or
wet hands or feet.
- Do not use the appliance barefoot.
The manufacturer cannot be held
responsible for bodily injury or damage
to property if these regulations are not
complied with.
11.1. Noise level
EEC Countries:
Weighted sound pressure level of the
machine is lower than 81dBA.
12. Maintenance and Periodic Cleaning
Operations
12.1. Maintenance
- It is essential to periodically check the
condition of the supply cable and of the
plug.
- In the event the supply cable or plug
is damaged, call in skilled technical
personnel to replace them, in order to
prevent any risk.
- In CE certied appliances, a special
tool is required to open the base plate for
reaching the cable.
- It is recommended to use original spare
parts only.
- In order to assure the lasting efciency of
the appliance, skilled technical personnel
must be called in order to perform
periodical maintenance, including
detailed checks of the condition of those
components which are subject to wear.
- Grinding blade condition must be
periodically checked. Keeping grinding
blades in an excellent condition assures
high quality grinding, resulting in a greater
productivity and limited overheating.
12.2. Cleaning
WARNING
The machine must not be dipped
in, nor splashed with water in
order to clean it. For cleaning
operations, please follow these
instructions very carefully.
WARNING
Disconnect appliance’s power
supply by unplugging it before
cleaning.

EN
11
12.2.1. Hopper
Wash the hopper once it has been removed
from the appliance, using neutral soap
and water, rinse abundantly with lukewarm
water and dry thoroughly. It is advisable
to clean the hopper periodically. Once
the hopper has been cleaned, it must be
attached to hopper grinding blade holder
using the relevant screw.
12.2.2. Grinding System
Remove the propeller and use a brush to
remove any coffee residues.
Remove the inner cylinder and the tray,
use a brush to remove any coffee residues.
Unscrew the set of adjustment disks and
use a brush to remove any coffee residues.


manuel
swift mini
Le moulin à café Swift Mini simplie et rationalise la préparation de l’expresso. Il
permet de moudre, doser et tasser un double expresso à la demande sans gaspillage
ni désordre. Le Swift Mini est compatible avec toutes les machines La Marzocco
Home. De plus, la Swift Mini peut fonctionner comme moulin à café standard à la
demande. Elle permet par conséquent de moudre pour préparer un seul expresso ou
pour la méthode de préparation avec ltre.

FR
swift mini
Certications disponibles :
Mode d'emploi V1.2 - 03/2020
La Marzocco S.r.l.
Via La Torre 14/H
Località La Torre
50038 Scarperia e San Piero
(Firenze) - ITALIA
www.lamarzocco.com
T: +39 055 849 191
F: +39 055 849 1990
Instructions originales vériées par le
fabricant.
Ces instructions sont également
disponibles dans un autre format sur un
site Web au moyen d'un Code QR.
Imprimé sur papier recyclé.
page 5
page 5
page 5
page 6
page 6
page 6
page 7
page 8
page 9
page 9
page 10
page 10
Chapitres
1. Avant-propos
2. Dimensions communes
3. Dénition du modèle disponible
4. Emballage
5. Mise hors Service et Démolition
6. Emploi
7. Installation
8. Fonctionnement de la machine
9. Avertissements généraux sur le fonctionnement de la machine
10. Dispositifs de sécurité
11. Avertissements Généraux et Spécications de Sécurité
12. Entretien et opérations de nettoyage périodiques

FR
3
Lorsque vous utilisez des
appareils électriques, vous
devez toujours observer des
précautions de sécurité, qui
incluent ce qui suit :
1. Lire toutes les instructions.
2. Pour une protection contre
les risques d’électrocution,
ne pas plonger (indiquer
une pièce spécique ou
les pièces en question)
dans l'eau ou dans
d’autres liquides.
3. Cet appareil n'est pas prévu
pour être utilisé par des
personnes (y compris les
enfants) avec des capacités
physiques, sensorielles
ou mentales réduites,
ou sans expérience
ni connaissances, à
moins qu'elles ne soient
surveillées étroitement
ou n’aient reçu des
instructions concernant
l'utilisation de l'appareil par
une personne responsable
de leur sécurité. Une
étroite supervision
est nécessaire en cas
d'utilisation de l'appareil
par des enfants ou près de
ces derniers. Les enfants
doivent être surveillés
pour s'assurer qu'ils ne
jouent avec l'appareil.
4. Couper l’appareil, puis le
débrancher de la prise
lorsqu’il n’est pas utilisé,
avant d'assembler ou de
désassembler des pièces et
avant de le nettoyer. Pour le
débrancher, saisir la che
et la retirer de la prise. Ne
jamais tirer sur le cordon
d’alimentation.
S’il est installé en
permanence, vérier
que l'appareil est hors
tension (OFF) lorsqu’il
n’est pas utilisé, avant de
le mettre sous tension,
de retirer des pièces et
avant de le nettoyer.
5. Éviter de toucher les
pièces mobiles.
6. Ne pas faire fonctionner
un appareil avec un
cordon ou une prise
endommagée ou en cas de
mauvais fonctionnement
de l'appareil, ou s’il est
tombé ou a été endommagé
de quelque manière que
ce soit. Pour de plus
amples informations sur
CLAUSES DE SÉCURITÉ IMPORTANTES
ATTENTION
CONSERVER CES INSTRUCTIONS

FR
4
ATTENTION
CONSERVER CES INSTRUCTIONS
l’examen, la réparation
ou le réglage, contacter
le fabricant au numéro
de téléphone de service
clientèle. (Le numéro
de téléphone du service
clientèle domestique doit
être mentionné dans le
manuel d'instruction, la
littérature incluse dans
l’emballage du produit ou
doit être marqué de façon
indélébile sur l’appareil).
7. L’emploi d'accessoires
non recommandés ou
vendus par le fabricant
peut provoquer un
incendie, une électrocution
ou une blessure.
8. Ne pas utiliser à l'extérieur
(ce point peut être
omis si le produit est
spécialement conçu pour
une utilisation extérieure).
9. Ne pas laisser pendre le
cordon du bord d'une
table ou d'un comptoir.
10.Toujours débrancher
l’appareil de l’électricité s’il
est laissé sans surveillance
et avant l'assemblage,
le désassemblage
ou le nettoyage.
11.Cet appareil ne peut être
utilisé par des enfants.
Conserver l'appareil et
son cordon hors de la
portée des enfants.
12. CONSERVER CES
INSTRUCTIONS.
13. L’appareil est conçu pour
être utilisé avec cycles de
10 secondes ON et 60
secondes OFF. Une utilisation
plus intense pourrait
provoquer l’intervention du
dispositif de protection.
14. Cet appareil est
principalement destiné
à être utilisé pour des
applications d’électroménager
et des applications
semblables telles que :
• zones de cuisine du
personnel dans des
boutiques, bureaux et autres
environnements de travail ;
• maisons de campagne ;
• par des clients
d’hôtels, de motels et
autres environnements
de type résidentiel ;
• environnements de
type bed & breakfast.
CLAUSES DE SÉCURITÉ IMPORTANTES

FR
5
1. Avant-propos
Cette notice de fonctionnement est partie
intégrante et essentielle du produit et doit
donc être fournie à tous les utilisateurs. Les
utilisateurs sont priés de lire attentivement
les indications et les mises en garde car elles
fournissent des informations importantes
sur la sécurité pendant l'installation, le
fonctionnement et l'entretien.
Ce manuel doit être conservé dans un endroit
sur de façon à pouvoir être consulté tant par
les utilisateurs inexperts que par ceux qui
connaissent déjà le fonctionnement du produit.
2. Dimensions, Poids, et Fonctions communes
3. Dénition du modèle disponible
POIDS [kg]
A
B
C
swift mini
A [mm] 272
14,2
322
449
B [mm]
C [mm]
D
E
166E [mm]
163D [mm]
1Interrupteur général (au-dessous)
2Plateau Ramasse-Gouttes
3Bague porte-ltre
4Bouton de dosage
5Disque de réglage de mouture du
café
6Trémie pour récipient de grains
de café
7Couvercle de la trémie
8Coulisse de blocage
3
1
8
Légende
2
4
5
6
7
1

FR
6
4. Emballage
1) S'assurer que le produit est intact en
examinant l'emballage pour vérier qu’il
ne porte aucun signe d'endommagement
susceptible d’affecter la machine se trouvant
à l'intérieur.
2) Vérier l'intégrité de la machine après avoir
soigneusement enlevé l'emballage.
L'emballage (boîtes, sacs en plastique, parties
en mousse et autres) ne doit pas être laissé
à la portée des enfants, en raison du danger
potentiel qu'il représente, ni être dispersé
dans l'environnement.
5. Mise hors Service et Démolition
Commencer par régler l'interrupteur général
sur la position “0” ou OFF.
5.1 Débranchement de l'alimentation
électrique
Débrancher l’appareil du réseau électrique en
éteignant le disjoncteur associé ou le dispositif
de protection de circuit . Débrancher le cordon
d'alimentation de la prise d'alimentation.
Débrancher le Cordon d'Alimentation du
Moteur de la Pompe du moteur de la pompe
à eau.
5.2 Notice de recyclage : avertissement
concernant la protection de l’environnement
Les déchets électriques et électroniques sont
dangereux mais constituent également des
matières rares et d’une certaine valeur qui
doivent être récupérées et recyclées comme
il se doit. Nous vous prions de bien vouloir
contribuer à la protection de l'environnement
et des ressources naturelles en remettant
l’équipement usagé à un centre de recyclage,
si de tels centres existent dans votre pays.
ATTENTION
Cette machine est conçue uniquement
pour la préparation de café.
ATTENTION
Le constructeur décline
toute responsabilité en cas
d'événements aboutissant à des
poursuites en responsabilité
civile si la mise à la terre n'a pas
été effectuée conformément aux
réglementations ou aux codes de
l'électricité locaux, nationaux,
et internationaux en vigueur, ou
si d'autres pièces électriques
ont été raccordées de manière
incorrecte.
ATTENTION
La garantie sera nulle en cas de :
• Utilisation incorrecte, non
conforme au but de conception ;
• Utilisation de pièces de rechange
non originales ;
• Cordon d'alimentation altéré ;
• Composant altérés ;
• Réparations effectuées par du
personnel non autorisé.
ATTENTION
Cet appareil est destiné à
l’usage ménager.
ATTENTION
L’appareil est conçu pour
être utilisé avec cycles de 10
secondes ON et 60 secondes
OFF. Une utilisation plus intense
pourrait provoquer l’intervention
du dispositif de protection.

FR
7
ATTENTION
L’appareil doit être placé en
position horizontale sur un
comptoir dont la hauteur du sol
est supérieure à 90cm.
6. Emploi
7. Installation
- Cet appareil doit être installé
conformément aux codes électriques et de
plomberie fédéraux, nationaux ou locaux
en vigueur. La machine doit, en outre,
être installée par des techniciens agréés
et qualiés, en suivant les instructions du
fabricant.
- Vérier que les données reportées sur
la plaquette signalétique du produit
correspondent à celles de l’alimentation
électrique du secteur à laquelle sera
raccordée la machine.
- Cet appareil doit être installé
conformément aux codes électriques et de
plomberie fédéraux, nationaux ou locaux
en vigueur. La machine doit, en outre,
être installée par des techniciens agréés
et qualiés, en suivant les instructions du
fabricant.
- Une installation incorrecte peut être à
l’origine de blessures corporelles à des
personnes ou des animaux et de dégâts
matériels, dont le fabricant ne pourra être
tenu pour responsable.
La sécurité de fonctionnement électrique
de cet appareil dépend d'un branchement
en bonne et due forme à la prise de courant,
conformément aux codes électriques
et aux règlements de sécurité locaux,
nationaux et internationaux et surtout de
sa mise à la terre. S'assurer que la mise à
la terre a été effectuée car elle représente
un élément de sécurité fondamental. Faire
contrôler le branchement à du personnel
qualié.
- S'assurer en outre que le système
électrique a une capacité sufsante pour la
puissance et la consommation maximales
indiquées sur l’appareil.
- Il est déconseillé d'utiliser des
adaptateurs, des prises multiples et/
ou des rallonges. Si l'on ne peut en
éviter l'utilisation, s'assurer qu'ils sont
conformes aux codes électriques et aux
règlements de sécurité locaux, nationaux
et internationaux en veillant à ne pas
dépasser les tensions, puissances et
absorptions indiquées sur ces adaptateurs
et ces rallonges.
- La trémie doit être xée au
broyeur de l'appareil au moyen d’une vis
prévue à cet effet qui sera enlée dans le
trou leté situé sur le support supérieur de
lame et dans le trou sur le col de la trémie.
- nettoyer complètement l’appareil lors
de sa première installation ; suivre les
instructions de ce manuel.
ATTENTION
La machine est prévue pour être
raccordée de façon permanente
à un câblage xe. Il est impératif
d'installer un dispositif différentiel
résiduel (DDR) avec un courant
nominal de fonctionnement
résiduel ne dépassant pas 30mA.
ATTENTION
Cette machine n'est pas appropriée
à un usage externe. Il ne faut pas
utiliser de jets d'eau pour nettoyer
la machine, ni la placer dans des
endroits où l'on utilise des jets
d'eau.

FR
8
8. Fonctionnement de la machine
8.1. Opérations préliminaires
8.1.1.
Brancher le cordon d'alimentation au
réseau électrique capable de fournir : 230
VCA et 530 Watt (pour la version à 220-
240V) ou 115VCA et 450 Watt (pour la
version à 115V).
8.1.2.
Vérier que la trémie est bien
positionnée sur l’appareil et est xée au
support supérieur de lame au moyen de la
vis prévue à cet effet.
Fermer la coulisse de blocage et remplir la
trémie de grains de café.
Ouvrir la coulisse de blocage pour que les
grains puissent tomber dans le broyeur.
8.1.3.
Mettre le moulin sous tension en
appuyant sur l'interrupteur général.
8.2. Emboîtement du porte-ltre
Le porte-ltre doit être emboîté
directement sur le moulin.
Le porte-ltre s’emboîte sans grand effort.
Si le moulin se déplace sur le comptoir, le
geste est trop fort.
Emboîter le porte-ltre délicatement.
Il n’est pas nécessaire de forcer pour le
mettre en place.
Une fois le porte-ltre emboîté, appuyer
sur le bouton de démarrage, à l’avant de
l’appareil.
Le café sera moulu, dosé et tassé.
8.3. Mouture alternative
Le moulin à café est équipé d'un broyeur
excluant la tour de pression.
Une fois que le porte-ltre est sous
le moulin, appuyer sur le bouton de
démarrage, à l’avant de l’appareil.
Le café sera moulu, dosé mais pas tassé.
8.4. Réglage de la mouture du café
Pour atteindre le temps de préparation
souhaité et la bonne consistance de café,
le moulin peut se régler manuellement
an de modier la mouture du café (la
pression de tassement n’est pas réglable
et reste constante). Tourner le disque de
réglage comme décrit ci-après.
Pour augmenter la grosseur du café moulu,
le disque de réglage doit être tourné dans
le sens des aiguilles d’une montre ; pour
diminuer, tourner au contraire le disque de
réglage dans le sens inverse des aiguilles
d’une montre.
Le disque reste dans la position choisie
sans besoin de blocages.
Moudre de petites quantités de café an
de déterminer un degré optimal de nesse.
Avant de contrôler la nesse du café
moulu, moudre quelques doses de café
Trémie
Vis de sécurité
de la trémie
Table of contents
Languages:
Other La Marzocco Coffee Grinder manuals

La Marzocco
La Marzocco K-6 User manual

La Marzocco
La Marzocco Swift User manual

La Marzocco
La Marzocco Mazzer Major V User manual

La Marzocco
La Marzocco La Marzocco User manual

La Marzocco
La Marzocco SWIFT EPSB User manual

La Marzocco
La Marzocco GB/5 Instruction sheet

La Marzocco
La Marzocco Major V User manual

La Marzocco
La Marzocco vulcano User manual

La Marzocco
La Marzocco vulcano swift User manual

La Marzocco
La Marzocco Linea Instruction sheet