La Marzocco SWIFT EPSB User manual

manual
swift epsb
The Swift grinder is the only grinder that grinds and tamps on demand, with no
waste and no mess, to an accurate volumetric dose.
Swift’s clever engineering and design guarantee level and consistent coffee beds,
time after time. Flat ceramic burrs ensure minimal heat buildup during the
grinding process. Compatible with all La Marzocco espresso machines. Swift is
ideal for high volume locations where consistency is key. Swift technology
maintains quality in the cup, shot after shot, no matter who is using it.

EN
swift epsb
cercaons available:
Operang Manual V2.1 - 11/2014
La Marzocco S.r.l.
Via La Torre 14/H
Località La Torre
50038 Scarperia e San Piero
(Firenze) - ITALIA
www.lamarzocco.com
info@lamarzocco.com
T: +39 055 849 191
F: +39 055 849 1990
EN
Chapters
1. Introducon
2. Components
3. Specicaons
4. Installaon
5. EngagingthePortalter
6. OperangtheSWIFT EPSB
6.1 SWIFT EPSB
6.2 SWIFT S/D
7. AdjusngCoeeGrind
8. AdjusngDoseQuanty
8.1 SWIFT EPSB
8.2 SWIFT S/D
9. DailyCleaning
10. Impeller
11. Burr Change-Out
12. Chute Clean-Out Tool
13. Fuse Replacement and Reset Switches
14. TipsandTroubleshoong
15. Electrical Diagrams
16. Cleaning Procedure
17. Recycling
page 3
page 3
page 4
page 5
page 6
page 7
page 7
page 7
page 9
page 10
page 10
page 11
page 15
page 18
page 20
page 24
page 25
page 27
page 29
page 31
page 32

EN
3
1. Introducon
2. Components
Verify that all parts are included when you receive your
new SWIFT EPSB.
a.Grinder
b. Two bean hoppers and lids
c. Driptray
d. Fuse pulling tool
e. Screwdriver
f. Cleaning brush
g.22mm.Portalterbaskets
h. Tamper cover lid
i. Fuses (inside tamper cover lid)
j. Long-armL-key3/32hexsize
k.Grinderdischargeclean-outtoolManual
Warrantyandregistraoncard
Espresso Preparaon System
Congratulaons on choosing
the SWIFT EPSBfrom La
Marzocco. Your applicaon
of this new product in your
café or home will result in a
numberofimportantbenets
toyou.
Quality, Consistency,
Conservaon, and Speed.
YournewSWIFTEPSBgrinds,
doses and tamps coee
directly into the portalter,
eliminang the need to do
this manually. It measures
and doses by volume, not
me, so waste and product
inconsistencyarereduced.At
thesameme,theSWIFTEPSB
enhancescoeefreshnessby
grinding coee by dose, not
bybulk.Thismanualincludes
informaon about how to
maintain and troubleshoot
your SWIFT EPSB for opmal
performance.
Please review it carefully.
a.
b.
b.
c.
d.
e.
g.
f.
h.
j.
d, e, i, j, k . Inside tamper cover
k.

EN
4
3. Specicaons
Height 65.5 cm/25.8 in.
Width 35 cm/13.8 in.
Depth 36 cm/14 in.
ShippingWeight 31kg/68lbs.
Voltage Single phase 220 VAC or Single phase 110 VAC
Amperage 7.5 amps, 220 VAC or 15 amps, 110 VAC
BeanHopperCapacity 1.8kg/4lbs.each
Was 780W
360 mm
14 in
655 mm
25,8 in
285 mm
11,2 in
350 mm
13,8 in

EN
5
The SWIFT EPSB is easy to
install.
However, there are several
important consideraons
to keep in mind. The SWIFT
EPSBrequires a grounded
110v, 15 amp (or 220v, 7.5
amp) power supply. It also
requires a minimum 16” x
16” (406 mm x 406 mm)
space on the counter. Since
the unit is 26” (660 mm) in
height,allow at least 30” (762
mm) of vercal clearance so
there is sucient space to
allowtheeasyremovalofthe
bean hoppers and lids. The
SWIFT EPSB weighs about 75
lbs(34kg),somakesureyour
counter will support this.
(1) Install the bean hoppers
and ghten the safety
screws.
(2) Plug the SWIFT EPSB
into a grounded 110v or
220v single phase power
supply.
4. Installaon
(4) Open the bean gates.
(3)Pourcoeeintothebean
hoppers.
Leave space above the
SWIFT EPSB.

EN
6
The portalter engages
directly to the SWIFT EPSB.
Since the SWIFT EPSBhas
no waterght seal, it is
not necessary to force the
portalter into place. Engage
the portalter with only a
light amount of force. If the
grinder shis on the counter
top, you are using too much
force.
5. Engaging the Portalter
There is no need to force it
intoposion.
Engageportaltergently.
(5) Turn on the grinder by
engaging the main power
switch. The red light will
come on.

EN
7
6. Operang the SWIFT EPSB
6.1 SWIFT EPSB
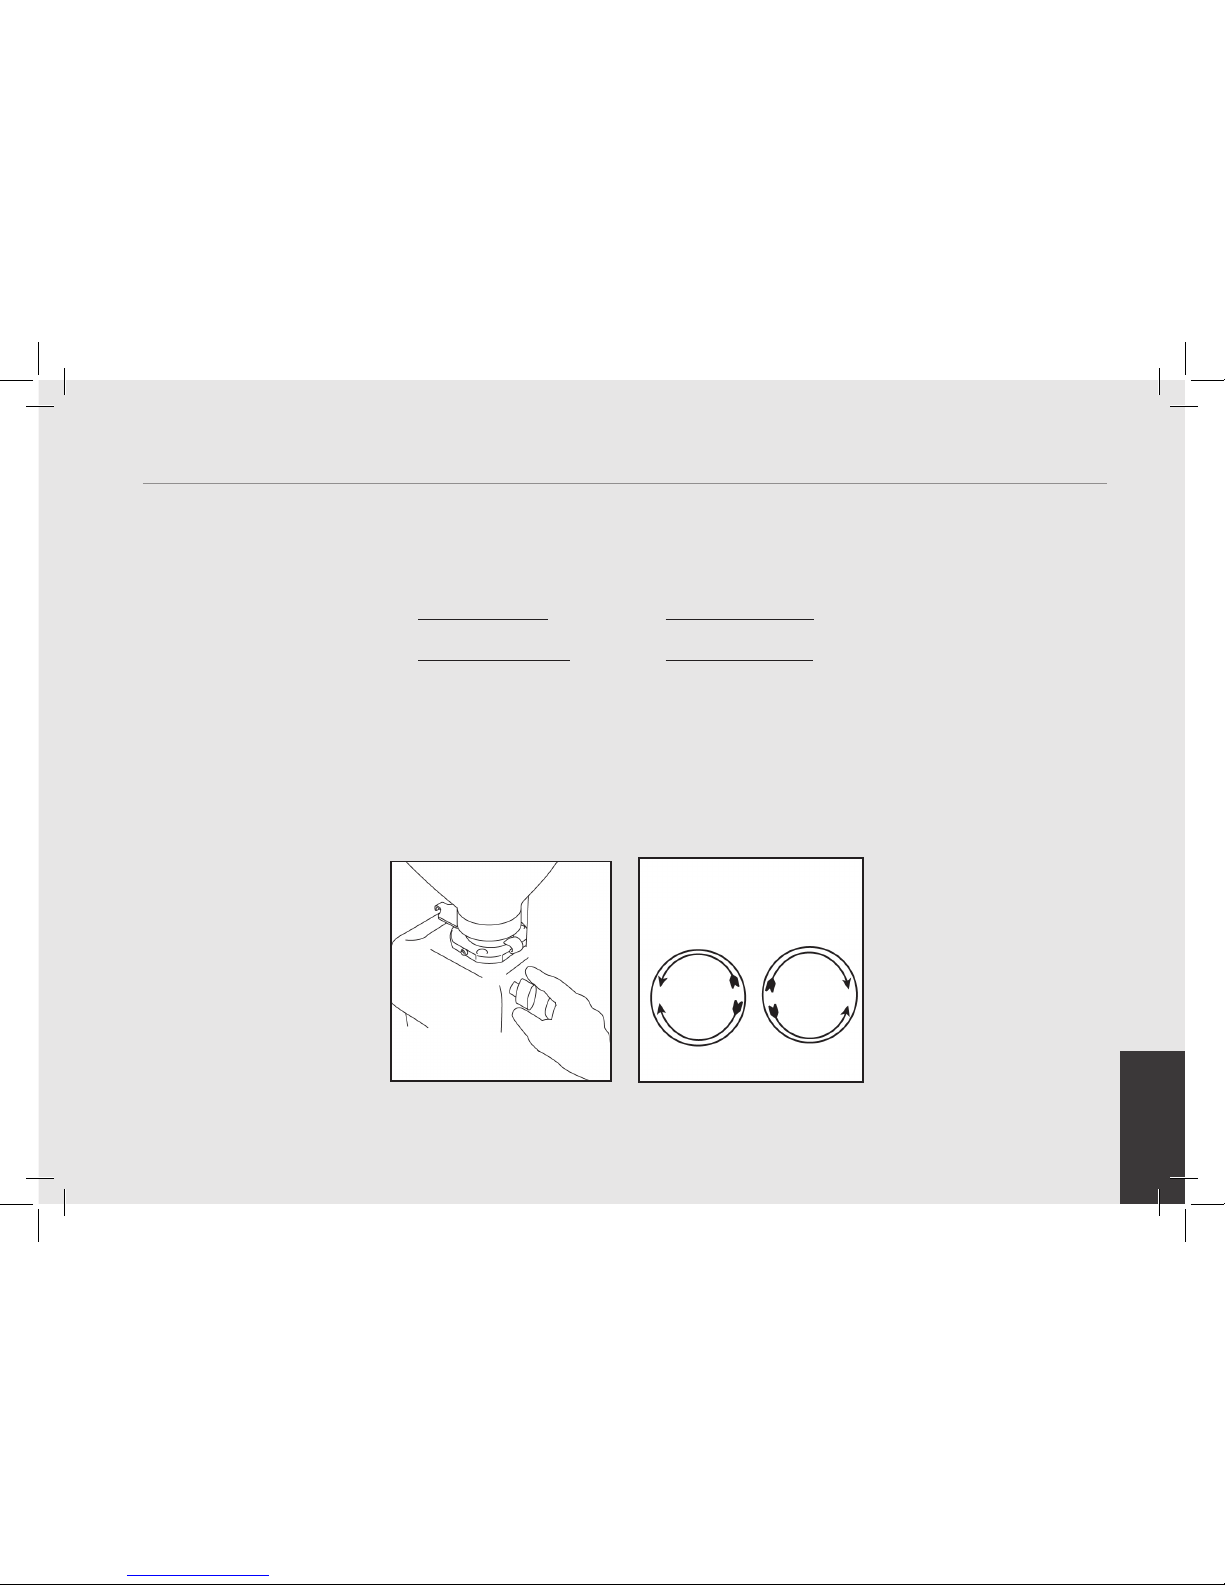
Once the portalter is
engaged, press one of the
start buons located at the
front of the SWIFT EPSB.
The right and le buons
correspond to the right and
lebean hoppers. Coee will
be ground, dosed, and tamped
from one of these locaons,
depending on which buon
you press.The red indicator
lights located above the
start buons are illuminated
when the SWIFT EPSBis
grinding and tamping. Once
the red light corresponding
to the buon selected is no
longer illuminated, you may
remove the portalter from
the SWIFT EPSBand engage
it into the espresso machine.
The SWIFT EPSBtamps the
coee as it is ground. When
the volume of ground coee
in the portalter reaches
the set level, the grinding
motorturnso.Thetamping
motor connues to run for
1-3 seconds, “polishing” the
tampedcoee.
6.2 SWIFT S/D
The SWIFT is now available in
a Single/Double dose version
which permits dosing and
tamping into specic lters
for either single or double
doses.
Selecttherightorlebean
hopper.
Removepreparedportalter.
SINGLE L116/A/S
DOUBLE L115/A/S
Externallythismodelappears
likethestandardversion,but
the internal impeller, which
deposits and presses the
coee,issmallerindiameter
so that it does not get stuck
insideasinglelter.

EN
8
Flashing indicator lights
The red indicator lights will
ashforanumberofreasons.
Thesearesummarizedbelow:
• You aempted to start
the process with a full
portalter.
• The safety mer has run
out due to an empty
beanhopper, a closed bean
gate, or a plugged bean
hopper chute.
• There is no portalter
engaged in the SWIFT
EPSB.
standardltersthat
are normally supplied with
espresso coee machines or
with standard Swi models
(doubleonly).
The lters designed for this
specic model of the SWIFT
have a dierent placement
ofholesthanstandardlters.
This dierence makes it
possible to obtain an elevated
qualityintheconsistencyof
brewing in spite of a grinder-
doser with automac
tamping.
Todoseandpresscoeewhen
using a double lter, there
is a cushioning cylindrical
ring next to the external
circumference of the impeller
(see image here below).
Using the S/D SWIFT
The S/D Swi grinder is
acvated by pressingthe “S”
switch ONCE to prepare a
singlelter(L115/A/S),
and TWICE in a row to prepare
adoublelter(L116/A/S).
As previously explained, the
lters used for the SWIFT
EPSB are dierent from the
Blinkingindicatorlightsrelay
informaon.
SWIFT S/D
- In version SWIFT S/D the
red indicator lights will ash
when working the grinder
for a double doses.

EN
9
7. Adjusng Coee Grind
Toachieveyourdesiredbrew
me and coee consistency,
a manual adjustment can
be made to the grinder to
modify the grind of the
coee.(Thetampingpressure
is not adjustable and remains
constant). Rotate the adjustor
knobsasdescribedbelow.
(1) Locate the grinder adjustor
knobthatcorrespondsto
theleorrightsideofthe
grinder.
(2)Grindingthecoeemore
nely will result in a
slower pour. To achieve
a slower pour, adjust the
knobsasfollows:
Lebeanhopper: Turn the
knob counter-clockwise.
Right bean hopper: Turn
theknobclockwise.
(3)Grindingthecoeemore
coarsely will result in a
faster pour. To achieve
a faster pour, adjust the
knobsasfollows:
Le bean hopper: Turn
theknobclockwise.
Rightbeanhopper:
Turn the knob counter-
clockwise.When making
this adjustment,
remember to turn the
knob in a minimum of
half-turn increments.
Brew one or two shots to
test the adjustment.
Note: There are many
variables that can aect
coee,includingtemperature,
humidity, and freshness of
the roast. All of these can
causeslightvariaonsinshot
mes.
Adjustcoeegrind
SLOWER
POUR
FASTER
POUR
SLOWER
POUR
Le
bean
hopper
Right
bean
hopper
FASTER
POUR

EN
10
8. Adjusng Dose Quanty
8.1 SWIFT EPSB
The SWIFT EPSBis set to dose
approximately16to18grams
of coee in 22mm basket
provided with the grinder.
It is possible to change the
dosage quanty by raising
or lowering the height of the
impeller. Addionally, the
SWIFT EPSBis able to dose
dierent quanes using
other baskets, available
throughyourretailer.
Loosen set screw
(2) Using the long-arm 3/32
hex-sizeL-key,loosenthe
set screw in the collar
of the tamper sha
coupling.
(1) Remove the tamper
cover as described on
page 19.
Liocover
(3) Holding the tamper
sha coupling in place,
rotate the impeller in the
direcondesired.
Holdtampersha
couplerand rotate
impeller
WARNING
HAZARDOUS VOLTAGE
DISCONNECT FROM POWER
SUPPLY BEFORE SERVICING

EN
11
(4) To increase the dosage
amount, turn the impeller
clockwise, as viewed
from below. To decrease
the dosage amount, turn
the impeller counter-
clockwise,asviewedfrom
below.
Note: One 360° turn is equal
to approximately 1 gram of
coee.
8.2 SWIFT S/D
Increase the dosage Decrease the dosage
(5) Ensure that the set screw
is against the at side
of the tamper sha.
Reghtenthesetscrewin
the collar of the tamper
shacoupling.
(6) Reassemble.
Key to performance:
The3gureshereshowhow
the Single/Double SWIFT
operates.
Coee drops through the
channels linked to the burrs
inside the dosing chamber
where it is deposited
and tamped in layers by the
impellerunlobtaining,one
layer at a me, the required
amount.
Single lter:
The coee is deposited and
pushed downward, therefore
tamped in a uniform manner
bytheimpeller.
The seng of the me for
grinding will determine the
amount of ground coee
readyforextracon.
Reghtensetscrew

EN
12
Double lter:
The coee is deposited and
then tamped in a uniform
fashion by the impeller and
the cushioning cylindrical
ring, whose springs push
downwards with the same
force as the impeller.
The quanty in this case is
determinedbythevolumeof
groundcoeethatpushesthe
sha upwards, which, at the
end of the process, will arrest
the motors of the grinder
and tamper through a switch
connected to an electronic
board.

EN
13
Seng up the Swi
Grinder S/D
Regulaon of single and
double doses: to establish
the doses on this specic
grinderitisnecessarytoread
through the procedures for
the standard SWIFT under
the secon “Regulaon of
quanty for dosing” as well
as follow these procedures.
BOTH MOTORS AND
HOPPERS CAN DELIVER
SINGLE AND
DOUBLE DOSES
Itismandatorytoproceedas
follows:
Double dose:
1)Turn o the machine and
remove the front tower
cover to access to the
screwsthatxtheshaof
the impeller.
2)Set the quanty of the
coeinthelterasonthe
standard SWIFT model.
(see image A)
3) Adjust the grind (double):
adjustthe grindto extract
60ml in 25 seconds.
4) Set the height of the
cylindrical ring: the
cylindricalringnexttothe
impeller should be at a
height that allows to obtain
a coee puck surface that
iscompletelyeven.
NOTE: The regulaon of the
height of the cylindrical ring
(moveable part or tamper)
is carried out by rotang
the part clockwise to li the
ring and rotang it counter
clockwisetolower.
The cylindrical ring is held
in place by two brass screws
(see image B) so that the
vibraons caused by the
rotaon of the impellers do
notalteritsposion.
Remove the two screws and
manually rotate the part,
graspingitfromtheboom.
The distance between the
impeller and the cylindrical
ringcanvaryfromaminimum
of 4 mm to 6 mm, a length
that permits to obtain a
perfectly even coee puck
(see picture below).
Raisering(counterclockwise)
Lowerring(clockwise)

EN
14
Single dose:
Thequantyofcoeeforthe
single dose is regulated by
me.
By turning the screw at the
le blue trimmer posioned
atthebackofthekeypaditis
possible to vary the grinding
me.
Turningthescrewsclockwise,
themeincreases,increasing
the dose.
Turning them counter
clockwise, the me
decreases,decreasing the
dose.
This model of the grinder
supplies a double dose that
can be set
between 15 and 17 gr and a
single dose that can be set
between 7,5 and 8,5 gr.
1)Beforeseng up, testthe
singledose:
a) if extracon ming of 30
ml of espresso is less than
25 seconds, increase gram
dose by rotang trimmer
clockwise.
b) if extracon ming of 30
ml of espresso is more than
25 seconds, decrease gram
dose by rotang trimmer
counterclockwise.

EN
15
Daily cleaning of the
SWIFT EPSBis important
to the quality of your
coee beverages and to
the mechanical life of the
equipment. When the
cleaning instrucons are
carried out each day, there
will be lile chance of old
coee residue spoiling the
avor of your espresso
drinks,orinterferingwiththe
mechanicaloperaonofyour
machine. There are three
areas that must be cleaned:
the bean hoppers, the burr
chamber, and the impeller.
9. Daily Cleaning
Close the bean gate Disconnect
(1) To clean the bean
hoppers, close the
bean gate to stop the
ow of coee beans
to the grinding burrs.
(2)Grind coee into the
portalter to clear
the remaining coee.
Thismayrequiretwodoses.
(3) Disconnect the SWIFT
EPSBfrom its power
supply.
Bean hoppers and burr chamber
WARNING
HAZARDOUS VOLTAGE
DISCONNECT FROM POWER
SUPPLY BEFORE SERVICING

EN
16
Loosensafetyscrew
(4) The bean hoppers are
locked into posion by
safetyscrew.Loosenthe
safety screw and li the
bean hopper from its
mount.
(5)Li the bean hopper
from its posion. (Hold
the bean gate closed
while removing the bean
hopper.)
Remove bean hoppers
(6) With a small brush, clean
the burr chamber.
Vacuum
(7)Vacuumcoeefragments
and loose grounds from
the burr chamber.

EN
17
Stronare
(8) Wipe the inside of the
beanhopperwithaso
cloth to remove coee
oils.
(9) Repeat for both right
andlebeanhoppers.
(10) Reassemble unit.
Do not operate without
bean hoppers in place
and safety screws
ghtened.
WARNING
DO NOT OPERATE WITHOUT
BEAN HOPPERS IN PLACE AND
SAFETY SCREWS TIGHTENED

EN
18
Holdshalockrmly
(3)Press and hold the sha
lock to prevent the sha
from turning.
(4) With your thumb and
forenger, press against
the impeller ats. Turn
the impeller clockwise,
as viewed from below, to
remove.
Remove
the reverse-threaded
impeller
Tamper cover lid removal
(2)Liothetampercover
lid.
(1) Disconnnect the SWIFT
EPSB from its power sup-
ply.
10. Impeller
HAZARDOUS VOLTAGE
DISCONNECT FROM POWER
SUPPLY BEFORE SERVICING
WARNING

EN
19
Clean impeller Cleanportalter
engagement
(5) With the impeller
out, clean around the
bayonet ring with the
brush and wipe loose
grounds from this area.
Insert the cleaning brush
intothecoeecollecon
area above the impeller
and again wipe loose
groundsaway. Cleanthe
impeller with a so, dry
cloth.
(6) Reinstall the impeller
by turning counter
clockwise.
(7) Reconnect the SWIFT
EPSBtoitspowersupply.

EN
20
11. Burr Change-Out
Periodic burr replacement is
required. While the ceramic
burrs used in the SWIFT
EPSB have a much longer
life expectancy than normal
steelburrs,itissllnecessary
to watch your coee for
the tell-tale signs of burr
wear. These signs include
inconsistent shot extracon
mes, and the absence of
noceablechange in your
espresso when adjustments
are made to the grinder.
Remove upper screws (2)
Remove lower screws (2) Liocover
(1) Close the bean gates
and grind out remaining
coee.
(2) Remove both bean
hoppers (see pages 13-
15).
(3) Remove the four screws
holding the tamper cover
in place, and li o the
tamper cover.
(4) Slide the two grind
adjustor knobs from the
shas.
WARNING
HAZARDOUS VOLTAGE
DISCONNECT FROM POWER
SUPPLY BEFORE SERVICING
Other manuals for SWIFT EPSB
2
Table of contents
Other La Marzocco Coffee Grinder manuals

La Marzocco
La Marzocco Swift mini User manual

La Marzocco
La Marzocco Mazzer Major V User manual

La Marzocco
La Marzocco Swift Mini User manual

La Marzocco
La Marzocco vulcano User manual

La Marzocco
La Marzocco La Marzocco User manual

La Marzocco
La Marzocco vulcano User manual

La Marzocco
La Marzocco Swift User manual

La Marzocco
La Marzocco Major V User manual

La Marzocco
La Marzocco Linea Instruction sheet

La Marzocco
La Marzocco vulcano swift User manual