LaboGene CoolSafe 100-9 Touch Superior XS User manual

Item No. 700637
CopyRight © 2016
INSTRUCTION MANUAL
CoolSafe 100-9 Touch Superior XS
CoolSafe 95-15 Touch Superior XL

Instruction manual for CoolSafe
01012016QA01
Item No. 700637
CopyRight © 2016
Page 2of 30
Symbols used in this manual
Note
Used to direct attention to a special item.
Warning
Used in case of danger of a serious accident or lethal injury.
Caution
Used in case of danger of medium or minor injuries or physical damage.
This document is the original instruction manual in accordance with the current Machinery Directive.
This document is the reference for any translation of this instruction manual. In case of doubts or
uncertainties the text in the original instruction manual is the valid.
LaboGene ApS
Industrivej 6-8
Vassingerød
DK-3540 Lynge
Denmark
Phone No. +45 39 40 25 66
Fax No. +45 39 95 25 66
Internet www.labogene.com

Instruction manual for CoolSafe
01012016QA01
Item No. 700637
CopyRight © 2016
Page 3of 30
Table of contents
1Introduction........................................................................................................................4
2Safety precautions.............................................................................................................4
2.1 General information .............................................................................................................4
2.2 Safety..................................................................................................................................4
3Installation..........................................................................................................................5
3.1 Installation of CoolSafe........................................................................................................5
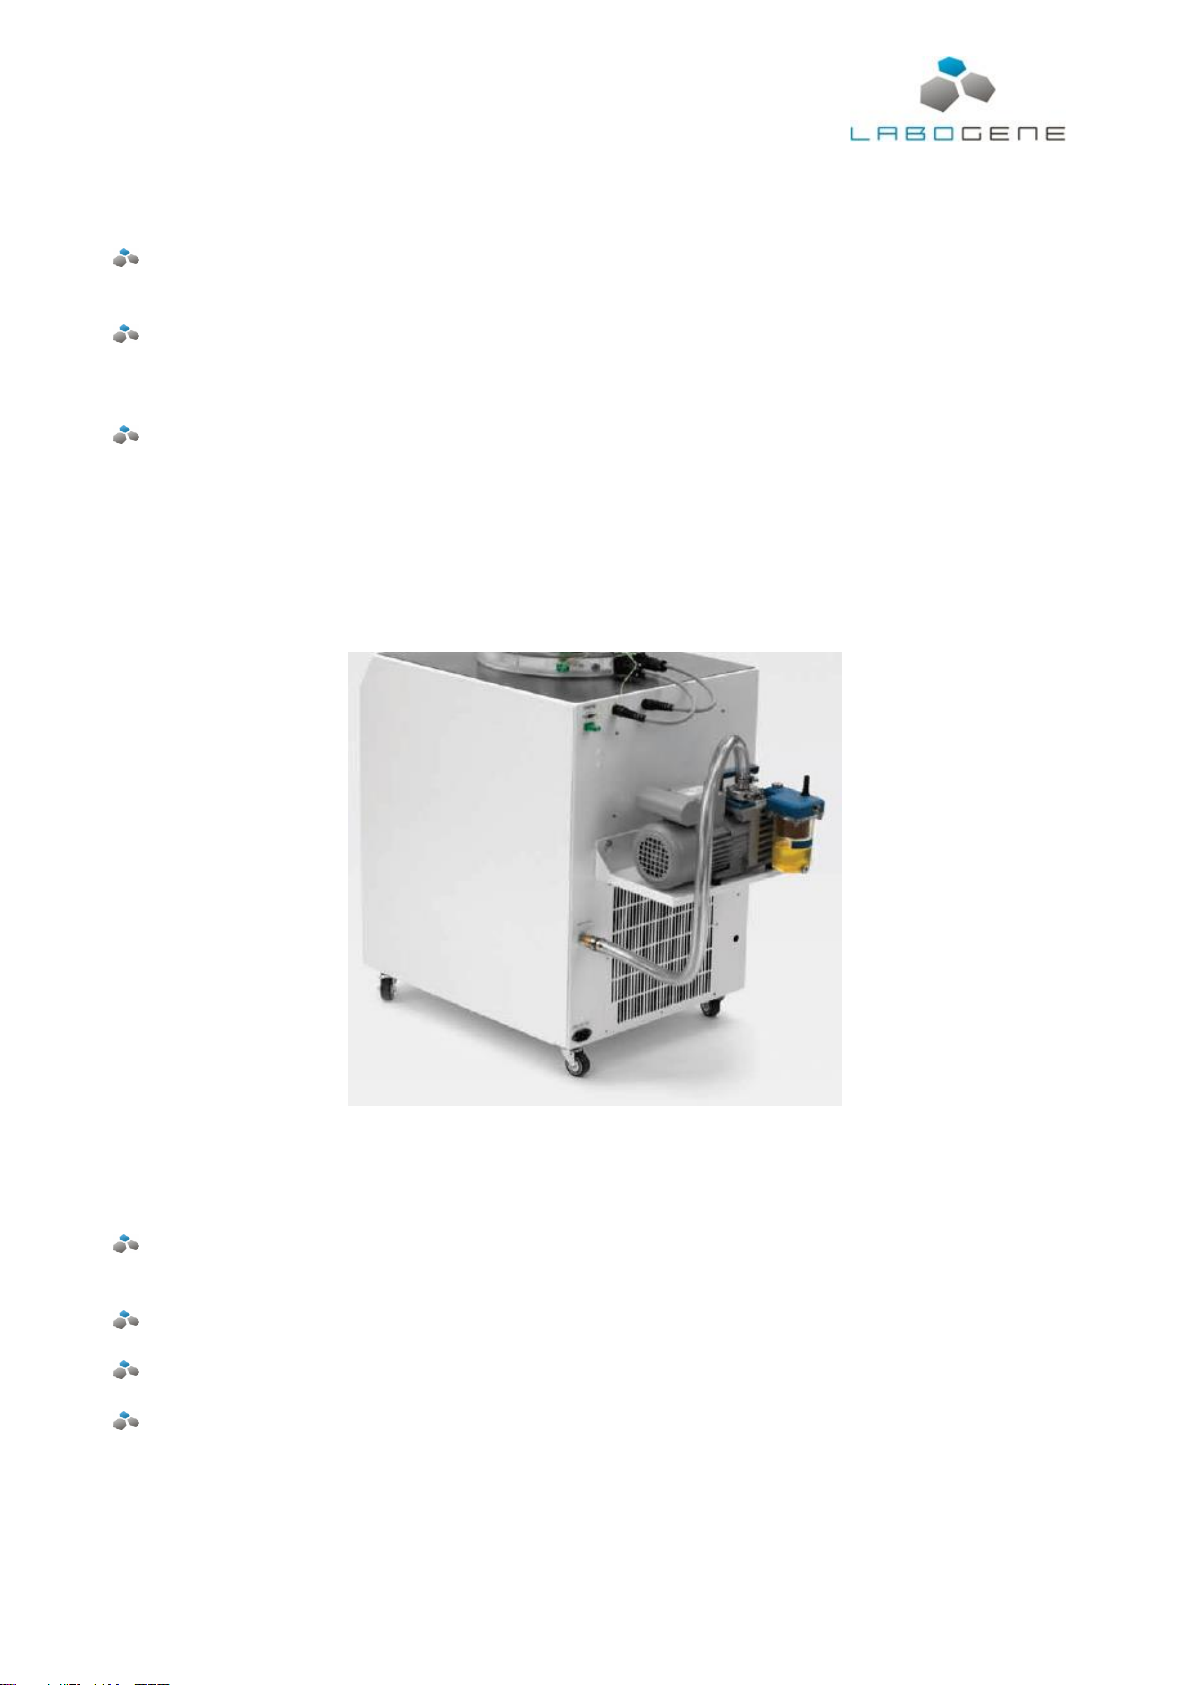
3.2 Installation of vacuum pump ................................................................................................5
3.3 Installation of accessories....................................................................................................6
4Functional description.......................................................................................................6
4.1 Control panel .......................................................................................................................6
4.2 Valves and connections.......................................................................................................7
4.2.1 Power supply and ON/OFF switch .......................................................................................7
4.2.2 Vacuum pump connection....................................................................................................7
4.2.3 Power supply for heating of and temperature signals from shelves......................................8
4.2.4 Product temperature............................................................................................................8
4.2.5 Drain valve...........................................................................................................................8
4.2.6 Pressure regulation valve (optional).....................................................................................9
4.2.6.1 Using the pressure regulation ..............................................................................................9
4.3 Interface, data acquisition and control..................................................................................9
5Operation..........................................................................................................................10
6User interface...................................................................................................................10
6.1 Main menu.........................................................................................................................11
6.2 Manual menu.....................................................................................................................11
6.2.1 Current shelf temperatures ................................................................................................12
6.2.2 Set-point shelf temperature................................................................................................12
6.2.3 Set-point pressure .............................................................................................................13
6.2.4 Alarm pressure ..................................................................................................................13
6.3 Auto menu.........................................................................................................................13
6.3.1 Programme list...................................................................................................................14
6.3.2 Start...................................................................................................................................14
6.3.2.1 Current shelf temperature..................................................................................................14
6.3.2.2 Alarm pressure ..................................................................................................................15
6.3.3 Edit programme.................................................................................................................15
6.3.3.1 Pre-freeze..........................................................................................................................15
6.3.3.2 Alarm pressure ..................................................................................................................16
6.3.3.3 Primary drying 1-5 and 6-9.................................................................................................16
6.3.3.4 Secondary drying...............................................................................................................17
6.4 Release.............................................................................................................................18
6.5 De-ice................................................................................................................................18
6.5.1 Set programme step time...................................................................................................18
6.5.2 Status for de-icing process.................................................................................................19
6.6 Stop...................................................................................................................................19
6.7 Setup.................................................................................................................................19
6.7.1 Language selection............................................................................................................19
6.7.2 Pressure selection .............................................................................................................20
6.7.3 Temperature selection.......................................................................................................20
6.7.4 Set time/date .....................................................................................................................20
6.8 Service ..............................................................................................................................21
6.9 Info ....................................................................................................................................21
7Error situations, status and error codes........................................................................22
7.1 Power failure......................................................................................................................22
7.2 Compressor start-up..........................................................................................................22
7.3 Status codes......................................................................................................................22
7.4 Error codes........................................................................................................................23
8Preparations.....................................................................................................................23
8.1 Pre-freezing and freeze drying...........................................................................................24
8.2 De-ice................................................................................................................................24
8.3 Stopping the vacuum pump ...............................................................................................25
8.4 Hints, tips and reminders ...................................................................................................25
9Maintenance.....................................................................................................................25
9.1 CoolSafe freeze dryer........................................................................................................25
9.2 Vacuum pump....................................................................................................................26
9.3 Cleaning ............................................................................................................................26
9.4 Checking for Leaks on the CoolSafe freezer dryer .............................................................26
10 The Freeze-drying process..............................................................................................27
11 Technical Specifications.................................................................................................28
12 Accessories .....................................................................................................................28
13 Declaration of conformity................................................................................................29
14 Annex - Pressure of Aqueous Vapor..............................................................................30

Item No. 700637
CopyRight © 2016
1 Introduction
The CoolSafe models XS & XL are complete fully automatic freeze dryers designed for research and
pilot scale production applications.
The unique chamber design that is located inside the condenser, offers reproducible pre-freezing of
the samples in incremental steps and a short vapour pathway, without restrictions, giving uniform
freeze drying performance.
The CoolSafe 100-9 Touch Superior XS has a 9 litre condenser with lowest reachable temperature
of -100 °C and comes complete with a 3 shelf chamber that is located inside the condenser.
The CoolSafe 95-15 Touch Superior XL has a 15 litre condenser with lowest reachable temperature
of -95 °C and comes complete with a 3 shelf chamber (optional 5 shelves) that is located inside the
condenser.
Freeze-drying is often used for sample preparations and for preservation and storage of biological
and pharmaceuticals materials. Freeze-drying is also ideally suitable for substances that are heat
sensitive.
If you are not familiar with the freeze-drying process, please read the section “The freeze-drying
process”, which outlines the freeze-drying process.
2 Safety precautions
2.1 General information
Please read this entire manual to fully understand the safe and effective use of this product. Should
you have any comments about this manual we will be pleased to receive them.
Note
If this equipment is used in a manner not specified by the manufacturer, the
protection provided by the equipment may be impaired.
2.2 Safety
Both CoolSafe models are electrically protected with an over current circuit breaker.
Both CoolSafe models utilize low temperature refrigeration to either -95°C or - 100°C and under no
circumstances should the cold surfaces of the condenser be touched whilst switched on, in operation
or in the de-icing process.
Do not handle, move or service the vacuum pump whilst in operation or if it is switched off, until it
has cooled down to ambient temperature. (See paragraph 7.2 regarding maintenance & changing of
oil in the vacuum pump).
It is advisable that safety glasses and personal protective garments are worn by all users of the
equipment.
CoolSafe XS & XL Models are fitted with castors, the front pair being lockable. Once located in the
position conducive to both the safety of the laboratory environment and personnel, it is advised that
the castors be in the locked position.
The safety system is designed according to safety requirements for electric equipment, control and
laboratory use (EN 61010-1), which assumes that two separate faults do not occur simultaneously.

Instruction manual for CoolSafe
01012016QA01
Item No. 700637
CopyRight © 2016
Page 5of 30
3 Installation
3.1 Installation of CoolSafe
Make sure that the mains supply is according to the specifications on the type label placed
on the rear panel.
It is important that free air circulation is available at the air inlet and outlet grills. If the
CoolSafe is positioned against a wall, there must be at least 100 mm free space at the rear
of the unit.
The CoolSafe 100-9 Touch Superior XS and the CoolSafe 95-15 Touch Superior XL are
both floor standing units fitted with castors, the front pair being lockable. Before operating
the system insure that the castors are in the locked position.
3.2 Installation of vacuum pump
A two stage vacuum pump (with 2-5 m3/h capacity or greater) must be connected to the CoolSafe
via the connection on the rear of the CoolSafe cabinet in order to allow cryo pumping. The vacuum
pump can be installed on the rear of the CoolSafe on a shelf support delivered with the equipment.
LaboGene recommends the VacuuBrand RZ2.5 rotary vane pump for which a variety of protection
accessories, against aggressive materials are available. The vacuum pump outlet/exhaust is fitted
with an oil mist filter as standard.
Check that the mains supply for the pump is according to the specifications on the type
label.
Connect the vacuum hose to the suction side of the pump.
Connect the pump to the vacuum connection pipe on the rear panel of the CoolSafe.
Check the oil level on the pump and fill it if necessary. The oil level sight glass should be
1/2 - 3/4 full.
LaboGene recommends that when the pump is running the gas ballast valve is in the open position.

Instruction manual for CoolSafe
01012016QA01
Item No. 700637
CopyRight © 2016
Page 6of 30
3.3 Installation of accessories
The shelving assemblies for the CoolSafe 100-9 Touch XS (3 electrically heated shelves) and the
CoolSafe 95-15 Touch XL (3 electrically heated shelves –optional 5 shelves) are positioned inside
the condenser and the appropriate connections, via the cables supplied, are made to the sockets on
the rear of the CoolSafe cabinet.
Warning
When loading the shelving units into the condenser wear suitable cryo- protective
gloves.
Samples may be loaded directly on to the shelves or by using the optional trays (cat.no.
7.001.000.264), these are particularly appropriate for “bulk samples”.
4 Functional description
The CoolSafe including a vacuum pump is a standalone unit that is setup, controlled and monitored
via the user interface placed on the front of the cabinet.
The control system lets the user take complete control of the system and makes it easy to set up the
system and run the freeze-drying process manually or automatically.
All the temperature, pressure and time parameters needed for the freeze drying process can easily
be controlled via the control panel or user interface.
4.1 Control panel
The control panel is placed on the upper front of the cabinet at an angle for easy reading and use.
The control panel, a 4,3” resistive colour touch screen, acts as input device for setup of the CoolSafe,
programming of freeze drying processes, monitoring device for the freeze drying process and
information panelfor status and alarm messages. Navigation is easy. To enter menu itemsjust press
lightly on the touch panel. If the menu holds more items than can be shown in one screen, use the
UP and DOWN arrows on the right side of the display to scroll through the menu items.
Navigation is easy. To enter menu items just press lightly on the touch panel. If the menuholds more
items than can be shown in one screen, use the UP and DOWN arrows on the right side of the
display to scroll through the menu items. To return to the previous menu press the LaboGene logo
placed in the lower right hand corner of the screen.
When a menu item is selected or in focus, the text is magnified. The text will be either yellow,
indicating that the menu item is information only or the text is white, indicating that more details can
be displayed by pressing the menu item selected.
Status line
Selected menu item
Parameter name
Parameter value
Scroll up/down
Level up key

Instruction manual for CoolSafe
01012016QA01
Item No. 700637
CopyRight © 2016
Page 7of 30
The status line at the top of the display shows the running mode of the freeze dryer, i.e. Manual or
Auto running freeze drying process, the actual stage of the freeze drying process, i.e. standby, pre-
freezing, primary drying and secondary drying. Next the status of the freeze dryer or the current
freeze drying process is displayed in a color coded area, green for OK, yellow for OK but not ready
to proceed and red for error or alarm situation. At the end time and date is shown.
4.2 Valves and connections
The CoolSafe is equipped with a number of valves and connections that makes the freeze dryer
function and operate correctly. Each must be set correctly and plugged in correctly to make the
CoolSafe operational.
4.2.1 Power supply and ON/OFF switch
The CoolSafe is designed to be plugged into a standard wall socket with build in earth and minimum
10 A fuse.
The CoolSafe is delivered with a country specific power cable, which is connected to the unit on the
lower left hand side on the back panel. The main ON/OFF switch is placed on the front panel of the
unit. When switched on the switch is illuminated green.
4.2.2 Vacuum pump connection
The connection for the vacuum pump is placed on the back of the cabinet. The connection between
the vacuum pump and the freeze dryer is a vacuum hose, which is clamped to the nozzles on the
vacuum pump and the freeze dryer with the delivered clamps.
Running mode Manual
Menu item in focus
Time and date
Status

Instruction manual for CoolSafe
01012016QA01
Item No. 700637
CopyRight © 2016
Page 8of 30
4.2.3 Power supply for heating of and temperature signals from shelves
The rack and shelves placed inside the condenser is connected to the control system through two
cables placed on the back of the cabinet.
For temperature regulation purposes, the temperature in each shelf is measured using a PT 100
temperature sensor. The signals from these sensors regulate the heating wire build into each shelf.
4.2.4 Product temperature
The temperature in the product being dried is measured using a thermocouple.
4.2.5 Drain valve
The drain valve is placed on the front of the cabinet. After de-icing or cleaning of the ice condenser
it can be drained through the drain valve.
Power for heating in shelves
Temperature signal from shelves
Product temperature signal

Instruction manual for CoolSafe
01012016QA01
Item No. 700637
CopyRight © 2016
Page 9of 30
A hose may be attached to the nozzle to minimize spillage. Remember to close the drain valve after
use.
4.2.6 Pressure regulation valve (optional)
The pressure regulation valve is placed on the front of the cabinet. It is a needle valve that is used
for fine-tuning the flow of air or inert gas into the ice condenser. It is used to reduce the hysteresis
on the pressure regulation.
Never close a needle valve too hard –there is a risk of the needle welding to the valve seat due to
the very tight fit.
4.2.6.1 Using the pressure regulation
The pressure regulation works from the display of the controller. Here a set point of the pressure
during the freeze drying is defined.
If a set point of e.g. 1 hPa is entered, the controller will try to maintain the pressure of 1 hPa during
the freeze drying process.
So when the vacuum valve is open and the vacuum pump reduce the pressure to 1 hPa, then the
pressure regulation valve will open, in order to inject air or inert gas to the freeze dryer chamber.
However, when the regulation valve open, then the pressure will increase very fast and with no
control. To enable a controlled pressure increase, a needle valve is built in, enabling fine tuning of
the flow into the chamber.
This will prevent an over-shoot in the chamber pressure, and enabling the control of the pressure
during the process.
In order to get the best result of the pressure regulation and the needle valve, it is necessary to make
a fine tuning of the needle valve. Same applies in case the set point pressure is changed.
So whenever the set point is changed, the needle valve must be fine-tuned.
If the needle valve is closed too much, then the pressure will still decrease, in which case the needle
valve must be opened more, or if the pressure increases too fast, the needle valve must be closed
more.
4.3 Interface, data acquisition and control
On the back of the CoolSafe cabinet, to the right of the name plate, slot for a SD card and a mini
USB connection is placed.
During freeze drying all time, pressure and temperature data is stored on the SD card at one minute
intervals. The data saved on the SD card is formatted for use in the LaboGene freeze drying software
package. From the software the data can be formatted and saved in an Excel compatible format.
The software package is included in the delivery.
Under the SD card slot a mini USB connection is available. This is used for connecting a computer,
running the LaboGene freeze drying software, from which the freeze dryer can be controlled. The
software offers a graphical user interface showing the complete freeze dryer system and the status

Instruction manual for CoolSafe
01012016QA01
Item No. 700637
CopyRight © 2016
Page 10 of 30
of all installed components. Further a screen makes it possible to see the time, pressure and
temperature of the system in real-time. This mode of operation is described in a separate manual for
this option.
5 Operation
The touch control system is designed and developed for running the CoolSafe freeze dryers
specifically. All the build in facilities are designed to facilitate easy control of the freeze dryer and the
freeze drying process in either manual or automatic running mode.
The touch control system is based on a simple structured menu structure for easy and logical setup
and control of the freeze dryer and freeze drying process. Navigation is done using a light touch of
a finger and all the menu items have been named to facilitate an intuitive and logical approach for
the user.
6 User interface
On start up the screen below will be showing until the control system is up and running.
When the system is fully loaded and initialized the main menu will be displayed on the touch screen.
SD card
Mini USB

Instruction manual for CoolSafe
01012016QA01
Item No. 700637
CopyRight © 2016
Page 11 of 30
6.1 Main menu
Touch screen –as opened
Menu
Action
Manual
Opens the manual menu.
Auto
Opens the program selection menu or the
automatic operation menu.
Release
Opens the release menu.
De-ice
Opens the de-ice menu.
Stop
Stops the ongoing process.
Setup
Opens the setup menu.
Service
Opens the service menu.
Info
Opens the information screen.
Press the LaboGene logo for 2-3 seconds to
lock the display for input. Unlock press again.
Touch screen - locked
Menu
Action
Press the LaboGene logo for 2-3 seconds to
lock the display for input. Unlock press again.
It is possible to lock and unlock the touch
screen from any menu or screen.
6.2 Manual menu
Touch screen –as opened
Item
Action
When entering the manual menu the compressors start cooling
the ice condenser.
Scroll up and down, using the arrows to the right, to select the
menu item you want to see or change.
Freeze drying time
Time elapsed since start of freeze drying.
Ice condenser temp.
The current temperature in the ice
condenser.
Actual pressure
The current pressure in the freeze dryer.
Actual shelf temp
The current shelf temperature –press to
open a list of the temperature on each
shelf.
Product temp.
The current product temperature –one
product temperature sensor available.
Set-point shelf temp
Press to set shelf temperature.
Set-point pressure
Press to set system pressure.
Alarm pressure
Press to set the alarm pressure.
Start freeze dry
Press to start manual freeze drying
process.
Reset error
Scroll down to see this menu item.
Press the LaboGene logo to return to the
main menu.
Press the LaboGene log for 2-3 seconds
to lock the display for input. Unlock press
again.

Instruction manual for CoolSafe
01012016QA01
Item No. 700637
CopyRight © 2016
Page 12 of 30
Touch screen –scrolled down
Item
Action
Product temp
The current product temperature –one
product temperature sensor available.
Set-point shelf temp
Press to set shelf temperature.
Set-point pressure
Press to set system pressure.
Alarm pressure
Press to set the alarm pressure.
Start freeze dry
Press to start manual freeze drying
process.
Reset error
Scroll down to highlight menu item, press
to reset error counter.
Press the LaboGene logo to return to the
main menu.
Press the LaboGene log for 2-3 seconds
to lock the display for input. Unlock press
again.
6.2.1 Current shelf temperatures
Touch screen –as opened
Item
Action
Press the LaboGene logo to return to the
manual menu.
Press the LaboGene log for 2-3 seconds
to lock the display for input. Unlock press
again.
6.2.2 Set-point shelf temperature
Touch screen –as opened
Item
Action
÷
Decrease set-point by 1 °C/°F.
Accept change in set-point.
+
Increase set-point by 1 °C/°F.
Press the LaboGene logo to return to the
manual menu.
Press the LaboGene log for 2-3 seconds
to lock the display for input. Unlock press
again.

Instruction manual for CoolSafe
01012016QA01
Item No. 700637
CopyRight © 2016
Page 13 of 30
6.2.3 Set-point pressure
Touch screen –as opened
Item
Action
÷
Decrease set-point by 0,001 hPa/Torr.
Accept change in set-point.
+
Increase set-point by 0,001 hPa/Torr.
Press the LaboGene logo to return to the
manual menu.
Press the LaboGene log for 2-3 seconds
to lock the display for input. Unlock press
again.
6.2.4 Alarm pressure
Touch screen –as opened
Item
Action
The alarm pressure is a limiting parameter that ensures that the
shelf heating is not turned on before this pressure is reached.
If the pressure raise above this pressure, during operation, the
shelf heating will be turned off to protect the product being
freeze dryed.
÷
Decrease set-point by 0,1 hPa/Torr.
Accept change in set-point.
+
Increase set-point by 0,1 hPa/Torr.
Press the LaboGene logo to return to the
manual menu.
Press the LaboGene log for 2-3 seconds
to lock the display for input. Unlock press
again.
6.3 Auto menu
Touch screen –as opened
Item
Action
Programme 1
Active programme, press to select
programme from list.
Start
Start active programme.
Edit
Edit active programme.
Press the LaboGene logo to return to the
main menu.
Press the LaboGene log for 2-3 seconds
to lock the display for input. Unlock press
again.

Instruction manual for CoolSafe
01012016QA01
Item No. 700637
CopyRight © 2016
Page 14 of 30
6.3.1 Programme list
Touch screen –as opened
Item
Action
List of programmes 1 to 10. Press the
desired programme to activate.
Press the LaboGene logo to return to the
auto menu.
Press the LaboGene log for 2-3 seconds
to lock the display for input. Unlock press
again.
6.3.2 Start
Touch screen –as opened
Item
Action
Freeze drying time
The time period the freeze dryer has run
the current programme.
Ice condenser temp.
View the current ice condenser
temperature.
Actual pressure
View the current pressure in the ice
condenser.
Actual shelf temp
Press to see list of Current shelf
temperatures.
Product temp.
View the current product temperature.
Set-point shelf temp
View the shelf temperature set-point
Set-point pressure
View the current ice condenser pressure
set-point.
Alarm pressure
Press to set the alarm pressure.
Reset Error
Press to reset counter.
Press the LaboGene logo to return to the
main menu.
Press the LaboGene log for 2-3 seconds
to lock the display for input. Unlock press
again.
6.3.2.1 Current shelf temperature
Touch screen –as opened
Item
Action
Press the LaboGene logo to return to the
auto menu.
Press the LaboGene log for 2-3 seconds
to lock the display for input. Unlock press
again.

Instruction manual for CoolSafe
01012016QA01
Item No. 700637
CopyRight © 2016
Page 15 of 30
6.3.2.2 Alarm pressure
Touch screen –as opened
Item
Action
÷
Decrease set-point by 0,1 hPa/Torr.
Accept change in set-point.
+
Increase set-point by 0,1 hPa/Torr.
Press the LaboGene logo to return to the
auto menu.
Press the LaboGene log for 2-3 seconds
to lock the display for input. Unlock press
again.
6.3.3 Edit programme
Touch screen –as opened
Item
Action
Pre-freeze
Press to edit pre-freeze process.
Alarm pressure
Press to set alarm pressure
Primary drying 1-5
Press to edit primary drying process.
Primary drying 6-9
Press to edit primary drying process.
Secondary drying
Press to edit secondary drying process.
Press the LaboGene logo to return to the
edit menu.
Press the LaboGene log for 2-3 seconds
to lock the display for input. Unlock press
again.
6.3.3.1 Pre-freeze
Touch screen –as opened
Item
Action
Pre-freeze 1-5
Edit one or more pre-freeze sequences.
Press the LaboGene logo to return to the
edit menu.
Press the LaboGene log for 2-3 seconds
to lock the display for input. Unlock press
again.

Instruction manual for CoolSafe
01012016QA01
Item No. 700637
CopyRight © 2016
Page 16 of 30
Touch screen –as opened
Item
Action
When activating a numerical box the the input bottons shown
below appears. Use ÷ and + to adjust the values and the to
accept the change.
Pre-freeze 1 - 5
Press the individual numerical boxes to
change the values.
Press the LaboGene logo to return to the
pre-freeze menu.
Press the LaboGene log for 2-3 seconds
to lock the display for input. Unlock press
again.
6.3.3.2 Alarm pressure
Touch screen –as opened
Item
Action
÷
Decrease set-point by 0,1 hPa/Torr.
Accept change in set-point.
+
Increase set-point by 0,1 hPa/Torr.
Press the LaboGene logo to return to the
edit menu.
Press the LaboGene log for 2-3 seconds
to lock the display for input. Unlock press
again.
6.3.3.3 Primary drying 1-5 and 6-9
Touch screen –as opened
Item
Action
Pre-freeze 1-5
Edit one or more pre-freeze sequences.
Press the LaboGene logo to return to the
edit menu.
Press the LaboGene log for 2-3 seconds
to lock the display for input. Unlock press
again.

Instruction manual for CoolSafe
01012016QA01
Item No. 700637
CopyRight © 2016
Page 17 of 30
Touch screen –as opened
Item
Action
When activating a numerical box the the input bottons shown
below appears. Use ÷ and + to adjust the values and the to
accept the change.
Pre-freeze 1 - 5
Press the individual numerical boxes to
change the values.
Press the LaboGene logo to return to the
primary drying menu.
Press the LaboGene log for 2-3 seconds
to lock the display for input. Unlock press
again.
6.3.3.4 Secondary drying
Touch screen –as opened
Item
Action
When activating a numerical box the the input bottons shown
below appears. Use ÷ and + to adjust the values and the to
accept the change.
Pre-freeze 1 - 5
Press the individual numerical boxes to
change the values.
Press the LaboGene logo to return to the
edit auto menu.
Press the LaboGene log for 2-3 seconds
to lock the display for input. Unlock press
again.

Instruction manual for CoolSafe
01012016QA01
Item No. 700637
CopyRight © 2016
Page 18 of 30
6.4 Release
Touch screen –as opened
Item
Action
Start Release
Press to start the pressure release
process. During release the compressors
are off, the vacuum valve is closed and
the release valve is opened.
The progress of the pressure release can
be followed on the moving bar graph at
the top of the screen.
Press the LaboGene logo to return to the
main menu.
Press the LaboGene log for 2-3 seconds
to lock the display for input. Unlock press
again.
6.5 De-ice
Touch screen –as opened
Item
Action
Programme step time
Press to open
Start
Start the de-icing process. Heating
elements in the condenser will start
melting the ice on the condenser wall.
Can either melt it completely or just
enough to free the ice block from the
condenser wall. The block can then be
removed from the condenser.
Remaining water is drained through the
drain valve.
Press the LaboGene logo to return to
the main menu.
Press the LaboGene log for 2-3
seconds to lock the display for input.
Unlock press again.
6.5.1 Set programme step time
Touch screen –as opened
Item
Action
When activating a numerical box the the input bottons shown
below appears. Use ÷ and + to adjust the values and the to
accept the change.
Programme step time
Press the individual numerical boxes to
change the values.
Press the LaboGene logo to return to
the de-ice menu.
Press the LaboGene log for 2-3
seconds to lock the display for input.
Unlock press again.

Instruction manual for CoolSafe
01012016QA01
Item No. 700637
CopyRight © 2016
Page 19 of 30
6.5.2 Status for de-icing process
Touch screen –as opened
Item
Action
Ice condenser temp.
Displays the current ice condenser
temperature.
Programme step time
Displays the remaining time of the de-
ice process.
Press the LaboGene logo to return to
the de-ice menu.
Press the LaboGene log for 2-3
seconds to lock the display for input.
Unlock press again.
6.6 Stop
Pressing the stop button will stop any ongoing process. Compressors will be turned off, the vacuum
valve will be closed and the release valve will be closed.
6.7 Setup
Touch screen –as opened
Item
Action
Language selection
Press to select the language displayed
in the control system.
Pressure selection
Press to select the pressure unit to be
displayed.
Temperature selection
Press to select the temperature unit to
be displayed.
Time/date
Press to set time and date.
Factory settings
Restricted menu –protected by
password.
Press the LaboGene logo to return to
the main menu.
Press the LaboGene log for 2-3
seconds to lock the display for input.
Unlock press again.
6.7.1 Language selection
Touch screen –as opened
Item
Action
-
Press the preferred language
Press the LaboGene logo to return to
the setup menu.
Press the LaboGene log for 2-3
seconds to lock the display for input.
Unlock press again.

Instruction manual for CoolSafe
01012016QA01
Item No. 700637
CopyRight © 2016
Page 20 of 30
6.7.2 Pressure selection
Touch screen –as opened
Item
Action
-
Press the preferred pressure unit.
Press the LaboGene logo to return to
the setup menu.
Press the LaboGene log for 2-3
seconds to lock the display for input.
Unlock press again.
6.7.3 Temperature selection
Touch screen –as opened
Item
Action
-
Press the preferred temperature unit.
Press the LaboGene logo to return to
the setup menu.
Press the LaboGene log for 2-3
seconds to lock the display for input.
Unlock press again.
6.7.4 Set time/date
Touch screen –as opened
Item
Action
When activating a numerical box the the input bottons shown
below appears. Use ÷ and + to adjust the values and the to
accept the change.
Time
Press the individual numerical boxes to
change the values.
Date
Press the individual numerical boxes to
change the values.
Year
Press the numerical box to change the
value.
Press the LaboGene logo to return to
the setup menu.
Press the LaboGene log for 2-3
seconds to lock the display for input.
Unlock press again.
This manual suits for next models
2
Table of contents
Other LaboGene Laboratory Equipment manuals

LaboGene
LaboGene CoolSafe Touch 700636 User manual

LaboGene
LaboGene Mars User manual

LaboGene
LaboGene SCANLAF Mars GS Series User manual

LaboGene
LaboGene CoolSafe Basic 55-4 User manual

LaboGene
LaboGene Fortuna 900 User manual

LaboGene
LaboGene ScanSpeed 1248 User manual

LaboGene
LaboGene CoolSafe User manual