LAMI AUTO ATLAS-14T User manual


1
Preface
Thank you very much for purchasing our
This Instruction Manual (booklet) includes details for safe use of this product.
Please read this booklet thoroughly and correctly use the machine.
Also, store this booklet properly for immediate use hen necessary hile using the product.
.
■
Preface P 1
┗ Table of contents..................................................................................................................................................
P 1
■
Precautions before Use
P 2
┣ List of labels attached to the product and meaning of symbols.....................................................P 2
┣ Precautions for handling ...................................................................................................................................P 3
┗ Places appropriate for installation.................................................................................................................
P 4
■
Characteristics of Product and Confirmation of Parts
P 5
■
Name of Each Part P 6
┣ Main body of AUTO ATLAS-T14 ....................................................................................................................P 6
┣ Interior of AUTO ATLAS-T14............................................................................................................................P 7
┣ Operation Panel of AUTO ATLAS-T14 .........................................................................................................P 8
┗ About basic operation / error display of operation panel / about setting and display ........
P 9
■
Before Processing Laminate
P 11
┣ About laminate film and materials that can be laminated................................................................. P 11
┗ About papers used ..............................................................................................................................................
P 12
■
Setting and Processing of Laminate Film
P 1
┗ Setting and Processing of Laminate Film...................................................................................................
P 13
■
Maintenance
P 15
┣ Heat rollers.............................................................................................................................................................. P 15
┣ Other rollers............................................................................................................................................................ P 15
┗ Cover ith a cloth after use ............................................................................................................................
P 15
■
Troubleshooting for Failures
P 16
┣ Po er does not turn on or machine does not function...................................................................... P 16
┣ It malfunctions or po er is immediately turned off.............................................................................. P 16
┣ Top unit cannot be closed ............................................................................................................................... P 16
┣ Paper is not supplied or stopped.................................................................................................................. P 16
┣ Processed material does not go in or come out.................................................................................... P 17
┣ Wrinkles or bubbles are formed on the processed material. Adhesion is poor ....................... P 17
┗ Laminated paper is not completed one by one .....................................................................................
P 17
■ Others P 18
┣ Product spec........................................................................................................................................................... P 18
┗ Inquiry .......................................................................................................................................................................
P 18
Table of Contents

2
This document classified and explains hazards and damages created hen the displayed symbols are
neglected and the product is used improperly, to prevent danger on customers or others and property
damage in advance.
Warning
When this sign is neglected and the product is handled improperly,
there is a concern for death or sever injury of human beings.
Caution
When this sign is neglected and the product is handled improperly, it
can result in human injury or physical damage.
This symbol represents matters that
must be follo ed due to concern for
injury.
This symbol represents prohibition
of disassembly for safety.
This symbol represents removal of
po er plug from outlet for safety.
This symbol represents prohibition
of touching the product ith et
hands.
This symbol represents instruction to
connect the earth ire for safety.
This symbol represents prohibition
of the product from getting et.
This symbol is a caution about danger
of hand getting caught by roller.
This represents expectation of
electric shock hen handled
improperly.
This represents expectation of
smoke or ignition hen handled
improperly.
Meaning of symbols

3
Warning
Only use the power cord included in the product and do not use with power sources other than the displayed.
Do not place heavy object on top of power cord, connect nearby a heating device, or connect multiple power cables to
an outlet.
Do not process power cord or use as damaged.
Accurately insert to the tip of electrode part.
Hold the plug when inserting power plug. Excessive bending, twisting or pulling of the cord can damage the cable
interior and cause electric shoc , fire or failure.
※ If power cord is damaged, contact our company or the seller.
Regularly remove power plug from the outlet to clean the electrode root and gap. Do not insert power plug with dusts
and alien substances attached.
Do not install this product in places with high temperature and humidity or poor ventilation, places with combustible
and explosive gases or toxic gases, places with large volume of dusts, and on top of flammable objects. Also, install at
least 50cm away from the wall when installing this product nearby a wall.
Do not approach the product near a firearm or high temperature. Do not insert metals, flammables, and liquids into the
machine.
Do not disassemble or remodel the machine.
Do not use in abnormal status such as smo e or abnormal odor and sound. When such status occurs, immediately turn
off the power switch. Remove power plug from the outlet and contact the seller or our company. Never repair the
product on your own as it is dangerous.
Caution
Power plug must be removed from the outlet when not used for long time.
Do not insert power plug using wet hands.
Earth connection must be done before connecting power plug to power. Also, remove power plug before disconnecting
earth.
Especially, eep away from children.
Do not mount on the product or place heavy object on top.
Do not place this product in an unstable place (on top of vibration or slanted surface and places where vibration of other
machines can be easily delivered). There is a concern for injury of a nearby person from falling or tripping.
Do not place the product in front of wind from air conditioner.
Do not bloc the vent hole. If the vent hole is bloc ed, there are concerns for failure or fire from accumulation of heat
inside.
During operation of the machine or insertion of laminate, be careful about hair, nec tie and nec lace from rolling in.
When film glue is attached to the laminate roller, squeeze a cloth soa ed in neutral detergent and wipe the roller. (※ Do
not clean the roller using benzene, thinner and sponge.
The rollers must be lifted up when laminate processing is not being performed.
Cover with a cloth when the machine is not used to avoid places with direct light or fluorescent light. Light can rapidly
degenerate rubber of the laminate roller.
Turn the power switch off and remove power plug from the outlet for safety during transportation of this product.

4
Install this product in the follo ing places.
Horizontal and stable places
Slanted or unstable use can have bad impact such as return of paper. Also, there is a concern
for an unexpected accident.
Places where exclusive power outlet can be secured.
Do not use this product ith po er sources other than po er ith rated voltage regulated in
this Manual.
There is concern for fire or electric leakage.
Also, earth or earth leakage breaker must be installed.
Places with no humidity and good ventilation
Installation of this product in a place ith high humidity is a cause of electric leakage or failure.
Avoid outdoor places, places ith direct light or ind from air conditioner, and places ith
large volume of dusts for installation.
Workability
Secure sufficient space for ork convenience.
Do not install too close to alls. If possible, it is optimal to secure enough space for a person
to pass.
This product descends the support hen attaching the laminate film.
If the product is installed at the center of a desk, it can be difficult to attach the film as the support is
blocked by the desk.
Refer to the figure above to install the product at the tip so that the support is not blocked.
Appropriate places for installation
※ Do not block the vent hole of this product. ※
Blocking the vent hole can cause fire from internal heat.
Do not install the product in the follo ing places.
∙ Narro places ith bad ventilation such as closets.
∙ On top of carpets and soft cloths
∙ On top of flammable objects such as papers and ne spapers
∙ Places that generate combustible and explosive gases or toxic gases
Also, the product must be at least 50cm a ay from the all hen installing near
a all..

5
Characteristics of Product
Stable thermal performance
Metal roller is positioned in front of heat rollers that perform laminate (compression) to preheat
the film for stable thermal performance, allo ing high quality laminate processing.
Auto cutting function
Edges of the laminated paper can be cut automatically.
High speed laminate
The metal roller described above is mounted to allo high speed laminate.
AUTO ATLAS-T14 : 1600 mm/min
Open device
Use of open device allo s opening and closure of top and bottom rollers. It is easier to attach
the laminate film, clean the rollers, and respond to troubles.
Confirmation of Parts
This product includes the follo ing parts and documents.
If some parts are missing, contact a nearby branch of our company or the seller of purchase.
Components included in
the main body
Front direction board
Main body of AUTO ATLAS-T14
Paper tube holder 4 (2sets)
Po er cord
Handle
Components separate from the main body
Instruction Manual
(this document)
Warranty

6
Name of Each Part
Main body of Auto Atlas
-
14T
Laminate film set bracket
Cooling fan
Cover attachment
Paper plate
Change paper size (length)
Change paper size ( idth)
Handle
Processed
Transport roller
Handle
Po er s itch, po er cord
Laminate film is set here.
Fan operates when roller temperature exceeds 82˚C.
Top cover is attached.
Paper to be processed is set.
Paper length can be cha
nged by
sliding.
Handle is used to open and close top unit.
Paper idth can be changed by
sliding.
The laminated paper comes out of this
The laminated paper is transported
The handle is
inserted here. It allo s vertical
movement of the rollers.
This is the inlet of po er cord provided ith
main po er s itch. [O]=off [I]=on

7
nterior of Auto Atlas
-
14T
Metal roller
Be careful as it gets hot during use.
Heat roller
Be careful as it gets hot during use.
Operation
Panel is used to operate, stop and set this product.
This lever is used to descend or fix the support hile
setting bottom laminate film.
The laminated paper is transported to the
Bottom lam
inate film support descending
Pull roller

8
Auto Atlas
-
14T Operation panel
Number Display
Displays surface temperature of the roller
and setting values.
In general (when no operation is done
after connecting power , current heat
roller temperature is displayed.
TEMP Button (LED lamp: orange)
LED lamp is turned on and heat roller
temperature is displayed if no button is
pressed after power connection. When
the button is pressed in this state, LED
lamp flickers and turns to temperature
display for the metal roller.
R Margin Button (LED lamp: orange)
The button is used to d
isplay mm setting
of the rear film in the direction of the
film. LED lamp is turned on and current
setting is displayed when the button is
pressed once.
L/CUT (LED lamp: green)
This selects whether to perform film
cutting using rotary cutter. LED lamp is
turned on and off whenever the button is
pressed, displaying whether the rotary
cutter is enabled or disabled.
E C Button
This button is used to cancel any
changes made to set
tings when various
settings are changed.
ENT Button
This button is used to switch to setting
mode or decide to apply the changed
value.
TART/ TOP
Button
This button starts or stops the device.
Ready Lamp (red)
This lamp is turned on when laminate wor
can be performed with consideration on
roller surface temperature.
The lamp will flic er when there is difference
between roller surface temperatur
e and
setting (while preheating after power
connection, etc.).
F Margin Button (LED button: orange)
This button issued to display remaining
mm of the front film in the direction of
the film.
LED lamp is turned on and current
setting is displayed when pressed once.
Option Button (LED lamp: orange)
Number of papers to be processed is
displayed when the product is at a stop,
performing countdown from the number of
papers. When setting is 「0」
, papers will be
supplied until they run out.
Setting value is reset when power is turned
off.
△
Button
▽
Button
These buttons are used to increase or
decrease values during setting.
W/CUT (LED button: green)
It can elevate / descend the paper
supply and operation of motor in
combination with other buttons.
Refer to page 9 for details.
Operation Display Lamp (LED lamp:
green
This lamp is turned on during operation
of the device.

9
Basic operation of this product is done by combining [W/CUT] ith other buttons.
LCD display Reason for stopping and solution
Jam sensor detection AOP]
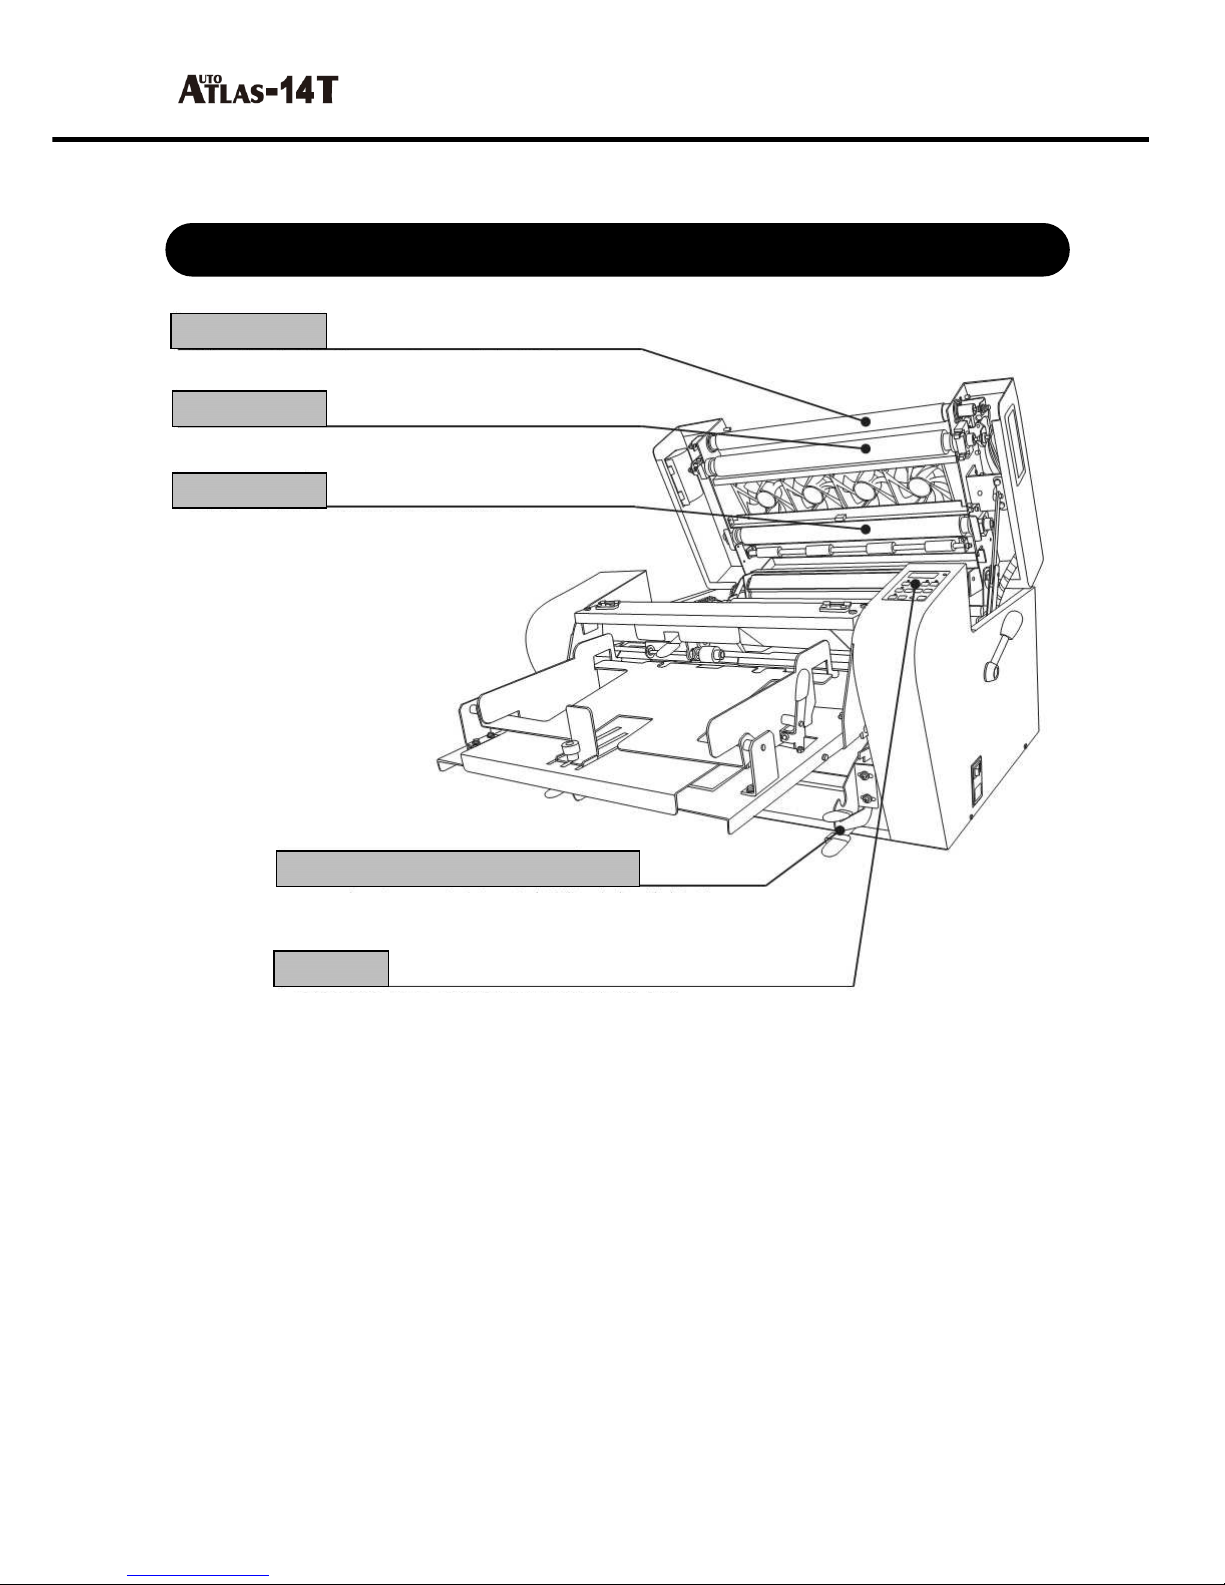
The processed material does not come out of the back and is caught
inside the product.
Open the top unit of this product and slo ly close hile taking the
material out.
※ Press [ESC] to cancel panel display.
The top unit is open. AOP]
The top unit of this product is not closed properly.
Since processing cannot be done as is, open the unit and close it again.
Make sure that it is not opened by pulling the handle before continuing
ith the processing.
※ Press [ESC] to cancel panel display.
Processing is finished for the number of paper set. A ]
If the number of processed paper is set, the product ill stop once
processing is done according to the number setting.
※ Press [ESC] to cancel panel display.
Film end detection F L 1 ]
Since top laminate film or bottom laminate film is used up, turn the
po er off and set ne films.
※ Press [ESC] to cancel panel display.
※ Contact our company or the seller hen other error occur.
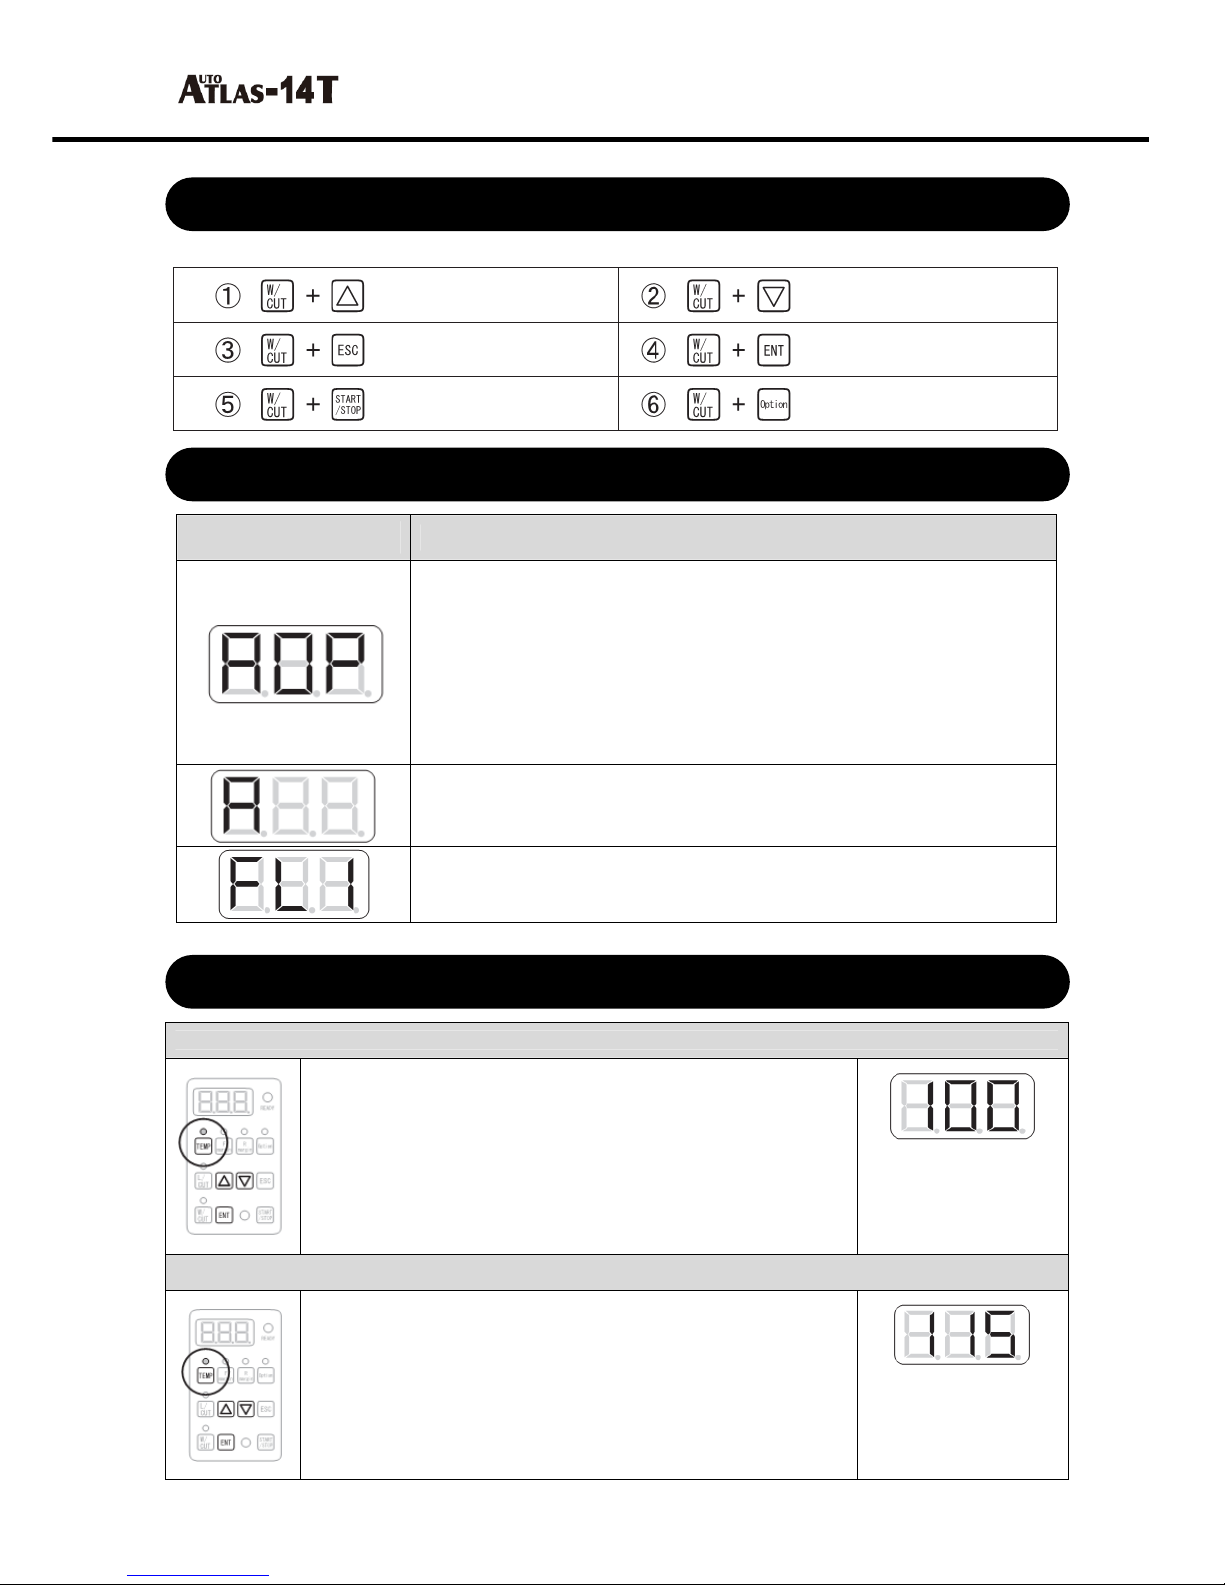
To adjust temperature of heat roller
Initial setting: 100˚C
Adjustable range: 10-120˚C
1. Turn on the TEMP LED and press [ENT] button.
2. Value on the display ill flicker. (Sho ing that you entered
setting mode)
3. Press △ and ▽ buttons to set the number ithin
10~120˚C.
4. When [ENT] button is pressed again, flickering display is
changed to on and setting is ended.
※ Press [ESC] button to stop during setting.
※ Setting is remembered hen po er is turned off.
Po er is connected
and surface
temperature of heat
roller is displayed
[100]=100˚C
To adjust temperature of metal roller
Initial setting: 115˚C
Adjustable range: 10-120˚C
1. Press [ENT] button hile TEMP LED is flashing
2. Value on the display ill flicker. (Sho ing that you entered
setting mode)
3. Press △ and ▽ buttons to set the number ithin
10~120˚C.
4. When [ENT] button is pressed again, flickering display is
changed to on and setting is ended.
※ Press [ESC] button to stop during setting.
※ Setting is remembered hen po er is turned off.
Po er is connected
and surface
temperature of metal
roller is displayed
[115]=115˚C
About setting and display
Auto Atlas
-
14T Error display of operation panel
Auto Atlas
-
14T Basic operation of operation panel
Elevation o
f paper plate
Descending of paper
plate
Operation of paper
plate motor
Reverse rotation of
main body motor
Operation of main
body motor
Operation of paper
supply motor

10
To make margin setting (front side of direction of film)
Initial setting: 3mm
Adjustable range: 0-50mm
1. Turn on the F margin LED and press [ENT] button.
2. Value on the display ill flicker. (Sho ing that you entered
setting mode)
3. Press △ and ▽ buttons to set the number.
4. When [ENT] button is pressed again, flickering display is changed
to on and setting is ended.
※ Press [ESC] button to stop during setting.
※ Setting is remembered hen po er is turned off.
F margin LED is
turned on and
number is
displayed
[ 3]=3mm
To make margin setting (back side of direction of film
Initial setting: 3mm
Adjustable range: 0-50mm
1. Turn on the R margin LED and press [ENT] button.
2. Value on the display ill flicker. (Sho ing that you entered
setting mode)
3. Press △ and ▽ buttons to set the number.
4. When [ENT] button is pressed again, flickering display is changed
to on and setting is ended.
※ Press [ESC] button to stop during setting.
※ Setting is remembered hen po er is turned off.
R margin LED is
turned on and
number is
displayed
[ 5]=5mm
To set the number of papers to be laminated
Initial setting: 0 sheet, Adjustable range: 0-250 sheets
1. Turn on the option LED and press [ENT] button.
2. Value on the display will flicker. (Showing that you entered setting
mode
3. Press △ and ▽ buttons to set the number.
4. When [ENT] button is pressed again, flickering display is changed to on
and setting is ended.
※ Press [ESC] button to stop during setting.
※ If setting value is 0, papers will be supplied until all papers on the paper
plate are used up. For values other than 0, paper supply is finished once
the number of papers set here is reached.
※ This setting value can be checked by pressing [Option] button when the
machine is at a stop.
Remaining number of papers to be processed can be seen if pressed
during operation of the machine.
Caution
The number displayed refers to the number of papers supplied, not the
number of papers for which laminate is complete.
Option LED is
turned on and
number of papers
is set [250]=250
sheets
To find out how many papers have been laminated so far
Initial value upon po er connection: 0 sheet
1. Press [ESC] button hile pressing [Option] button.
2. Value on the display ill flicker and sho the number of papers
process after po er connection.
※ Displayed number refers to the number of papers for hich
laminate is complete.
※ It does not sho the number of papers processed before po er
connection.
[ESC] is pressed
while pressing
[Option] button
[125]=125 sheets
To delete the number of laminated papers
Initial value upon po er connection: 0 sheet
1. Press [ENT] button hile pressing [Option] button.
2. The count is deleted and [0] is displayed.
※ Displayed number refers to the number of papers for hich
laminate is complete.
※ It does not sho the number of papers processed before po er
connection.
Caution
It is displayed as [0] once deleted and cannot be cancelled.
[ENT] is pressed
while pressing
[Option] button
[ 0]=0 sheet

11
Before Laminate Processing
There are t o types of laminate film, 「roll type」 and 「pack type」.
This product uses 「roll type」 laminate film.
※ 「Pack type」 laminate film and 「cold film」 cannot be used.
Thickness (µ) micron
This is thickness of the laminate film. Use according to the purpose. Films
used by this product are 50 μ and 100 μ films.
Size of paper tube
(inner)
Size of paper tube differs according to structure of the laminator. Exclusive
1-inch paper tube is used on this product.
Type of roll film –
Hot-roll film
Hot-roll film
Heat is applied to melt glue and attach paper to the film.
Cold-roll film
Separate (paper) is attached to the surface.
During use, the paper is separated by the rapping device
and compressed by the roller.
Glued surface (internal
and external)
The product is expressed as bei
ng internal or external depending on
hether the glued surface on the laminate film is on the inside or outside
of roll scroll. (※ This product is external type.)
Caution
Incorrect direction of the film can result in attachment of adhesive to
the roller and damaging of the roller.
Different laminators have different materials (papers) that can be laminated.
This product can also laminate 「photographs」 and 「colored printouts」 ith the help of heating
structure in the internal rollers, but there are materials (inappropriate) for laminate.
Things ritten using crayons (there are crayons that are liquefied hen heated)
Thermal or pressure sensitive papers deformed or damaged by heat or pressure
Objects that are not papers (they can damage the machine)
Materials that can be laminated
About
laminate film
-
Do not place laminate film in places ith high temperature and humidity.
- When laminate is not used, store the film in film shelf or box.
- Use films appropriate for the laminator.
- If a problem is found in the film before use, do not use it and contact the seller.
Reckless use can cause failure of the laminator.
Precautions while handling laminate film
Inner diameter of
paper tube
ize of paper t
ube
Product with glued surface on the
outside of roll scroll is called
「external」.
Glued surface of
Glued surface of internal film
Product with glued surface on
the inside of roll scroll is called
「internal」.

12
Refer to belo for sizes and thicknesses of papers that can be used on this product.
About papers used
Vertical size of paper
Horizontal size of paper
Paper Type
JIS Standard Size
Width
Length
Vertical
Horizontal
Paper thic ness (basis
weight:
)
number of papers
Ex: coating paper
※
Since thic ness differs according to paper type,
the above table is only for reference. Confirm
thic ness (basis weight: g/m2) of the paper used
with the paper seller or manufacturer.
A3 printout
is laminated
(cut after processing to w
anted
siz
e)
Deformed size is laminated as
is
Caution
Deformed sizes such as triangle, circle and star shapes cannot be used, even if they are
included in the above.
Papers ith non-
standard thickness may not be supplied or several pages can be
supplied at once. Since it can also be affec
ted by printing status such as toner and ink,
the above table is only for reference.
up to 300size of paper
up to 250size of paper
up to 2000size of paper
up to 150size of paper

13
Setting and Processing of Laminate Film
Refer to the follo ing to set the laminate film.
※ Since it is dangerous nearby during film setting, turn the po er OFF and cool the rollers for 10
minutes before setting.
1 ] Check the installation point of this product.
①This product must have the bottom laminate film stand pulled do n.
Film setting can be made difficult by the stand depending on the installation position.
2 ] Set the top laminate film.
①Look at the tip of the film from the front and position the paper tube holder ith spring
on the right side. (For external type)
②Since left side of the film set bracket is fixed, set the left side first.
③Pull the film to the metal roller and slo ly open the top unit of main body to insert the film so
it comes out of the outlet.
3 ] Set the bottom laminate film.
①Pull the brackets on left and right sides of direction board to separate the direction board.
During installation, make sure that the film is inserted into the bracket gap inside the circle in
the figure on the right.
Setting and Processing of Laminate Film
Right spring paper
tube holder
metal roller
Allow the film to come
out of the outlet

14
②Slo ly pull do n the left and right levers of the bottom laminate film stand underneath the
paper plate do n to the edge.
③The film passes through the back of tension bar and comes out of outlet past the heat roller.
④Slo ly lift the bottom laminate stand to the edge of left and right levers to return it to its
original state.
⑤When closing the top unit, close it by slo ly pulling top and bottom films from the outlet to
prevent formation of rinkles on the films. Here, be careful not to stretch the film too strongly.
⑥Return the direction board to its original position.
Do not slant the direction board.
4 ] Set the paper to be processed.
①Place the paper to be processed on top of paper plate, and adjust the size using lever to
prevent the paper from moving in any direction.
Use a paper ith size and thickness compatible ith this product.
5 ] Connect power and set detailed settings.
①Connect po er on the right side of this product.
②Set front and back margins and number of papers to be processed on the operation panel.
Refer to P8~10 for setting.
6 ] Start processing.
①When [READY] lamp is turned on in red, preparation is complete.
Press [START/STOP] button to start processing.
※ If the machine immediately stops or an error is generated hile processing, revie the setting
method.
Pull Roller
Heat Roller
Tension bar
Caution
Since each part becomes as hot as the heat roller during use of this product, be careful about burning.
Some errors cannot be resolved without turning the power off.
Settings such as number of papers to be processed are reset with power off and must be reconfigured.
Right spring
paper
tube holder

15
Maintenance
This product is composed of various rollers, and they must be cleaned ith use.
Laminate can be maintained as desirable by cleaning the rollers.
Cleaning of roller
Small amount of glue can leak out of the film section and attach to the roller during laminate
processing. If glue remains on the rollers, it can degenerate quality of laminate process or cause
failure. The rollers must be regularly cleaned.
①Remove the direction board and open the top unit to clean.
②Wipe out ith soft cloth or ipe glue and contamination out using antiseptic ethanol
or alcohol. Do not use solvent thinner and benzene as they can deform or discolor the
rollers.
③Bottom heat rollers ill not rotate for safety hen [START/STOP] button is pushed ith
the top unit open. Close the top unit and slo ly rotate the rollers for cleaning.
Other rollers
Other rollers are cleaned as identical to heat rollers as paper scraps and dusts can attach to
rollers. Feed roller on the back of the direction board must be cleaned as ell.
Cover with a cloth after use.
After using this product, cover the main body ith a large cloth ith sufficient size to avoid
dusts.
Stop the rollers hen cleaning.
Do not clean the rollers using hard objects like steel ool as they can damage
rollers.
Do not inflict force on rollers for long time.
Do not c
lean rollers using thick paper, hich is occasionally found in pack type
laminators. Thick paper can block the device and cause damage or failure. Like ise,
do not use thin paper to clean rollers. Paper can roll into rollers, causing failure.
Caution

16
Troubleshooting for Failures
The follo ing must be kept in mind hile using this product
Power does not turn on or machine does not function
Insert outlet plug and check power switch
Make sure that the outlet plug is correctly connected.
Check hether po er s itch on the rear side is turned on.
If the po er cord is disconnected by scratch, contact our company or the seller.
Check disconnection of fuse
If it is disconnected, replace ith a ne fuse ith identical spec.
When the same symptom continues to occur, contact our company or the seller.
Heater or light projector is used nearby, or long drum (cord reel) is used
When such products are used, use different po er system.
If a drum is used, separate the drum and connect this product.
.
Abnormal sound is created by motor
When abnormal sound is created by the motor, the sa -tooth is damaged or scre is loosened.
Contact our company or the seller.
Setting temperature is not reached
Check the display on the operation panel.
If [READY] lamp flickers, ait until the lamp is turned on.
The top unit is left open
Check hether the handle on the right side of main body is pulled do n or in open state.
If the top unit is not closed properly, close it again.
Display on the operation panel is strange.
If text displayed on the operation panel appears as 「0」 or broken, turn off the po er and ait
for a moment before applying po er again.
If the problem cannot be resolved by reconnecting po er, contact our company or the seller.
It malfunctions or power immediately turns off
There is problem in wiring.
Contact our company or the seller.
PCB malfunctions due to static electricity generated inside the machine.
Turn the po er off first and then turn it on again.
Top unit cannot be closed
Handle is pulled down.
Lift the handle to remove pressure status and pull do n the handle again.

17
Paper is not supplied or stopped
You are trying to process a paper that does not satisfy the spec.
If more than 30mm of papers is set on the paper plate, reduce the number of papers.
Do not use papers ith thickness outside the scope.
Direction board is not set correctly.
Pull the side handles for ard hile correcting position of the direction board.
Processed material does not go in or come out
Did you insert a paper too thick?
Thickness range of paper that can be process by this product is 64/m2~160g/m2.
When a thicker paper is inserted, paper cannot be supplied and laminate process cannot be
done cleanly, or the product can be damaged if orst. Do not process papers thicker than the
regulated thickness.
Is the film or paper rolled into a roller?
If the processed paper does not come out or is caught inside, it may have rolled into a roller.
Immediately press [START/STOP] button to stop processing and open the top unit to check.
Do not try to remove the film using cutter as the roller can be damaged by the cutter. Contact
our company or the seller.
Wrinkles form on the material or it shows bad adhesiveness
Laminate film is not installed properly or tension of paper tube holder is loose.
Refer to P13~14 of this document for proper setting.
Handle is lifted up
If the top unit moves unstably hen its handle is grabbed to open, the handle is lifted up.
Open and close the unit and rotate the handle to pressurize the heat roller.
The machine is installed on a slanted surface.
Reinstall the machine on a flat surface.
Laminated paper does not come out one by one
L/CUT button is not pressed.
If L/CUT LED is turned off, the cutter will not function. Press the button to turn LED
on.
When the top unit is opened after suspending the process, heat roller and metal roller
are extremely hot. Be careful about burning and injury.
Caution

18
Others
Max. laminating idth
A3 (305mm)
Laminating speed
1.6m/min (Fixed)
Processing temperature
Max. 120˚C
Roller composition
Metal rollers, Heat rollers, Pull rollers (2 ea)
Pressurizing method
Spring, Cam method
Po er requirements
AC 230V 50/60 Hz
Po er consumption
1150 W
Size (W×D×H)
530 x 900 x 420 (mm)
Weight
35 kg
Setting temperature arm-up time
About 5 minutes (differs according to the environment.)
Available laminate film
50 micron, 100 micron
Maximum diameter of laminate film
100 micron x 100 m (External roll diameter: up to 120 dia.)
Basis eight of paper used
60 ~ 160 g/㎡
Possible height of paper setting
About 30 mm (copying paper 64 g/㎡ : about 300 sheets)
Temperature of use
10˚C ~ 32˚C
Humidity of use
15 % ~ 85 % (No condensation)
Storage temperature
0˚C ~ 35˚C
Storage humidity
15 % ~ 85 % (No condensation)
※ Details in this document can be changed ithout notice to make improvements on the product.
Product
Specification
Table of contents
Other LAMI Laminator manuals