Lanaform ABPM-100 User manual

TENSIOMÈTRE
BRAS
BLOEDDRUKMETER
ARM
OBERARMBLUTDRUCK-
MESSGERÄT
NADLAKTNI MERILNIK
KRVNEGA TLAKA
BLODTRYCKSMÄTARE
FÖR ARM
WHO R ISK
INDICATOR
MEDICAL
DEVICE
IRREGULAR HE ART
RHYTHM ALERT
4×30
MEMORIES
ABPM-100
ARM BLOOD
PRESSURE
MONITOR
HEALTH

EN FR NL DE SL SV
EN Instruction manual
The photographs and other images of the
product in this manual and on the packaging
are as accurate as possible, but do not claim
to be a perfect reproduction of the product.
Thank you for choosing the LANAFORM ABPM-100
arm blood pressure monitor. The arm blood pressure
monitor is designed to be a non-invasive measuring
process and for monitoring adults’ blood pressure. It
allows you to measure your blood pressure quickly
and easily, register the values and display changes in
values.Itwarns youifyou havean irregularheartbeat.
TITLE AND DESCRIPTION OF DISPLAY
SYMBOLS ON THE INSERT DESCRIBING
THE PRODUCT’S FEATURES
Denition of
the symbol Identication Information provided
by the manufacturer
Manufacturer ’s
details Manufacturer
Batch number Production batch number
BF device The cu is type BF
applied part
Instructions
for use Followthe
instructions for use
The sign background
colour: blue.
The sign graphical
symbol:white
Please note:
see instructions
for use
Please note: consult the
enclosed documents.
Please read these
instructions before
using the device.
Please also follow these
instructions carefully
when using the device.
Notiedbody
European
representative European representative
Electrical and
electronic
waste (WEEE)
The device should not be
disposed of with other
household waste at the
end of its serviceable life.
Date of
manufacture
Serial number
Keep dry
PLEASE READ ALL THE
INSTRUCTIONS BEFORE USING
YOUR BLOOD-PRESSURE MONITOR,
PARTICULARLY THESE FEW
BASIC SAFETY INSTRUCTIONS
•
When using this product, please make sure you
comply with all the items listed below. Any devi-
ation from these instructions may cause injury or
aect the accuracy of the readings.
• Always measure your blood pressure at the same
time of day so that the values are comparable.
•
Rest for about 5 minutes before taking any
measurements.
• When you have to take several measurements on
an individual, wait for 5 minutes between each
measurement.
•
Do not eat, drink, smoke or take part in physical
activitiesfor at least 30 minutes beforehand.
•
Refrain from talking when themonitoris recording
measurementsinordertoguaranteetheiraccuracy.
•
Take another measurement if you are at all in
doubtabout thevaluesyouhavebeenmeasuring.
• The measurements you have taken are purely for
information purposes – they are not a substitute
for a proper medical examination!
•
Notifyyourdoctorofyourresultssinceyoushould
never under any circumstances take any medical
decisionsbasedon thesemeasurementsalone(for
example,choosingmedicinesandtheir dosages).
•
Donotusetheblood-pressure monitoronnew-borns,
pregnant womenand patients with pre-eclampsia.
•
Itis inappropriate forpeoplewithserious arrhyth-
mia to use this Electronic Sphygmomanometer.
•
Donot use thecu otherthansuppliedby theman-
ufacturer, otherwise it may bring biocompatible
hazard and might result in measurement error.
• If the blood circulation is restricted in an arm due
to chronic or severe vascular diseases (including
vasoconstriction), the accuracy of the measuring
process on the wrist is limited. In this case, use an
upperarmblood pressure monitor.
• Cardio-vasculardiseasecancauseincorrect or in-
accurate measurements. This is also true for very
lowbloodpressure,diabetes,circulationproblems,
irregular heartbeats and chills, feverorshaking.

EN FR NL DE SL SV
ABPM-100 EN Instruction manual 3/74
• The monitor mustnot beused at thesame time as
anyhigh-frequency surgical device.
•
Onlyuse thedevice on people whosearm perimeter
is the same as that stated for the device.
•
Pleasenotethatthefunctionofthelimbconcerned
maybehamperedwhen inating.
• Blood circulation must not be blocked for longer
thannecessary when takingblood pressure. If the
device does notwork, removethe cufromthe arm.
•
Donottakemeasurementstoofrequentlyandavoid
sustained pressure in the cu. This causes blood
circulation to be reduced and may cause injury.
•
Please donot putthe cu on an arm, thearteriesor
veinsof whichareundergoingmedicaltreatment,
e.g. whereanintravascular accessdevice is present
whichisintendedforintra-vasculartreatmentorif
there is an arteriovenous shunt in place.
•
Do notuse thecu onpeoplewho haveundergone
a mastectomy.
•
Do not put the cu over wounds as its use may
aggravatethem.
•
Put thecuonlyround thearm.Donotput thecu
over other parts of the body.
•
Theblood-pressuremonitorisbattery-operatedonly.
•
Automatic switch-omeans that themonitorwill
gointoenergy-savingmodewhen leftuntouched
for one minute.
•
Thedeviceisdesignedfor useasdescribedinthese
instructions for use. The manufacturer cannot be
held responsible for damage caused by inappro-
priate or improper use.
•
Donot use thecu otherthansuppliedby theman-
ufacturer, otherwise it may bring biocompatible
hazard and might result in measurement error.
• Please do not share the cu with other infective
person to avoid cross-infection.
•
Avoidcompressionor restrictionoftheconnection
tubing during measurement, which may cause
ination error, or harmful injury due to contin-
uouscupressure.
•
ThisElectronicSphygmomanometeris designedfor
adultsand shouldneverbeusedoninfantsoryoung
children. Consult your physician or other health
careprofessionalsbefore use on older children.
Storage and
maintenance instructions
• The monitor is made up of precision electronic
components. The accuracy of the values meas-
uredand the serviceable life ofthedevice depend
on careful handling:
·
Protect the device from shocks, humidity,
dirt, marked uctuations in temperature and
direct sunlight.
· Do not drop the device.
·
Do not use the device in the vicinity of strong
electro-magnetic elds and keep it away from
cordless or portable telephone facilities, etc.
•
It is recommended that the batteries be re-
moved when the device is not being used for
long periods.
Notes on batteries
•
If theliquidof thebatterycellcomes into contact
with theskinor eyes, rinse the area aectedwith
water and consult a doctor.
Ingestion hazard! Young children might
swallow the batteries and suocate. So keep
the batteries out of the reach of children!
•
Check the plus (+)et minus (-) polarity symbols.
• If a battery has leaked, put on protective gloves
and clean the battery compartment with a
dry cloth.
• Protect the batteries from excessive heat.
Explosion hazard! Do not throw
batteries onto the re.
• Do not attempt to re-charge the batteries.
•
Remove the batteries from the battery com-
partment if the device is not to be used for a
lengthy period.
• Use only identical or equivalent batteries.
•
Always replace all thebatteries at the same time.
• Do not use rechargeable batteries.
• Do not dismantle, open or break the batteries.

EN FR NL DE SL SV
4/74 ABPM-100 EN Instruction manual
Instructions for repair and removal
• Batteries must not be disposed of with house-
hold waste.
•
Please take at batteries tothe collectionpoints
providedfor this purpose.
• Do not open the device. Failure to follow these
instructions may void the warranty.
•
Youmust notrepair oradjustthe device yourself.
If you havedone so, safe operation ofthedevice
can no longer be guaranteed.
•
Only the customer service department or an
authorised operator may carry out any repairs.
•
Before ling any claim, however, please check
the battery statusbeforehand and replace them,
ifnecessary.
•
In the interests of environmental protection,
the device should not be disposed of with other
household waste at the end of its serviceable
life. It should be disposed of via your country’s
authorised collection points. The device must
be disposed of in accordance with the European
WEEE (Waste Electrical and Electronic equip-
ment)Directiveon usedelectrical andelectronic
devices. Ifyou have anyquestions on this,please
contact the local bodies responsible for the dis-
posal and recycling of these products.
DESCRIPTION OF THE DEVICE
1 Screen
2 Stop/start button
3 Memory button
4 Cuconnectionsocket
5 Battery compartment
6 Scale for ranking measuring results
7 Cu
8 Cu pipe
9 Connection to the cu
DISPLAYSCREEN
10 Systolicpressure
11 Diastolic pressure
12 Pulse rate measurement
13 Pulse symbol
14 User memory
15 Backup location number/average memory
value (AL), morning (A), evening (P)
16 Memory function symbol
17 Irregular heart beat symbol
18 Ranking measuring results
19 Deation
20 Time et date
21 Battery change symbol
INSERTING THE BATTERIES
•
Remove the battery compartment cover (5) on
the left-hand side of the device.
•
Insert four 1.5V micro batteries (LR03 alkaline
not included in the packaging).
•
You must insert the batteries according to the
polarity illustrated. Do not use rechargeable
batteries.
• Closethe batterycompartment cover carefully.
•
If the battery change symbol
(21)
appears, no
measurements can be taken and you need to
change all the batteries.

EN FR NL DE SL SV
ABPM-100 EN Instruction manual 5/74
Removing the batteries
• Flat and fully discharged batteries must be dis-
posed of in special containers or at collection
points intended for this purpose or returned
to an electrical appliance retailer. You have a
legalobligationtodisposeofbatteries properly.
SET-UP DATE AND TIME
•
This menu allows you to adjust the following
functions one after the other:
Time Date Hour format
You must adjust the date and time.
Without these adjustments, it is impossible
to register and read your measurements
accurately with the date and time.
Time format
•
Press and hold down the STOP/
START button
(2)
and the memory
button
(3)
at the same time for 3
seconds or insert the batteries.
•
Using the memory button
(3)
, select the time
format you require and conrm by pressing the
STOP/START button (2).
Date
•
The year ashes on the screen. Using
the memory button
(3)
, select the
year you require and conrm by
pressing the STOP/STARTbutton
(2)
.
•
The month ashes on the screen. Using the
memory button
(3)
, select the month you re-
quire and conrm by pressing the STOP/START
button (2).
•
The day asheson the screen. Usingthe memory
button (3), select the day you require and conrm
by pressing the STOP/START button (2).
If the time format has been adjusted
to 12 pm, the order of the day and
month displayed is reversed.
Time
•
The time ashes onthe screen.Using thememory
button (3), select the time you require and con-
rm by pressing the STOP/START button (2).
•
The minutes ash on the screen. Using the
memory button (3), select the minutes you
require andconrmby pressingSTOP/START
(2)
.
•
Onceall the dates have been adjusted, the device
automatically switches o.
MEASURING BLOOD PRESSURE
Positioning the cu
• Put the cu on your bare left
arm. The circulation in your
arm must not be restricted
by clothes that are too tight
or anything else.
•
Position the cu on your
arm so that the lower edge
is 1 - 2cm above the crook of your elbow and
above the artery. The pipe is directed towards
the middle of your palm.
• Now close the free part of the cu around your
arm using the Velcro without making it too
tight. You must be able to insert two ngers
under the cu.
•
Now connect the cu’s pipe into the cu’s
power supply.
The device must only be used with the
original cu. The cu is intended for an
arm circumference of 22 to 30cm.

EN FR NL DE SL SV
6/74 ABPM-100 EN Instruction manual
Adjusting to
the correct position
• Rest for about 5 minutes before
taking any measurements. Oth-
erwise, this may cause errors.
• Measurements can only be taken when sitting
down or prone. Make sure in every case that the
cu is at heart level.
•
Make yourself comfortable before taking your
blood pressure. Make sure that your back and
your arms are well supported on the backrest
and armrests. Do not cross your legs. Put your
feet at on the oor.
• In order not to distort the result, it is important
to remain calm whentaking the measurements
and not to talk.
Measuring blood pressure
•
Position the cu as describedabove andgetinto
thepositionyou wanttotakethemeasurements.
•
Tostartthe monitor, pressthe STOP/STARTbutton
(2). All displays will light up briey.
• To choose the memory location you want, press
thememoryfunctionbutton
(3)
.( , ,or ).
•
The results of measuring 4 dierent people or
the morning and evening measurements may
be recorded separately in four memories with
30 places.
•
The monitor automatically starts the measur-
ingprocess.
•
Youcan stop the measuringprocess at anytimeby
pressing the STOP/START button (2). As soon as it
recognises a pulse,the Pulsesymbolis displayed.
•
The results of measuring the systolic pressure
(10)
, diastolic pressure
(11)
and the pulse
(12)
are displayed. The irregular heartbeat symbol
(if there is one) (17) and the symbol for ranking
measuring results (18) ash.
•
Er_ is displayed when the measuring process
has not been carried out correctly. Read the
chapter Error message/Rectifying errors in
these instructions for use and start taking
measurements again.
•
Switch o the monitor by pressing the STOP/
START button (2). The measuring result is then
recorded in the user memory you have chosen.
•
If youforgetto switch o the device, it will switch
oautomaticallyafterapproximately1minute.
•
Wait at least 5 minutes before taking another
measurement.
EVALUATING THE RESULTS
Irregular heart beat
•
Thisdeviceis able toidentify anyirregularheart
beatduringthe measuring process anddisplays
it, if necessary,after the measuring processwith
the corresponding symbol (17).
•
This may indicate arrhythmia. Arrhythmia is
a disease characterised by an anomaly in the
heart rate due to disturbances in the bio-elec-
trical system. The symptoms (heart beats that
are late or early, faster or slower pulse) can be
caused particularly by heart disease, by age, by
natural predisposition, by a diet that is too rich,
by stress or even by lack ofsleep. Onlya medical
consultation can determine arrhythmia.
If the symbol is displayed after the measuring
process, start again. Make sure that you rest

EN FR NL DE SL SV
ABPM-100 EN Instruction manual 7/74
for 5 minutes and do not talk or move during
the measuring process. If the symbol often ap-
pears, please consult a doctor. Self-diagnosis
and self-medication based on the results of the
measuring process can be dangerous. You must
follow your doctor’s instructions.
Ranking measuring results
•
Theresultsofthemeasurementprocessareranked
and evaluated according to the table below.
These values must only be used for information
purposes because blood pressure diers from
personto person and dependingon their age, etc.
It is important to consult your doctor regularly.
Your doctor will provideyou with your own values
fornormalbloodpressureandthelevel atwhich
blood pressure is regarded as dangerous.
The ranking is displayed as is the scale of the
device for establishing the range within which
blood pressure hasbeen measured.If the systolic
and diastolic values are within two dierent
ranges (e.g. systolic within the “normal high”
range and diastolic within the “normal” range),
the scale markingsforthe chart will always give
the highest range on the device, i.e. “normal
high” in this example.
Range of blood
pressure values Systolic
(in mmHg) Diastolic
(in mmHg) Colour
displayed
Level 3:
acute hypertension ≥ 180 ≥ 110 Red
Level 2:
intermediate
hypertension
160 – 179 100 - 109 Orange
Level 1:
mild hypertension 140-159 90 - 99 Yellow
Normal high 130 - 139 85 - 89 Green
Normal 120 - 129 80 - 84 Green
Optimum <120 <80 Green
Source: WHO, 1999 (World Health Organisation)
Recovering and removing
measuring values
•
The result of every successful measurement is
recorded with the date and time. When there
are more than 30 measuring data, the oldest
measurement is deleted.
•
Press the memory button
(3)
to displaythemeas-
uringresult.Thenumberofresultsrecorded for
the selected user is displayed.
•
Press the STOP/START button
(2)
to select an-
other user and conrm by pressing the memory
button (3).
•
The average value(AL)
(15)
ofall thevaluesmeas-
ured andrecorded for this useris then displayed.
•
If there isno result in the memory of theselected
user, the LCD screen displays “0” for blood pres-
sure and for the pulse measurement.

EN FR NL DE SL SV
8/74 ABPM-100 EN Instruction manual
• Press the memory button (3). A7 ashes on the
screen.Theaveragevalue ofmorningmeasure-
ments of the last 7 days is displayed (morning:
5 am – 9 am).
• Press the memory button (3). P7 ashes on the
screen. The average value of evening measure-
ments of the last 7 days is displayed (evening:
6 pm 8 pm).
•
If you press the memory button again (3)
again, the latest measurement is displayed on
the screen. The irregular heartbeat symbol (if
there is one)
(17)
and the symbol for ranking
the measuring results (18) ash.
•
If youpress the memory button
(3)
again,you can
see your individual measurements.
• To switch the device o, press the STOP/START
button (2).
• You can leave the menu at any time by pressing
the STOP/START button (2).
Deleting the values measured
• To delete the records of a specic user memory,
rst select a user memory.
• Hold the memory button (3) down for 3 seconds
to delete the results.
ERRORMESSAGE/RECTIFYINGERRORS
Problem Cause Solution
The LCD screen
displays an
abnormal result.
The cu is in the
wrong position or has
not been tightened
suciently.
Apply the cu cor-
rectly and tr y again.
The body’s posture
is not correct
during the test
Re-read sections
“Adjusting to the
correct position”
in the instructions
and try again.
Arm or body move-
ment, nervousness,
excitement or the ac t
of talking during the
measuring process
Take another
measurement and
followthe positioning
instructions and
instructions for use.
Hear t rate is irregular
(arrhythmia) The blood pressure
monitor is not
suitable for people
suering from
serious arrhythmia
•
Intheeventof error,anerror messageis displayed
on the screen Er_.
• Error messages may be displayed when:
·
the systolic or diastolic pressure has not been
measured (ER1or ER2 is displayed on the screen);
·
systolic or diastolic pressure is outside the
measuring range (“Hi” or “Lo” is displayed on
the screen);
·
the cu is too tight or too loose (ER3 or ER4 is
displayed on the screen);
· blood pressure ishigherthan 300 mmHg (ER5 is
displayed on the screen);
·
ination takes more than 180 seconds (ER6 is
displayed on the screen);
·
there is an error on the system or the device
(ER7 or ER8 or ERA is displayed on the screen);
· the batteries are nearly at (18).

EN FR NL DE SL SV
ABPM-100 EN Instruction manual 9/74
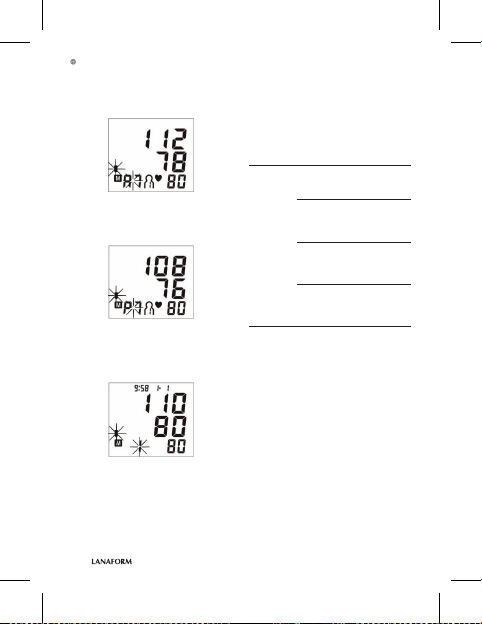
Technical alarm – Description
If the (systolic or diastolic) blood pressure taken is
outside the range indicated in the “Technical Fea-
tures” paragraph, the technical alarm displays the
message “Hi” or “Lo” on the screen. In this case,
consultadoctor or check that youare usingthe device
properly.The technical alarm’slimit valuesarevalues
set by the factory and can neither be changed nor
deactivated. Under the IEC 60601-1-8, these limit
values of the alarm have a lower priority. The tech-
nical alarmis notalocked alarm anddoesnotneedto
be reset. Thesignal displayed on the screen switches
o automatically after approximately 8 seconds.
MAINTENANCE AND STORAGE
•
Clean thedevice and the cucarefully,using only
a slightly damp cloth.
• Do not use detergent or solvent.
• Never put either the device or the cu in water
as this might seep into the device or cu and
damage them.
•
Do not put heavy objects on the device or on
the cu when they are being stored. Remove
the batteries.
• No component can be maintained by user inthe
monitor. The circuit diagrams, component part
lists, descriptions, calibration instructions, or
other information which will assist the user’s
appropriately qualied technical personnel to
repair those parts of equipment which are des-
ignated repairably can be supplied.
• It is recommended the performance should be
checked every 2 years or after repair. Please
contact the service center.
•
The monitorcan maintain thesafety and perfor-
mance characteristics for a minimum of 10,000
measurements or three years.
•
The cu integrity is maintained after 1,000
open–closecycles of the closure.
• It is recommended the cu should be disinfect-
ed 2 times every week if needed (For example,
in hospital or in clinique). Wipe the inner side
(the side contacts skin) of the cu by a soft cloth
squeezed after moistened with Ethyl alcohol
(75-90%), then dry the cu by airing.
•
Clean thecuafterthe usage of every 200 times
is recommended.
TECHNICAL SPECIFICATIONS
OF THE PRODUCT
Model number LA090206
Measuring
method Measuring blood pressure on the arm,
oscillometric and non-invasive
Measuring
range Pressure in the cu 0 – 300 mmHg
Systolic pressure 60 – 260 mmHg
Diastolic pressure 40 – 199 mmHg
Pulse 40 – 180 beats/minute
Accurac y of
the indicator systolic ±3 mmHg
diastolic ±3 mmHg
pulse ±5% of the value displayed
Memory 4 x 30 memory locations
Dimensions +/- 107 x 80 x 52mm
Weight +/- 287g (without any batteries)
Cu size 22 - 30cm
Admin. operat-
ing conditions + 10°C a + 40°C, ≤85% relative air
humidity (non-condensing)
Permissible
storage
conditions
-20°C a +50°C, ≤85% relative air humidity,
800 – 1 050 hPa of ambient pressure
Power supply 4 x 1.5 V AAA batteries
Battery lifespan Approximately 200 measurements,
depending on the increased blood
pressure and ination pressure
Accessories Instructions for use, storage box
Ranking Internal power supply, IP20, no AP
or APG, continuous use, BF device
Pressure meas-
uring system
components
Pump,Valve, LCD, Cu, Sensor
Changes could be made to the technical features
without any prior warning for updating purposes.
•
This device complies with European standard
EN60601-1-2 and meets the special safety re-
quirementsconcerningelectromagneticcompat-
ibility. Please note that HF portable and mobile
communication devices are likely to aect this
device. For further details, please contact the
after-salesservice at the address stated or consult
the end of the instructions for use.

EN FR NL DE SL SV
10 /74 ABPM-100 EN Instruction manual
•
This device complies with European Directive
93/42/EEC for Medical Products, the Medical
Products Act as well as European Standards
EN1060-1 (pertaining to Non Invasive Blood
Pressure Monitoring Equipment, part 1: Gen-
eral Requirements), EN 1060-3 (pertaining to
NonInvasiveBlood Pressure Monitoring Equip-
ment, part 3: Supplementary Requirementsfor
Electromechanical Blood Pressure Monitoring
Equipment)and EC80601-2-30(Electrical Medical
Equipment,parts 2-30:Particular requirements
forthesafety,includingessentialperformance,
ofautomatic non-invasiveblood pressuremon-
itoring equipment).
• The accuracy of this blood pressure monitor has
been tested correctlyand its durability hasbeen
designed for long-term use. Technical meas-
urement checks must be carried out using the
appropriate methodswhenthedevice isused for
medical purposes. For accurate information on
how tocheck the accuracy of the device, you can
send a requestby post tothe after-salesservice.
ADVICE REGARDING
THE DISPOSAL OF WASTE
All the packaging is composed of materials that
pose no hazard for the environment and which can
be disposed of at your local sorting centre to be
used as secondary raw materials. The cardboard
may be disposed of in a paper recycling bin. The
packaging lm must be taken to your local sorting
and recycling centre.
When you have nished using the device, please
dispose of itin an environmentallyfriendlyway and
in accordance with the law.Prior to disposal, please
remove the battery and dispose of it at a collection
point so that it can be recycled.
Under no circumstances should
spent batteries be disposed of
with household waste.
EC 0197 DECLARATION DE CONFORMITY
Medical device
Category IIa.
We, LANAFORM,
hereby declare that the medical device
“ABPM-100” Lot001 LA090206 complies with European
Directive 93/42/EC concerning medical devices and
its most recent amendment 2007/47/EC.
LIMITED WARRANTY
LANAFORM guarantees this product against any
material or manufacturing defect for a period of
two years from the date of purchase, except in the
circumstances described below.
The LANAFORM guarantee does not cover damage
caused as a result of normal wear to this product. In
addition, the guarantee covering this LANAFORM
product does not cover damage caused by abusive
or inappropriate or incorrect use, accidents, theuse
of unauthorized accessories, changes made to the
product orany other circumstance, ofwhatever sort,
that is outside LANAFORM’s control.
LANAFORM may not be held liable for any type of
circumstantial, indirect or specic damage.
All implicit guarantees relating to the suitability of
the product are limited to a periodof two yearsfrom
the initial date of purchase as long as a copy of the
proof of purchase can be supplied.
On receipt, LANAFORM will repair or replace your
appliance at its discretion and will return it to you.
The guarantee is only valid through LANAFORM’s
Service Centre.Anyattempttomaintain thisproduct
by a person other than LANAFORM’s Service Centre
will render this guarantee void. •

EN FR NL DE SL SV
ABPM-100 EN Instruction manual 11 /74
ELECTROMAGNETICCOMPATIBILITYINFORMATION
Guidance and manufacture’s declaration - electromagnetic emissions
ABPM-100 is intended for use in the electromagnetic environment specied below.
The customer or the user of ABPM-100 should assure that it is used in such an environment.
Emissions test Compliance Electromagnetic environment - guidance
RF emissions
CISPR 11 Group1 ABPM-100 uses RF energy only for its internal function.
Therefore, its RF emissions are very low and are not likely to
cause any interference in nearby electronic equipment.
RF emissions
CISPR 11 Class B ABPM-100 is suitable for use in all establishments other than domestic
and those directly connected to the public low-voltage power supply
network that supplies buildings used for domestic purposes.
Harmonic emissions
IEC 61000-3-2 Not applicable
Voltage uctuations/
icker emissions Not applicable
Guidance and manufacturer’s declaration - electromagnetic immunity
ABPM-100 is intended for use in the electromagnetic environment specied below.
The customer or the user of ABPM-100 should assure that it is used in such an environment.
Immunity test IEC 60601test level Compliance level Electromagnetic environment - guidance
Electrostatic discharge (ESD)
IEC61000-4-2 ± 6 kV contact
± 8 kV air ± 6 kV contac t
± 8 kV air Floors should be wood, concrete or ceramic tile. If
oors are covered with synthetic material, the
relative humidity should be at least 30 %.
Power frequency
(50/60 Hz)
Magnetic eld
IEC61000-4-8
3 A/m 3 A/m Power frequenc y magnetic elds should be at
levels charac teristic of a typical location in a
typical commercial or hospital environment.

EN FR NL DE SL SV
12 /74 ABPM-100 EN Instruction manual
Guidance and manufacturer’s declaration - electromagnetic immunity
ABPM-100 is intended for use in the electromagnetic environment specied below.
The customer or the user of ABPM-100 should assure that it is used in such an environment.
Immunity test IEC 60601test level Compliance level Electromagnetic environment - guidance
Radiated RF
IEC 61000-4-3 3 V/m 80 MHz
to 2.5 GHz 3 V/m Portable and mobile RF communications equipment should
be used no closer to any part of ABPM-100, including cables,
than the recommended separation distance calculated from
the equation applicable to the frequency of the transmit ter.
Recommended separation distance
d =2.3√P 800 MHz to 2,5 GHz
Where P is the maximum output power rating of the transmitter
in wat ts (W) according to the transmitter manufac turer and
d is the recommended separation distance in meters (m).
Field strengths from xed RF transmitters, as determined
by an electromagnetic site surveyashould be less than
the compliance level in each frequency range.b
Interference may occur in the vicinity of equipment
marked with the following symbol:
NOTE 1: At 80 MHz and 800 MHz, the higher frequency range applies.
NOTE 2: These guidelines may not apply in all situations.
Electromagnetic propagation is aected by absorption and reection from structures, objects and people.
a: Field strengths from xed transmitters, such as base stations for radio (cellular/cordless) telephones and land
mobile radios, amateur radio, AM and FM radio broadcast and TV broadcast cannot be predicted theoretically
with accurac y. To assess the electromagnetic environment due to xed RF transmitters, an electromagnetic site
survey should be considered. If the measured eld strength in the location in which ABPM-100 is used exceeds
the applicable RF compliance level above, ABPM-100 should be observed to verify normal operation. If abnormal
performance is observed, additional measures may be necessary, such as re-orienting or relocating ABPM-100.
b: Over the frequency range 150 kHz to 80 MHz, eld strengths should be less than 3 V/m.
Recommended separation distances between portable and mobile RF communications equipment and ABPM-100
ABPM-100 is intended for use in an electromagnetic environment in which radiated RF disturbances are con-
trolled. The customer or the user of ABPM-100 can help prevent electromagnetic interference by maintaining a
minimum distance between portable and mobile RF communications equipment (transmitters) and ABPM-100
as recommended below, according to the maximum output power of the communications equipment.
Rated maximum output
power of transmitter
W
Separation distance according to frequency of transmitter
m
150 kHz to 80 MHz
d= 1.2√P 80 MHz to 800 MHz
d= 1.2√P 800 MHz to 2,5 GHz
d= 2.3√P
0,01 0.12 0.12 0.23
0,1 0.38 0.38 0.73
11.2 1.2 2.3
10 3.8 3.8 7.3
100 12 12 23
For transmitters rated at a maximum output power not listed above, the recommended separation distance d in
meters (m) can be determined using the equation applicable to the frequency of the transmitter, where P is the
maximum output power rating of the transmitter in watts (W) according to the transmitter manufacturer.
NOTE 1: At 80 MHz and 800 MHz, the separation distance for the higher frequency range applies.
NOTE 2: These guidelines may not apply in all situations. Electromagnetic propagation is af-
fected by absorption and reection from structures, objects and people.

ABPM-100 FR Manuel d’instructions 13 /74
EN FR NL DE SL SV
FR Manuel d’instructions
Les photographieset autresreprésentations
du produit dans le présent manuel et sur
l’emballage se veulent les plus dèles
possibles mais peuvent ne pas assurer
une similitude parfaite avec le produit.
Nousvousremercions d’avoiracheté letensiomètre
bras ABPM-100 de LANAFORM. Le tensiomètre de
bras est conçu pour la mesure non invasive et la
surveillance des valeurs de tension artérielle des
personnesadultes.Ilvous permet demesurervotre
tensionrapidementetfacilement,d’enregistrerles
valeurs et d’acher l’évolution des valeurs. Vous
êtes averti en cas d’éventuels troubles du rythme
cardiaque.
TITRE ET DESCRIPTION DES SYMBOLES
GRAPHIQUES SUR LA PLAQUETTE DE
CARACTERISTIQUES DU PRODUIT
Dénition du
symbole Identication Informations associées
du fabricant
Coordonnées
du fabricant Fabricant
Numéro de lot Numéro de lot de
production
Appareil type BF Le brassard est une pièce
appliquée de type BF
Manuel
d’utilisation Respectezles consignes
du mode d’emploi
Couleur de fond du
symbole : bleu.
Couleur du pictogramme
: blanc.
Attention,
voir notice
d’instructions
Attention, consultez les
documents joints. Veuillez
lire ces instructions avant
d'utiliser l'appareil.
Veuillez également
suivre attentivement
ces instructions lors de
l'utilisation de l'appareil.
Organisme
notié
Repésentant
Européen Représentant européen
Déchet d’équipe-
ment électrique
et électronique
(DEEE)
L'appareil ne doit pas être
éliminé avec les autres
déchets ménagers à la
n de sa durée de vie.
Date de
fabrication
Numéro de série
Conserver au sec
VEUILLEZ LIRE TOUTES LES
INSTRUCTIONS AVANT D’UTILISER
VOTRE MONITEUR DE TENSION
ARTERIELLE, EN PARTICULIER
CES QUELQUES CONSIGNES DE
SECURITE FONDAMENTALES
• Veuillez vous assurer, lors de l’utilisation de ce
produit, devousconformeràtouslespointsmen-
tionnésci-dessous.Toutedivergencepar rapport
àces pointspourraitcauserdesincidences surla
précision des relevés.
•
Mesurez toujours votre tension au même moment
delajournéeanquelesvaleurssoientcomparables.
•
Avant toute mesure, reposez-vous pendant
environ 5 minutes !
•
Lorsquevousdevez eectuerplusieursmesures
surune personne, patientez à chaquefois 5 mi-
nutes entre chaque mesure.
• Evitez de manger, boire, fumer ou de pratiquer
des activités physiques pendant au moins 30
minutes avant la mesure.
• Abstenez-vous de parler au cours de la mesure
an de garantir la précision.
•
Eectuez une nouvelle mesure si vous avez un
doute sur les valeurs mesurées.
• Les mesures quevousavezétablies serventuni-
quementd’information–elles neremplacentpas
un examen médical !
•
Communiquez vos résultats à votre médecin,
vous ne devez prendre en aucun cas des déci-
sions d’ordre médical sur la base de ces seules
mesures (par ex. le choix de médicaments et
de leurs dosages) !

14 /74 ABPM-100 FR Manuel d’instructions
EN FR NL DE SL SV
•
N’utilisez pas le tensiomètre sur des nou-
veau-nés,desfemmesenceintesetdespatientes
atteintes de pré-éclampsie.
•
Cetensiomètreélectronique n’est pasadapté aux
personnes atteintes d’arythmie sévère.
•
Les maladies cardio-vasculaires peuvent en-
trainer des erreurs de mesure ou des mesures
imprécises. C’est également le cas lors d’une
tension très basse, de diabète, de troubles de la
circulation etdu rythmecardiaque et defrissons
de èvre ou de tremblements.
•
Le tensiomètrene doit pas êtreutilisé parallèle-
mentàun appareilchirurgical haute fréquence.
•
Utilisezuniquementl’appareilsurdes personnes
dont le périmètre du bras correspond à celui
indiqué pour l’appareil.
•
Veuilleznoterquelafonction dumembreconcer-
né peut être entravée lors du gonage.
•
Il ne faut pas bloquer la circulation sanguine
plus longtemps que nécessaire au cours de la
prise de tension. Si l’appareil ne fonctionne pas
bien, retirez la manchette du bras.
•
Evitez des mesures tropfréquentes ou unepres-
sioncontinue de la manchette. Elles entrainent
une réduction de la circulation sanguine et
constituent un risque de blessure.
• Veillez à ne pas placer la manchette sur un bras
dont les artères ou les veines sont soumises à
un traitement médical, par ex.en présence d’un
dispositif d’accès intra vasculaire destiné à un
traitement intra vasculaire ou en cas de shunt
artério-veineux.
•
N’utilisez pas la manchette sur des personnes
qui ont subi une mastectomie.
•
Ne placez pas la manchette sur des plaies, son
utilisationpeut lesaggraver.
• Placez la manchette uniquement au niveau du
bras. Ne placez pas la manchette sur d’autres
parties du corps.
• Vous ne pouvez utiliser le tensiomètre qu’avec
des piles.
•
L’arrêt automatique permet de faire passer le
tensiomètre en mode économie d’énergie lors-
qu’aucune touche n’est manipulée pendant un
délai d’une minute.
•
L’appareil est conçu pour l’utilisation décrite
dansce mode d’emploi. Lefabricant ne peutêtre
tenupourresponsabledes dommages causés par
une utilisation inappropriée ou non conforme.
•
Ne pas utiliser de tensiomètre autre que celui
fourni par le fabricant. L’utilisation de tout autre
tensiomètrepourrait présenterun risquedebio-in-
compatibilitéetdonnerdes mesures erronées.
•
Ne pas partager le brassard avec d’autres per-
sonnes infectées pour éviter toute contami-
nation croisée.
•
Éviter toute compression ou toute entrave
du tube pendant la mesure, car cela pourrait
compromettre le gonage ou provoquer une
blessure en raison de la compression continue
par le brassard.
•
Ce tensiomètre électronique est conçu pour
l’adulteet ne doit jamais être utiliséchez le nour-
rissonoulejeuneenfant.Consulterun médecin
ou un autre professionnel de la santé avant de
l’utiliser chez un enfant plus âgé.
Consignes de rangement
et d’entretien
•
Le tensiomètre est constitué de composants
de précision et électroniques. La précision des
valeurs mesurées et ladurée de viede l’appareil
dépendent d’un maniement soigné :
·
Protégezl’appareilcontreleschocs,l’humidité,
les saletés, les fortes variations de température
et l’ensoleillement direct.
· Ne laissez pas tomber l’appareil.
·
N’utilisez pas l’appareil à proximité de champs
électromagnétiques puissants, tenez-le éloigné
desinstallationsderadioetdestéléphonesmobiles.
•
Si l’appareiln’est pas utilisé pendantune période
prolongée,il estrecommandéde retirerlespiles.

ABPM-100 FR Manuel d’instructions 15 /74
EN FR NL DE SL SV
Remarques relatives aux piles
•
Si du liquide dela cellule de pile entre en contact
avec la peau ou les yeux, rincez la zone touchée
avec de l’eau et consultez un médecin.
Risque d’ingestion ! Les enfants en bas âge
pourraient avaler des piles et s’étouer.
Veuillez donc conserver les piles hors
de portée des enfants en bas âge !
•
Respectez les signes de polarité plus (+) et
moins (-).
• Si une pile a coulé, enlez des gants de protec-
tion et nettoyez le compartiment à piles avec
unchionsec.
• Protégez les piles d’une chaleur excessive.
Risqued’explosion!
Ne jetez pas les piles dans le feu.
•
Les piles ne doivent être ni rechargées ni
court-circuitées.
•
En casde non-utilisationprolongéede l’appareil,
sortez les piles du compartiment à piles.
•
Utilisez uniquement des piles identiques ou
équivalentes.
•
Remplacez toujours l’ensemble des piles si-
multanément.
• N’utilisez pas de batterie !
•
Ne démontez, n’ouvrezou ne cassezpas les piles.
Consignes de réparation
et d’élimination
• Les piles ne doivent pas être jetées avec les or-
dures ménagères.
• Veuillez jeter les piles usées dans les points de
collecte prévus à cet eet.
• N’ouvrezpasl’appareil.Le non-respectdecette
consigne annulera la garantie.
• Vous ne devez pas réparer ou ajuster l’appareil
vous-même.Lebonfonctionnementdel’appareil
n’est plus garanti si tel était le cas.
•
Seul le service client ou un opérateur autorisé
peut procéder à une réparation.
•
Cependant, avant toute réclamation, veuillez
contrôler au préalable l’état des piles et les
remplacer le cas échéant.
•
Dans l’intérêt de la protection de l’environne-
ment, l’appareil ne doit pas être jeté avec les
ordures ménagères à la n desa durée de service.
L’élimination doit se faire par le biais des points
decollectecompétentsdans votrepays.Eliminez
l’appareil conformément à la directive euro-
péenne–WEEE(WasteElectricalandElectronic
Equipment)relativeauxappareilsélectriqueset
électroniquesusagés.Pourtoutequestion,adres-
sez-vous aux collectivités locales responsables
de l’éliminationet du recyclage de cesproduits.
DESCRIPTION DEL’APPAREIL
1 Écran
2 Touche Marche/Arrêt
3 Touche mémoire
4 Prise de connexion à la manchette
5 Compartiment de piles
6 Échelle pour classement des
résultats de mesure
7 Manchette
8 Tuyau de la manchette
9 Connexion à la manchette

16 /74 ABPM-100 FR Manuel d’instructions
EN FR NL DE SL SV
ÉCRAN D’AFFICHAGE
10 Pression systolique
11 Pression diastolique
12 Valeur du pouls mesurée
13 Symbole Pouls
14 Mémoire utilisateur
15 Numéro de l’emplacement de
sauvegarde / valeur de la mémoire
moyenne (AL), matin (A), soir (P)
16 Symbole fonction mémoire
17 Symbole troubles du rythme cardiaque
18 Classement des résultats de mesure
19 Dégonage
20 Heure et date
21 Symbole de changement de piles
INSERTION DES PILES
• Retirez le couvercle du compartiment à piles (5)
sur le côté gauche de l’appareil.
•
Insérez quatre piles micro de 1,5 V (alcalines
de type LR03 non inclues dans le packaging).
•
Veillez impérativement à insérer les piles en
respectant la polarité indiquée. N’utilisez pas
de batteries rechargeables.
• Refermez soigneusement le couvercle du com-
partiment à piles.
•
Si le symbolede changement des piles
(21)
appa
-
rait, il n’est plus possibled’eectuerde mesure et
vous devez changer toutes les piles.
Élimination des piles
• Lespilesusagéesetcomplètement déchargées
doiventêtre misesau rebut dans des conteneurs
spéciaux ou aux points de collecte réservés à
cet usage ou bien déposées chez un revendeur
d’appareilsélectriques.L’élimination desbatte-
riesestuneobligationlégalequi vous incombe.
REGLAGE DATE ET HEURE
• Dans ce menu, vous avez la possibilité de régler
successivement les fonctions suivantes :
Format heure Date Heure
Vous devez impérativement régler la date et
l’heure. Sans ces réglages, il est impossible
d’enregistrer et de consulter correctement
vos mesures avec la date et l’heure.
Format de l’heure
•
Maintenez la touche MARCHE/
ARRÊT (2) et la touche mémoire (3)
enfoncéessimultanémentpendant
3 secondes ou insérez les piles.
•
Al’aide de latouche mémoire
(3)
,sélectionnez le
formatdel’heure quivousconvientetconrmez
avec la touche MARCHE/ARRÊT (2).
Date
•
L’annéeclignoteàl’écran.Al’aidede
latouchemémoire (3) sélectionnez
l’année que voussouhaitezet conr-
mez avec la touche MARCHE/ARRÊT (2).
• Le mois clignote à l’écran. A l’aide de la touche
mémoire(3) sélectionnezle mois que vous sou-
haitez et conrmez avec la touche MARCHE/
ARRÊT (2).
•
Le jour clignote à l’écran. A l’aide dela touchemé-
moire
(3)
,sélectionnezlejour quevoussouhaitez
et conrmez avec la touche MARCHE/ARRÊT (2).

ABPM-100 FR Manuel d’instructions 17 /74
EN FR NL DE SL SV
• Si le format de l’heure est réglé sur 12h, l’ordre
d’achage du jour et du mois est inversé.
Heure
• L’heure clignote à l’écran. A l’aide de la touche
mémoire(3) sélectionnez l’heure que vous sou-
haitez et conrmez avec la touche MARCHE/
ARRÊT (2).
•
Les minutes clignotent à l’écran. A l’aide de la
touche mémoire(3) sélectionnez les minutes
que vous souhaitez et conrmez avec la touche
MARCHE/ARRÊT (2).
•
Une fois toutes les dates réglées, l’appareil
s’éteint automatiquement.
MESURER LA TENSION
Positionner la
manchette
•
Placez la manchette sur le
bras gauche nu. La circula-
tion du bras ne doit pas être
gênée par des vêtements
serrés ou autre.
•
Positionnez la manchettesur lebras de façonàce
que lebord inferieur se trouve 1 - 2cm au-dessus
du plidu coude et au-dessus del’artère. Letuyau
est dirigé vers le milieu de la paume de la main.
• Refermez maintenant la partie libre de la man-
chette autourdu bras,sanstrop serrer,àl’aide de
la fermeture Velcro. Le serrage de la manchette
doitpermettredepasserdeux doigtsau-dessous.
• Branchez maintenant le tuyau de la manchette
dans la prise de connexion de la manchette.
L’appareil ne doit être utilisé qu’avec la
manchette d’origine. La manchette est
prévue pour un tour de bras de 22 à 30 cm.
Adopter une
position adéquate
•
Avanttoutemesure,reposez-vous
pendantenviron5minutes!Sinon,
celapourrait entrainerdeserreurs.
•
La mesure doit se faire en po-
sition assise.
•
Installez-vousconfortablementavantdeprendre
votre tension. Faites en sorte que votre dos et vos
bras soient bien appuyés sur le dossier et les ac-
coudoirs.Necroisezpasles jambes.Posezlespieds
bien à plat sur le sol. Soutenez impérativement
votre bras et pliez-le. Faites attention, dans tous
les cas, à ce quele brassardse trouveau niveau du
cœur. Sinon, cela pourrait entrainer des erreurs
considérables.Détendezvotrebrasetles paumes.
•
Pour nepasfausser le résultat, il est importantde
restercalme durant la mesure etde ne pas parler.
Mesurer la tension artérielle
•
Positionnez la manchettetel que décrit plus haut
et installez-vous dans la position de votre choix
pour eectuer la mesure.
•
Pour démarrer le tensiomètre, appuyez sur la
touche MARCHE/ARRÊT
(2)
. Tous les achages
s’allument brièvement.
• Pour choisir l’emplacement mémoire souhaité,
appuyez sur la touche de fonction mémoire (3).
( , , ou ).
• Les résultats des mesuresde4 personnes dié-
rentes oules mesuresdu matin etdu soir peuvent
être enregistrées séparément dans quatre mé-
moires de 30 places.
•
Le tensiomètre commence automatiquement
la mesure.

18 /74 ABPM-100 FR Manuel d’instructions
EN FR NL DE SL SV
•
Vous pouvez interrompre la mesure à tout
moment en appuyant sur la touche MARCHE/
ARRÊT
(2)
. Dès qu’un pouls est reconnaissable,
le symbole Pouls s’ache.
•
Les résultatsde mesure de lapressionsystolique
(10)
,de lapressiondiastolique
(11)
et du pouls
(12)
sontachés. Le symbole de troubles durythme
cardiaque (s’il y en a) (17) et le symbole de clas-
sement des résultatsde mesures
(18)
clignotent.
•
Er_ s’ache lorsque la mesure n’a pas pu être
eectuée correctement. Lisez le chapitre Mes-
saged’erreur/Résolutiondeserreursdece mode
d’emploi et recommencez la mesure.
•
Eteignez le tensiomètreen appuyantsur la touche
MARCHE/ARRÊT
(2)
.Ainsi, le résultat de lamesure
estenregistrédanslamémoireutilisateurchoisie.
•
Si vous oubliez d’éteindre l’appareil, il s’étein-
dra automatiquement âpres environ 1 minute.
• Attendez au moins 5 minutes avant d’eectuer
une nouvelle mesure !
ÉVALUER LES RESULTATS
Troubles du rythme cardiaque
•
Cet appareil est capable d’identier d’éven-
tuels troubles du rythme cardiaque au cours
de la mesure et le signale le cas échéant après
la mesure, par le symbole correspondant (17).
•
Celapeut indiquerunearythmie.L’arythmieest
unemaladiequisecaractériseparuneanomalie
durythme cardiaque,enraison deperturbations
dusystèmebioélectrique.Lessymptômes(bat-
tements cardiaques enretardou en avance, pouls
plus rapide ou plus lent) peuvent être induits
notamment par une pathologie cardiaque, par
l’âge, pardes prédispositions naturelles, par une
alimentation trop riche, par le stress ou encore
par unmanque de sommeil.Une arythmienepeut
être établie que par une consultation médicale.
Si le symbole s’ache après la mesure, recom-
mencez-la. Veillez à vous reposer pendant 5
minutes et à ne pas parler ni bouger pendant la
mesure.Sile symbole apparaitsouvent,veuillez
consulter un médecin. Il peut être dangereux
d’eectuer un autodiagnostic et une automé
-
dication sur la base des résultats de la mesure.
Suivez impérativement les instructions de
votre médecin.
Classement des résultats de mesure
• Les résultats de mesure sont classés et évalués
selon le tableau suivant.
Ces valeurs ne doivent être utilisées qu’à titre
indicatif, car la tension artérielle varie selon
les personnes, les âges, etc. Il est important de
consulter votre médecin de manière régulière.
Votre médecin vous donnera vos valeurs per-
sonnelles pour une tension artérielle normale
et la valeur à laquelle la tension artérielle est
considérée comme dangereuse.
Le classement qui s’ache ainsi que l’échelle
de l’appareil permettent d’établir la plage dans
laquelle se trouve la tension mesurée. Si les va-
leurs de systole et de diastole se trouvent dans
deuxplagesdiérentes (par ex. systole enplage «
normale haute»et diastoleen plage « normale»),
lagraduationgraphiqueindique toujourslaplage
la plus haute sur l’appareil, à savoir « normale
haute » dans le présent exemple.

ABPM-100 FR Manuel d’instructions 19 /74
EN FR NL DE SL SV
Plage des valeurs
de tension Systole
(en mmHg) Diastole (en
mmHg) Indicateur
de couleur
Niveau 3 :
forte hypertonie ≥ 180 ≥ 110 Rouge
Niveau 2 :
hypertonie
moyenne
160 – 179 100-109 Orange
Niveau 1 :
légère hypertonie 140-159 90-99 Jaune
Normale haute 130-139 85-89 Vert
Normale 120-129 80-84 Vert
Optimale <120 <80 Vert
Source : OMS, 1999 (Organisation Mondiale de la Sante)
Récupérer et supprimer
les valeurs de mesure
• Le résultat de chaque mesure réussie est enre-
gistré avec la date et l’heure. Lorsqu’il y a plus
de 30 données de mesure, la mesure la plus an-
cienne est écrasée.
•
Pouracher lerésultatde mesure,appuyezsur la
touchemémoire
(3)
.Lenombrede résultats enre
-
gistréspourl’utilisateursélectionné est aché.
• Appuyez sur la touche MARCHE/ARRÊT (2) pour
sélectionner un autre utilisateur et conrmez
avec la touche mémoire (3).
•
Ensuite, la valeur moyenne (AL)
(15)
de toutes
les valeurs mesurées enregistrées pour cet uti-
lisateur est achée.
•
S’il n’y a pas de résultat dans la mémoire de
l’utilisateur sélectionné, l’écran LCD ache « 0
»pourla tension artérielle et lamesuredu pouls.
•
Appuyezsur latouche demémoire
(3)
.A7 clignote
àl’écran.Lavaleurmoyennedesmesures mati-
nales des 7 derniers jours est achée (matin:
5h00 – 9h00).
• Appuyez sur la touche mémoire (3). P7 clignote
à l’écran. La valeur moyenne des mesures du
soir des 7 derniers jours est achée (soir :
18:00 –20:00).
• Si vous appuyez de nouveau sur la touche mé-
moire (3), la dernière mesure s’ache à l’écran.
Le symbole de troubles du rythme cardiaque
(s’il y en a) (17) et le symbole de classement des
résultats de mesures (18) clignotent.

20/ 74 ABPM-100 FR Manuel d’instruc tions
EN FR NL DE SL SV
• Si vous appuyez de nouveau sur la touche mé-
moire
(3)
, vous pouvez consulter vos mesures
individuelles.
• Pour éteindre l’appareil, appuyez sur la touche
MARCHE/ARRÊT (2).
•
Vous pouvez quitter le menu à tout moment
en appuyant sur la touche MARCHE/ARRÊT (2).
Eacer les valeurs mesurées
•
Poureacertouslesenregistrementsd’unemé-
moire utilisateur donnée, sélectionnez d’abord
une mémoire utilisateur.
•
Maintenez la touche mémoire (3) appuyée
pendant 3 secondes pour eacer les résultats.
MESSAGE D’ERREUR/
RESOLUTION DES ERREURS
Problème Cause Solution
L’écran LCD
ache un résultat
anormal.
La position de la
manchet te n'est
correcte ou elle n'est
pas bien serrée
Appliquez la man-
chette correctement
etréessayez.
La posture du corps
n'est pas correcte
pendant le test
Passez en revue les
sections «Adopter
une position
adéquate» des
instructions et
essayez à nouveau.
Mouvement du
bras ou du corps,
état d’énervement,
d’excitation ou
le fait de parler
pendant la mesure
Prenez une nouvelle
mesure en veillant
à bien respecter
les consignes de
positionnement
et d’utilisation.
La fréquence
cardiaque est
irrégulière (arythmie)
Le tensiomètre ne
convient pas pour les
personnessourant
d'arythmie grave
•
En cas d’erreur, un message d’erreur s’ache
à l’écran Er _.
•
Des messages d’erreur peuvent s’acher lorsque:
· la pression systolique ou diastolique n’a pas pu
être mesurée (ER1ou ER2 s’ache à l’écran) ;
·
la pression systolique ou diastolique se trouve
hors de la plage de mesure (« Hi » ou « Lo » s’af-
che à l’écran) ;
· la manchette est trop serrée ou trop lâche (ER3
ou ER4 s’ache à l’écran);
· la tension artérielle est supérieure à 300 mmHg
(ER5 s’ache à l’écran);
·
le gonage dure plus de 180 secondes (ER6
s’ache à l’écran);
· il existe une erreur sur le système ou l’appareil
(ER7 ou ER8 ou ERA s’ache à l’écran);
· les piles sont presque vides (21).
Alarme technique – Description
Si la tension artérielle (systolique ou diastolique)
mesurée se situe hors de l’intervalle donné dans le
paragraphe«Caractéristiquestechniques»,l’alarme
technique ache à l’écran le message «HI» ou « Lo
».Dansce cas, consultez unmédecin ouvériez que
vous utilisez correctement l‘appareil. Les valeurs
limitesdel‘alarmetechniquesontdesvaleursd‘usine
xeset nepeuventêtre ni modiées,ni désactivées.
Dans le cadre de la norme CEI 60601-1-8, ces va-
leurs limites del‘alarme ontune priorité secondaire.
L’alarmetechnique n’estpasunealarme verrouillée
et n’a pasbesoind’être réinitialisée. Le signalache
à l’écran disparait automatiquement au bout de 8
secondes environ.
ENTRETIEN ET RANGEMENT
•
Nettoyez soigneusement l’appareil et la man-
chette, uniquement à l’aide d’un chion légè-
rement humide.
• N’utilisez pas de détergent ni de solvant.
•
Ne passez jamais l’appareil ni la manchette sous
l’eau, qui pourrait s’inltrer à l’intérieurde l’ap-
pareil ou de la manchette et l’endommager.
Table of contents
Languages:
Other Lanaform Blood Pressure Monitor manuals