4
Unpack the Dispenser
1. Set shipping carton upright on the oor then cut package
banding straps and remove.
2. Open top of carton and remove interior packaging.
3. Lift carton up and o of the unit.
4. Remove plywood shipping base from unit by moving unit so
that one side is o the counter top or table allowing access
to screws on the bottom of the plywood shipping base.
Selecting/Preparing Counter Location
5. Remove accessory kit and loose parts from ice compartment.
6. If leg kit has been provided, assemble legs by tilting unit.
4. Unit may be installed directly on countertop or on legs. If
installed directly on the counter, unit must be sealed to the
countertop with an FDA approved sealant. If an icemaker is
to be mounted on top of dispenser, do not install dispenser
on legs.
5. Select a location for the remote pump deck, syrup pumps,
remote avor shot syrup pumps (if necessary), CO2tank,
s y r u p c o n t a i n e r s , a n d w a t e r l t e r ( r e c o m m e n d e d ) .
6. Using Counter Cutout Template provided, cut out required
opening for the water, syrup, and CO2lines in the designated
dispenser location.
A
I
R
O
U
T
A
I
R
O
U
T
A
I
R
I
N
A
I
R
O
U
T
A
I
R
I
N
A
I
R
O
U
T
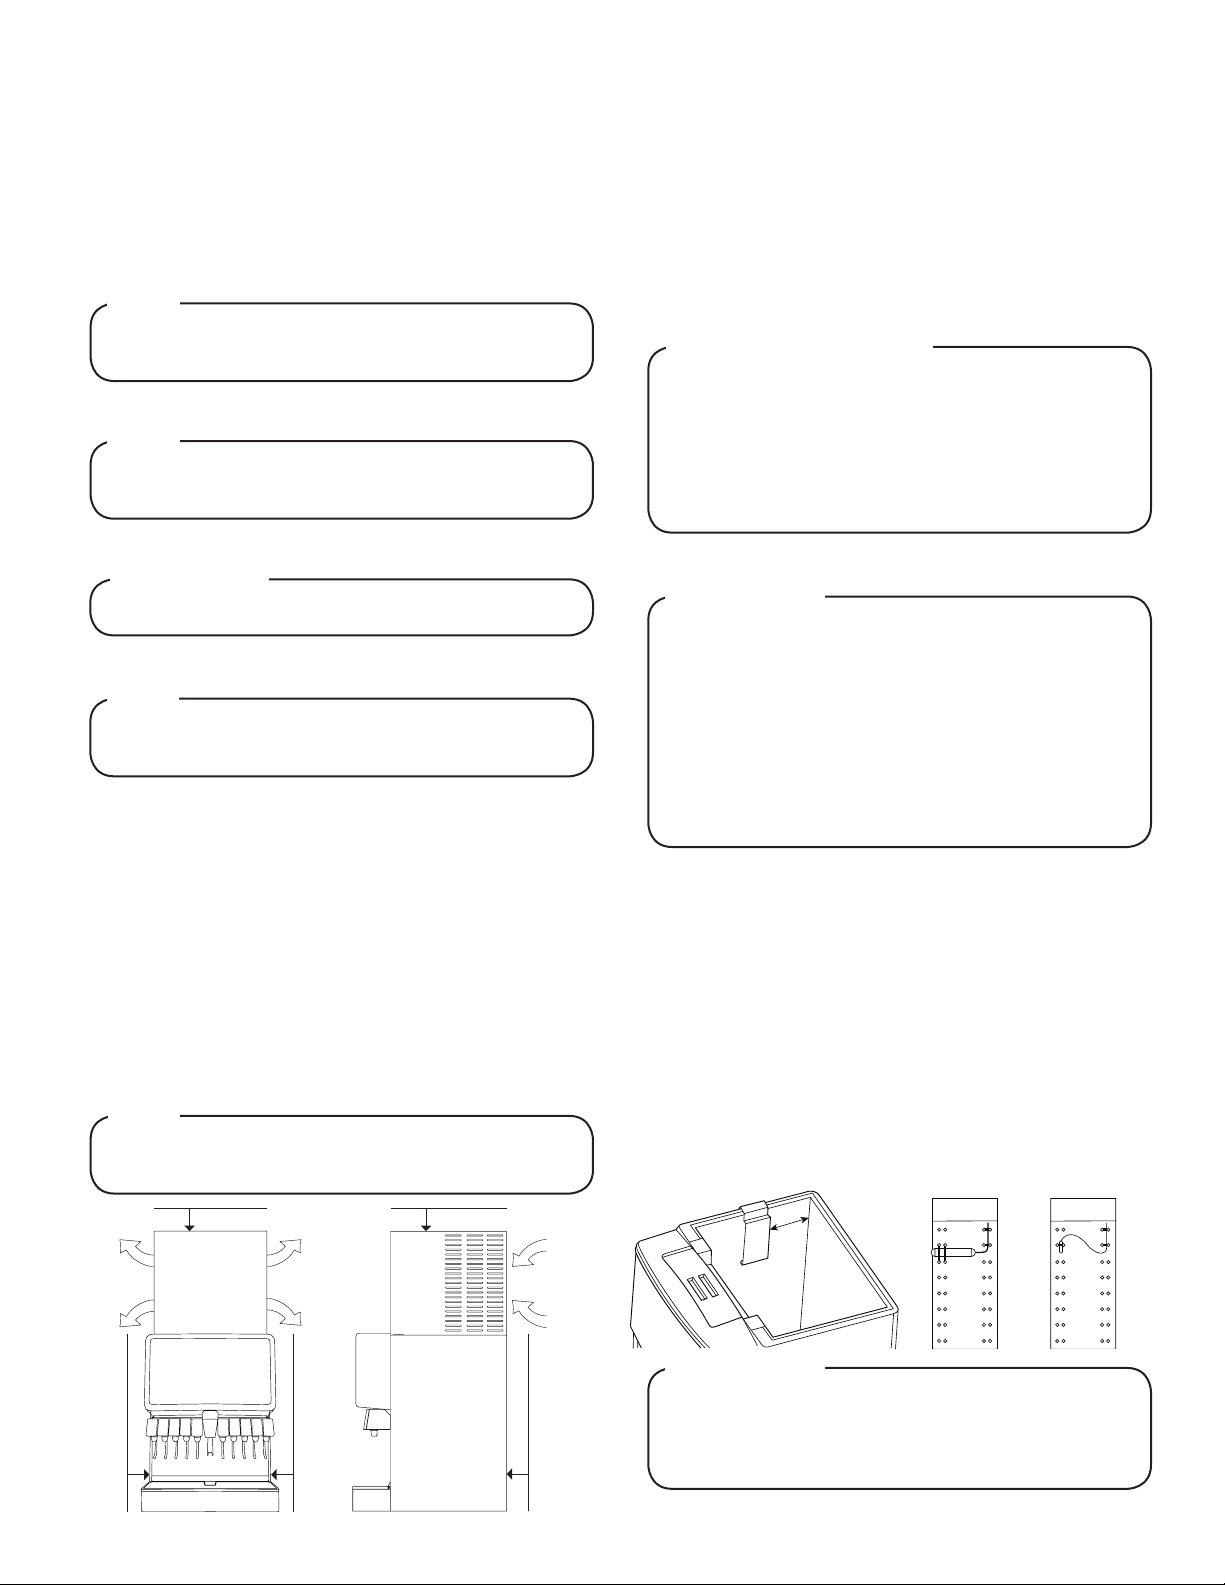
Minimum 6” (152 mm)
clearance above ice maker
6” (152 mm) clearance
6” (152 mm) clearance
6” (152 mm) clearance
DO NOT LAY UNIT ON ITS SIDE OR BACK
! ATTENTION
Ifunitistobetransported,itisadvisabletoleavethe
unitsecuredtotheplywoodshippingbase.
NOTE
Inspectunitforconcealeddamage.Ifevident,notify
deliveringcarrierandleaclaimagainstthesame.
NOTE
1. Select a level, well ventilated location that is in close
proximity to a properly grounded electrical outlet, within ve
(5) feet (1.5 m) of a drain, a water supply that meets the
requirements shown in the Specications section found on
pages 4-6, away from direct sunlight or overhead lighting,
and has sucient clearance for air circulation.
2. Sucient clearance must be provided, if an ice maker is not
installed, to allow lling ice compartment from a ve gallon
bucket (a minimum of 16 inches is recommended).
3. The selected location should be able to support the weight of
the dispenser, ice and possibly an icemaker being installed
after counter cut out is made. Total weight (with icemaker) for
this unit could exceed 800 pounds (363.6kg).
Thedispensershouldonlybeinstalledinalocation
whereitcanbeoverseenbytrainedpersonnel
NOTE
LancerdoesNOTrecommendtheuseofshavedor
akeiceinthedispenser.
NOTE
Inordertofacilitateproperdispenserdrainage,ensure
thatthedispenserislevel,fronttobackandsideto
side.Placealevelonthetopoftherearedgeofthe
dispenser.Thebubblemustsettlebetweenthelevel
lines.Repeatthisprocedurefortheremainingthree
sides.Levelunitifnecessary.Foroptimumperfor-
manceplacetheunitata0°tilt.Themaximumtiltis5°.
Leveling the Dispenser:
Installing an Icemaker (if necessary)
Wheninstallinganicemakeronthedispenser,usea
binthermostattocontroltheicelevel(seebelow).This
willpreventdamagetothedispensingmechanism.The
bracketformountingathermostatislocatedintheice
bin.Duringtheautomaticagitationcycleandwhile
dispensingice,ensurethereisadequatespacebe-
tweenthetopoftheicelevelandthebottomofthe
icemakersotheicecanmovewithoutobstruction.
Contactyouricemakermanufacturerforinformation
onasuitablebinthermostat.
! ATTENTION
1. Install the icemaker per manufacturer specications. Points
of consideration include drainage, ventilation, and drop
zones.
2. An adapter plate is required when installing an icemaker.
Contact your Sales Representative or Lancer Customer
Service for more information.
3. A bin thermostat is required in order to control the level of ice
in the dispenser (Refer to ATTENTION above). Contact your
icemaker manufacturer to obtain the correct bin thermostat.
4. Bin thermostat should be a minimum of 2” below the top
edge of the dispenser. The preferred location of the bin
thermostat is on the left side wall.
Failuretouseanicebinthermostatwillnotonlyvoid
yourIBD’swarrantybutwillresultintheinabilityto
controltheleveloficeintheicebinwhichcancause
damagetoyourdispenser.
! ATTENTION
4”
Attach Bin Stat Bracket As Shown Recommended Bin Stat Attachment
Bulb Tube