ASSEMBLY INSTRUCTIONS:
INSTRUCCIONES DE MONTAJE:
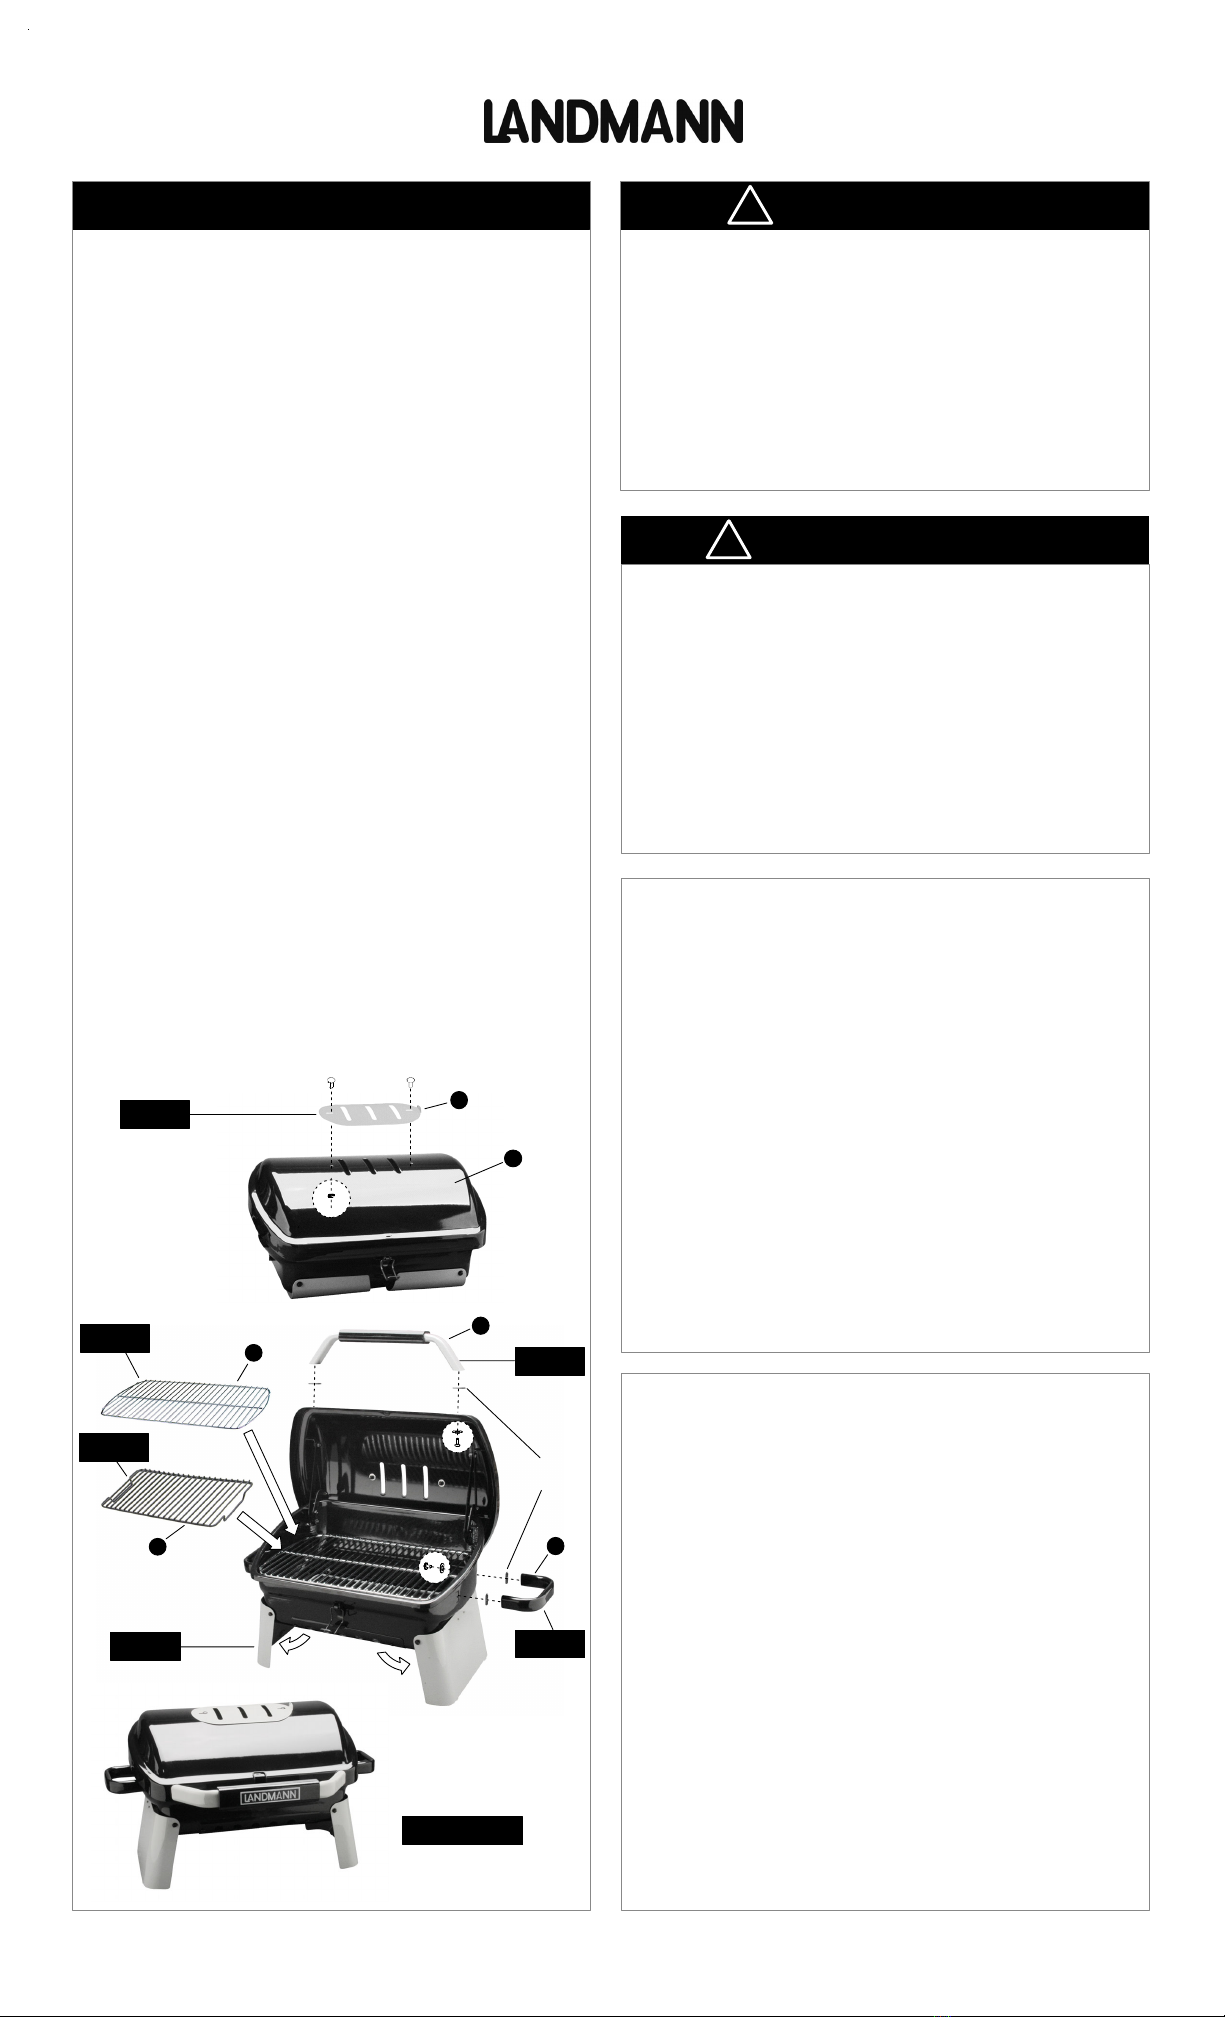
STEP 1: ATTACH TOP VENT
Unclamp the latch and open the lid. Find the top vent [B] and open
attached hardware bag that contains (2) pins and (2) opening washer.
Attach the vent to the lid inserting the pin from the top, fastening each
pin with a opening washer. See STEP 1 below.
PASO 1: FIJE EL RESPIDADERO DE LA TAPA
Abres el cierre y la tapa. Encuentre el respiradero superior [B] y abra el
paquete de la ferreteria que contiene (2) los pernos y (2) las arandelas que
se abre. Monte el respiradero a la tapa con la perna y la arandela que de se
abra. Vea el PASO 1.
STEP 3: ATTACH SIDE HANDLES
Next find the (2) side handles [C] and remove the screws, washers and
gaskets that are attached to the handles. Use these screws to attach (1)
handle to the right side and (1) to the left side of the bowl. Make sure the
gaskets are in between the handle and the bowl, and the washers are
between the head of the screw and bowl. See STEP 3 below. Tighten all
screws securely.
PASO 3: UNA LAS MANIJAS LATERALES
Después encuentre (2) las manijas [C] del lado. Quita los tornillos y las
juntas que se unen a las manijas. Utilice estos tornillos para unir (1) la
manija al derecho y (1) al lado izquierdo del tazón. Asegurandose que
las juntas estén entre la manija y el tazón. Vea la ilustración 3. Apriete
todos los tornillos con seguridad.
STEP 4, 5, 6: UNFOLD LEGS & INSTALL GRATES
Unfold the legs and make sure they are positioned like shown in
illustration below. Place the charcoal grate [E] on the bottom of the bowl
followed by the cooking grate [F]. You are now ready to cook! Please
read the operating instructions next.
PASO 4, 5, 6: DESPLEGA LAS PATAS Y MONTE LAS REJILLAS
Revele las patas y asegurandose de que están colocadas como
demostrada en la ilustración abajo. Coloque la parrilla del carbón [E] en
el fondo del tazón seguido por la parrilla de cocinar [F]. Está ahora listo
para cocinar! Lea por favor las instrucciones de operacion siguiente.
1. First determine the cooking site. The site should be away from buildings,
flammable items and vehicles. DO NOT USE on tables or decks made of
wood or flammable materials. Use only on non-flammable surfaces
including concrete, brick or stone.
2. Adjust the lid and bowl vents to wide open.
3. Open the lid and remove the cooking grate and set off to the side. Put
approximately 16-20 charcoal briquettes on the charcoal grate. Light
according to the briquette manufacturer instructions.
4. Carefully place the cooking grate back inside the grill and wait for the
charcoal to ash over. Once the charcoal has ashed over you can
begin grilling. Use caution when operating the grill. Surfaces will be hot.
5. Adjusting the air vents controls the cooking temperature, the
more open the vents, the hotter the fire.
6. To extinguish the coals, close air vents and lid.
OPERATING INSTRUCTIONS
1. Primero determine sitio para cocinar. El sitio debe estar lejos de
edificios, artículos inflamables y vehículos. No utilice mesas
hechas de materiales inflamables tales como madera, plástico, etc.
Utilice solamente en superficies que no son inflamables como en
concreto, ladrillo o piedra.
2. Abra los respiraderos de la tapa y del tazón lo más ancho posible.
3. Abra la tapa y quite la parrilla de cocinar y coloquese al lado. Ponga
aproximadamente 16-20 briquetas del carbón en la parrilla de carbón.
Enciéndase según las instrucciones del fabricante de la briquetas.
4. Coloque con cuidado la parrilla de cocinar adentro y espere que el
carbón se haga ceniza. Cuando se ha hecho ceniza usted puede
comenzar a asar a la parilla.
5. Adjustando los respiraderos controla la temperatura de la cocina, los
mas abierto los respiraderos, lo mas caliente el fuego.
6. Para apagar las briquetas cierre completamente los respiraderos y
la tapa.
!
!INSTRUCCIONES DE OPERACION
PAGE 2
CHARCOAL GOURMET PORTABLE GRILL
™
Landmann USA (“Landmann”) warrants that this product shall be free of defects
in material and workmanship to the original purchaser from the date of purchase
for the time set forth below when assembled and operated in accordance with
the instructions accompanying the product. This warranty does not cover
normal wear of parts or damage resulting from any of the following: negligence,
abuse, misuse, alteration, improper installation, improper maintenance or failure
to perform normal maintenance, or any use contrary to operating instructions.
Furthermore, Landmann does not warrant in any way the paint finish of the
product or cover, leg or vent discoloration, damage, or deterioration due to any
normal or severe weather conditions or to any chemical exposure.
This limited warranty applies to all parts for one (1) year from the date of
purchase. Landmann may require proof of purchase. Therefore, you should
retain your sales slip or receipt.
Do not return product or any parts to the store or ship to the manufacturer
without written authorization. Contact Customer Service at 1-800-3GRILLS
(1-800-347-4557) or customerservice@landmann-usa.com. Any returned
products or parts must be returned postage prepaid.
Product repair or replacement as provided under this warranty is your exclusive
remedy. Landmann shall not be liable for any incidental or consequential
damages or breach of any express or implied warranty on this product or any
part thereof, except to the extent prohibited by applicable law, any implied
warranty is limited to one year from day of purchase. Some states do not allow
the exclusion or limitation of incidental or consequential damages, or allow
limitation on how long an implied warranty lasts, therefore, the above limitation
or exclusion may not apply to you. This warranty gives you specific legal rights,
and you may also have other rights, which vary, from state to state.
1 YEAR LIMITED WARRANTY
Landmann USA ("Landmann") garantiza que este producto estará libre de
defectos en material y mano de obra para el comprador original a partir de la
fecha de la compra por el tiempo indicado abajo cuando esta montadas y la
usan de acuerdo con las instrucciones que acompaña el producto. Esta
garantía no cubre el desgaste normal de piezas o daño resultando de cualquiera
de las siguientes: negligencia, abuso, mal uso, alteración, instalación
incorrecta, falta de mantenimiento, fracaso de realizar mantenimiento normal, o
utilizando al contrario a las instrucciones de funcionamiento. Además,
Landmann no cubriráde ninguna manera el acabado de la pintura del producto,
ni cubre la descoloración, el daño, o la deterioración debido a ninguna
condiciones atmosférica normal o severa o a cualquier exposición química.
Esta garantía limitada se aplica a todas las piezas por un (1) año a partir de la
fecha de la compra. Landmann puede requerir la prueba de la compra. Por lo
tanto, usted debe conservar su recibo, hoja de venta o factura.
No devuelva el producto o ninguna piezas a la tienda o al fabricante sin la
autorización escrita. Ponganse en contacto con el servicio de cliente en
1-800-3GRILLS (1-800-347-4557) or customerservice@landmann-usa.com.
Cualquier producto o partes devueitas tienen que ser franqueo pagado por
adelantado.
El unico remedio segun la presente garantia es la reparacion o reemplazo.
Landmann no se hace responsable de cualquier daño incidental o
consecuencial causado por el incumplimiento de cualquier garantia explicita o
implicita con este producto o alguna de sus partes excepto hasta donde lo
prohiba la ley aplicable, cualquier garantia implicata de comercializacion o vida
para un proposito en particular de limita en la duracion por la vigencia de la
presente garantia. Algunos estados no permiten la exclusión o la limitación de
daños incidental o consecuencial, se limite a cuanto pueda durar una garantia,
de manera que las limitaciones o exclusiones no aplican a usted. Esta garantía
le da derecho legal, y usted puede también tener otros derechos, que varien
entre estados.
GARANTÍA LIMITADA DE 1 AÑO
STEP 2: ATTACH LID HANDLE
Find the lid handle [D] and remove the screws, washers and gaskets that
are attached to the handle. Use these screws to attach the handle to the
lid making sure the gaskets are between the handle and the lid, and the
washers are between the head of the screw and lid. See STEP 2 below.
Tighten all screws securely.
PASO 2: FIJE LA MANIJA DE LA TAPA
Encuentre la manija de la tapa [D] y quite los tornillos y las juntas que se
unen a la manija. Utilice estos tornillos para unir la manija a la tapa
asegurandose de que las juntas están entre la manija y la tapa. Vea la
ilustración 2. Apriete todos los tornillos con seguridad.
STEP 1
STEP 2
STEP 3
STEP 4
STEP 5
STEP 6
ASSEMBLED
A
B
D
F
EC
GASKETS
JUNTA
MONTADA


