manuals.online logo
Brands
  1. Home
  2. •
  3. Brands
  4. •
  5. Kongskilde
  6. •
  7. Blower
  8. •
  9. Kongskilde SupraVac 2000 Technical Document

Kongskilde SupraVac 2000 Technical Document

SupraVac 2000
Tractor powered suction blower
Mounting of Loading Equipment
Montage der Ladeausrüstung
Montage du matériel de chargement
Montaż wyposażenia załadunkowego
Montering af læsseudstyr
Manual de montaje equipo de carga
2
FR
Montage du matériel de chargement sur
SupraVac 2000
Il est important que le matériel de chargement soit
monté et ajusté tel qu’il est décrit ci-dessous. Un
ajustement incorrect peut causer des dommages
au matériel de chargement.
Placer les deux sections prémontées du matériel de
chargement au sol conformément à la gure. Utiliser
des planches pour soutenir les sections de façon à ne
pas rayer la surface du matériel de chargement
PL
Montaż wyposażenia załadunkowego na
urządzeniu SupraVac 2000
Zamontowanie i regulacja wyposażenia
załadunkowego w sposób opisany poniżej ma
istotne znaczenie. Nieprawidłowa regulacja
może spowodować uszkodzenie wyposażenia
załadunkowego.
Ułożyć oba zmontowane odcinki wyposażenia
załadunkowego na posadzce w sposób pokazany na
rysunku. Aby zabezpieczyć powierzchnie wyposażenia
załadunkowego przed zarysowaniem, podłożyć pod
nie odpowiednie płyty.
DK
Montering af læsseudstyr på SupraVac
2000
Det er vigtigt, at læsseudstyret monteres og juste-
res som angivet nedenfor. Forkert justering kan
medføre, at læsseudstyret beskadiges.
Læg de to for-monterede sektioner af læsseudstyret
på gulvet som vist. Brug nogle brædder til at under-
støtte sektionerne, så læsseudstyrets overade ikke
bliver skrammet.
ES
Manual de montaje equipo de carga de
SupraVac 2000
Es importante que el equipo se monte y se ajuste
según se describe a continuación. Un ajuste
incorrecto puede dañar el equipo.
Colocar las dos piezas en el suelo, tal como se
muestran en el dibujo adjunto. Vigilar que no se rayen
las supercies.
GB
Mounting of Loading Equipment on
SupraVac 2000
It is important that the loading equipment is
mounted and adjusted as described below. Wrong
adjustment may result in the loading equipment
being damaged.
Place the two pre-mounted sections of the loading
equipment on the oor as shown. Use some boards to
support the sections, so that the surface of the loading
equipment is not scratched.
DE
Montage der Ladeausrüstung am
SupraVac 2000
Die Ladeausrüstung muss unbedingt wie nachfol-
gend beschrieben montiert und eingestellt werden.
Eine falsche Einstellung kann zu einer Beschädig-
ung der Ladeausrüstung führen.
Legen Sie die beiden vormontierten Abschnitte der La-
deausrüstung wie dargestellt auf den Boden. Benutzen
Sie Bretter zur Unterstützung der Abschnitte, sodass
die Fläche der Ladeausrüstung nicht zerkratzt wird.
3
Monter l’axe au moyen de la goupille (C).
Si une bague d’étanchéité est montée sur la charnière,
celle-ci doit être démontée pendant que le matériel de
chargement est ajusté.
PL
Połączyć oba odcinki za pomocą sworznia (A).
Wyregulować długość trzpienia (B) na 295 mm.
Zamontować trzpień za pomocą sworznia (C).
Jeżeli w zawiasie zamontowany jest pierścień
uszczelniający, na czas regulacji wyposażenia
załadunkowego należy go zdemontować.
DK
Saml de to sektioner med splitbolten (A).
Juster spindlen (B) så længden bliver 295 mm.
Monter spindlen ved hjælp af splitbolten (C).
Hvis der er monteret en pakning ved hængslet, skal
denne pakningen afmonteres, mens læsseudstyret
justeres.
ES
Montar las dos secciones con el perno (A).
Ajustar el tensor (B), para que su longitud sea de
295mm.
Colocar el tensor en la posición (C).
Si se monta un anillo de sellado en la bisagra, este
anillo de sellado debe desmontarse mientras se ajusta
el equipo de carga.
A
B
C
B
295 mm
GB
Assemble the two sections with the pin (A).
Adjust the spindle (B), so that the length is 295 mm.
Mount the spindle by means of the pin (C).
If a sealing ring is mounted at the hinge, this sealing
ring must be dismounted, while the loading equipment
is adjusted.
DE
Fügen Sie die beiden Abschnitte mit dem Stift (A)
zusammen.
Stellen Sie die Spindel (B) ein, sodass die Länge 295
mm beträgt.
Montieren Sie die Spindel mittels Stift (C).
Wenn ein Dichtring am Scharnier montiert wird, muss
dieser während der Einstellung der Ladeausrüstung
demontiert werden.
FR
Assembler les deux sections avec la goupille (A).
Ajuster l’axe (B) de sorte que la longueur soit de 295
mm.
4
PL
Zamocować pas do podnoszenia u góry wyposażenia
załadunkowego i za pomocą dźwigu ostrożnie
umieścić wyposażenie załadunkowe na dmuchawie
ssącej. Zamocować wyposażenie załadunkowe za
pomocą śrub M8 (pamiętać o założeniu uszczelki).
Zamontować stężenie (D).
DK
Fastgør en løftestrop til toppen af læsseudstyret og løft
forsigtigt læsseudstyret på plads på sugetrykblæseren
ved hjælp af en kran. Monter læsseudstyret med M8
bolte (Husk at montere en pakning).
Monter afstivningen (D).
ES
Fijar una correa de elevación a la parte superior del
equipo y colóquelo con cuidado en el ventilador de
succión, por medio de una grúa. Sujetar con tornillos
M8 (recordar de montar una junta).
Montar el refuerzo (D).
D
GB
Fasten a lifting strap to the top of the loading equip-
ment and place the loading equipment carefully on the
suction blower by means of a crane. Mount the loading
equipment with M8 bolts (remember to mount a ga-
sket).
Mount the bracing (D).
DE
Befestigen Sie einen Hebegurt am Oberteil der La-
deausrüstung und legen Sie die Ladeausrüstung
vorsichtig mittels eines Krans auf das Ansauggebläse.
Befestigen Sie die Ladeausrüstung mit M8 Schrauben
(denken Sie hierbei daran, eine Dichtung vorzusehen).
Montieren Sie die Verstrebung (D).
FR
Serrer une sangle de levage sur la partie supérieure
du matériel de chargement et placer le matériel de
chargement avec précaution sur le ventilateur aspirant
au moyen d’une grue. Monter le matériel de charge-
ment avec des boulons M8 (ne pas oublier de monter
un joint).
Monter la jambe de force (D).
5
GB
Za pomocą siłownika hydraulicznego podnieść
wyposażenie załadunkowe tak aby zawias (E) dotarł
do ogranicznika w położeniu (F).
Wyregulować długość trzpienia (B) tak, aby osiągnąć
jedynie styk między dwiema rurami z tyłu zawiasu.
Następnie skrócić trzpień o 1/8 obrotu i dokręcić
nakrętki blokujące.
DK
Løft læsseudstyret ved hjælp af hydraulik cylinderen
indtil hængslet (E) går mod stop ved (F).
Juster længden af spindlen (B) indtil der netop er kon-
takt mellem de to rør ved bagsiden af hængslet. Skru
derefter spindlen 1/8 omgang sammen igen og spænd
kontramøtrikkerne.
ES
Elevar el equipo mediante el cilindro hidráulico hasta
la posición (E) y se ja la posición (F).
Ajustar la longitud del tensor (B) hasta que haya
contacto entre los dos tubos. Entonces acortar
el tensor 1/8 de vuelta y apretar las tuercas de
seguridad.
B
E
F
GB
Raise the loading equipment by means of the hydraulic
cylinder, until the hinge (E) catches on stop at (F).
Adjust the length of the spindle (B), until contact bet-
ween the two tubes at the back of the hinge is just
made. Then shorten the spindle 1/8 turn again and
tighten the lock nuts.
DE
Heben Sie die Ladeausrüstung mit einem Hydraulik-
zylinder an, bis das Scharnier (E) in die Arretierung (F)
greift.
Stellen Sie die Länge der Spindel (B) ein, bis der Kon-
takt zwischen den beiden Rohren und der Rückseite
des Scharniers hergestellt ist. Kürzen Sie die Spindel
nochmals um eine 1/8 Drehung und ziehen Sie die
Kontermuttern an.
FR
Soulever le matériel de chargement au moyen du vérin
hydraulique jusqu’à ce que la charnière (E) atteigne la
butée à (F).
Régler la longueur de l’axe (B) jusqu’à ce qu’un
contact entre les deux tubes à l’arrière de la charnière
soit établi. Raccourcir ensuite l’axe sur 1/8 de tour et
serrer les écrous de xation.
6
GB
Lower the loading equipment by means of the hydrau-
lic cylinder, until it is almost in the bottom position (it
must not catch on stop). Mount the cyclone on the loa-
ding equipment, so that the outlet of the cyclone points
downwards, when the loading equipment is lifted into
loading position. Tighten the bolts only slightly.
Raise the loading equipment by means of the hydrau-
lic cylinder and adjust then the cyclone in the slotted
holes, so that the outlet is vertical. Then fasten the
cyclone.
DE
Senken Sie die Ladeausrüstung über den Hydraulik-
zylinder ab, bis sie fast die untere Position erreicht
(sie darf nicht in den Anschlag greifen). Sehen Sie den
Zyklon an der Ladeausrüstung vor, sodass der Zyklo-
nausgang nach unten zeigt, wenn die Ladeausrüstung
in die Ladeposition gehoben wird. Ziehen Sie die
Schrauben nur leicht an.
Heben Sie die Ladeausrüstung mittels des Hydrau-
likzylinders an und richten Sie jetzt den Zyklon in den
Langlöchern aus, sodass der Auslass in vertikaler
Position ist. Befestigen Sie jetzt den Zyklon.
FR
Abaisser le matériel de chargement au moyen du vérin
hydraulique jusqu’à ce qu’il se situe quasiment dans
la position inférieure (il ne doit pas atteindre la butée).
Monter le cyclone sur le matériel de chargement de
sorte que la sortie du cyclone soit dirigée vers le bas
lorsque le matériel de chargement est élevé dans la
position de chargement. Serrer les écrous uniquement
légèrement.
Soulever le matériel de chargement au moyen du
vérin hydraulique, puis ajuster le cyclone dans les
trous oblongs de sorte que la sortie soit verticale. Puis,
serrer le cyclone.
7
PL
Za pomocą siłownika hydraulicznego opuścić
wyposażenie załadunkowe do położenia prawie
całkowicie obniżonego (nie może się oprzeć na ograni-
czniku). Zamontować na wyposażeniu załadunkowym
separator cyklonowy tak, aby po podniesieniu
wyposażenia załadunkowego do położenia załadunku,
wylot separatora cyklonowego był skierowany w dół.
Lekko dokręcić śruby.
Za pomocą siłownika hydraulicznego podnieść
wyposażenie załadunkowe i wyregulować separator
cyklonowy w podłużnych otworach tak, aby wylot był
ustawiony pionowo. Następnie dokręcić separator
cyklonowy.
DK
Sænk læsseudstyret ved hjælp af hydraulikcylinderen
så det næsten er i nederst position (det må ikke gå
mod stop). Monter cyklonen på læsseudstyret således
at afgangen på cyklonen kommer til at pege nedad,
når læsseudstyret løftes op i læsseposition. Spænd
kun boltene løst til.
Hæv læsseudstyret ved hjælp at hydraulilcylinderen
og juster derefter cyklonen i langhullerne, så afgangen
bliver lodret. Spænd derefter cyklonen fast.
ES
Bajar el equipo a través del cilindro hidráulico, hasta
que casi esté en la posición inferior (no debe ponerse
en parada). Montar el ciclón en el equipo, de modo
que la salida del ciclón mire hacia abajo, cuando el
equipo se levanta en posición de carga. Apretar los
tornillos ligeramente.
Elevar el equipo mediante el cilindro hidráulico y
ajustar entonces el ciclón en la ranura, de modo que la
salida es vertical. A continuación, jar el ciclón.
8
FR
Monter le support (G) pour le cyclone sur le cadre du
ventilateur aspirant. Serrer les boulons uniquement
légèrement. Abaisser avec précaution le matériel de
chargement jusqu’à ce que la goupille de guidage soit
sur le point d’être en prise avec le support.
Ajuster le support dans les fentes de sorte que la hau-
teur corresponde à la goupille de guidage prévue sur
le cyclone. Puis, serrer le support.
Abaisser entièrement le matériel de chargement avec
le vérin hydraulique de sorte que le cyclone soit arrêté
dans le support se trouvant sur le cadre.
PL
Zamontować podpórkę (G) separatora cyklonowego
na ramie dmuchawy ssącej. Lekko dokręcić śruby.
Ostrożnie opuścić wyposażenie załadunkowe do
momentu, aż sworzeń prowadzący na separatorze
cyklonowym znajdzie się w miejscu wprowadzenia do
podpórki.
Wyregulować podpórkę w szczelinach tak, aby jego
wysokość pasowała do sworznia prowadzącego na se-
paratorze cyklonowym. Następnie dokręcić podpórkę.
Za pomocą siłownika hydraulicznego całkowicie
opuścić wyposażenie załadunkowe tak, aby separator
cyklonowy oparł się o podpórkę na ramie.
DK
Monter støttebeslaget (G) for cyklonen på sugetryk-
blæserens ramme. Spænd kun boltene løst til. Sænk
forsigtigt læsseudstyret ved hjælp af hydraulik cylin-
deren indtil styretappen på cyklonen er lige ved at gå i
indgreb med støttebeslaget.
Juster støttebeslaget i langhullerne så højden passer
med styretappen på cyklonen Spænd derefter støtte-
beslaget fast.
Sænk læsseudstyret helt ned ved hjælp af hydraulik
cylinderen så styretappen på cyklonen går i indgreb
med støttebeslaget.
ES
Montar el soporte de apoyo (G) para el ciclón, en el
chasis del soplador. Apretar los tornillos ligeramente.
Bajar con cuidado el equipo, hasta que el pasador de
guía en el ciclón esté engranado con el soporte de
apoyo.
Ajustar el soporte de apoyo en las ranuras, de modo
que la altura se ajusta al perno de guía del ciclón. A
continuación, jar el soporte de apoyo.
Bajar completamente el equipo mediante el cilindro
hidráulico, de modo que el ciclón esté colocado en el
soporte de apoyo del chasis.
G
GB
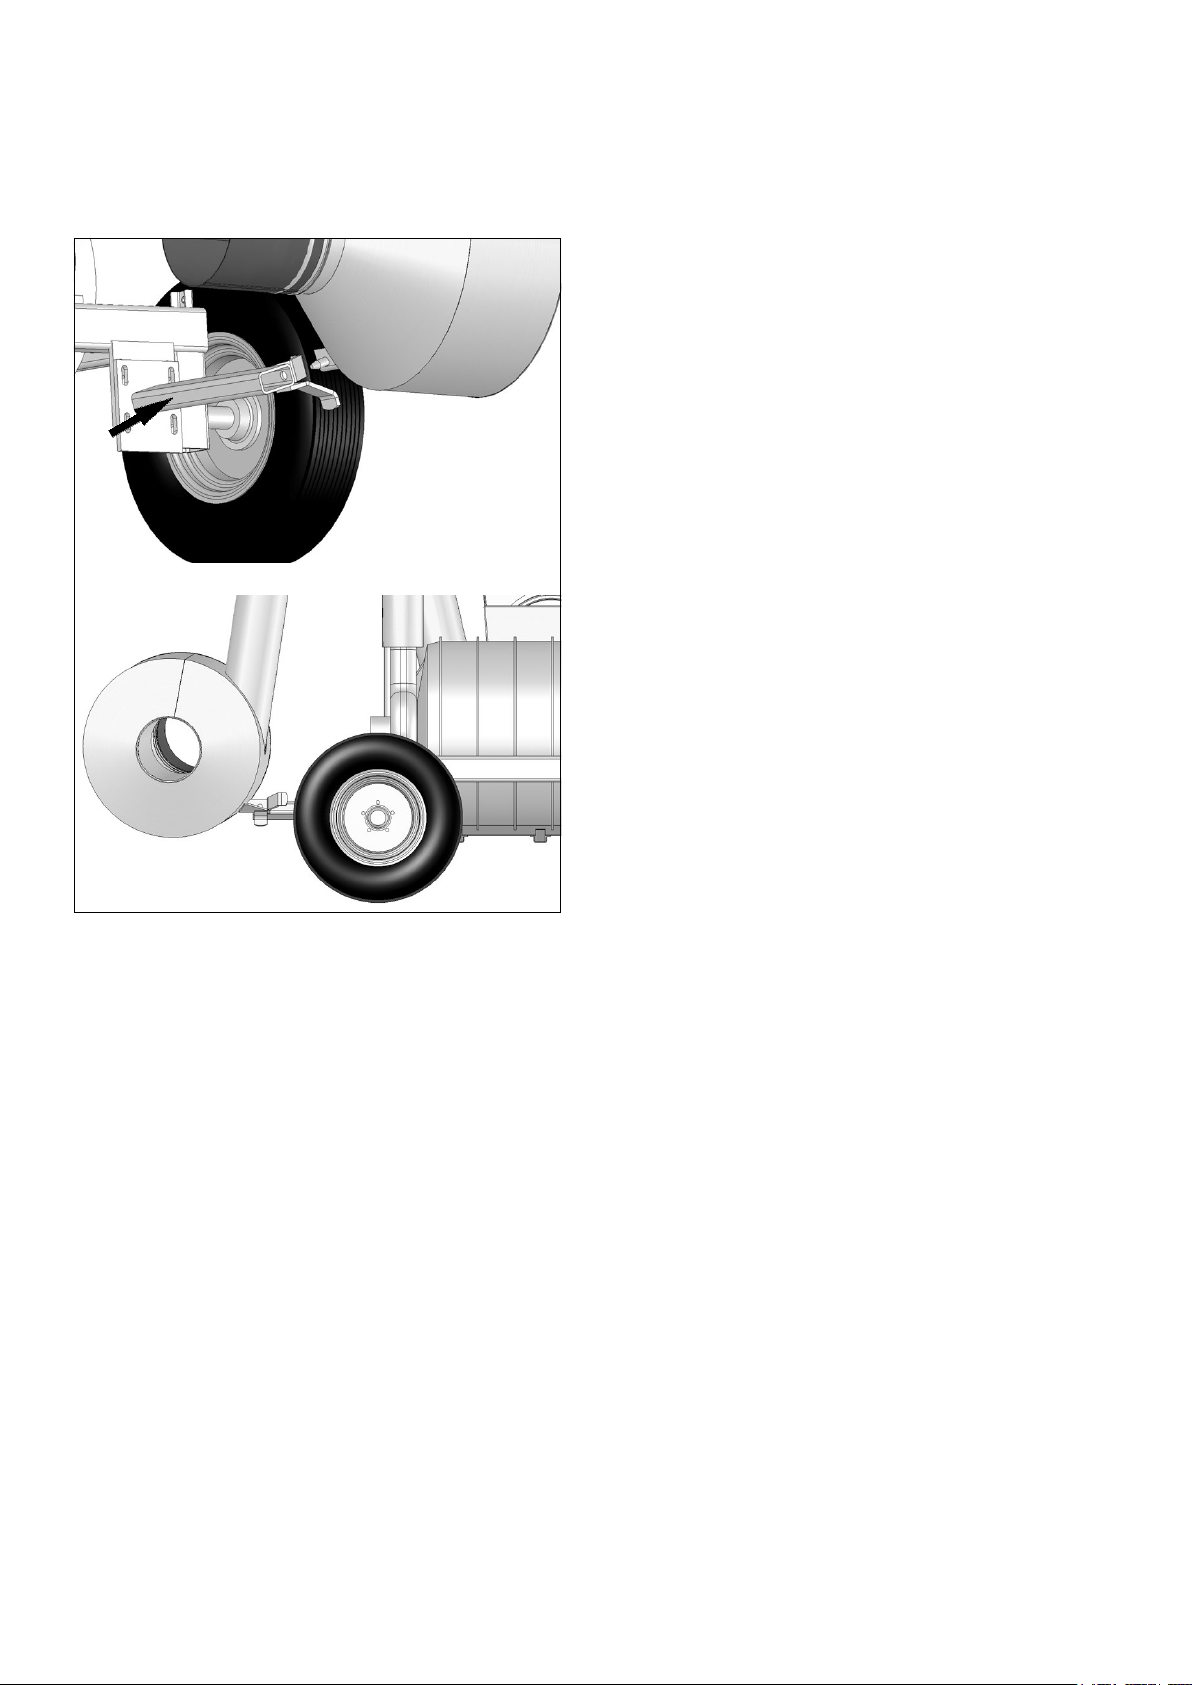
Mount the support bracket (G) for the cyclone on the
frame of the suction blower. Fasten the bolts only
slightly. Carefully lower the loading equipment, until
the guide pin on the cyclone is on the point of being in
gear with the support bracket.
Adjust the support bracket in the slots, so that the
height ts the guide pin on the cyclone. Then fasten
the support bracket.
Lower the loading equipment completely with the hy-
draulic cylinder, so that the cyclone is parked in the
support bracket on the frame.
DE
Befestigen Sie den Stützträger (G) für den Zyklon am
Rahmen des Ansauggebläses. Ziehen Sie die Schrau-
ben nur leicht an. Senken Sie die Ladeausrüstung
vorsichtig ab, bis der Führungsstift am Zyklon in den
Träger greift.
Richten Sie den Träger in den Schlitzen so aus, dass
die Höhe mit dem Führungsstift am Zyklon übereins-
timmt. Befestigen Sie jetzt den Träger.
Senken Sie die Ladeausrüstung vollständig mit dem
Hydraulikzylinder ab, sodass der Zyklon auf dem Trä-
ger am Rahmen liegt.
9
J
H
K
GB
Mount the throttle (H) on the loading equipment with
the pins (J) and (K).
DE
Befestigen Sie die Klappe (H) an der Ladeausrüstung
mit den Stiften (J) und (K).
FR
Monter l’obturateur (H) sur le matériel de chargement
avec les goupilles (J) et (K).
PL
Za pomocą sworzni (J) i (K) zamontować przepustnicę
(H) na wyposażeniu załadunkowym.
DK
Monter spjældet (H) på læseudstyret med splitboltene
(J) og (K).
ES
Montar la tapa (H) en las posiciones (J) y (K).
10
PL
Poluzować śruby (L) i (M) w górnej części przepust-
nicy. Wyśrodkować przepustnicę względem rury i
dokręcić śruby (M). Wyregulować przepustnicę w
podłużnych otworach tak, aby stykała się z rurą na
całym obwodzie. Dokręcić śruby (L), równocześnie
podnosząc ręką zawias do położenia (N).
DK
Løsn skruerne (L) og skruerne (M) i toppen af låget.
Juster spjældet således at det er centreret i forhold til
røret og fastspænd skruerne (M) igen. Juster spjældet
i langhullerne så spjældet har kontakt med røret på
hele omkredsen. Fastspænd nu skruer (L) samtidig
med at der med hånden løftes opad i hængslet ved
position (N).
ES
Aojar los tornillos (L) y (M) de la parte posterior de la
tapa. Ajustar la tapa de manera que esté centrada y
apriete los tornillos (M) de nuevo.
Ajustar la tapa en las ranuras, de modo que esté
completamente en contacto con el tubo, en toda la
circunferencia. Ahora apretar los tornillos (L), al mismo
tiempo que se levanta manualmente la tapa (N).
L
Pos. N
M
GB
Loosen the screws (L) and the screws (M) at the top
of the throttle. Adjust the throttle so that it is centred
compared to the tube and fasten the screws (M) again.
Adjust the throttle in the slotted holes, so that the
throttle is fully in contact with the tube at the whole
circumference. Now fasten the screws (L) at the same
time as the hinge is lifted upwards at the position (N)
by the hand.
DE
Lösen Sie die Schrauben (L) und (M) am Oberteil der
Klappe. Richten Sie die Klappe so aus, dass sie mittig
zum Rohr ist und ziehen Sie die Schrauben (M) wieder
an. Richten Sie die Klappe in den Langschlitzen so
aus, dass diese vollständig auf dem gesamten Umfang
des Rohrs auiegt. Ziehen Sie jetzt die Schrauben (L)
an und heben Sie gleichzeitig das Scharnier manuell in
die Position (N).
FR
Desserrer les vis (L) et les vis (M) situées en haut
de l’obturateur. Ajuster l’obturateur de sorte qu’il soit
centré par rapport au tube et serrer à nouveau les
vis (M). Ajuster l’obturateur dans les trous oblongs de
sorte que l’obturateur soit entièrement en contact avec
le tube sur toute la circonférence. Serrer maintenant
les vis (L) en même temps que la charnière est élevée
sur la position (N) par la main.
11
O
GB
Raise the loading equipment half upwards with the
hydraulic cylinder and mount the sealing ring (O) at the
hinge.
DE
Heben Sie die Ladeausrüstung mit dem Hydraulikzy-
linder halb hoch und befestigen Sie den Dichtungsring
(O) am Scharnier
FR
Soulever le matériel de chargement à moitié vers le
haut avec le vérin hydraulique et monter la bague
d’étanchéité (0) sur la charnière.
PL
Za pomocą siłownika hydraulicznego podnieść
wyposażenie załadunkowe do połowy i zamontować
pierścień uszczelniający (O) w zawiasie.
DK
Løft læsseudstyret halvt op ved hjælp af hydraulik
cylinderen og monter pakningen (O) ved hængslet.
ES
Elevar el equipo hacia arriba con el cilindro hidráulico
y montar el anillo de cierre (O) en la tapa.
12
GB
Lower the loading equipment with the hydraulic cylin-
der, so that the cyclone is parked in the support brack-
et on the frame.
DE
Senken Sie die Ladeausrüstung mit dem Hydraulikzy-
linder ab, sodass der Zyklon auf dem Träger am Rah-
men liegt.
FR
Puis, abaisser le matériel de chargement avec le vérin
hydraulique de sorte que le cyclone soit arrêté dans le
support se trouvant sur le cadre.
PL
Następnie za pomocą siłownika hydraulicznego
opuścić wyposażenie załadunkowe tak, aby separator
cyklonowy oparł się o podpórkę na ramie.
DK
Sænk derefter læsseudstyret ved hjælp af hydraulik
cylinderen, så cyklonen er parkeret i støttebeslaget på
stativet.
ES
A continuación, bajar el equipo mediante el cilindro
hidráulico, de manera que el ciclón esté apoyado en el
chasis.
13
14
15
Kongskilde Industries A/S
Skælskørvej 64
DK - 4180 Sorø
Tel. +45 72 17 60 00
[email protected]om
www.kongskilde-industries.com
www.kongskilde-grain.com
121 165 454 You can always nd the latest version of the manuals at 18.03.2021
www.kongskilde-grain.com

Other manuals for SupraVac 2000

1

Other Kongskilde Blower manuals

Kongskilde MULTIAIR FC 1000 User manual

Kongskilde

Kongskilde MULTIAIR FC 1000 User manual

Kongskilde MultiAir MA FCE 3000 User manual

Kongskilde

Kongskilde MultiAir MA FCE 3000 User manual

Kongskilde MULTIAIR 1000 Manual

Kongskilde

Kongskilde MULTIAIR 1000 Manual

Kongskilde SupraVac 2000 User manual

Kongskilde

Kongskilde SupraVac 2000 User manual

Kongskilde TRL 20 User manual

Kongskilde

Kongskilde TRL 20 User manual

Kongskilde SUC E Series Manual

Kongskilde

Kongskilde SUC E Series Manual

Kongskilde SUC 500E User manual

Kongskilde

Kongskilde SUC 500E User manual

Kongskilde MULTIAIR FC 1000 User manual

Kongskilde

Kongskilde MULTIAIR FC 1000 User manual

Kongskilde MULTIAIR FC 3000 User manual

Kongskilde

Kongskilde MULTIAIR FC 3000 User manual

Kongskilde TRL 600 User manual

Kongskilde

Kongskilde TRL 600 User manual

Kongskilde FRL 10 User manual

Kongskilde

Kongskilde FRL 10 User manual

Kongskilde MULTIAIR FC 4000 User manual

Kongskilde

Kongskilde MULTIAIR FC 4000 User manual

Kongskilde TRL Series Manual

Kongskilde

Kongskilde TRL Series Manual

Kongskilde SUC 300T User manual

Kongskilde

Kongskilde SUC 300T User manual

Kongskilde MULTIAIR 2000 User manual

Kongskilde

Kongskilde MULTIAIR 2000 User manual

Kongskilde SUC T 300 User manual

Kongskilde

Kongskilde SUC T 300 User manual

Kongskilde MultiAir MA FCE 3000 User manual

Kongskilde

Kongskilde MultiAir MA FCE 3000 User manual

Kongskilde MultiAir FC 2000 User manual

Kongskilde

Kongskilde MultiAir FC 2000 User manual

Kongskilde MULTIAIR FCE Technical specifications

Kongskilde

Kongskilde MULTIAIR FCE Technical specifications

Kongskilde SUC 1000 TR User manual

Kongskilde

Kongskilde SUC 1000 TR User manual

Kongskilde SUC 700T User manual

Kongskilde

Kongskilde SUC 700T User manual

Kongskilde Multiair 3000 User manual

Kongskilde

Kongskilde Multiair 3000 User manual

Kongskilde SUC-E 100 User manual

Kongskilde

Kongskilde SUC-E 100 User manual

Kongskilde MULTIAIR FC 1000 User manual

Kongskilde

Kongskilde MULTIAIR FC 1000 User manual

Popular Blower manuals by other brands

Elem Garden Technic ASB3000-16 Original instructions

Elem Garden Technic

Elem Garden Technic ASB3000-16 Original instructions

Echo PB-265LN Operator's manual

Echo

Echo PB-265LN Operator's manual

Tuthill TI850 INSTALLATION OPERATION MAINTENANCE REPAIR MANUAL

Tuthill

Tuthill TI850 INSTALLATION OPERATION MAINTENANCE REPAIR MANUAL

Mantis 3559 Operator's manual

Mantis

Mantis 3559 Operator's manual

Hitachi RB 24EAP Handling instructions

Hitachi

Hitachi RB 24EAP Handling instructions

Makita DUB184RF instruction manual

Makita

Makita DUB184RF instruction manual

Nilfisk-Advance Captor 4300 Instructions for use

Nilfisk-Advance

Nilfisk-Advance Captor 4300 Instructions for use

Black & Decker GWC1800L-XE Original instructions

Black & Decker

Black & Decker GWC1800L-XE Original instructions

Scarab M65T Operating and Basic Maintenance Instructions

Scarab

Scarab M65T Operating and Basic Maintenance Instructions

ST. SpA AB 500 Li 48 Operator's manual

ST. SpA

ST. SpA AB 500 Li 48 Operator's manual

FRADAN Magnum Series Operator's manual

FRADAN

FRADAN Magnum Series Operator's manual

Gardner Denver 8000 Series Operating and service manual

Gardner Denver

Gardner Denver 8000 Series Operating and service manual

GMC ST1800 instruction manual

GMC

GMC ST1800 instruction manual

Toro Flex-Force Power System 51820T Operator's manual

Toro

Toro Flex-Force Power System 51820T Operator's manual

Champion Power Equipment 200934 Operator's manual

Champion Power Equipment

Champion Power Equipment 200934 Operator's manual

DeWalt DCMBA572X1 Original instructions

DeWalt

DeWalt DCMBA572X1 Original instructions

Flymo SCIROCCO 2200 Original instructions

Flymo

Flymo SCIROCCO 2200 Original instructions

Solo Port 423 instruction manual

Solo

Solo Port 423 instruction manual

manuals.online logo
manuals.online logoBrands
  • About & Mission
  • Contact us
  • Privacy Policy
  • Terms and Conditions

Copyright 2025 Manuals.Online. All Rights Reserved.