Lee Precision Six Pack Progressive User manual

Ammunition reloading can be dangerous if done improperly and
can result in serious injury or death.
· Reloading should not be attempted by persons not willing and
able to read and follow instructions exactly.
· Children should not be permitted to reload ammunition without
strict parental supervision.
· Always wear safety glasses and hearing protection when
reloading and shooting.
· Ammunition loaded with these tools and data should only be
used in modern guns in good condition.
· We do not accept responsibility for ammunition loaded with
these tools or data as we have no control over the manufacture
and storage of components or the loading procedure and
techniques.
· Primers and gun powders, like gasoline and matches, can be
dangerous if improperly handled or misused.
BP5099
1
Six Pack Progressive | Six Pack Pro Kit
INSTRUCTIONS
DANGER
CAUTION
CASE FEED SPRING
# PR2118
LEE PRECISION, INC.
4275 Hwy. U · Hartford WI 53027
www.leeprecision.com
Kits includes new Breech
Lock Die Set. Utilizes an
integrated o-ring to keep
dies firmly in place, yet
remain finger adjustable.
Color coded for easy
identification. The best
value for Lee Breech
Lock press owners.
Breech Lock Die Set
KIT SHOWN
SLIDER BLOCK
#90479
FOLDING PRIMER TRAY
1 included
#90606 (2 pack)
PRIMER TROUGH & SLIDER
#BP5079
PRIMER
GUIDES
INDEX ROD
#BP5087
CASE EJECTOR
#BP5086
BRACKET
#BP5086
CONNECTING LINK (2)
#BP2888
⁄-20 NUT
#FM1371
LINK PIN
#BP3000
TOGGLE (2)
#BP2774
SPACER
#BP1427
LEVER SLEEVE 10°
#BP5090
LEVER CLAMP 10°
#BP5101
PRIMER COLLECTION TUBE
#BP3064
CAP FOR COLLECTION TUBE
#BP3127
(NOT PICTURED)
Auto-Drum
Powder Measure
# 90811
Universal Case Feeder
# 90242
Bin
# 90687
Die wrench included
Works on
spline drive
breech lock
bushings
and lock
rings.
LUBRICATION
POINTS
use STP
™
motor oil
treatment or motor
oil on link pins and
ram
PRIMER FEED SPRING
# PR5343
RAM
BASE
#91980
Small
#91981
Large

2
12
Mount your press. The most convenient way to mount your
press is with our Lee Bench Plate System # 90251 or Lee
Reloading Stand #90688 . This system includes all of
the mounting hardware and allows for quick press removal
without unbolting from bench. Or, purchase (qty. 3) ¼” bolts
and nuts and prepare your workbench for use with this press.
# 90251 Bench Plate
# 90688 Reloading Stand
SAFETY CONSIDERATIONS
•Be sure of proper powder and charge for
bullet weight selected.
•Wear safety glasses and hearing protection
when reloading or shooting.
•Be extremely careful to avoid a double
charge. If in doubt, empty the case and
recycle it.
•Do not permit distractions while loading.
This is a complex machine that needs
your fullest attention.
SMOOTH OPERATING TIPS
•Always move the lever smoothly in complete
strokes. An interrupted stroke can cause
a jam or double charge.
•Do not force it or you will break something. If
it does not feel right, stop and check out
the problem.
•Oil ram using STP™ motor oil treatment.
Using any oil, lubricate link bolts every
few thousand rounds.
SETUP TOOLS REQUIRED
•Safety glasses & ear protection
•⁄ inch allen wrench (included)
•Lock ring wrench (included)
Slide the primer collection tube assembly onto bottom of
the ram.
3
PRIMER FEED SETUP
Primer feed spring comes installed on the
tool head. Confirm that the open end of the
hook is facing you.
C
Select proper primer guide and connect to the
primer slider with the L or S face down. Insert
primer slider and guide assembly into the end of
the trough. Slide the slider assembly up to the
shell plate.
Raise the carrier to the top of the stroke.
Take the primer feed spring and manipulate
it to align the hook onto the primer slider.
After installation is completed cycle the press
to assure free in/out travel. These steps can be
reversed for changing the primer guide.
*IMPORTANT* Do not operate primer feed without a small or large primer guide installed into slider. Doing so will cause damage to your primer slider.
Install face down
Primer Guide
91981 Large
Primer Guide
91980 Small
*Note* Small guide has a
dimple on attach boss.
AB
DE
Important!
Do not operate without a small or large
primer guide intalled into slider.
*Note* Small guide has a
dimple on attach boss.

3
5
INSTALL SHELL PLATE
4
BC
Remove case ejector
EF
D
Raise carrier ¾ of the way up. Install
shell plate, spin on clockwise.
Lower carrier to bottom of the stroke
(handle up). With 1/4 inch hex key, rotate
key clockwise to loosen.
Lightly tighten with 1/4 inch hex
key, hold shell plate and rotate
key counterclockwise
Remove Breech Lock Bushing
Die from station 4 to access the
index rod.
Lower carrier to bottom of
the stroke then raise slightly
remove index rod.
Installing or changing shell plate. See top of page 5 for listing.
Push in the 5 case retainers to touch the shell plate. At any time if you need to remove the case,
simply slide out of the shell plate. Be sure to reset the case retainers.
Lower the lever, drop case into the case feed hole port in front
of the slider block and raise lever to insert case into shell plate.
Lower the lever and the case is raised into the sizing die position.
Lift the lever, the case will advance to the priming station and
primer will be seated at the carrier’s bottom of the stroke. Lower
the lever, the case will be in station #2, the powder charging and
pistol expanding station. Raise and lower the lever to advance
shell plate.
Important Whenever the normal reloading sequence is interrupted, the most important hazard to guard
against is a double charge. It is always best to completely remove the oending case. With carrier at mid-
stroke position, push on the shell plate to rotate clockwise or counterclockwise to remove oending case.
Cycle the lever up and down to confirm the shell plate is advancing correctly.
Set case retainers & dry run (no primers, powder or bullets)
A

4
Position 5 or 6
May be used for bullet seating. If you are seating and crimping
in one operation, use position 6 as it gives you easy access to
manually place the bullet. If you are Factory crimping, this die
will always be installed in postion 6.
Rifle Easy Adjust
Dead Length Bullet
Seating Die
Adjusting
Screw
Rifle Collet Factory
Crimp Die
Position 4
Works well with a
powder check die or
inline bullet feed die
Handgun Bullet
Seating Die
Adjusting
Screw
Adjusting
Screw
Pistol Carbide Factory
Crimp Die
TOOL HEAD POSITION & INITIAL SETUP
Position 5 or 6 = Bullet Seating Die
Position 4 = Accessory
Position 6 = Factory Crimp Die
We suggest Lee dies as they use a powder through expanding die to conveniently charge your brass while expanding the
case mouth. Lock rings are not required when utilizing the spline drive breech lock bushing.
Follow the reloading die instructions for the type and brand of dies you have selected.
The only instructions special to the Six Pack are highlighted here.
How to install Breech Lock Bushings
Drop the breech lock bushing into the press frame, and rotate the
bushing 1/6 of a turn clockwise finger tight. Remove by rotation
1/6 turn counterclockwise and lifting from the frame. To prevent
die movement, install and remove by grasping the spline on the
bushing. A handy die wrench is included.
6

5
This die may come with a silver Breech Lock Bushing installed.
(A) Install appropriate die and bushing onto Auto Drum powder measure.
(B) Insert assembly into position 2.
(C) Position a case under position 2 and raise to top of its stroke (hold
lever down).
(D) Rotate entire powder measure and die inward until the top of stroke
indicator nears the top of the slot in the casting.
Dispense position
Note: slider drop
tube should not
make contact with
top of slot
Position 3
This is an excellent positon for the optional Lee
Universal Expanding die when loading bottleneck
rifle cartridges.
Universal Case Expanding
Die # 90798
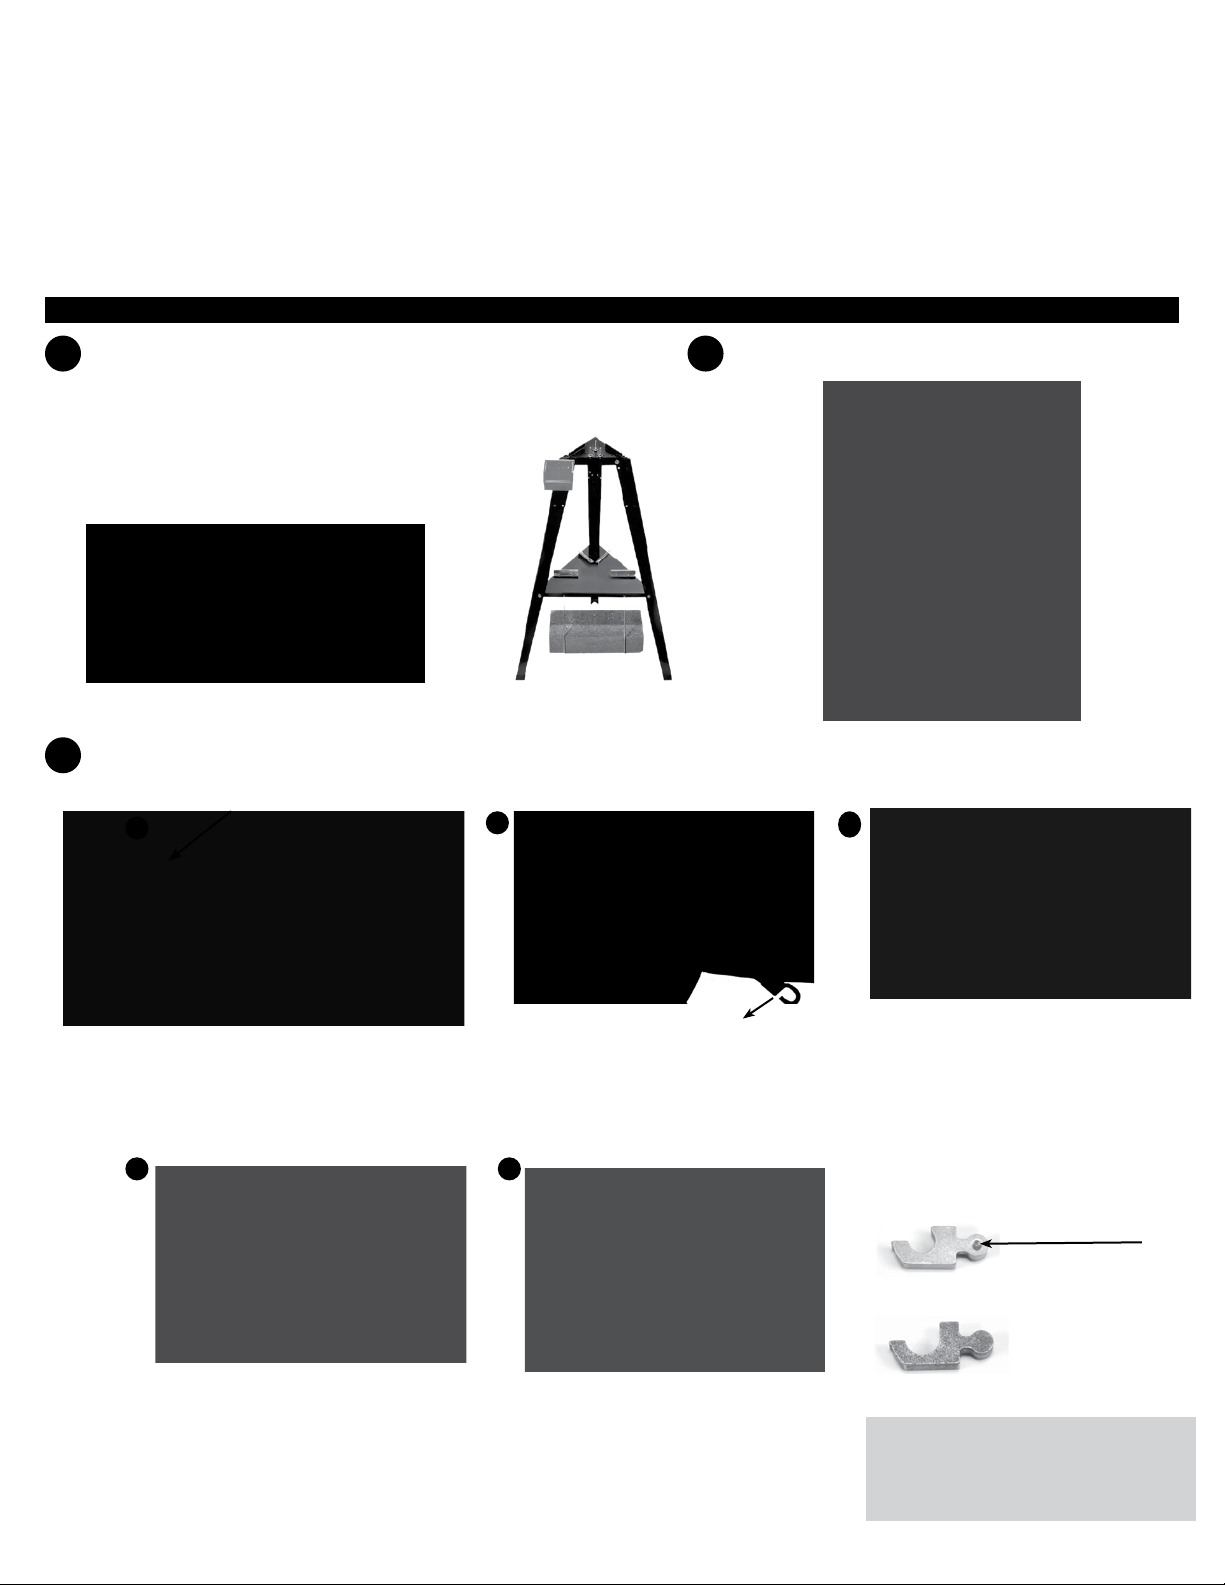
Position 2 = Powder Through Expanding Die or Rifle Charging Die
Position 3 = Universal Case Expanding Die
Position 1 = Full Length Sizer Die
sizing & depriming must be done in this station
Position 4 = Accessory
priming
position
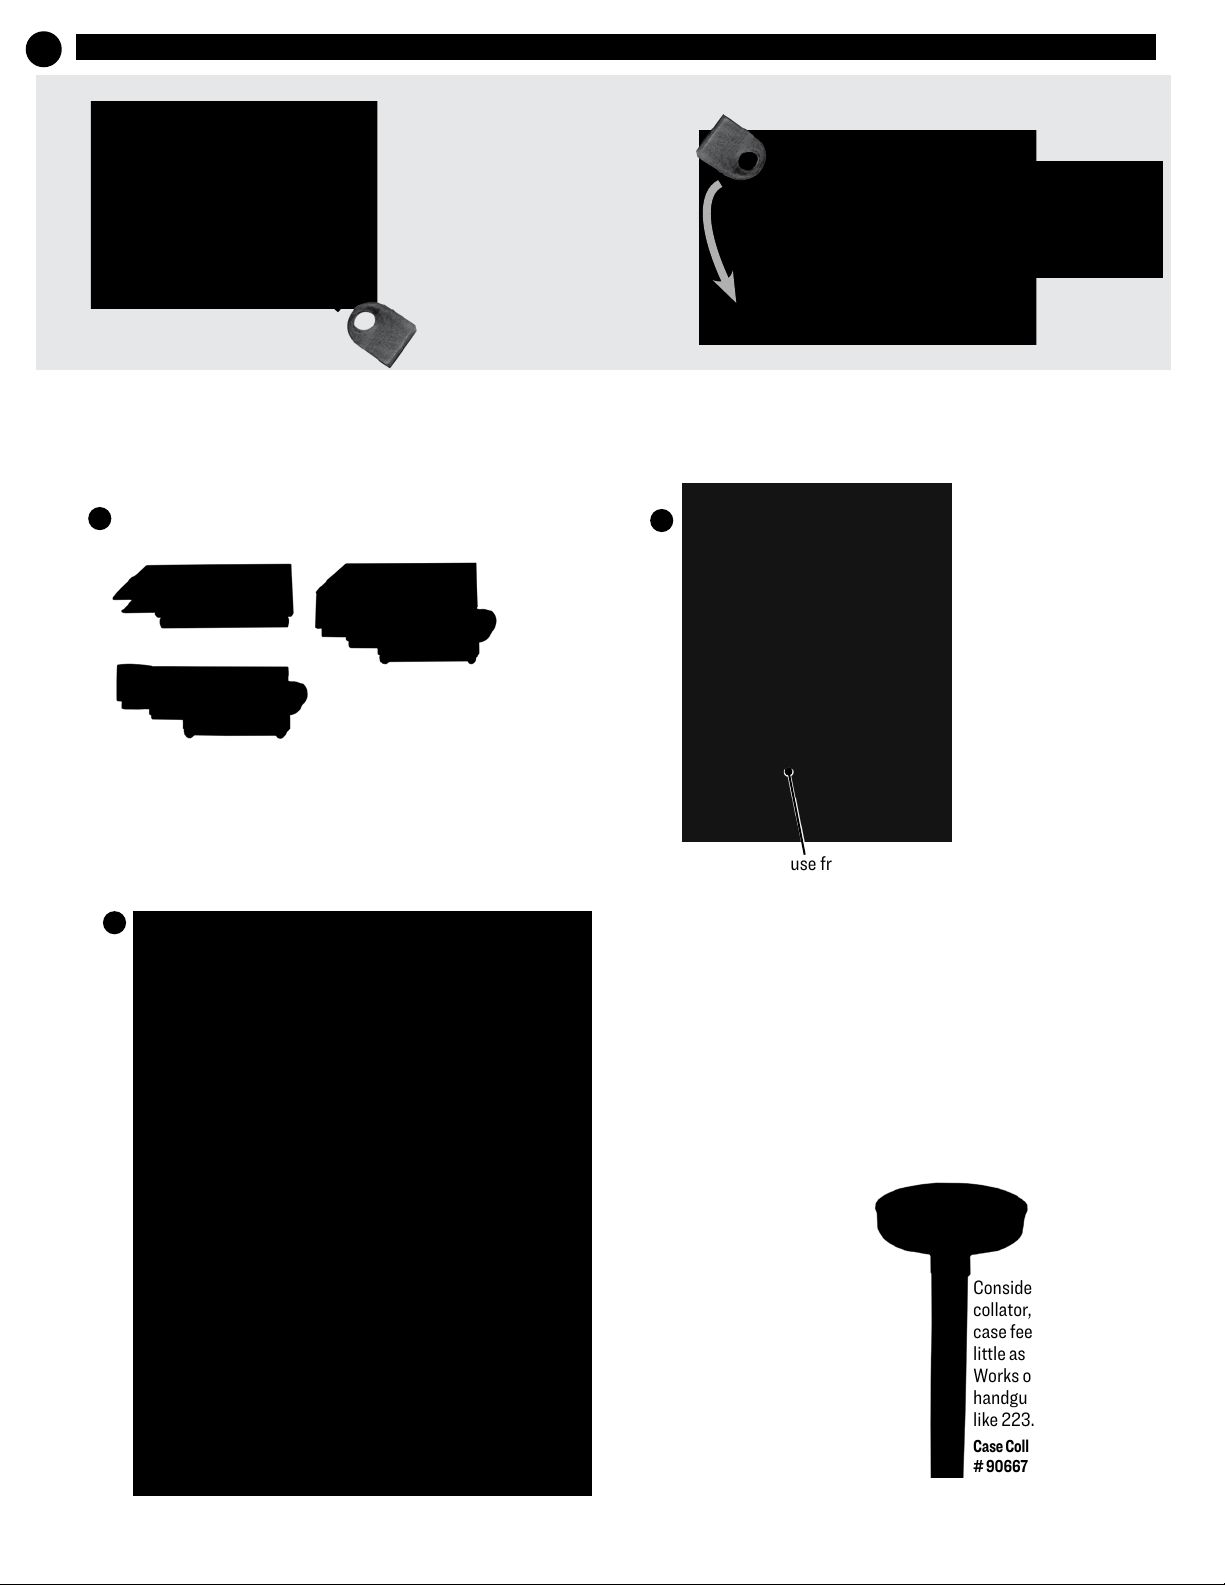
This die may come with a red Breech Lock Bushing installed.
(A) Install die and bushing in tool head position 1.
(B) Raise the carrier to top of stroke. (Handle down and hold)
(C) Screw die into contact the shell plate.
(D) Release lever, screw in the die additional 1/3 turn further.
*Note* Using a 1/2” (13mm) wrench on the decapper clamp makes adjustment
easy.
EZ X Expander / Decapper
Breech Lock Bushing
Decapper Clamp
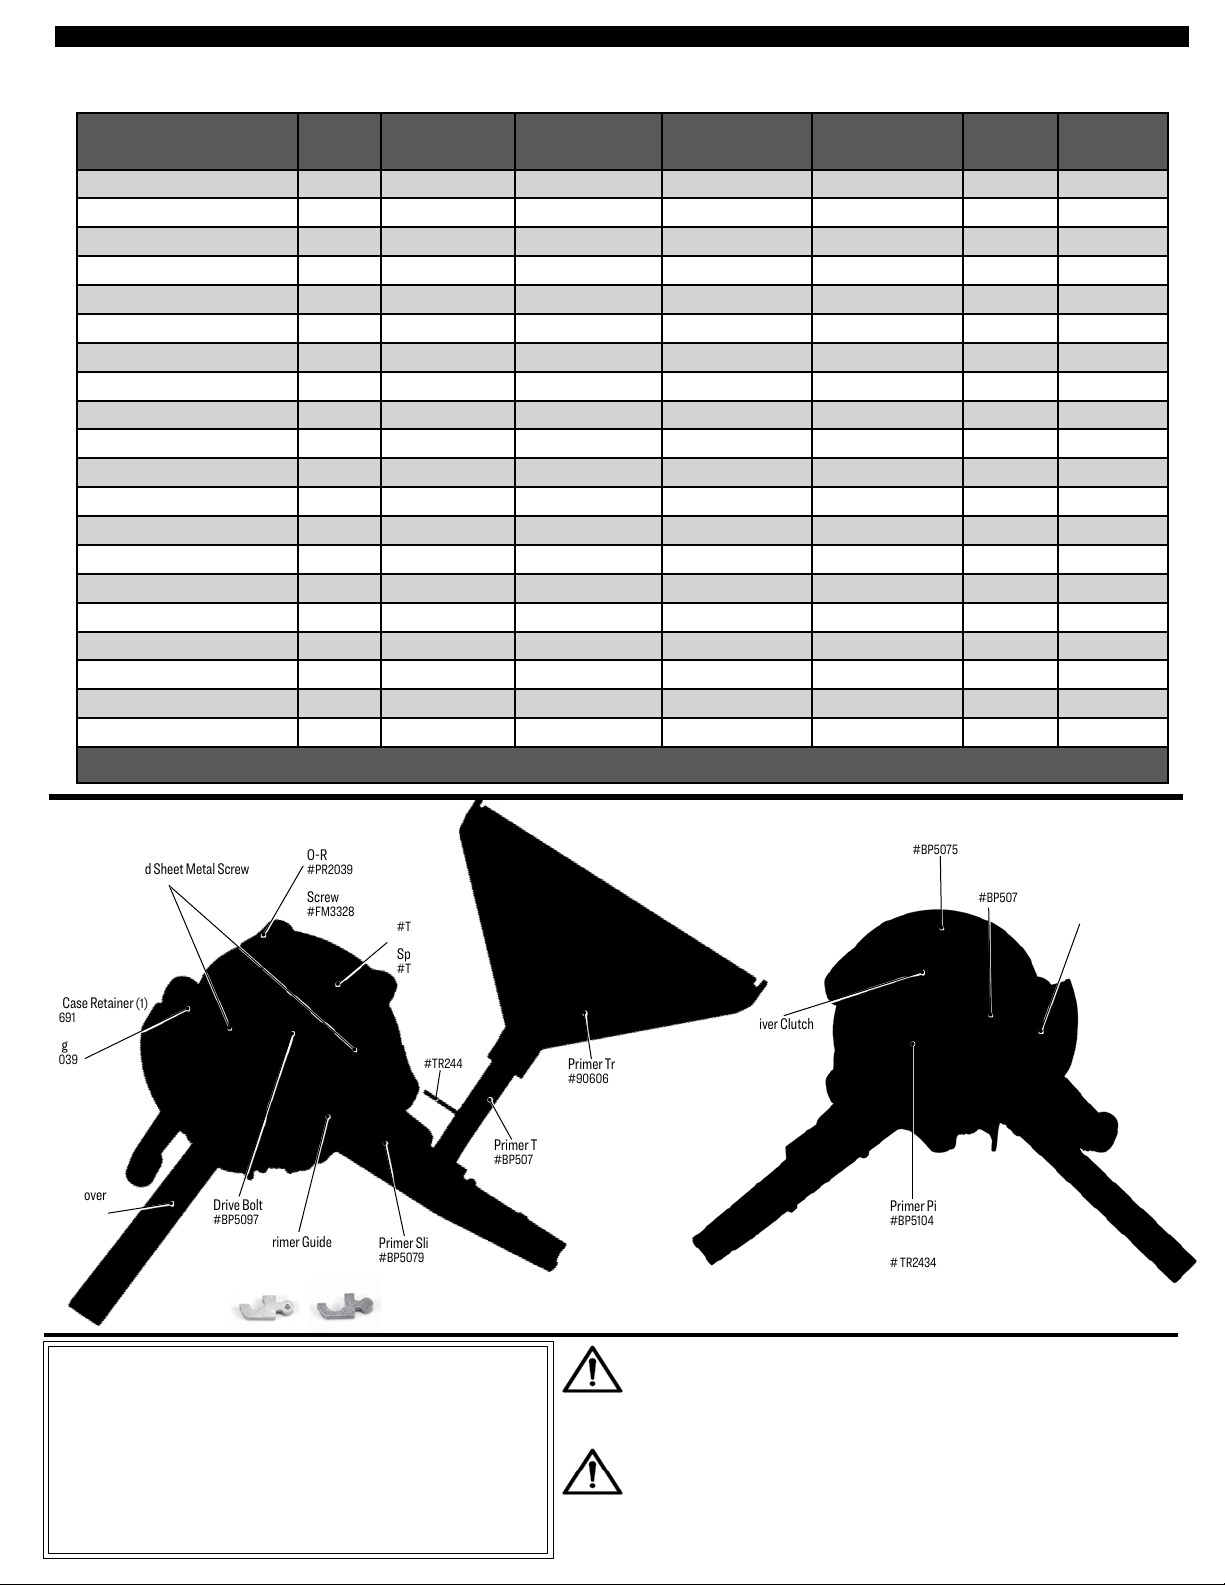
SHELL PLATE LISTINGSHELL PLATE LISTING ShellShell
PlatePlate Product Product
SPECIAL, MAG SPECIAL, MAG SS
ACP, CREED ACP, CREED LL
x WAT., SWISS x WAT., SWISS LL
ACP ACP SS
S&W LONG, H&R MAG. S&W LONG, H&R MAG. AA
BELTED MAGNUMS, MAG, BRITISH BELTED MAGNUMS, MAG, BRITISH
KRAG, MM WSMKRAG, MM WSM
LL
SS
M CARBINE, ACP M CARBINE, ACP SS
WIN, RIGBY WIN, RIGBY LL
MAGNUM MAGNUM LL
SWIFT, JAP, SOCOM SWIFT, JAP, SOCOM LL
MAG., SPL., COLT MAG., SPL., COLT LL
X MM PPC, PPCX MM PPC, PPC LL
COLT, S&W COLT, S&W LL
X FNX FN SS
S&W, XR S&W, XR LL
MM LUGER, S&W, SUPER, x TOKAREVMM LUGER, S&W, SUPER, x TOKAREV SS
MM AUTOMM AUTO LL
HORNET HORNET
REM SPC REM SPC LL

ALL PRIMERS ARE DANGEROUS and it should be anticipated that the primers in the tray could explode through accident, misuse or spontaneously. Should
an explosion occur, our tests have demonstrated that safety glasses will normally prevent serious injury to the user. Primers are capable of exploding with
sucient force to seriously injure the user, or persons nearby. When loading primers—safety glasses and hearing protection must be used.
Slide the flow
control to
OPEN.
Lift tray so output spout
touches table, shake tray
side to side to upright all
the primers. Allow cover to
naturally fold up, notice how
the primers glide across hinge
upright themselves and work
their way towards the outlet.
Fold cover over, slide the flow control to
LOCK position, feel for the detent. Grasp
the top and bottom of the flow control valve
using your thumb and index finger above
and below tray.
NOTE: make sure it is in the LOCK detent
position, or else primers may spill.
Slide the tray into the trough. Slide
the flow control to the ON position.
ABC
DE
WARNING: Handling live primers and spent primers may expose you to lead or other chemicals, which are known to the State of
California to cause reproductive harm and cancer. For more information, go towww.P65Warnings.ca.gov.
Randomly
deposit
primers.
Don’t let the primer level fall below the tray level. Once the last primer has exited the folding tray, replenish the primer
supply, or else you will be loading cases without primers.
DANGER: Primers can explode with sucient force to seriously injure the user or persons nearby.
IMPORTANT - Fill the primer feed tray. View help video for loading primers into tray:
TROUBLESHOOTING
PROBLEM CAUSE REMEDY
Primers will not feed
properly
• Wrong primer guide is installed or the primer
guid is installed upside down. The S and L must
be installed facing down. See Remedy >
• Install appropriate primer guide with letter facing down.
Primer doesn’t feed onto
priming punch
• Oil in trough
• Primer trough not full
• Remove all oil with solvent or blow out powder or dust with compressed air
• Always keep primer trough full, there must be a minimum of 5 primers in the
trough to feed properly
Primer doesn’t enter case • Primer crimp not removed
• Wrong size primer
• Ream or swage primer pocket
• Caution, some 45ACP cases now have small primer pockets
Tipped primers • Case not fully in shell plate • Adjust case retainers
Cases don’t eject • Case ejector • Verify case ejector is installed
Shell plate does not index • Driver clutch missing or damaged • Rotate 90 degrees and re-install, or replace part # PR3691.
Large Primer Guide
# 91981
Small Primer Guide
shown installed.
Notice dimple on
attach boss.
# 91980
Tap the trough several times
to fill.
6
Install primer feeder
F
7

IMPORTANT - Fill the primer feed tray. View help video for loading primers into tray:
7
INSTALLING Universal Case Feeder
ABConfirm case feed spring
in attached to front hole
of case slider
Case slider blockCase slider block
RiserRiser
See chart on page 7. Some cases require riser
to be installed on top of case slider block.
Slide the RISER block on
top of CASE SLIDER BLOCK
until the front and back are
flush. Tighten Phillips screw
on riser block.
This accessory will greatly simplify progressive reloading placing a case every time the press is cycled. The case slider block is already on
your press. Longer cases will require you to attach the riser to the case slider block. All you need to do is install the feed plate configured
for the case that you will be loading.
Assembled as a SMALL feed plate
Bolt and nuts are adjacent to small
through hole and the small plug.
smallsmall
holehole
small
plug
installed
largelarge
holehole
Assembled as a LARGE feed plate
small plug removed
storage spot for
small plug
Reference grid on top of page 8 for setup instructions
Install case feeder
use front hole
8
Continued, see page 6
CSee chart below. Install the
correctly configured feed
plate (large or small) keeping
the bottom of the case feed
plate a pennies thickness
above the case mouth. Slide a
case through feed plate. Place
penny on top of the case, slide
feed plate into carrier. Secure
the feed plate with a nut
above and below the carrier
slide rail. Tighten 7/16” nuts
under and above carrier.
Case Collator
# 90667
Consider the case
collator, fills all four
case feed tubes in as
little as 10 seconds.
Works on most
handgun and short rifle
like 223.

Drive Bolt
#BP5097
Primer Guide
Small #91980
Large #91981
Primer Slider
#BP5079
Primer Trough
#BP5079
Pin
#TR2442
⁄ Steel Ball
#TR2433
Spring (not visible)
#TR2434
#8 x ⁄ Flat Head Sheet Metal Screw
#FT5221
Long Case Retainer (4)
#BP5086
O-Ring
#PR2039
Screw
#FM3328
Short Case Retainer(1)
#PR3691
O-Ring
#PR2039
Screw
#FM3328
Primer Tray (1 included)
#90606
2 pack
Carrier Cover
#BP5073
TeLeeGuarane
lee reloading products are guaranteed not to wear out or break from
normal use for two full years or they will be repaired or replaced
at no charge if returned to the factory. Any Lee product of current
manufacture, regardless of age or condition, will be reconditioned to
new, including a new guarantee, if returned to the factory with payment
equaltohalfthecurrentretailprice.
8
WARNING: Handling live primers and spent primers may expose you to
lead or other chemicals, which are known to the State of California to cause
reproductive harm and cancer. For more information, go to
www.P65Warnings.ca.gov.
WARNING: This product may contain steel alloyed with trace amounts of
lead and other elements which are known to the State of California to cause
reproductive harm and cancer. For more information, go to
www.P65Warnings.ca.gov. To prevent exposure, do not alter the product by
welding, grinding, etc.
⁄ hex key
#PR2125
Primer Pin
#BP5104
Primer Pin Spring (not visible)
# TR2434
6-32 x 1 ⁄ Pan Head
#FT4956
Driver Clutch
#PR3691
Bottom Cover
#BP5075
Shell Plate Carrier Detail
Carrier Core
#BP5072
To convert the Six Pack Pro from a one cartridge to another, you will need the proper shell plate and appropriate Lee reloading die set. The chart below shows
proper configuration with catalog numbers.
CARTRIDGE CHANGE OVER
CartridgeCartridge ShellShell
PlatePlate Shell PlateShell Plate
Product Product Univ. Case FeedUniv. Case Feed
Plate SizePlate Size Univ. Case FeedUniv. Case Feed
Slider BlockSlider Block Breech LockBreech Lock
Reloading DiesReloading Dies ChargingCharging
diedie PrimerPrimer
GuideGuide
S&W Long S&W Long AA SMALLSMALL N/AN/A SmallSmall
mm Lugermm Luger SS SMALLSMALL N/AN/A ** SmallSmall
Super Super SS SMALLSMALL N/AN/A SmallSmall
Auto Auto SS SMALLSMALL N/AN/A ** SmallSmall
SPL & MAG SPL & MAG SS SMALLSMALL RISERRISER ** SmallSmall
S&W S&W SS SMALLSMALL N/AN/A ** SmallSmall
mm Automm Auto LL SMALLSMALL N/AN/A ** LargeLarge
SPL & MAG SPL & MAG LL LARGELARGE RISERRISER ** LargeLarge
ACP ACP LL SM LG SM LG LARGELARGE N/AN/A ** Large or SmallLarge or Small
Colt Colt LL LARGELARGE RISERRISER ** LargeLarge
REM REM SS SMALLSMALL RISERRISER (LUBE REQ.)(LUBE REQ.) SmallSmall
AAC Blackout AAC Blackout SS SMALLSMALL RISERRISER (LUBE REQ.)(LUBE REQ.) SmallSmall
WIN WIN LL LARGELARGE RISERRISER (LUBE REQ.)(LUBE REQ.) LargeLarge
WIN WIN LL
91836
LARGELARGE RISERRISER (LUBE REQ.)(LUBE REQ.) LargeLarge
LL
91836
LARGELARGE RISERRISER (LUBE REQ.)(LUBE REQ.) LargeLarge
mm REM MAGmm REM MAG LL
91840
LARGELARGE RISERRISER (LUBE REQ.)(LUBE REQ.) LargeLarge
- WIN- WIN LL
91837
LARGELARGE RISERRISER (LUBE REQ.)(LUBE REQ.) LargeLarge
WIN MAG WIN MAG LL
91840
LARGELARGE RISERRISER (LUBE REQ.)(LUBE REQ.) LargeLarge
Creedmoor Creedmoor LL
91836
LARGELARGE RISERRISER (LUBE REQ.)(LUBE REQ.) LargeLarge
N/A = Not available LUBE REQ. = # 90006 LEE resizing lubricant required *4 Die Breech Lock set availableN/A = Not available LUBE REQ. = # 90006 LEE resizing lubricant required *4 Die Breech Lock set available
This manual suits for next models
1
Table of contents
Other Lee Precision Power Tools manuals

Lee Precision
Lee Precision Classic Turret Press User manual

Lee Precision
Lee Precision DELUXE APP 90933 User manual

Lee Precision
Lee Precision PRO 1000 User manual

Lee Precision
Lee Precision Lee 4 User manual

Lee Precision
Lee Precision Classic Turret Press User manual

Lee Precision
Lee Precision APP User manual