manuals.online logo
Brands
  1. Home
  2. •
  3. Brands
  4. •
  5. LEGRAND
  6. •
  7. Switch
  8. •
  9. LEGRAND Wattstopper InteliSwitch AS-100 User manual

LEGRAND Wattstopper InteliSwitch AS-100 User manual

Wattstopper
®
InteliSwitch®Automatic Control Switch 120/277VAC (Version 2)
Installation Instructions • Instructions d’Installation • Instrucciones de Instalación
No: 24983 – 03/20 rev. 1
Catalog Number • Numéro de Catalogue • Número de Catálogo: AS-100
Country of Origin: Made in China • Pays d’origine: Fabriqué en Chine • País de origen: Hecho en China
INSTALLATION
1. Connect wires as shown in the WIRING section that follows.
2. Attach the switch to the wall by mounting it in the wall box with the two (2) mounting screws
provided.
3. Install the cover plate.
4. Turn ON power to the switch and, if necessary, put it into Setup Mode to select options.
SPECIFICATIONS
Voltages...........................................120 or 277VAC, 50/60Hz
Load Requirements
@120VAC, 50/60Hz ....0-1300W ballast & incandescent
@277VAC, 50/60Hz ..............................0-3000W ballast
DESCRIPTION AND OPERATION
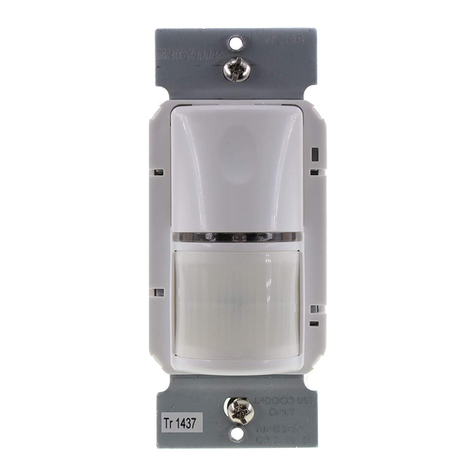
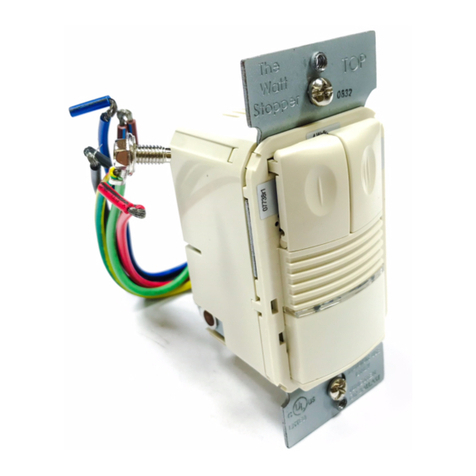
The Wattstopper InteliSwitch®AS-100 is an automatic control switch that
operates as both a manual and automatic control device.
Manually, it allows users to control loads ON and OFF. Automatically, the
AS-100 receives signals to turn loads ON and OFF from Wattstopper
lighting control panels, or other lighting control systems.
Lighting control panels not only automatically turn lights ON and OFF,
but can also send a shut-OFF signal to warn users that the switch will
shut OFF lighting in five minutes. The LED on the AS-100 will blink, and
an audible beep (if enabled, see SETUP section) warns users of the
impending shut-OFF.
The display has three (3) LEDs that indicate activity and Setup Mode
options (or current choices). The center (red) LED blinks during the
shut-OFF time delay, indicating that lights will soon turn OFF.
A Setup Mode allows selection of options for operation with a lighting
control panel.
WARNING: TURN THE POWER OFF AT THE
CIRCUIT BREAKER BEFORE WIRING.
LED Display behind
translucent window
(3 LEDs: Green – Red –Green)
ON/OFF button
Strip Gauge
#12 to #16 AWG
Cu Wire Only
2
WIRING
The ground terminal must be connected to ground for the AS-100 to function. Never connect the AS-100 to a power pack; always
connect the AS-100 to a lighting control panel.
HotNeutral Load
Lighting
Control
Panel
Line
Ground No connection for
this application. *
Line
GroundLoad
3-Way
Signal Wire**
Wiring a single switch to
a lighting control panel
Line
Ground Ground
Do not connect
to line voltage*
Line
GroundLoad
3-Way
Line
GroundLoad
3-Way
Hot
Lighting
Control
Panel
Line
Remote Switch Master Switch
No Load
Connection
Load
Neutral
Do not connect
to line voltage*
Signal
Wire**
Signal Wire**
Neutra
l
Wiring for 3-way operation with a lighting control panel
SETUP
The AS-100 Automatic Control Switch comes factory preset and ready to install in conjunction with a lighting control panel. The default
operation is manual-ON/OFF along with automatic-OFF when signaled by the lighting control panel.
NOTE: Setup options apply to Master Switch only under 3-way operation.
If an audible beep warning or automatic-ON features are desired, use the following procedure:
• Setup for the switch options is accomplished with the ON/OFF button and LED display. There is no need to remove the cover plate.
1. To enter Setup Mode: Press and hold down the ON/OFF button until the LEDs flash every second from left to right (approximately
7 seconds).
2. When in Setup Mode, the configuration LEDs flash to indicate the current configuration settings. Press the ON/OFF button to
sequence through the option selections until the desired options are displayed.
3. To exit Setup Mode and save the selected options: Press and hold the ON/OFF button until the LEDs flash every second from
right to left (approximately 3 seconds). If the lights controlled by this switch are ON, the lighting fixtures will turn OFF. Setup is now
complete and the option selections are saved.
If the ON/OFF button is not pressed to exit Setup Mode, the AS-100 will time out of Setup Mode after approximately 30 seconds,
and new option selections will not be saved.
Factory Settings:
• Lighting control panel automatic-
OFF capable.
• No Setup Mode options are
selected.
• See Operation (next page) for
other available functions.
$XWRPDWLF21
$XGLEOHEHHSGXULQJ$XWRPDWLF'HOD\HGRII
6HWXS0RGH2SWLRQV
/('GLVSOD\
2SWLRQLVRQZKHQ/('IODVKHVLQGLVSOD\
6HWXS0RGHRSWLRQVRIIIDFWRU\VHWWLQJ
$XGLEOHEHHSRSWLRQRQ
$XWRPDWLF21RSWLRQRQ
$XWRPDWLF21
$XGLEOHEHHSRSWLRQVRQ
8QXVHG
* Never connect line voltage to the 3-Way terminal. Doing so will damage the AS-100 and void the warranty.
**Signal Wire (Blue with White Stripe) connects to Neutral. For a replacement or retrofit application , it can connect to Ground.
3
OPERATION
Manual ON and OFF control is always available by pressing the ON/OFF button.
Automatic-OFF and Automatic Delayed-OFF are always enabled regardless of other Setup Mode options.
When set for Automatic-ON mode (see SETUP section), the AS-100 turns ON the load when it receives the Automatic-ON signal from a
Wattstopper lighting control panel or other lighting control system.
Automatic Control Signals
Automatic commands to turn OFF or turn ON the load connected to the AS-100 come from the lighting control panel interrupting power
to the AS-100 for the amount of time shown below (timing must be +/- one-quarter of a second):
Command Power Interrupt Duration Function Description
Automatic-ON 3 sec. Lights turn ON (if Automatic-ON Setup Mode option is enabled).
Automatic-OFF 5 sec. Lights turn OFF when power is interrupted (for 5 seconds), turn back ON for 7
seconds, then turn OFF.
Automatic
Delayed-OFF
1 – 2 sec. Initiates a five-minute delay period before shutting OFF lights. At any time,
pushing the ON/OFF button before the lights turn OFF cancels the countdown
and keeps the lights ON until the next control signal from the lighting control
panel, or until the AS-100 is manually turned OFF.
During the Delayed-OFF period:
1. The lights flash once when power is interrupted (for 1–2 seconds).
2. The center (red) locator LED begins to blink once every two (2) seconds.
3. An audible beep sounds once every minute (if enabled, see Setup section).
4. During the final minute, the LED blinks once every second and the beep
sounds every five (5) seconds (if enabled) until the lights are turned OFF.
TROUBLESHOOTING
1. Verify that all connections are tightly secured.
2. Ensure that all wiring is properly done according to the schematic (see Wiring section).
3. Check for the correct option setting if the audible beep or Automatic-ON operating mode does not work properly (see SETUP
section).
4. When choosing automatic commands to delay OFF, shut OFF or turn ON the switch by interrupting power to the switch, check the
specified time duration and make sure the resolution for timing is +/- one-quarter of a second (see Operation section).
5. Check to make sure that the ground terminal is connected.
The AS-100 will not operate properly without a ground connection.
6. If the AS-100 is still not functioning properly, call 800.879.8585 for Technical Support.
ORDERING INFORMATION
Catalog Number Description
AS-100* Automatic Control Switch
ASP-211 Cover plate for single-gang box
ASP-422 Blank cover plate for double-gang box
ASP-432 Cover plate for double-gang box with switch option
* - W for white, I for ivory, A for light almond.
COVER PLATES
The Wattstopper InteliSwitch AS-100 Automatic Control Switch fits behind industry standard decorator-style cover plates. Wattstopper
has both single- and double-gang switch plates available in most configurations. Consult the Wattstopper product selection guide or your
distributor for more information.
WARNING: TURN THE POWER OFF AT THE
CIRCUIT BREAKER BEFORE WIRING.
800.879.8585
www.legrand.us/wattstopper
No. 24983 – 03/20 rev. 1
© Copyright 2020 Legrand All Rights Reserved.
© Copyright 2020 Tous droits réservés Legrand.
© Copyright 2020 Legrand Todos los derechos reservados.
Wattstopper warranties its products to be free
of defects in materials and workmanship for a
period of five (5) years. There are no obligations
or liabilities on the part of Wattstopper for
consequential damages arising out of, or in
connection with, the use or performance of this
product or other indirect damages with respect
to loss of property, revenue or profit, or cost of
removal, installation or reinstallation.
Wattstopper garantit que ses produits sont
exempts de défauts de matériaux et de fabrication
pour une période de cinq (5) ans. Wattstopper
ne peut être tenu responsable de tout dommage
consécutif causé par ou lié à l’utilisation ou
à la performance de ce produit ou tout autre
dommage indirect lié à la perte de propriété, de
revenus, ou de profits, ou aux coûts d’enlèvement,
d’installation ou de réinstallation.
Wattstopper garantiza que sus productos
están libres de defectos en materiales y mano
de obra por un período de cinco (5) años. No
existen obligaciones ni responsabilidades por
parte de Wattstopper por daños consecuentes
que se deriven o estén relacionados con el
uso o el rendimiento de este producto u otros
daños indirectos con respecto a la pérdida
de propiedad, renta o ganancias, o al costo
de extracción, instalación o reinstalación.
WARRANTY INFORMATION INFORMATIONS RELATIVES À LA GARANTIE INFORMACIÓN DE LA GARANTÍA

Other LEGRAND Switch manuals

LEGRAND 7 521 90 User manual

LEGRAND

LEGRAND 7 521 90 User manual

LEGRAND Galion 2 824 26 User manual

LEGRAND

LEGRAND Galion 2 824 26 User manual

LEGRAND adorne ASPD1531 User manual

LEGRAND

LEGRAND adorne ASPD1531 User manual

LEGRAND C2G C2G41604 User manual

LEGRAND

LEGRAND C2G C2G41604 User manual

LEGRAND Valena 7702 89 User manual

LEGRAND

LEGRAND Valena 7702 89 User manual

LEGRAND WattStopprer RS-150U Quick start guide

LEGRAND

LEGRAND WattStopprer RS-150U Quick start guide

LEGRAND Chief Kontour KPWR Series User manual

LEGRAND

LEGRAND Chief Kontour KPWR Series User manual

LEGRAND DA2524 User manual

LEGRAND

LEGRAND DA2524 User manual

LEGRAND 0 672 21 User manual

LEGRAND

LEGRAND 0 672 21 User manual

LEGRAND adorne sofTap Dimmer ADTP600RMH User manual

LEGRAND

LEGRAND adorne sofTap Dimmer ADTP600RMH User manual

LEGRAND 4128 58 User manual

LEGRAND

LEGRAND 4128 58 User manual

LEGRAND Wattstopper WS-301-347 User manual

LEGRAND

LEGRAND Wattstopper WS-301-347 User manual

LEGRAND Arteor 5 722 69 User manual

LEGRAND

LEGRAND Arteor 5 722 69 User manual

LEGRAND 4 226 81 User manual

LEGRAND

LEGRAND 4 226 81 User manual

LEGRAND Niloe LE-764500 User manual

LEGRAND

LEGRAND Niloe LE-764500 User manual

LEGRAND 0 883 07 User manual

LEGRAND

LEGRAND 0 883 07 User manual

LEGRAND WZ3RL10 User manual

LEGRAND

LEGRAND WZ3RL10 User manual

LEGRAND PRO 21 Galea Sistena NGS Solfa Smart Control 7759... User manual

LEGRAND

LEGRAND PRO 21 Galea Sistena NGS Solfa Smart Control 7759... User manual

LEGRAND pass & seymour LightSense PSWS User manual

LEGRAND

LEGRAND pass & seymour LightSense PSWS User manual

LEGRAND Excel Life EM802TD User manual

LEGRAND

LEGRAND Excel Life EM802TD User manual

LEGRAND In One Celiane 672 15 User manual

LEGRAND

LEGRAND In One Celiane 672 15 User manual

LEGRAND PW-100 User manual

LEGRAND

LEGRAND PW-100 User manual

LEGRAND Watt Stopper RS-250 User manual

LEGRAND

LEGRAND Watt Stopper RS-250 User manual

LEGRAND Adorne LC7001 User manual

LEGRAND

LEGRAND Adorne LC7001 User manual

Popular Switch manuals by other brands

GrandTec Grand iUSB HUB user manual

GrandTec

GrandTec Grand iUSB HUB user manual

Hawking HKS104 Quick installation guide

Hawking

Hawking HKS104 Quick installation guide

ATEN VP2120 user manual

ATEN

ATEN VP2120 user manual

Multico EW-K1302DPUC4K Quick installation guide

Multico

Multico EW-K1302DPUC4K Quick installation guide

Kathrein EXD 158 Twin manual

Kathrein

Kathrein EXD 158 Twin manual

Versitron SG10208 user manual

Versitron

Versitron SG10208 user manual

Cisco Intelligent Gigabit Ethernet Switch Module manual

Cisco

Cisco Intelligent Gigabit Ethernet Switch Module manual

Korenix JetNet 6828Gf-2AC Quick installation guide

Korenix

Korenix JetNet 6828Gf-2AC Quick installation guide

KVM-TEC Scalable line manual

KVM-TEC

KVM-TEC Scalable line manual

Televes EUROSWITCH MSW 17 Series manual

Televes

Televes EUROSWITCH MSW 17 Series manual

Cabletron Systems GIGAswitch GSR-16 User's reference manual

Cabletron Systems

Cabletron Systems GIGAswitch GSR-16 User's reference manual

Abocom TC08 Specification sheet

Abocom

Abocom TC08 Specification sheet

Fish Tuning CSP5 manual

Fish Tuning

Fish Tuning CSP5 manual

Field Controls 46104600 manual

Field Controls

Field Controls 46104600 manual

Transition Networks SM12DP2XA quick start guide

Transition Networks

Transition Networks SM12DP2XA quick start guide

STL G-140 user manual

STL

STL G-140 user manual

Arista DCS-7050QX-32S quick start guide

Arista

Arista DCS-7050QX-32S quick start guide

CAMBRIONIX ThunderSync3-16 user manual

CAMBRIONIX

CAMBRIONIX ThunderSync3-16 user manual

manuals.online logo
manuals.online logoBrands
  • About & Mission
  • Contact us
  • Privacy Policy
  • Terms and Conditions

Copyright 2025 Manuals.Online. All Rights Reserved.