LENCO SCD-6900 User manual

1
MODEL:SCD‐6900
PORTABLEDAB+ANDFMRADIOWITHCD,
CASSETTEANDBLUETOOTH
USERMANUALPortableDAB+andFMradiowithCD,cassetteandBluetooth
GEBRUIKSHANDLEIDINGDraagbareDAB+enFM‐radiometcd,cassetteenBluetooth
BEDIENUNGSANLEITUNGTragbareDAB+/FM‐RadiomitCD,KassetteundBluetooth
MODED’EMPLOIRadioportableDAB+etFMavecCD,cassetteetBluetooth
MANUALDEUSUARIORadioportátilDAB+YFMconCD,caseteyBluetooth
Version:1.0

2
Index
English .................................................................................................................................................................................3
Nederlands.........................................................................................................................................................................14
Deutsch ..............................................................................................................................................................................27
Français .............................................................................................................................................................................41
Español ..............................................................................................................................................................................54

3
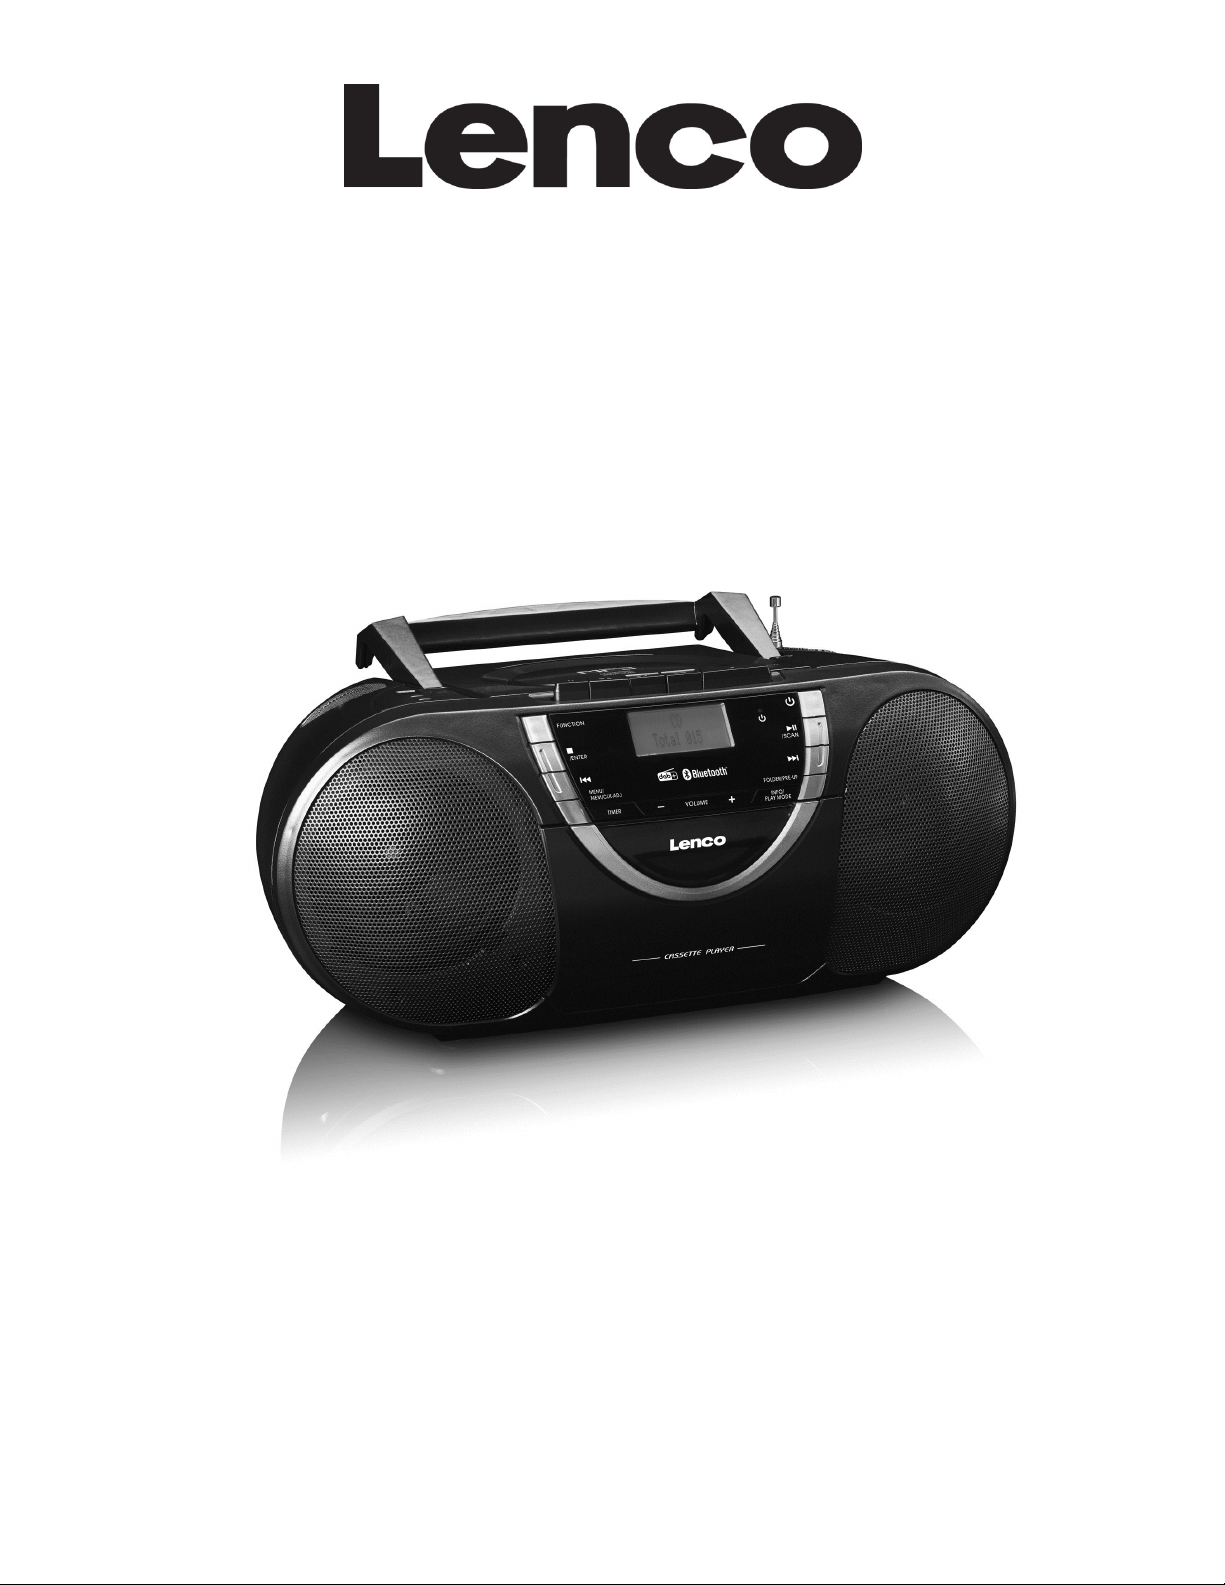
EnglishPortableDAB+andFMradiowithCD,cassetteandBluetooth
CAUTION:
Usageofcontrolsoradjustmentsorperformanceofproceduresotherthanthosespecifiedhereinmayresultin
hazardousradiationexposure.
PRECAUTIONSBEFOREUSE
KEEPTHESEINSTRUCTIONSINMIND:
1. Donotcoverorblockanyventilationopenings.Whenplacingthedeviceonashelf,leave
5cm(2”)freespacearoundthewholedevice.
2. Installinaccordancewiththesuppliedusermanual.
3. Keepthedeviceawayfromheatsourcessuchasradiators,heaters,stoves,candlesandotherheat‐generating
productsornakedflame.Thedevicecanonlybeusedinmoderateclimates.Extremelycoldorwarm
environmentsshouldbeavoided.Workingtemperaturebetween0°and35°C.
4. Avoidusingthedevicenearstrongmagneticfields.
5. Electrostaticdischargecandisturbnormalusageofthisdevice.Ifso,simplyresetandrestartthedevice
followingtheinstructionmanual.Duringfiletransmission,pleasehandlewithcareandoperateinastatic‐free
environment.
6. Warning!Neverinsertanobjectintotheproductthroughtheventsoropenings.Highvoltageflowsthrough
theproductandinsertinganobjectcancauseelectricshockand/orshortcircuitinternalparts.Forthesame
reason,donotspillwaterorliquidontheproduct.
7. Donotuseinwetormoistareassuchasbathrooms,steamykitchensornearswimmingpools.
8. Thedeviceshallnotbeexposedtodrippingorsplashingandmakesurethatnoobjectsfilledwithliquids,such
asvases,areplacedonorneartheapparatus.
9. Donotusethisdevicewhencondensationmayoccur.Whentheunitisusedinawarmwetroomwithdamp,
waterdropletsorcondensationmayoccurinsidetheunitandtheunitmaynotfunctionproperly;lettheunit
standinpowerOFFfor1or2hoursbeforeturningonthepower:theunitshouldbedrybeforegettingany
power.
10. Althoughthisdeviceismanufacturedwiththeutmostcareandcheckedseveraltimesbeforeleavingthe
factory,itisstillpossiblethatproblemsmayoccur,aswithallelectricalappliances.Ifyounoticesmoke,an
excessivebuild‐upofheatoranyotherunexpectedphenomena,youshoulddisconnecttheplugfromthe
mainpowersocketimmediately.
11. Thisdevicemustoperateonapowersourceasspecifiedonthespecificationlabel.Ifyouarenotsureofthe
typeofpowersupplyusedinyourhome,consultyourdealerorlocalpowercompany.
12. Keepawayfromanimals.Someanimalsenjoybitingonpowercords.
13. Tocleanthedevice,useasoftdrycloth.Donotusesolventsorpetrolbasedfluids.
Toremoveseverestains,youmayuseadampclothwithdilutedetergent.
14. Thesupplierisnotresponsiblefordamageorlostdatacausedbymalfunction,misuse,modificationofthe
deviceorbatteryreplacement.
15. Donotinterrupttheconnectionwhenthedeviceisformattingortransferringfiles.Otherwise,datamaybe
corruptedorlost.
16. IftheunithasUSBplaybackfunction,theUSBmemorystickshouldbepluggedintotheunitdirectly.Don’tuse
anUSBextensioncablebecauseitcancauseinterferenceresultinginfailingofdata.
17. Theratinglabelhasbeenmarkedonthebottomorbackpanelofthedevice.
18. Thisdeviceisnotintendedforusebypeople(includingchildren)withphysical,sensoryormentaldisabilities,
oralackofexperienceandknowledge,unlessthey’reundersupervisionorhavereceivedinstructionsabout
thecorrectuseofthedevicebythepersonwhoisresponsiblefortheirsafety.
19. Thisproductisintendedfornonprofessionaluseonlyandnotforcommercialorindustrialuse.
20. Makesuretheunitisadjustedtoastableposition.Damagecausedbyusingthisproductinanunstable
positionvibrationsorshocksorbyfailuretofollowanyotherwarningorprecautioncontainedwithinthisuser
manualwillnotbecoveredbywarranty.
21. Neverremovethecasingofthisdevice.
22. Neverplacethisdeviceonotherelectricalequipment.

4
23. Donotallowchildrenaccesstoplasticbags.
24. Onlyuseattachments/accessoriesspecifiedbythemanufacturer.
25. Referallservicingtoqualifiedservicepersonnel.Servicingisrequiredwhenthedevicehasbeendamagedin
anyway,suchasthepowersupplycordortheplug,whenliquidhasbeenspilledorobjectshavefallenintothe
device,whenthedevicehasbeenexposedtorainormoisture,doesnotoperatenormally,orhasbeen
dropped.
26. Longexposuretoloudsoundsfrompersonalmusicplayersmayleadtotemporaryorpermanenthearingloss.
27. IftheproductisdeliveredwithpowercableorACpoweradaptor:
Ifanytroubleoccur,disconnecttheACpowercordandreferservicingtoqualifiedpersonnel.
Don’tsteponorpinchthepoweradaptor.Beverycareful,particularlyneartheplugsandthecable’s
exitpoint.Donotplaceheavyitemsonthepoweradaptor,whichmaydamageit.Keeptheentiredevice
outofchildren’sreach!Whenplayingwiththepowercable,theycanseriouslyinjurethemselves.
Unplugthisdeviceduringlightningstormsorwhenunusedforalongperiod.
Thesocketoutletmustbeinstalledneartheequipmentandmustbeeasilyaccessible.
Donotoverloadacoutletsorextensioncords.Overloadingcancausefireorelectricshock.
Deviceswithclass1constructionshouldbeconnectedtoamainsocketoutletwithaprotectiveearthed
connection.
Deviceswithclass2constructiondonotrequireaearthedconnection.
Alwaysholdtheplugwhenpullingitoutofthemainsupplysocket.Donotpullthepowercord.Thiscan
causeashortcircuit.
Donotuseadamagedpowercordorplugoralooseoutlet.Doingsomayresultinfireorelectricshock.
28. Iftheproductcontainsorisdeliveredwitharemotecontrolcontainingcoin/cellbatteries:
Warning:
“Donotingestbattery,ChemicalBurnHazard”orequivalentworking.
[Theremotecontrolsuppliedwith]Thisproductcontainsacoin/buttoncellbattery.Ifthebatteryis
swallowed,itcancausesevereinternalburnsinjust
2hoursandcanleadtodeath.
Keepnewandusedbatteriesawayfromchildren.
Ifthebatterycompartmentdoesnotclosesecurely,stopusingtheproductandkeepitawayfrom
children.
Ifyouthinkbatteriesmighthavebeenswallowedorplacedinsideanypartofthebody,seekimmediate
medicalattention.
29. CautionabouttheuseofBatteries:
Dangerofexplosionifbatteryisincorrectlyreplaced.Replaceonlywiththesameorequivalenttype.
Batterycannotbesubjectedtohighorlowextremetemperatures,lowairpressureathighaltitude
duringuse,storageortransportation.
Replacementofabatterywithanincorrecttypethatcanresultinanexplosionortheleakageof
flammableliquidorgas.
Disposalofabatteryintofireorahotoven,ormechanicallycrushingorcuttingofabattery,thatcan
resultinanexplosion.
Leavingabatteryinanextremelyhightemperaturesurroundingenvironmentthatcanresultinan
explosionorthatleakageofflammableliquidorgas.
Abatterysubjectedtoextremelylowairpressurethatmayresultinanexplosionortheleakageof
flammableliquidorgas.
Attentionshouldbedrawntotheenvironmentalaspectsofbatterydisposal.
INSTALLATION
Unpackallpartsandremoveprotectivematerial.
Donotconnecttheunittothemainsbeforecheckingthemainsvoltageandbeforeallotherconnections
havebeenmade.
*ThoseinstructionsarerelatedonlytoproductsusingpowercableorACpoweradaptor.

5
Caution:
Useofcontrolsorproceduresotherthanthosespecifiedhereinmayresultinhazardousradiation
exposure.
Thisunitshouldnotbeadjustedorrepairedbyanyoneexceptqualifiedservicepersonnel.
LOCATIONOFCONTROL
1) USBsocket
2) Auxinsocket
3) 3.5mmheadphonejack
4) Cassettebuttons
5) Handle
6) FMantenna
7) CDdooropen/close
8) LCDdisplay
9) Functionbutton
10) Stop/Enterbutton
11) Skip/Tuningdownbutton
12) Menu/Mem/clock‐adjustbutton
13) Timerbutton
14) Volumeup/downbutton
15) Cassettedoor
16) StandbyLED
17) On/Offbutton
18) Play/pause/Scanbutton
19) Skip/tuningupbutton
20) Pre/Folderupbutton
21) Info/Playmodebutton
22) DCJack
CLASS1LASER
PRODUCT
CAUTION
Thelightningflashand
arrowheadwithinthe
triangleisawarningsign
alertingyouofdangerous
voltageinsidetheproduct
RISKOFELECTRICSHOCK
DONOTOPEN
CAUTION:TOREDUCETHERISKOFELECTRICSHOCK
DONOTREMOVECOVER(ORBACK).NOUSER
SERVICIABLEPARTSINSIDE.REFERSERVICINGTO
QUALIFIEDSERVICEPERSONNEL.
Theexclamationpoint
withinthetriangleisa
warningsignalertingyou
ofimportantinstructions
accompanyingtheproduct

6
Important:
Sincethesensitivecircuitrymaycauseinterferencetoaradiotunernearby,switchthisunitoffwhile
operatingotherradiodevices.
DuetothecomplexityoftheMCUcontrol,pleaseun‐plugthemainpowersupplyoftheunitiftheunit
stopsduringoperation!Thisisnotamalfunctionofthesystem!
Precautionsforuse
Installation
•Unpackallpartsandremoveprotectivematerial.
•Donotconnecttheunittothemainsbeforecheckingthemainvoltageandbeforeallother
connectionshavebeenmade.
•Donotcoveranyventsandmakesurethatthereisaspaceofseveralcentimetersaroundtheunitfor
ventilation.
Connection
1. ConnecttheDCplugoftheincludedAC/DCadaptortoDCjack(22)thentheAC/DCadaptorconnect
totheACoutlet.
2. Whenyoufirstplugtheunitintothemains,theunitwillgointostandbymode.TheStandbyLEDwill
lightup
3. Turnontheunitbypressing“On/Standby”button(17).IftheLCDdisplay(8)isonwithbacklighting,it
meansthepowersupplyisnormal.Nowthesystemisreadytoplaythemusic.
DCconnection
ForDCoperation,pleaseinsert8pcssizeC(UM‐2)batteriesintothe
batterycompartmentandremovetheACplugfromACtheoutlet
thendisconnecttheACcordfromtheACsocket.
PleaseremoveanybatteriesfromtheunitwhilstusingDCpower
supply.Itisrecommendedtoremoveanybatteriesfromtheunitif
unitwillnotbeusedforaperiodoftime.
Settingtheclock
1. Settheunittostandbymode.
2. Pressandholdthe“Menu/Mem/clk‐adj”button(12),thehourdigitwillflashonLCDdisplay(8)Press
theSkipdown(11)orSkipup(19)buttontosetthecorrecthour.Pressthe
“Menu/Mem/clk‐adj”button(12)tostorethehourthentheminutedigitwillflash.
3. PresstheSkipdown(11)orSkipup(19)buttontosetthecorrectminutes.
4. Press“Menu/Mem/Menu/clk‐adj”button(12)tostorethecorrecthour.
Thepresettimewillberesetcompletelyifdisconnectingthemainpowersupply.Youare
recommendedtoswitchthesystemintostandbymodeforconvenientuse.
TheclockwillsynchronizetoRDS/DABclockoncereceivingtheRDS/DABsignaliftheclockwas
notsetinadvance.
Listeningtoradio
Operation
Manualtuning
1. TurnontheunitbyOn/Offbutton(17)andthenpresstheFunctionbutton(9)untilitreachesthe“FM”
mode.
2. PresstheSkipdown(11)orSkipup(19)buttontotuneyourdesiredstation.
3. Adjustvolumeup/downbutton(14)forthedesiredvolumelevel.

7
Autotuning
1. SettheunittoFMmode.
2. Presstheautoscanbutton(18)once;theunitwillstarttoscanupwardsuntilaradiostationis
received.Presstuningdownbutton(11)onceandthenpresstheautoscanbutton(18),theunitwill
scandownwards.Iftheradiodatasystem(RDS)broadcastingsignalisreceived,theunitwillsetthe
actualtimeautomatically.
3. Adjustvolumeknob(14)forthedesiredvolumelevel
FMscansetting
Afterautotuningiftoomanyunwantedweakradiostationsarereceived,youcanselectstrongstations
onlybyfilteringouttheweakersignals.
1. InFMmode,press“Menu/Mem/clk‐adj”button(12)toenterthe“Menu”,thenpressSkipdown
(11)orSkipup(19)buttontoselect“Scansetting”.
2. Press“Stop/Enter”button(10)toenterthe“Scansetting”,thenpressSkipdown(11)orSkipup
(19)buttontoselect“Strongstationonly”.Thenpress“Stop/Enter”button(10)toconfirmthe
setting.
3. Performtheautotuningoperationagainasabove.
FM&FM‐stereoreception
TheunitwilldefaulttotheFMmodeinMono.Thus,ifFMstereosignalreceived,settheFMmodeto
StereobypressMenubutton(12),thenpressSkipdown(11)orSkipup(19)buttontoselect
Audiosetting,pressEnterbutton(10)andpressSkipdown(11)orSkipup(19)againto
selectFMstereo,thenpressEnterbutton(10)toconfirm.Whenstereosignalsareweakandnoisy.It
ispreferabletochangetheFMmodebythesameprocedure.
Hintsforbestreception:‐
FM:thereceiverhasarodantenna(6)attherearcabinet.Itshouldbetotallyextendedforthebest
reception.
Radiodatasystem(RDS)
Thisisthefeaturewhichdisplaystheinformationreleasedfromtheradiobroadcastandwillshowedon
theLCDdisplaystepbystepasbelowbypressingthePlaymode/infobutton(21)continuously.
Radiotextprogramtypefrequencymono/stereotimedate
Digitalaudiobroadcasting(DAB)radio
1. SettheunittoDABmodebypressFunctionbutton(9).
2. PressthePlay/pause/Scanbutton(18)once;theunitwillstartafullscanfromrange11b‐12d.
PressSkipdown(11)orSkipup(19)buttontoselectyourdesiredDABchannelthenpress
“Stop/Enter”button(10)toconfirmtheselectedchannel.
3. PressthePlaymode/infobutton(21)continuouslytocheckthebelowinforeleasedbyDAB.
SignalstrengthprogramtypeGroupnamefrequencysignalerrortransferratetime
date
4. Adjustvolumeknob(14)forthedesiredvolumelevel.
Dynamicrangecontrol
ThisapparatusprovidesthreedynamicrangemodestomatchdifferentprogramtypesinDABmode.
1. InDABmode,press“Menu/Mem/clk‐adj”button(12)toenterthe“Menu”,thenpressSkipdown
(11)orSkipup(19)buttontoselect“DRC”.
2. Press“Stop/Enter”button(10)toenterthe“DRC”setting,thenpressSkipdown(11)orSkipup
(19)buttontoselect“DRChigh/low/off”mode.Thenpress“Stop/Enter”button(10)toconfirm
thesetting.
3. Inanystatepress“Menu/Mem/clk‐adj”button(12)toquitthesettingmode

8
Languagesetting
Thisapparatusprovide4languagesforFM/DABoperationdisplay.
1. InDAB/FMmode,press“Menu/Mem/clk‐adj”button(12)toenterthe“Menu”,thenpressSkipdown
(11)orSkipup(19)buttontoselectSyetem”.
2. Press“Stop/Enter”button(10)toenterthe“System”setting,thenpressSkipdown(11)orSkip
up(19)buttontoselect“Language”thenpress“Stop/Enter”button(10)toenterlanguagemode,
thenpressSkipdown(11)orSkipup(19)buttontoselectyourdesiredlanguagebetween
English/French/German/Italian.Thenpress“Stop/Enter”button(10)toconfirmthesetting.
3. Inanystatepress“Menu/Mem/clk‐adj”button(12)toquitthesettingmode
Presetstations
Youcanstoreupto20radiostationsinthememory(10‐FM/10‐DAB).
1. SettoFM/DABmode
2. Turntothedesiredradiostationby“manual”or“auto”tuningmethod.
3. Pressandholdthe“Mem/clk‐adj”button(12)toenablememorystate.
4. PressSkipdown(11)orSkipup(19)buttontoselectthedesiredstationmemoryfor
storage.
5. Press“Stop/Enter”button(10)toconfirmthesetting.
6. Repeatstep2to5tostoreotherstations.
Recallpresetstations
1. SettoFM/DABmode
2. PressPre‐upbutton(20)torecallthestoredstation.
3. PressSkipdown(11)orSkipup(19)buttontoselectthedesiredrecallstation.
4. Press“Stop/Enter”button(10)againtoconfirmtherecallstation.
DAB/FMreset:
IfyouwouldliketoerasealltheFM/DABstaionsstored.
1. SetinDABorFMmode,press“Menu/Mem/clk‐adj”button(12)toenterthe“Menu”,thenpressSkip
down(11)orSkipup(19)buttontoselect“System”.
2. Press“Stop/Enter”button(10)toenterthe“System”setting,thenpressSkipdown(11)orSkip
up(19)buttontoselect“Factoryreset”.Thenpress“Stop/Enter”button(10)toconfirmthe
factoryreset.
3. Apparatuswilltheneraseallthestoredstations.
PlayingCD/MP3disc
Gettingstarted
1. PresstheFunctionbutton(9)toselectCDmode.
2. OpentheCDdoorbypressingtheCDdooropen/close(7).PutaCDdiscintothecompartmentand
closetheCDdoor.
3. Asearchisperformedifadiscisinside.Totalnumberoftracksisread.
Play/pausemode
1. IfPlay/Pausebutton(18)ispressedduringstopmode,thefirsttrackwillbeplayed.
2. IfPlay/Pausebutton(18)ispressedduringplayback,thesystemwillgointopausemodeandthe
pauseindicatorwilllightupintheLCDdisplay(8).Pressagaintoresumenormalplayback.
Stopmode
1. IfStopbutton(10)ispressedduringplayorpausemode.Theunitwillgointostopmodeand
displaythetotalnumberoftrackintheLCDdisplay(8).
Skipmode(skipup /skipdown )
1. Duringplaymode,ifskipup button(19)ispresseditwillgotonexttrackanddisplaythetrack
number.

9
2. Duringplaymode,ifSkipdownbutton(11)ispressed,itwillgobacktothebeginningofthe
track,sametracknumber.
3. Afterstep2,pressskipdownbutton(11)again,itwillgototheprevioustrackandplaythe
beginningofthetrack.
ForMP3disc/file
1. PlacetheMP3‐CDintheCDcompartment.Afterasearchisperformedthetotalnumberoftrackswill
beshownontheLCDdisplay(8).
2. PressSkipuporSkipdown(11/19)buttontoselectthetracknumber.
3. Whenthedesiredtrackandalbumisbeingselected,pressthe“Play/Pause”button(18)tostart
playback.
Remark
- Press“Folderup”button(20)onthemainunittoselecttheMP3folderupwardly.
- ThetracknumberwilldisplayontheLCD(8)andthenitwillplaythattrackwhenyoupress
Play/Pausebutton(18).
Repeat/Randommode
Pressthe“Playmode”button(21)duringplaybacktoselectrepeatandrandomfunctions,asingletrack,
singlefolder(MP3only)orallthetrackscanbeplayedindifferentmodesasfollows:‐
ForCD
(1) Repeat1(2) Repeatalltrack (3) Random(4) Offmode
Indicator
PlaymodeonLCDdisplay
RepeattrackRep1
RepeatallRepA
RandomRand
Offmode ‐‐‐‐‐‐‐‐‐‐‐‐‐
ForMP3disc/file
(1) Repeat
1
(2) Repeat1
folder
(3) Repeatall
tracks
(4) Random (5) Off
mode
Indicator
PlaymodeonLCDdisplay
RepeatsingletrackRep1
RepeatsinglefolderRepF
RepeatalltracksRepA
RandomRand
Offmode ‐‐‐‐‐‐‐‐‐‐‐‐‐‐‐‐‐
Repeatplay
Youcanlistentothedesiredtracksorfolderrepeatedlybyusingthisfunction.
Randomplay
Youcanlistentoallthetracksinarandomorderbyusingthisfunction
CD/MP3discprogramming
Upto20tackscanbeprogrammedfordiscplayinanyorder.Beforeuse,besuretopressthestopbutton.
1. SetinCDmode.
2. PresstheMemorybutton(12),“P01&T000”willappearonLCDdisplay(8).
3. SelectadesiredtrackbyusingtheSkipup/Skipdownbuttons(19/11).

10
4. PresstheMemorybutton(12)toenterthetrackintothememory.
5. Repeatsteps3and4toenteradditionaltracksintothememoryifnecessary.
6. Whenallthedesiredtrackshavebeenprogrammed,press“Play/Pause”button(18)toplaythe
discintheorderyouhaveprogrammed.
7. Press“Stop”button(10)toterminateprogramplay.
Press“Stop”buttontwice(10)atCDstopmodetocancelallprogrammedmemoryuntilthe“Prog”
indicatordisappearonLCDdisplay(8).
ForMP3disc/file,pressthe“Folderup”button(20)toselectthe1sttrackofnextfolderdirectlyand
hencetospeedupthesongselection.
Theprogrammingmodewillautomaticallystopifnobuttonisbeingpressedinaperiodofabout
30secondsafterpressingtheMemorybutton(12).
Remark:‐
MP3trackformatrequirement:‐
- Bitrate:32kbps~320kbps,samplingrate:32kHz,44.1kHzand48kHzdecodable
- TheperformanceofplayingMP3discisdependentonthequalityoftherecordingdiscandthe
methodofrecording.Furthermore,thesearchinglead‐timeforMP3‐CDislongerthannormalCDdue
tothedifferentformat.
PlaybackofMP3songviaUSBstoragemedia
Connecting
ThesystemisabletodecodeandplaybackallMP3fileswhicharestoredinmemorymediausingtheUSB
port.
1. SetthesystemtoStandbymodefirstoranyotherfunctionexceptUSBmode.
2. Plug‐intheUSBpen‐drivewiththefaceupandmakesureitsfullyinserted.
ConnectingtheUSBpen‐driveupsidedownorbackwardscoulddamagetheaudiosystemorthe
storagemedia.Checktobesurethedirectioniscorrectbeforeconnection.
3. TurnontheunitagainbyOn/offbutton(17)andsetpressFunctionbutton(9)toselectUSBmode.
Thesystemwillstartreadingthestoragemediaautomaticallyafterconnecting,andLCDdisplay(8)
willshowthetotalnumberofMP3filesbeingdetected.
4. RepeatthesameplaybackprocedureasplayingCD/MP3discasabove.
Remark
- ThesystemcandetectandreadthefilesunderMP3formatonlyinUSBmodebutnotothermusicfile
formats.
- IfyouconnectthesystemtoanMP3playerviatheUSBsocket,duetovariancesinfilesystem
formats,someMP3playersmaynotbeabletoplayviatheUSBsocket.Thisisnotamalfunctionof
thesystem.
- TheUSBportdoesnotsupportconnectionwithaUSBextensioncableandisnotdesignedfor
communicationwithcomputer.
- DuetoERPstagetworequirementsandtoprotecttheenvironment(forEuropeanmarketonly).
Theunitwillswitchtostandbymodeautomaticallyifnomusicisdetectedplayingforover15
minutes.
RemovingofUSB
ToremovetheUSBstick,turnoffthepowerorswitchthefunctionmodetoeithercdortunermodefirst,
thenun‐plugitbypullingouttheUSBsocketdirectly

11
Bluetoothconnectingandplayback
1. PresstheFunctionbutton(9)toselect“BT/AUX”mode.
2. IftheAux‐injackisnotconnected,thesystemwillswitchtoBTmodeautomaticallyand“BT“withthe
flashingof“Pairing”willbeshownontheLCDdisplay(8).ItmeanstheBluetoothisinsearching
mode.
3. SwitchontheBluetoothfeatureofyourBluetoothdevice(suchasmobilephone)andselect“Lenco
SCD‐690”Bluetoothequipmenttoconnect.
4. Onceconnectedsuccessfully,theLCDdisplay(8)willshow“BTConnected“.
StartplaybackfromyourBluetoothdeviceandenjoythemusic.
5. AdjusttheVolumeUp/Downbutton(14)todesiredvolumelevel.
6. TodisconnecttheBluetoothconnection,turnofftheBluetoothfeatureofyourBluetoothdevice.The
LCDdisplaywillshow“BT“withtheflashingof“Pairing”forpairingofanewdeviceorswitchoffthe
unit.
Listeningtotape
Generaloperation
Stop/ejectkeypresstostopalldeckoperation.Pressagaintoopenthecassettedoor.
Fastforwardkey&
Fastrewindkey
presstostartrapidtapewindingineitherforwardorreversedirection.Press
stop/ejectkey,thecassettespoolsstopturning.
Playkeypresstostartplayingtape.
Pausekeypresstostoptapeoperationtemporarily.Pressagaintoresumeplay.
Playback
Select“Tape”byFunctionbutton(9)
Putinthecassettetape.
Pressplaykeytoactiveplayback
AdjusttheVolumeup/downcontrol(14)tothedesiredlevel.
Usepausekeywhenyouwanttostopplaybacktemporarily.
Pressstop/ejectkeywhenfinished.
Morefeatures
A. Alarmclocksetting
ThisfunctionallowsthesystemtoturnonautomaticallyandwakeyouuptoCD,FM/DAB,buzzerorUSB
mode.Setthesystemtostandbymode,thenpressandholdthe“Timer”keytoentertheTimersetting
mode,LCDwillshowTimerOntime,Moreover,thetimerclockwillflashthehourdigit,thismeansthe
unitisallreadytoentertimersettingmode.
1) Ontimesetting:Presstheskipupordown(19/11)tosetthehour.Thenpress
Timerbutton(13)tostorethetimerstartinghour,minutedigitwillflash,press
skipupordown(19/11)tosettheminute.ThenpressTimerbutton
(13)tostorethetimerontime
2) Offtimesetting:Afterabovestep,theLCDwillshow“TimerOff”andhourdigitwasflashing.
Pressskipupordown(19/11)tosetthehour.ThenpressTimer
button(13)tostorethetimeroffhour,minutedigitwillflash,pressskipup
ordown(19/11)tosettheminute.ThenpressTimerbutton(13)to
storethetimerofftime
3) Mode:Thenpressskipupordown(19/11)toselecttimeronmode.Then
pressTimerbutton(13)tostorethetimeronmode.Pressskipupor
down(15/21)toselecttimeronvolumelevelandpressTimerbutton
(13)tocompletethetimersetting.TheUnitwillreturntostandbymodeand
thedisplaywillshowthetimericon“”.

12
Active/de‐activetimerfunction(Instandbymodeonly)
1. Toactivetimerfunction,pressthe“Timer”buttononcethetimerindicator“”willappearinthe
LCDdisplay(2).
2. Tocanceltimerfunction,press“Timer”buttonagainthetimerindicator“”willdisappear.
Remark:‐
Ifthereisnomusicsourcebeingdetected(CDorUSB)whenthepresettimeisreached,systemwill
defaultto“FM”functionforwake‐upmodeautomatically.Thesystemwillpresettothelastradio
frequencybeinglistenedtoobeforeswitchingoff.
ForFM/DABwakeup,thesystemwillpresettothelastradiofrequencybeinglistenedtoobefore
switchingoff.
Ifwakeuptobuzzerisselected,theunitwillemita“beepbeep”soundattheselectedtime.
Thereareabout4secondsforthealarmsettingmode,thissystemwillreturntonormalmode
automaticallyifnokeysarebeingpressedinthistimeframe.
Duringthealarmonmode,pressingthe“On/off”button(17)willswitchoffthesystem.
Duetodisplaysizelimitation,timericon“”willnotappearonLCDduringoperatinginFM/DAB
mode
B. Aux‐inconnection
ConnecttheunittootherdevicesbyconnectingtheAuxinjack(2)witha3.5mmcable(notprovided)and
theotherendconnecttotheexternaldevicesuchasDiscman/MP3playertoperformthemusicplayback
orencodingfunctionetc.
1) Selectthe“BT/AUX“modebypressingthefunctionbutton(9)andtheunitwillautomaticallyswitch
to“AUXIN”modeaslongastheAux‐incableisconnected
2) AdjusttheVolumeUp/Downbutton(14)todesiredvolumelevel.
3) Starttoplayyourexternaldevice.
C. UsingHeadphones
InsertingtheplugofyourheadphonesintotheHeadphonejackwillenableyoutolisteninprivate.
READTHISIMPORTANTINFORMATIONBEFOREUSINGYOURHEADPHONES
1) Avoidextendedplayatveryhighvolumeasitmayimpairyourhearing.
2) Ifyouexperienceringinginyourears,reducethevolumeorshutoffyourunit.
3) Keepthevolumeatareasonableleveltoallowyoutohearoutsidesounds.
SPECIFICATION
ACPOWERAC 230V~50Hz
RADIOFREQUENCYFM87.5–108MHz
DAB:174.928‐239.2MHz
BLUETOOTHVERSIONV2.1
NOTE:DuetoERPstagetworequirementsandtoprotecttheenvironment,theunitwillswitch
tostandbymodeautomaticallyifnomusicisplayingafter15minutes.

13
Guarantee
LencooffersserviceandwarrantyinaccordancetoEuropeanlaw,whichmeansthatincaseofrepairs
(bothduringandafterthewarrantyperiod)youshouldcontactyourlocaldealer.
Importantnote:ItisnotpossibletosendproductsthatneedrepairstoLencodirectly.
Importantnote:Ifthisunitisopenedoraccessedbyanon‐officialservicecenterinanyway,thewarranty
expires.
Thisdeviceisnotsuitableforprofessionaluse.Incaseofprofessionaluse,allwarrantyobligationsofthe
manufacturerwillbevoided.
Disclaimer
UpdatestoFirmwareand/orhardwarecomponentsaremaderegularly.Thereforesomeoftheinstruction,
specificationsandpicturesinthisdocumentationmaydifferslightlyfromyourparticularsituation.All
itemsdescribedinthisguideforillustrationpurposesonlyandmaynotapplytoparticularsituation.No
legalrightorentitlementsmaybeobtainedfromthedescriptionmadeinthismanual.
DisposaloftheOldDevice
Thissymbolindicatesthattherelevantelectricalproductorbatteryshouldnotbe
disposedofasgeneralhouseholdwasteinEurope.Toensurethecorrectwaste
treatmentoftheproductandbattery,pleasedisposetheminaccordancetoany
applicablelocallawsofrequirementfordisposalofelectricalequipmentorbatteries.In
sodoing,youwillhelptoconservenaturalresourcesandimprovestandardsof
environmentalprotectionintreatmentanddisposalofelectricalwaste(Waste
ElectricalandElectronicEquipmentDirective).
CEMarking
Hereby,LencoBeneluxB.V.,Thermiekstraat1a,6361HBNuth,TheNetherlands,declaresthatthis
productisincompliancewiththeessentialEUdirectiverequirements.
Thedeclarationofconformitymaybeconsultedviatechdoc@commaxxgroup.com
Service
Formoreinformationandhelpdesksupport,pleasevisitwww.lenco.com
LencoBeneluxBV,Thermiekstraat1a,6361HB,TheNetherlands.

14
NederlandsDraagbareDAB+enFM‐radiometcd,cassetteenBluetooth
LETOP:
Hetgebruikvanafstandsbedieningenofaanpassingenofdeuitvoeringvanproceduresdienietinditdocumentzijn
gespecificeerd,kanleidentotgevaarlijkeblootstellingaanstraling.
VOORZORGSMAATREGELENVOORGEBRUIK
ONTHOUDDEVOLGENDEINSTRUCTIES:
1. Bedekofblokkeerdeventilatieopeningenniet.Wanneeruhetapparaatopeenschapplaatst,dientu5cm(2”)
vrijeruimterondomhetgeheleapparaattebehouden.
2. Installeerhetproductvolgensdemeegeleverdegebruikershandleiding.
3. Houdhetapparaatuitdebuurtvanhittebronnen,zoalsradiatoren,verwarmingen,kachels,kaarsenenandere
hittegenererendeproductenofopenvuur.Hetapparaatkanalleenwordengebruiktineengematigdklimaat.
Extreemkoudeofwarmeomgevingendienentewordenvermeden.Hetbedrijfstemperatuurbereikligttussen
0°Cen35°C.
4. Gebruikditapparaatnietindebuurtvankrachtigemagnetischevelden.
5. Elektrostatischeontladingkannormaalgebruikvanditapparaatverstoren.Uhoefthetapparaatinditgeval
slechtsteresettenenopnieuwoptestartenvolgensdegebruikershandleiding.Weesvoorzichtigtijdens
bestandsoverdrachtengebruikhetproductineenomgevingzonderstatischeinterferentie.
6. Waarschuwing!Steeknooiteenvoorwerpviadeventilatie‐ofandereopeningeninhetproduct.Eris
hoogspanninginhetproductaanwezigenalsuereenobjectinsteekt,kandateenelektrischeschok
veroorzakenen/ofkortsluitingindeinterneonderdelen.Morsomdezelfderedengeenwaterofvloeistofop
hetproduct.
7. Gebruikhettoestelnietinvochtigeruimtes,zoalsbadkamers,stomendekeukensofindebuurtvan
zwembaden.
8. Hetapparaatmagnietwordenblootgesteldaandruppelsenspettersenzorgervoordatergeenmetvloeistof
gevuldevoorwerpen,zoalsvazen,opofindebuurtvanhetapparaatwordengeplaatst.
9. Gebruikditapparaatnietwanneercondensatiekanoptreden.Wanneerhetapparaatineenwarme,natte
ruimtewordtgebruikt,kunnenzichwaterdruppelsofcondensvormeninhetapparaatenkanhetapparaat
nietgoedfunctioneren.Laathetapparaat1of2uuruitstaanvoordatuhetinschakelt:hetapparaatdient
droogtezijnvoordatdezestroomontvangt.
10. Alhoewelditapparaatmetgrotezorggefabriceerdenverschillendekerengeïnspecteerdisvoordathetde
fabriekverlaat,ishetnogsteedsmogelijkdaterproblemenoptreden,zoalsmetalleelektrischeapparaten.Als
urook,eenovermatigehitteontwikkelingofeniganderonverwachtverschijnselopmerkt,moetuonmiddellijk
destekkervanhetnetsnoeruithetstopcontacthalen.
11. Ditapparaatmoetwordengebruiktmeteenvoedingsbronzoalsgespecificeerdophetspecificatielabel.Alsu
twijfeltoverhettypevoedingdatgebruiktwordtinuwhuis,raadpleegdanuwdealerofplaatselijk
energiebedrijf.
12. Buitenbereikvandierenhouden.Sommigedierenkauwengraagopvoedingskabels.
13. Gebruikeenzacht,droogdoekjeomhetapparaattereinigen.Gebruikgeenoplosmiddelenofopbenzine
gebaseerdevloeistoffen.Ukunteenvochtigdoekjemetverdundschoonmaakmiddelgebruikenom
hardnekkigevlekkenteverwijderen.
14. Deleverancierisnietverantwoordelijkvoorschadeofverlorengegevensveroorzaaktdoorstoring,misbruik,
modificatievanhetapparaatofbatterijvervanging.
15. Onderbreeknooitdeverbindingwanneerhetapparaatformatteertofbestandenoverdraagt.Degegevens
kunnenanderscorruptofverlorenraken.
16. IndienhetapparaateenUSB‐afspeelfunctieheeft,moetdeUSB‐geheugenstickrechtstreeksophetapparaat
wordenaangesloten.GebruikgeenUSB‐verlengkabel,omdatdiekanleidentotstoringenmetfoutieve
gegevensalsgevolg.
17. Hetclassificatielabelbevindtzichopdeonderkantofhetachterpaneelvanhetapparaat.

15
18. Dithulpmiddelisnietbedoeldvoorgebruikdoormensen(inclusiefkinderen)meteenfysieke,zintuiglijkeof
mentalehandicap,ofeengebrekaanervaringenkennis,tenzijzijtoezichtofinstructieshebbengekregenover
hetjuistegebruikvanhethulpmiddeldooreenpersoondieverantwoordelijkisvoorhunveiligheid.
19. Ditproductisalleenvoorniet‐professioneelgebruikbedoeldennietvoorcommercieelofindustrieelgebruik.
20. Verzekeruervandathetapparaatineenstabielepositiestaatopgesteld.Schadediewordtveroorzaaktdoor
hetgebruikvanditproductineenonstabielepositie,trillingenofschokkenofhetnietopvolgenvande
waarschuwingenofvoorzorgsmaatregelenindezegebruikershandleidingwordtnietgedektdoordegarantie.
21. Verwijdernooitdebehuizingvanditapparaat.
22. Plaatsditapparaatnooitopandereelektrischeapparatuur.
23. Geefkinderengeengelegenheidinaanrakingmetplasticzakkentekomen.
24. Gebruikuitsluitenduitbreidingen/accessoiresgespecificeerddoordefabrikant.
25. Laatallereparatiesoveraangekwalificeerdonderhoudspersoneel.Onderhoudisnodigalshetapparaatis
beschadigd,bijvoorbeeldalsdevoedingskabelofdestekkerisbeschadigd,alservloeistofophetapparaatis
gemorst,alservoorwerpeninhetapparaatzijngevallen,alshetapparaatisblootgesteldaanregenofvocht,
alshetapparaatnietnormaalwerktofalshetisgevallen.
26. Langdurigeblootstellingaanhardegeluidenvanpersoonlijkemuziekspelerskanleidentottijdelijkof
permanentgehoorverlies.
27. Alshetproductwordtgeleverdmetvoedingskabelofwisselstroomvoedingsadapter:
Alserzichproblemenvoordoen,moetudevoedingskabelloskoppelenenhetteronderhoudaanbieden
aangekwalificeerdpersoneel.
Nooitopdevoedingsadapterstappenofdezeindrukken.Weeszeervoorzichtig,vooralinhetgebied
ronddestekkersendekabelaansluitingen.Plaatsgeenzwarevoorwerpenopdevoedingsadapter,om
beschadigingervantevoorkomen.Houdhetgeheleapparaatbuitenbereikvankinderen!Wanneer
kinderenmetdevoedingskabelspelen,kunnenzijernstigletseloplopen.
Haaldestekkeruithetstopcontacttijdensonweerofwanneerudezelangeretijdnietgebruikt.
Hetstopcontactmoetindebuurtvandeapparatuurzijngeïnstalleerdeneenvoudigtebereikenzijn.
LaatAC‐stopcontactenofverlengsnoerennooitoverbelastraken.Overbelastingkanbrandofeen
elektrischeschokveroorzaken.
ApparatenmeteenKlasse1structuurdienentewordenaangeslotenopeenstopcontactmeteen
beschermendeaardverbinding.
ApparatenmeteenKlasse2structuurvereisengeenaardverbinding.
Houdaltijddestekkervastwanneerudezeuithetstopcontacttrekt.Treknooitaandevoedingskabel.
Ditkantoteenkortsluitingleiden.
Gebruiknooiteenbeschadigdevoedingskabelofstekkerofeenlosstopcontact.Ditvormtnamelijkeen
risicoopbrandofelektrischeschokken.
28. Indienhetproductknoopcelbatterijenbevatofwordtgeleverdmeteenafstandsbedieningdie
knoopcelbatterijenbevat:
Waarschuwing:
“Batterijnietinslikken,chemischbrandgevaar”ofgelijkwaardigewerking.
Demeegeleverdeafstandsbedieningbevateenknoopcelbatterij.Alsdebatterijwordtingeslikt,kandeze
inslechts2uurernstigeinternebrandwondenveroorzakenentotdedoodleiden.
Houdnieuweengebruiktebatterijenbuitenbereikvankinderen.
Alsdebatterijhoudernietgoedkanwordengesloten,dientuhetproductnietmeertegebruikenen
buitenbereikvankinderentehouden.
Alsudenktdatbatterijenzijningesliktofbinnenineenwillekeuriglichaamsdeelterechtzijngekomen,
dientuonmiddellijkmedischehulptezoeken.

16
29. Waarschuwingm.b.t.hetgebruikvanbatterijen:
Alsdebatterijonjuistwordtgeplaatst,bestaaterexplosiegevaar.Vervangdebatterijalleendooreen
zelfdeofvergelijkbaresoortbatterij.
Steldebatterijnietblootaanextreemhogeoflagetemperaturenofeenlageluchtdrukopgrotehoogte
tijdensgebruik,opslagoftransport.
Vervangingvaneenbatterijdooreenincorrecttypekanleidentoteenontploffingofdelekkagevan
ontvlambarevloeistoffenofgas.
Hetweggooienvaneenbatterijinhetvuurofeenheteoven,ofhetmechanischverpletterenof
insnijdenvaneenbatterij,kanleidentoteenexplosie.
Hetachterlatenvaneenbatterijineenomgevingmetextreemhogetemperaturenkanleidentoteen
explosieofhetlekkenvanbrandbarevloeistofofgas.
Eenbatterijdieaaneenextreemlageluchtdrukwordtblootgesteld,kanleidentoteenexplosieofhet
lekkenvanbrandbarevloeistofofgas.
Aandachtvoorhetmilieuisnodigbijhetverwijderenvandebatterijen.
INSTALLATIE
Pakalleonderdelenuitenverwijderdebeschermendematerialen.
Sluithetapparaatnietaanophetstopcontact,voordatudenetspanninghebtgecontroleerdenvoordat
alleandereaansluitingenzijngemaakt.
*DezeinstructieszijnenkelvantoepassingopproductenmeteenvoedingskabelofeenACvoedingsadapter.

17
Letop:
Hetgebruikvanbedieningenofproceduresandersdanbeschrevenindezedocumentatiekanleidentot
blootstellingaanschadelijkestraling.
Ditapparaatdientuitsluitendtewordenaangepastofgerepareerddoorgekwalificeerd
onderhoudspersoneel.
PLAATSINGVANBEDIENINGSELEMENTEN
1)USB‐aansluiting
2)Aux‐ingang
3)3,5mmhoofdtelefoonuitgang
4)Cassettetoets
5)Handvat
6)FM‐antenne
7)CD‐klepjeopenen/sluiten
8)LCD‐scherm
9)knopFunctie
10)Stop/Entertoets
11)Vorige/Tuneromlaag‐toets
12)Menu/Mem/clock‐adjust‐toets
13)Timer‐toets
14)Volumeomhoog/omlaagtoets
15)Cassettedeurtje
16)Stand‐by‐led
17)Aan/uittoets
18)Start/Pauze/Scantoets
19)Volgende/Tuneromhoog‐toets
20)Pre/Folderup‐toets
21)Info/Playmode‐toets
22)DC‐aansluiting
KLASSE1
LASERPRODUCT
LETOP
Debliksemschichtbinnenin
dedriehoekisbestemdu
tewaarschuwenopde
aanwezigheidvangevaarlijke
spanningbinneninhet
product.
RISICOOPELEKTRISCHESCHOKKEN
OPENHETAPPARAATNIET
LETOP:OMHETRISICOOPELEKTRISCHESCHOKKENTE
VOORKOMEN,NOOITDEBEHUIZING(OFACHTERZIJDE)
OPENEN.GEENINTERNEONDERDELENDIEUZELFKUNT
REPAREREN.LAATALLEREPARATIESDOORBEVOEGD
ONDERHOUDSPERSONEELUITVOEREN.
Hetuitroeptekenbinnenin
dedriehoekisbedoeldomu
tewijzenopdeaanwezigheid
vanbelangrijkeinstructies
meegeleverdmet
hetproduct

18
Belangrijk:
Omdathetgevoeligecircuitinterferentiekanveroorzakeninradiotunersindebuurtvanhetapparaat,
dientuditapparaatuitteschakelenwanneeruandereradioapparatuurgebruikt.
WegensdecomplexiteitvandeMCU‐bediening,koppelhetapparaata.u.b.losvandevoedingsbronals
hetapparaatstopttijdensgebruik!Ditduidtnietopeenstoringvanhetsysteem!
Voorzorgsmaatregelenvoorgebruik
Installatie
•Pakalleonderdelenuitenverwijderdebeschermendematerialen.
•Sluithetapparaatnietaanophetstopcontactvoordatudenetspanninghebtgecontroleerdenalle
andereverbindingentotstandhebtgebracht.
•Bedekgeenvandeventilatieopeningenenzorgvoorenkelecentimetersvrijeruimterondomhet
apparaatvoorventilatie.
Aansluiting
1.SluitdeDC‐stekkervandemeegeleverdeAC/DC‐adapteraanopdeDC‐aansluiting(22)ensluitde
AC/DC‐adaptervervolgensaanophetAC‐stopcontact.
2.Wanneeruhetapparaatvoorheteerstaansluitophetstopcontact,zethetzichautomatischop
stand‐byenzaldestand‐by‐ledoplichten.Destand‐by‐ledzaloplichten
3.Schakelhetapparaatindooropdetoets“Aan/Stand‐by”(17)tedrukken.Alsdelcd‐display(8)is
ingeschakeldmetachtergrondverlichting,betekentditdatdevoedinginordeis.Hetsysteemisnu
gereedommuziekaftespelen.
DC‐aansluiting
VoorgebruikopDC‐voeding,installeera.u.b.8stukstypeC(UM‐2)
batterijenindebatterijhouder,trekdeAC‐stekkeruithet
stopcontactenkoppeldeAC‐kabelvervolgenslosvandeAC‐ingang.
Haala.u.b.allebatterijenuithetapparaatwanneerudezeop
DC‐voedinggebruikt.Hetisraadzaamallebatterijenuithetapparaat
teverwijderenwanneerudezevoorlangeretijdnietgebruikt.
Deklokinstellen
1.Zethetapparaatindestandby‐modus.
2.Houddetoets“Menu/Mem/clk‐adj”(12)ingedruktendeuuraanduidingzalbeginnenteknipperenop
deLCD‐display(8).DrukopdetoetsVorige/Omlaag(11)ofVolgende/Omhoog(19)omde
juisteurenintestellen.Drukopdetoets“Menu/Mem/clk‐adj”(12)omdeurenopteslaan,de
minutenzullenvervolgensbeginnenteknipperen.
3.DrukopdetoetsVorige/Omlaag(11)ofVolgende/Omhoog(19)omdejuisteminuteninte
stellen.
4.Drukopdetoets“Menu/Mem/clk‐adj”(12)omdeminutenopteslaan.
Alsudenetvoedingonderbreekt,zaldeingesteldetijdvolledigwordenteruggesteld.Wijradenu
aanhetsysteemopstand‐byteschakelenvooreenvoudiggebruik.
DeklokzalzichzelfmetdeRDS‐/DAB‐kloksynchroniserenzodrahetRDS‐/DAB‐signaalwordt
ontvangenalsdekloknognietisingesteld.

19
Naarderadioluisteren
Bediening
Handmatigafstemmen
1.SchakelhetapparaatindoormiddelvandeAan/uittoets(17)endrukopdeFunctietoets(9)totude
“FM”‐modusbereikt.
2.DrukopdetoetsenVorige/Omlaag(11)ofVolgende/Omhoog(19)omaftestemmenopde
gewenstezender.
3.PasdeVolumeknop(14)aantothetgewenstevolumeniveau.
Automatischafstemmen
1.ZethetapparaatinFM‐modus.
2.DrukeenmaalopdetoetsScan(18)omhetapparaatinoplopendefrequentietelatenscannentotdat
ereenradiostationwordtontvangen.DrukeenmaalopdetoetsVorige/Omlaag(11)envervolgensop
detoetsScan(18)omhetapparaatinaflopendefrequentietelatenscannen.Alshet
RDS‐uitzendsignaal(RadioDataSysteem)wordtontvangen,zalhetsysteemdehuidigetijd
automatischinstellen.
3.PasdeVolumeknop(14)aantothetgewenstevolumeniveau
FM‐scaninstelling
Alsernadeautomatischescanteveelongewensteradiostationsmeteenzwaksignaalwordenontvangen,
dankuntualleensterkestationsselecterendoordezwakkeresignalenteverwijderen.
1.DrukinFM‐modusopdetoets“Menu/Mem/clk‐adj”(12)omhet“Menu”teopenenendruk
vervolgensopdeVorige/Omlaagtoets(11)ofVolgende/Omhoogtoets(19)om“Scansetting”
(Scaninstelling)teselecteren.
2.Drukopdetoets“Stop/Enter”(10)omde“Scansetting”(Scaninstelling)teopenenendruk
vervolgensopdeVorige/Omlaagtoets(11)ofVolgende/Omhoogtoets(19)om“Strong
stationsonly”(alleenkrachtigestations)teselecteren.Drukvervolgensopdetoets“Stop/Enter”(10)
omuwinstellingtebevestigen.
3.Voeropnieuwdeautomatischeafstemprocedureuitzoalshierbovenstaatbeschreven.
FM‐enFM‐stereo‐ontvangst
HetapparaatzalinMonostandaardopFM‐modusschakelen.ZetdaaromalsueenFM‐stereosignaal
ontvangt,deFM‐modusopStereodoortedrukkenopdeMenu‐toets(12),drukdanopdetoetsen
Vorige/Omlaag(11)ofVolgende/Omhoog(19)omdeAudiosetting(Audio‐instellingen)te
selecteren,drukopdeEnter‐toets(10)endrukopnieuwopdetoetsenVorige/Omlaag(11)of
Volgende/Omhoog(19)omFMstereoteselecteren,drukvervolgensopdeEnter‐toets(10)om
tebevestigen.Alshetstereosignaalzwakenlawaaierigis.SchakelbijvoorkeuropdeFM‐modusvia
dezelfdeprocedure.
Tipsvooroptimaleontvangst:‐
FM:deontvangerheefteenstaafantenne(6)opdeachterbehuizing.Trekdezevollediguitvooreen
optimaleontvangst.
RadioDataSysteem(RDS)
DezefunctietoontstapsgewijsdevolgendeinformatieopdeLCD‐displaydiewordtverstrektdoorde
radiozenderalsumeerderekerenopdetoetsInfo/Playmode(21)drukken.
Radiotekstprogrammatypefrequentiemono/stereotijddatum
Digitalaudiobroadcasting(DAB)radio
1.SchakelhetapparaatinDAB‐modusdooropdeFunctietoets(9)tedrukken.
2.DrukeenmaalopdetoetsPlay/Pause/Scan(18);hetapparaatzaleenvolledigescanstarten
binnenhetbereik11b‐12d.DrukopdetoetsenVorige/Omlaag(11)ofVolgende/Omhoog
(19)omhetgewensteDAB‐kanaalteselecterenendrukdanopdetoets“Stop/Enter”(10)omhet
gekozenkanaaltebevestigen.

20
3.DrukmeerderekerenopdePlaymode/Infotoets(21)omdeinformatieuitgezondendoorDABte
controleren,indevolgordehieronderbeschreven.
SignaalsterkteprogrammatypeGroepsnaamfrequentiesignaalstoring
overdrachtsnelheidtijddatum
4.Pasdevolumeknop(14)aantothetgewenstevolumeniveau.
Dynamischebereikcontrole
Ditapparaatheeftdriedynamischebereikmodidieovereenkomenmetverschillendesoorten
programmatypesindeDAB‐modus.
1.DrukindeDAB‐modusopdetoets“Menu/Mem/clk‐adj”(12)omhet“Menu”teopenenendruk
vervolgensopdetoetsenVorige/Omlaag(11)ofVolgende/Omhoog(19)om“DRC”te
selecteren.
2.Drukopdetoets“Stop/Enter”(10)omdeinstelling“DRC”teopenenendrukvervolgensopde
Vorige/Omlaagtoets(11)ofVolgende/Omhoogtoets(19)omdemodus“DRChigh/low/off”
(DRChoog/laag/uit)teselecteren.Drukvervolgensopdetoets“Stop/Enter”(10)omuwinstellingte
bevestigen.
3.Drukineenwillekeurigemodusopdetoets“Menu/Mem/clk‐adj”(12)omdeinstellingsmoduste
verlaten.
Taalinstelling
Ditapparaatstelt4talenbeschikbaarvoordeweergaveinFM/DAB‐modus.
1.DrukinDAB/FM‐modusopdetoets“Menu/Mem/clk‐adj”(12)omhet“Menu”teopenenendruk
vervolgensopdeVorige/Omlaagtoets(11)ofVolgende/Omhoogtoets(19)om“System”
(Systeem)teselecteren.
2.Drukopdetoets“Stop/Enter”(10)omdeinstelling“System”(Systeem)teopenen,drukvervolgens
opdetoetsVorige/Omlaag(11)ofVolgende/Omhoog(19)om“Language”(Taal)te
selecteren,drukopdetoets“Stop/Enter”(10)omdetaalmodusteopenenendrukvervolgensopde
toetsVorige/Omlaag(11)ofVolgende/Omhoog(19)omdegewenstetaaltekiezenuitde
optiesEnglish/French/German/Italian(Engels/Frans/Duits/Italiaans).Drukvervolgensopdetoets
“Stop/Enter”(10)omuwinstellingtebevestigen.
3.Drukineenwillekeurigemodusopdetoets“Menu/Mem/clk‐adj”(12)omdeinstellingsmoduste
verlaten.
Voorkeuzezenders
Ukuntto20radiostationsopslaaninhetgeheugen(10‐FM/10‐DAB).
1.StelhetapparaatinopFM/DAB‐modus
2.Stemafopdegewensteradiozenderviade“handmatige”of“automatische”afstemmethode.
3.Houddetoets“Mem/clk‐adj”(12)ingedruktomdegeheugenmodusteopenen.
4.DrukopdetoetsenVorige/Omlaag(11)ofVolgende/Omhoog(19)omhetgewenste
stationsgeheugenteselecterenvoordegeheugenopslag.
5.Drukopdetoets“Stop/Enter”(10)omuwinstellingtebevestigen.
6.Herhaalstappen2tot5omanderezendersopteslaan.
Voorkeuzezendersoproepen
1.StelhetapparaatinopFM/DAB‐modus
2.DrukopdePre‐up‐toets(20)omdeopgeslagenzendersteopenen.
3.DrukopdetoetsenVorige/Omlaag(11)ofVolgende/Omhoog(19)omdezenderte
selecterendieuwiltoproepen.
4.Druknogmaalsopdetoets“Stop/Enter”(10)omhetoproepenvandezendertebevestigen.
DAB/FMterugstellen:
AlsualleopgeslagenFM‐/DAB‐stationswiltwissen.
1.StelhetapparaatinopDAB‐ ofFM‐modus,drukopdetoets“Menu/Mem/clk‐adj”(12)omhet
“Menu”teopenenendrukvervolgensopdetoetsenVorige/Omlaag(11)ofVolgende/Omhoog
(19)om“System”(Systeem)teselecteren.
Table of contents
Languages:
Other LENCO Radio manuals

LENCO
LENCO KCR-190WH User manual

LENCO
LENCO LUCILLE User manual

LENCO
LENCO DIR-200WD User manual

LENCO
LENCO DIR-141 User manual

LENCO
LENCO PDR-011 User manual

LENCO
LENCO PDR-051 User manual

LENCO
LENCO PDR-016 User manual

LENCO
LENCO DAR-040 User manual

LENCO
LENCO LUCILLE User manual

LENCO
LENCO IR-1650 User manual

LENCO
LENCO KCR-11 User manual

LENCO
LENCO IR-2100 User manual

LENCO
LENCO BT-9000 User manual

LENCO
LENCO DIR-150 User manual

LENCO
LENCO SCD-6800 User manual

LENCO
LENCO DAR-012 User manual

LENCO
LENCO SR-600 BT User manual

LENCO
LENCO DIR-140BK User manual

LENCO
LENCO DAR-081 User manual

LENCO
LENCO PDR-026 User manual