Lenovo K13 User manual

Tip: To best view this guide, download a PDF
reader app, then open the guide in the app.
User Guide

Hot topics
Contents
Hot topics
Get Started
First look
Insert the SIM and microSD cards
Power on
Sign in
Connect to Wi-Fi
Check your battery charge level
Navigate your phone
Improve battery life
Care for your phone
Learn the basics
Home screen
Help & more
Search
Notifications
Status icons
Volume
Do not disturb
Lock screen
Quick settings
Speak
Gestures
Direct Share
Personalize your phone
Redecorate your home screen
Digital wellbeing & parental controls
Apps
Phone
Messages
Chrome™
Camera
Gallary Go
Gmail
Duo
Calendar
More apps
Connect, share, pay & sync
Connect with Wi-Fi
Connect with Bluetooth wireless
Share files with your computer
Share your data connection
Share with contacts nearby
Print
Sync to the cloud
Cast your screen to a TV
Use a memory card
Airplane mode
Mobile network
Protect your phone
Screen lock
Your privacy
Screen pinning
Backup & restore
App safety
Data usage
Troubleshoot your phone
Restart or remove an app
Restart your phone
Check for software update
Reset
Stolen phone
Accessibility
Text-to-speech output
Change your phone’s display
Change your phone’s sounds
Get more help
Where is my legal, safety, & regulatory
information?
Service & repairs
Copyright & trademarks
Hot topics
» Quick settings
» Personalize your phone
» Camera
» Protect your phone
» Speak
» Connect to Wi-Fi
» System navigation
Tip: To view all of these topics on your phone, swipe up from the home screen
and tap Device Help > Learn. For FAQs and other phone support, visit
http://support.lenovo.com.
To view the SAR and/or PD values for your phone, from the home screen, swipe
up and tap Settings > , then type Regulatory labels.
This product meets the applicable national or international RF exposure
guidance (SAR guideline) when used normally against your head or, when worn or
carried, at a distance of 5 mm from the body. To meet RF exposure guidelines during
body-worn operation, the device should be positioned at least this distance away from
the body. The SAR guideline includes a considerable safety margin designed to assure
the safety of all persons, regardless of age and health.
To view additional information, visit www.sar-tick.com.
Caution: Before using your phone, please read the legal information. Swipe up and tap
Settings > About phone > Legal information.

Get Started
Get Started
First look
Let’s get started. We’ll guide you through startup and tell you a bit about your phone’s
features.
Phone hardware buttons: top right are Volume up and down keys, middle right is Power button. Bottom middle is charging port. Top right is headset jack. On screen, top left is front camera, top right is flash. Navigation
icons are along the bottom.
Note: Certain apps and features may not be available in all countries.
Main
Camera
Macro
Camera
Headset Jack
USB-C®/
Charger
Microphone
Fingerprint
Sensor
Front
Camera
SIM &
microSD
Card Tray
Speaker
Volume
Buttons
Power
Button
Proximity
Sensor
Google
Assistant
Button
Flash
Power button
Choose from these options:
» Power on/o: Press and hold the Power button, then tap Power o. When your
phone is o, press and hold the Power button to turn it on.
» Sleep/Wake up: To conserve battery power and prevent accidental touches, put the
touchscreen to sleep by pressing the Power button. Press it again to wake it up.
» Restart: To restart your phone, press and hold the Power button, then tap Restart.
Tip: see Protect your phone.
Volume buttons
To turn volume up or down:
» Media volume: Press the buttons when your phone is not ringing, or during a song or
video, to adjust media volume.
» Ring volume: Press a volume button, then tap and slide the Ring volume bar.
Press a volume button when your phone is ringing to silence a call.
» Call volume: Press the buttons during a call.
» Alarm volume: Press a volume button, then tap and slide the Alarm volume bar.
Tip: For more on volume control, see Volume.
Google Assistant button
Press the Google Assistant button, then speak a command or ask a question. For more
about this feature, see The Google Assistant™ Go.

Get Started
Insert the SIM and microSD cards
To activate phone service, you might need to insert a SIM card (or two), or this may
have been done for you. You can also add a microSD card, which is optional and sold
separately.
Put in the cards
Caution: Make sure you use the correct size SIM card and don’t cut the SIM card.
1 Insert the SIM tool into the tray hole to pop out the tray.
2 Insert the SIM card(s) with the gold contacts down, then gently push the tray into the
slot. Add a microSD card for additional storage.
Note: microSD card is optional, sold separately.
SIM
One SIM model
or
SIM1
SIM2
Two SIM model
SIM card insert graphic. After the battery is removed, the SIM card is inserted in the slot on the left with the clipped corner to the upper left. The SDcard is inserted in the right slot.
Nano SIM
Power on
Press and hold the Power button, then follow the prompts to get started.
Power on graphic. Press and hold the Power button until the screen lights up.
Sign in
If you use Gmail™, you already have a Google™ account—if not, you can create an
account during setup. Signing into your Google account lets you access, sync, and
backup your stu. You can see your Google apps, contacts, calendar, photos, and more.
Tips
» To add, edit, or delete accounts, swipe up and tap Settings > Accounts.
» To set up email accounts, see Gmail.
» For help with your Google account, visit www.google.com/accounts.
Connect to Wi-Fi
For faster Internet access and to conserve mobile data use, swipe the status bar down.
Touch and hold to choose a Wi-Fi network. For full instructions, see Connect with
Wi-Fi.
Note: This phone supports apps and services that may use a lot of data, so make sure
your data plan meets your needs. Contact your service provider for details.

Get Started
Check your battery charge level
Now is a good time to check if your phone needs to be charged. Swipe down on the
home screen to show battery charge level.
USB-C
Charge phone graphic. Plug in a charger to charge your phone fully.
To charge your phone, insert the charging cable that came with your phone into
the charging port (see First look for port location). Plug the other end into a power
receptacle.
Note: Use of other chargers is not recommended.
Navigate your phone
Explore by touch
Use your fingers to find your way around:
» Tap: Choose an icon or option.
» Touch and hold: See more options.
» Drag: Move items on the home screen.
» Swipe: Scroll through lists or between screens.
» Pinch or double-tap: Zoom in and out on websites, photos, and maps.
» Twist: Twist a map with two fingers to rotate it, and pull two fingers down to tilt it.
» Menus: When you see , , or , you can tap it to open options for the current
screen.
» Close Keyboard: To close a keyboard, tap .
System navigation
Navigate using either gestures or buttons on the screen.
Navigation buttons
Find it: Swipe up and tap Settings > System > Gestures >System navigation >
3-button navigation
» Back: Tap Back to go to the previous screen.
» Home: Tap Home to return to the home screen.
» Recents: Tap Recents to see your recent apps (or browser tabs), and tap an app
to reopen it. Double tap to quickly switch between your recent apps. To remove an
app from the recent list, swipe it up. To scroll the list, swipe right or left.
» Google Assistant Go: Touch and hold Home to launch the Google Assistant Go.
Learn more about The Google Assistant™ Go.
Navigation bar
Find it: Swipe up and tap Settings > System > Gestures >System navigation >
Gesture navigation
» Go to the home screen: Swipe up from the bottom of the screen.
» See recent apps: Swipe up from the bottom of the screen and hold. Tap an app to
reopen it. Tap the app icon to see app info or pin it.
For Home screen,
swipe up.
To go back, swipe
toward the middle.
For recent apps,
swipe up and hold.
To switch apps,
swipe left or right at
the bottom.
For Google
Assistant Go, swipe
up diagonally.

Get Started
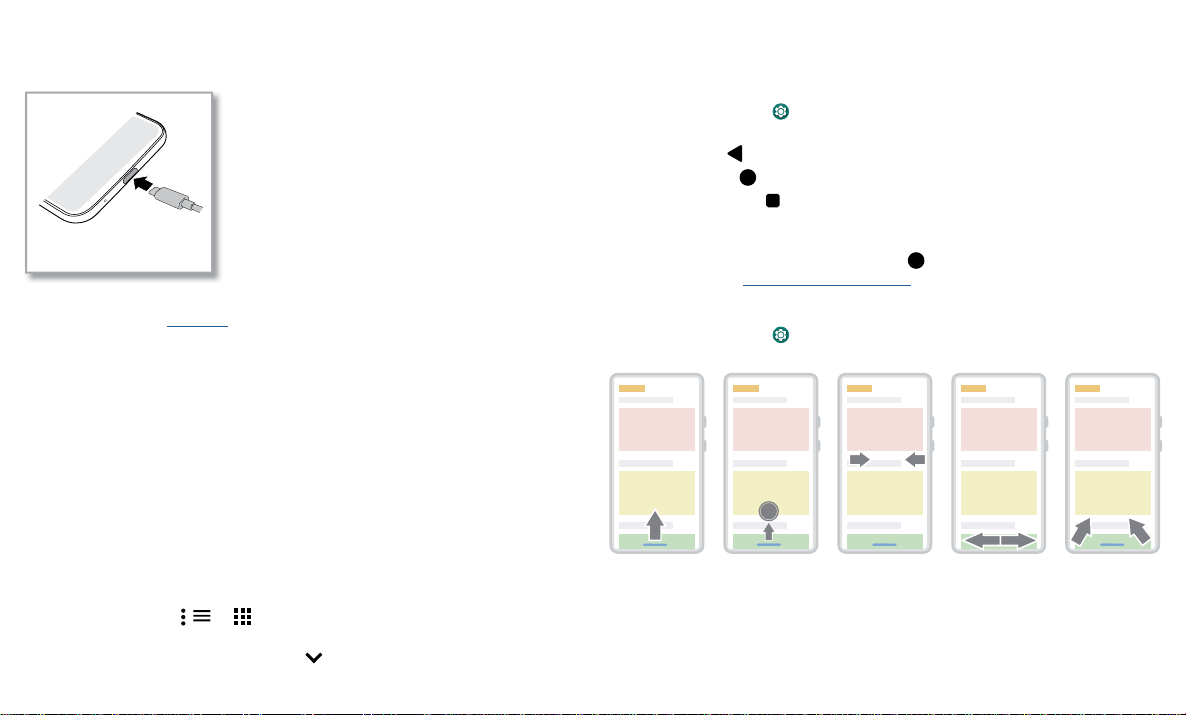
» Go back a screen: Swipe toward the middle of the screen from the left or right edge.
» Switch between apps: Swipe left or right across the bottom of the screen.
» Launch the Google Assistant Go: Swipe up diagonally from the bottom corner of the
screen to launch the Google Assistant Go. Learn more about The Google Assistant™
Go.
Improve battery life
Your phone processes tons of information. Depending on what apps are in use, your
phone may use a lot of power.
When your phone is not in use for a period of time, unnecessary background processes
are shut down to optimize battery life.
» To see what’s using up battery power, swipe up and tap Settings > Battery >
USAGE DETAILS.
» To help improve battery life, swipe up and tap Settings > Battery > Battery Saver,
then turn it on. When it is on, your phone’s display changes to dark theme.
» To limit battery use for apps that you don’t use often, swipe up and tap Settings >
Battery > Adaptive Battery, then turn it on.
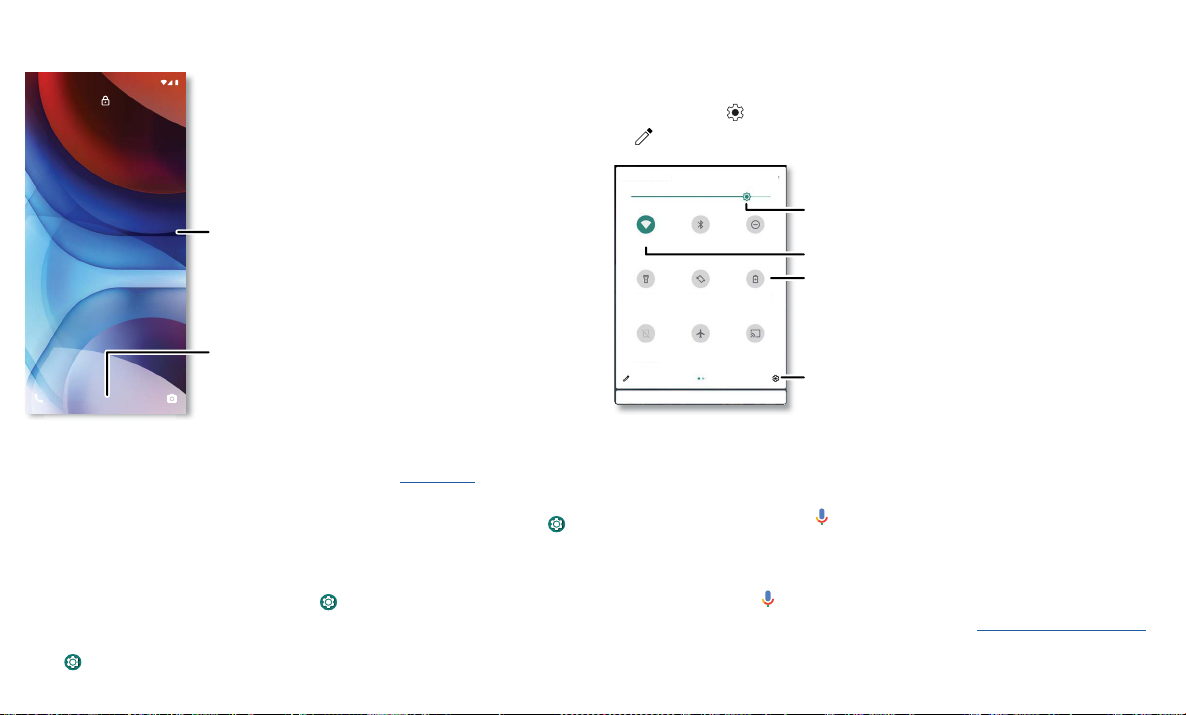
Tip: To quickly open Settings, swipe down twice on the status bar and tap .
Battery Tips
To save even more battery life between charges, you could reduce:
» Unused accounts: Swipe up and tap Settings > Accounts.
» Recording or streaming videos or music.
Care for your phone
Tips
» When you’re near water, consider using a Bluetooth speaker to listen to music from
your phone while keeping it safe. For more, see Connect with Bluetooth wireless.
» Hold your phone firmly when using gestures to open the camera or to turn the
flashlight on/o. For more, see Gestures.
» Don’t leave your phone in a hot car on a sunny day. If you do accidentally do this, let
your phone cool o before powering up.
In case of water
Mobile devices marketed as water repellent are not waterproof. Avoid prolonged
exposure to water, and do not submerge in water. In the event your device is exposed
to water, dry your device and ports thoroughly with a soft, clean cloth. Water damage is
not covered by your warranty.
Tips to prevent damage to your phone:
» Dry your phone and ports thoroughly with a soft, clean cloth.
» Don’t try to charge your phone when it’s wet.
» Do not expose your phone to salt water or other liquids.
» Do not expose your phone to water at high pressure.
» Do not drop or puncture your device, as this could damage the water repellent
features.
Clean your phone
To disinfect your phone:
» Use wipes or cloths moistened with isopropyl alcohol with a concentration of 70%
(specific for electro-electronic products).
» It is recommended that you turn your phone o to clean it.
» Avoid moisture in the phone’s openings, including the charging port, headset jack,
microphones, and speakers.
» Do not immerse the phone in cleaning agents, and do not use cleaning materials that
contain bleach or abrasive agents.
» Do not use sprays directly on the screen.

Learn the basics
Learn the basics
Home screen
The home screen is what you see when you turn on your phone. From here you can
explore apps and more.
Note: Software updates may change the look of your home screen.
Tips
» Open app list: Swipe up from the home screen to see all your apps.
» Return home: To return to the home screen from any location, tap Home .
» Pages: To add a page, drag an app to the right side of the screen until you see a new
page. You can add multiple pages. To see other pages of shortcuts and widgets (if
available), swipe the home screen left.
Swipe down for
notifications and
settings.
Search by typing, or
tap the microphone
and say a command.
11:35
11:35
Play Store
Gallery
Duo
Google
..
.
Read, translate, or
search text using
Google Lens.
Swipe up to see all
your apps.
» Settings: To quickly open common settings, swipe the status bar down. To open
more settings, swipe the status bar down again and tap .
» Customization: To personalize your home screen and other features, see Personalize
your phone.
Help & more
Learn even more about your phone and get support.
Find it: Swipe up and tap Device Help
Tip: Some apps have their own help that’s specific to their features. Just tap the menu
inside the app for details.
Search
On the home screen, tap the Google Search box for a text search or tap to search by
voice.
When you type, suggestions appear below the search field:
» To search for a suggestion, tap it.
» To search for text in the search field, tap on the keyboard.
Tip: To close the keyboard, tap .
Note: For voice search, see Speak.
Notifications
At the top of the screen, icons on the left notify you about new messages or events. If
you don’t know what an icon means, swipe the status bar down for details.
Tip: Getting too many notifications? Touch and hold a notification to see which app is
sending them to you. Then you can turn them o.

Learn the basics
Notifications screen. Swipe down from the top of the home screen down to view notifications.
Tip: To quickly change common settings, swipe the status bar down. For more, see
Quick settings.
App notifications
You may see a notification dot on an app. This app notification, or badge,
tells you the app has an update or an announcement, such as a new email or
a missed call. Touch and hold the app for more information, options, or app
shortcuts.
Status icons
Icons at the top right of the screen tell you about phone status:
Status Icons
Network strength Alarm set
/ Wi-Fi in range/connected Data Saver on
Bluetooth on/connected Battery Saver on
Airplane mode / Battery charging/full
Do not disturb
T
ue,
A
pr
3
Android Setup
Drive · Anna Pics
Google · 27°
Finish setting up your Lenovo K13
Copy your data, set wallpaper, and more
FINISH SETUP
1 file uploaded.
Vacation.png
Manage CLEAR ALL
Tue, Apr 3
Tip: Swipe left or right to remove a
notification. Some notifications show
more options when you slide them
halfway.
Swipe down to see
your notifications.
Tap a notification to open it, or
choose an option, such as Reply.
Volume
Press the side volume buttons up or down to select a ringer volume and see other
controls.
Volume screen. Press the Volume keys up or down to control the volume for Ring Notification, Media, and Alarm sounds. On screen, change the volume using slide bars.
Do not disturb
To turn o some or all sounds, swipe the status bar down, and touch and hold Do
Not Disturb. Select an option:
» See all exceptions: Select whether to hear calls, messages, alarms, media, touch
sounds, reminders or events.
» Restrict notifications: Set if you’d like to see notifications when Do Not Disturb
mode is on.
» Default duration: Set how long Do Not Disturb lasts.
» Schedules: Set to get notified by important schedules like Sleeping and Event.
Tip: Create an exception for repeat callers that allows a call to sound from the same
person within a 15-minute period, tap Calls >Allow repeat callers.
Show all volume controls.
Mut
e the ringer or set phone
to vibrate.
Slide the bar to
increase/decrease volume.
Mute the media player.

Learn the basics
Lock screen
Your touchscreen is on when you need it and o when you don’t.
» Screen o and on: Press the Power button to turn the screen o and on.
» Screen lock: To unlock the main lock screen, swipe up from the bottom of the screen.
To apply security to the lock screen (recommended), see Screen lock.
» Notifications: Double tap a notification to open it.
Tip: To prevent notifications from appearing in the lock screen, swipe up and tap
Settings > Apps & notifications > Notifications > Notifications on lock screen >
Don’t show notifications.
» Lock screen message: To add a message to your lock screen, such as your name in
case your phone gets lost, swipe up and tap Settings > Display >Advanced >
Lock screen display > Lock screen message.
» Screen timeout: To change your timeout (screen locks automatically), swipe up and
tap Settings > Display > Advanced > Screen timeout.
11:35
11:35
Tue, 3 April
Tue, 3 April
11:35
Tue, Apr 3
Thanks for finding my phone!
Swipe up to unlock
your screen.
Add a lock screen message for
anyone who finds your phone.
Quick settings
For quick access to Wi-Fi, Bluetooth, Airplane mode, brightness, and other settings,
swipe the status bar or lock screen down. Swipe down again for more settings. Tap an
icon to turn features on or o. Touch and hold an icon to see more options. For even
more settings, tap .
Tap to rearrange your settings and add or remove settings.
Speak
Google Voice™
Use Google voice commands to tell your phone what you want.
» Use voice to make a call: Tap on the home screen. Then say “Call” and then a
contact name or number. Or, say “Send text.”
Tip: If a contact has more than one number, you can say which number to call (for
example, “Call Joe Black Mobile”).
» Search by voice: Tap on the home screen to search by voice.
Note: To wake up your phone by saying “Hey Google,” see The Google Assistant™ Go.
Flashlight
Battery Saver Airplane mode
Dolby
Smart audio
Auto-rotate
BluetoothDo Not Disturb
Flashlight
Batter
y S
aver
Airplane mode
Dol
Do
Do
o
Do
Do
Do
D
Do
Do
Do
Do
Do
D
D
Do
Do
Do
D
Do
D
D
Do
D
Do
o
Do
D
Do
Do
Do
o
Do
Do
D
Do
D
D
Do
Do
Do
Do
o
D
D
D
o
o
Do
Do
Do
Do
Do
D
Do
o
D
D
o
o
o
Do
o
o
o
Do
D
o
D
D
o
o
Do
o
o
D
o
o
o
by
Smart audio
Aut
Aut
Au
Aut
Au
Aut
Aut
Aut
Aut
Aut
A
At
Aut
Au
A
A
Aut
Aut
A
A
Aut
Aut
Aut
Aut
t
ut
t
Aut
Au
Aut
Aut
A
u
Au
Aut
Aut
Aut
A
Au
A
A
u
Au
Au
t
Aut
Aut
t
t
Au
Aut
Aut
Aut
Au
Aut
A
ut
t
Aut
t
ut
ut
t
u
Au
u
Aut
Au
u
u
A
A
A
A
Au
t
Aut
t
t
A
Au
A
u
u
t
A
A
u
t
o-r
o-r
o-r
o-r
or
o
o-r
o-r
o-r
o-r
o-
or
o-r
-r
o
o-r
o
o
o-r
r
o-r
o-r
o-r
o
o-r
r
o-r
-
o
o-r
o-r
o-
o
-r
r
r
r
o
-r
-
-
r
r
r
r
r
or
r
r
r
r
r
o
o
o
ota
ota
ota
ota
ota
ota
ota
ota
ota
ota
ota
ota
t
ota
t
ota
t
ta
ta
ota
ota
t
ota
ota
ota
ota
a
ota
ota
t
t
t
ota
a
ota
ota
ota
t
ot
ota
ot
ota
ota
ota
ota
ota
t
a
a
ot
ota
o
t
o
o
t
t
ota
a
ta
a
ota
a
o
o
ota
o
t
ot
ta
a
a
a
a
ot
t
a
a
a
ota
a
o
ta
o
o
t
ta
o
a
te
te
te
t
te
te
te
te
t
t
te
te
te
t
te
t
te
te
e
te
e
te
t
te
t
te
te
te
te
t
t
te
t
te
te
e
t
t
t
e
t
te
e
t
t
t
t
t
t
t
e
e
e
t
te
t
e
e
l
Blu
Blu
Blu
Blu
Bl
Blu
Blu
u
B
Bl
Bl
Bl
l
Bl
Bl
Bl
Blu
Blu
Blu
Blu
Blu
B
B
Blu
u
Blu
Bl
Bl
B
B
Blu
B
Blu
Blu
Bl
Bl
Bl
Blu
Bl
B
Bl
Blu
B
Bl
B
B
Blu
Bl
B
Bl
Bl
Blu
u
Bl
Bl
B
u
u
u
Blu
u
u
u
u
e
eto
e
e
e
e
e
e
e
oth
Do
D
Do
Do
Do
Do
Do
Do
D
D
D
Do
D
D
D
Do
o
Do
D
D
D
Do
D
D
D
Do
Do
D
D
Do
D
Do
Do
Do
Do
Do
Do
Do
Do
D
D
Do
D
o
D
D
o
D
D
Do
D
o
Do
D
D
D
Do
o
o
D
D
o
D
Do
o
Do
N
Not
Not
Not
No
No
Not
No
Not
Not
N
No
Not
Not
Not
No
N
N
No
Not
No
No
Not
N
N
Not
Not
N
N
N
N
o
No
No
No
No
Not
ot
N
N
No
No
No
Not
N
Not
N
N
Not
N
o
N
N
No
N
o
No
o
o
o
N
o
o
t
t
o
t
ot
t
t
Di
Di
D
Di
D
Di
D
Di
D
D
D
D
D
D
Di
Di
D
D
D
D
D
D
Di
D
D
D
D
Di
D
D
D
D
D
D
D
D
D
D
D
D
D
D
D
Di
D
D
D
D
stu
stu
s
stu
stu
stu
st
stu
st
stu
st
stu
stu
stu
u
stu
stu
stu
stu
s
s
s
stu
stu
st
stu
stu
stu
s
s
stu
stu
s
st
s
s
stu
s
s
stu
s
s
t
u
u
u
s
s
s
s
s
u
u
u
u
u
s
s
t
u
u
u
tu
u
s
t
u
stu
s
t
t
u
rb
rb
rb
r
rb
rb
rb
b
b
rb
b
b
b
b
b
b
b
b
b
b
b
rb
rb
b
b
b
b
rb
rb
b
b
b
b
rb
b
b
b
b
b
b
b
b
b
b
b
r
rb
b
b
b
b
b
Wi-Fi
Flashlight Auto-rotate
No SIM card
Mobile data Airplane mode Screen Cast
Battery Saver
Bluetooth Do Not Disturb
Turn Wi-Fi on/off.
See all phone settings.
Set screen brightness.
Tap an icon to turn it on/off.
Touch and hold to see more
options.

Learn the basics
Voice to text
On a keyboard, tap , then speak your message or search text. You can also speak
punctuation.
The Google Assistant™ Go
Note: This feature may not be available in all languages.
To open the Google Assistant Go:
» Press the Google Assistant button, then speak a command.
» Tap Assistant from the home screen or from your list of apps.
» Swipe up from the bottom corner of the screen, then speak or type a command.
Note: You can also say “Hey Google” or “Ok Google” to start the Google Assistant Go.
To turn this feature on, swipe up and tap Settings > Apps & notifications > Default
apps > Assist app.
Tip: For more on the Google Assistant Go, visit https://support.google.com/assistant.
Gestures
Explore special gestures designed to save you time and make your day easier.
Find it: Swipe up and tap Settings > System > Gestures
» Swipe fingerprint for notifications: Swipe down on the fingerprint sensor to check
your notifications.
» Jump to camera: Press the Power button twice to quickly open the main camera.
» System navigation: Navigate using either gestures or buttons at the bottom of the
screen. For more, see System navigation.
» Prevent ringing: Press the Power and Volume Up buttons at the same time to switch
incoming calls to vibrate or mute.
» Lift to check phone: Pick up your phone to check time, notifications and other info.
» Three-finger screenshot: Touch the screen with three fingers to take a screenshot.
» Fast flashlight: Turn the flashlight on/o with two chopping motions.
Direct Share
In some apps, you can share something directly to a contact, app, or conversation.
Abe
Allie
Anna MedinaKevin Astrid Fanning
TO Type a name, phone number, or email
K
Michael
M
Nathan More
N
Create link Shared
album
Gmail Messages
Swipe up for more
share options.
Tap a contact to
share information.
Select the share option (usually by tapping ) within an app, then select a contact,
choose an app, or type a name or number to find a contact.
To use Bluetooth or Nearby Share to share files, see Connect, share, pay & sync.

Personalize your phone
Redecorate your home screen
Customize your home screen the way you want.
» Change your wallpaper: Touch and hold an empty spot on the home screen, then
tap Wallpapers.
» Add a home screen page: Drag an app to the right side of the home screen until a
new page appears. You can add multiple pages.
» Adjust display settings: Adjust brightness, font size, and screen saver. Swipe up and
tap Settings > Display.
» Switch to dark theme: Change your display to use dark theme, which saves battery
and can be easier on your eyes. Swipe up and tap Settings > Display > Advanced
> Dark theme.
» Rotate: In many apps, the touchscreen switches from portrait to landscape when you
11:35
11:35
Play Store
Gallery
Duo
Google
.
..
Drag shortcuts on top of
each other to make a folder.
Tap a shortcut to open.
Touch and hold to move or delete.
Touch and hold an empty
spot to change wallpaper.
rotate your phone. To turn this on or o, swipe up and tap Settings > Display >
Advanced > Auto-rotate screen.
Tip: To see more home screen settings, touch and hold an empty spot and tap Home
settings.
Choose apps & widgets
» Add apps to the home screen: Swipe up, touch and hold an app, then drag it to one
of your home screen pages.
» Download new apps: Tap Play Store. For more on apps, see App safety.
» Group apps together: Drag one app onto another. Do it again to add more apps to
the folder. To name the folder, tap it and enter a name below the apps.
» See app options: Touch and hold an app. If the app has quick options (shortcuts),
you’ll see a list.
» Move or delete widgets and apps: Touch and hold a widget or app and drag it to
another spot, another page, or to Remove.
Note: Removing an app from your home screen doesn’t uninstall the app from your
phone.
Customize sounds & appearance
Customize your phone’s sounds and display settings:
» Set ringtone and notifications: Swipe up and tap Settings > Sound.
Tip: Set notification sounds for individual apps within the app’s settings.
» Night light: Set your screen to turn slightly amber colored at night. Swipe up and tap
Settings > Display > Eye comfort.
» Add vibrate for calls: To make your phone vibrate, swipe up and tap Settings >
Sound, then tap Vibrate for calls.
» Set a ringtone for a contact: Swipe up and tap Contacts, select the contact, then
tap Menu > Set ringtone.
» Change language: Swipe up and tap Settings > System > Languages & input >
Languages.
» Adjust font size: Swipe up and tap Settings > Display > Advanced > Font size.

Apps
Digital wellbeing & parental controls
Set limits on how much time you spend on your phone, get a bedtime reminder, and
manage notifications.
Find it: Swipe up and tap Settings >Digital Wellbeing & parental controls
Digital wellbeing screen that shows options, such as Do Not Disturb and options for bedtime, app limits, and managing notifications.
To supervise this phone remotely, view and set screen time limits, and add restrictions
to services and apps, tap Set up parental controls.
WAYS TO DISCONNECT
Dashboard
Focus mode
T
ap to set up
N
o t
i
mers se
t
REDUCE INTERRUPTIONS
Manage notifications
Do Not Disturb
Digital Wellbeing & parental co...
Contacts
P
h
one
Camer
a
S
ett
i
ngs
3 12
Un
l
oc
k
s Noti
fi
cations
1 hr, 40 mins
TODAY
Your Digital Wellbeing tools
Show icons in the app list
Turn on Do Not Disturb.
Limit your app time and
more.
See a breakdown of how you
spend your time on your
phone.
Apps
Your phone comes ready with some great apps. To find and add more apps, tap Play
Store. To learn more, see App safety.
Phone
Keep in touch by choosing a contact, returning a missed call, or using a voice command
to start a call.
Make a call
Find it: Phone
» Call a contact: To call a contact or recent call, tap the contact name.
» Dial a phone number: To open the dialpad, tap . Enter a number, then tap to
call it.
» Voice dial: To voice dial, tap on the home screen or say “Hey Google”, then say
“Call <name>”.
» Voicemail: appears in the status bar when you have new voicemail. To hear it,
swipe down and tap the notification.
Tip: To enter the international dialing code (+), touch and hold 0. To add 2-sec pause
or wait after numbers, tap Menu .

Apps
Receive a call
» Answer a call: When your phone is locked, swipe up to answer. When the phone
is unlocked, tap Answer.
» Ignore a call: When your phone is locked, swipe down to reject the call and send
it to voicemail. When the phone is unlocked, tap Decline.
Tip: You can also press the Power button to ignore the call, or press a volume button
to silence the ringer.
» Respond with a text: When your phone is locked, tap Reply, and select a
message to respond.
Note: When you hold your phone to your ear, the touchscreen goes dark to avoid
accidental touches. When you move the phone away from your ear, the screen lights
up again. Don’t use covers or screen protectors (even clear ones) that cover the
Search contacts and places
Favorites
FAVORITES Add
RecentsContacts
Allie Ben Cade
Mobile Mobile Mobile
BC
A
See recent calls.
See all your contacts.
Dial a number.
Tap a favorite to call it.
proximity sensor above the touchscreen.
During a call
» Mute a call: Tap Mute on the call screen to mute the call. You can hear your caller,
but they can’t hear you.
» Multi-task: While you’re on a call, swipe up from the bottom of the screen to look up
a phone number, address, or open other apps. To reopen the call screen, swipe the
status bar down and tap Ongoing call.
» Answer a second call: To answer a second call, tap Swipe up to answer. The first
call is placed on hold. To switch between calls, tap Swap.
» 3-way call: To join two calls together, answer the second incoming call while your
first call is active, or tap Add call to dial a second call. The first call is placed on
hold. Tap Merge to join the calls together.
» End a call: Tap .
Favorites
See all your favorite contacts together.
Find it: Phone > Favorites
To add favorites, tap Contacts, scroll or search to find the contact, then tap .
Recent calls
View your calls (with newest first), and then call, text, or store them:
Find it: Phone > Recents
» To return a call, tap next to the caller’s name or number.
» To send a text message, store the number, or other options, tap the caller’s picture.
» To remove an entry from the call log, touch and hold the name or number, then tap
Delete.
» To clear the list, tap Menu > Call history > Menu > Clear call history.
Caller ID & spam
Find it: Phone > Menu > Settings > Caller ID & spam

Apps
Tap Filter spam calls to prevent suspected spam callers from disturbing you.
To block a caller from calling again, tap Phone > Recents, touch and hold the
name or number, then tap Block/report spam.
Your phone number
Find it: Swipe up and tap Settings > About phone > Phone number
Emergency calls
Your service provider programs one or more emergency phone numbers you can call
under any circumstances, even when your phone is locked. Emergency numbers vary
by country. Your pre-programmed emergency number(s) may not work in all locations,
and sometimes an emergency call cannot be placed due to network, environmental, or
interference issues.
1 Tap Phone (if your phone is locked, drag up from the bottom of the screen, then
tap Emergency).
2 Enter the emergency number.
3 Tap to call the emergency number.
Note: Your phone can use location based services (GPS and AGPS) to help emergency
services find you. For more information, swipe up and tap Settings > Location >
Advanced > Emergency Location Service.
Messages
Stay in touch with messages and pictures. For tips on using the keyboard, see Use the
keyboard.
Find it: Messages
» Create: Tap
Start chat
.
» Attach: When you’re typing a message:
• Tap to attach a GIF or a contact, create a voice recording, and more.
• Tap to attach a photo or video from the gallery or take and attach a new photo
or video.
» Send: Tap
SMS
to send the message.
» Reply: Open a conversation, then enter your response in the text box at the bottom
and tap
SMS
.
» Message screen showing change and search options in the upper right, a list of previous messages with contacts, and the new message icon in the lower right corner.
Tips
» Add another contact to a message thread: In a conversation, tap Menu > Details >
Add people.
» Delete thread: To delete a whole thread of messages, touch and hold the thread,
then tap . To archive a thread, swipe it left or right. You can find archived messages
by tapping Menu > Archive.
» Save pictures: Touch and hold a picture, and then tap Menu > Save to save it. To
see the picture, swipe up and tap Gallary > Folders > Messages.
» Voice entry: Tap a text box, then tap on the keyboard.
Tip: If you don’t see on the keyboard, swipe up and tap Settings > System >
Languages & input > Virtual keyboard > Google voice typing to activate voice entry.
Start chat
You: Hey, where are you?
Astrid Fanning
You: Lunch tomorrow?
Daniel Lester
You: Do we need more treats?
Gracie Jo Just now
20 min
Wed
Search conversations
5 min
Swipe left or right to
archive a message.
Write a new message.
Change settings.

Apps
» Turn o notifications: Stuck in a busy conversation? You can turn o notifications.
Tap the thread, then tap Menu > Details or Group details > Notifications.
» Add or block a phone number: In a conversation, touch and hold a message to see
options to save as a contact, delete the message, or block the phone number.
» Spam protection: To turn on spam protection, tap Menu > Settings >Spam
protection.
Set your default messaging app
To set your default messaging app, swipe up and tap Settings > Apps &
notifications > Default apps >SMS app, then select the messaging app to use as the
default.
Use the keyboard
When you tap a text box, like in a message or search, you have keyboard options.
» Type or gesture: Enter letters by touching them one at a time. Or, enter a word by
tracing a path through the letters. While you’re typing, word suggestions appear
above the keyboard. Tap one to select it.
» Voice entry: Tap on the touchscreen keyboard, then say what you want to type.
» Close the keyboard: Tap .
» Symbols and numbers: Touch and hold a letter to enter the number at the top of it.
To enter symbols, tap .
» Capital letters: Tap for one capital letter. For all capital letters, tap twice
quickly.
Text message
See a different
keyboard? It varies by
app. This one is for
texting.
» Keyboard options: To customize your keyboard, swipe up and tap Settings >
System > Languages & input > Virtual keyboard > Gboard.
» Cut, copy and paste: Touch and hold a word to highlight it, tap Cut or Copy. Touch
and hold the location you want to paste the text, and tap Paste.
Chrome™
Access the Internet with the Chrome browser app.
Find it: Chrome
Or tap the Google search box and enter or speak text to search.
Note: Your phone uses your Wi-Fi network (or your mobile phone network) to access
the Internet. If you can’t connect, contact your service provider. Your service provider
may charge to surf the web or download data.
Google Chrome browser showing the options menu in the upper right corner.
» Go to a web page: Tap the address bar at the top of a page and enter an address.
11:35
Search or type web address
Facebook YouTube Amazon.co... Wikipedia
ESPN.com Yahoo eBay Instagram
Discover - off
Search or type web address
See options.
Enter text or tap
the microphone
to search.

Apps
» Add a bookmark: Tap Menu > .
» Open a bookmark: Tap Menu > Bookmarks.
» Mobile sites: Some websites automatically show you a “mobile” version of their
page—if you want to see the computer version of a website, tap Menu > Desktop
site.
» Reload: If a page doesn’t load correctly, tap Menu > .
» Tabs: To open a new tab, tap Menu > New tab. To move from one tab to another,
tap .
» Clear history: In the browser, tap Menu > Settings > Privacy and security > Clear
browsing data. Then choose history, cache, cookies, and other options.
» Help: For more about Google Chrome, tap Menu > Help & feedback or visit
https://support.google.com/chrome.
Downloads
Warning: Apps downloaded from the web can be from unknown sources. To protect
your phone and personal data from theft, download apps only on Google Play™ Store.
» Files: Tap the download link. To see the file, tap Menu > Downloads.
» Images: Touch and hold it, then tap Download image. To see the picture, tap
Gallary > Folders > Download.
Browser settings
To change your browser security settings, text size, and other options, tap Menu >
Settings.
Safe surfing & searching
Keep track of what your browser and searches show:
» Incognito: To open a tab that won’t appear in your browser or search history, Menu
> New incognito tab.
» Auto complete: Your browser automatically fills in names and addresses, if you have
entered the same information before. To turn o this feature, tap Menu > Settings >
Addresses and more > Save and fill addresses.
Tip: Auto complete also fills in payment information, such as a credit card. To turn
o this feature, tap Menu > Settings > Payment methods > Save and fill payment
methods.
» Pop-ups: To stop pop-up windows from opening, tap Menu > Settings > Site
settings > Pop-ups and redirects, then tap the switch to turn it o.
» Safe browsing: To protect your phone from websites that might be unsafe, tap Menu
> Settings > Safety check > Safe Browsing.
Camera
Take crisp, clear photos.
Take photos
Find it: Camera
Camera viewfinder screen. Take a photo by pressing the shutter button at the bottom middle, switch to front camera on the lower left. Video camera button is at the bottom right while the options menu is at the extreme
right.
» Take a photo: Tap to take a photo.
» Take a selfie: Tap in the camera screen to switch to the selfie camera.
Video Photo
50
50
Switch to selfie camera.
Tap anywhere to change the
focus (rear camera only) or
exposure. Touch and hold to
lock the focus in an area.
Ta ke a photo.
Adjust settings.
Tap to select a photo or
video mode.

Apps
» Multi-shot: Touch and hold to take a burst of photos.
» Tips: To see tips to help you take great photos, tap .
Record videos
Find it: Camera, then tap
Tap to start recording. Then tap to stop recording. Tap on the screen while
recording to save a photo. Or tap to pause the video.
Camera options
Point, tap, and you’re done, or play with these camera options.
Viewfinder options for rear and front cameras
Flash Set to on, o, or auto.
Timer Set a timer to 3or 10 seconds.
HDR Turn on HDR (high dynamic range) eect for better pictures
in challenging lighting situations, such as outdoors
Torch Turn on a flashlight when taking a video (main camera only).
Face Beauty With the selfie camera, smooth skin and beautify faces. Set
to on or o.
Photo and video modes
Macro Capture an up-close, detailed photo (up to 4cm away)
Bokeh Take portraits using special enhancements and eects. For
more, see Take a bokeh photo.
Night Vision Take photos in low light situations.
Photo Tap to take a photo. Touch and hold to take a burst of
photos.
Manual Control professional camera settings, like WB and ISO.
Video Tap to take a video. When taking a video, you can also turn
Flashlight on or o.
Panorama Take a wide-angle shot. Use the on-screen guide to slowly
pan while you are taking the photo.
Camera settings
To find these options, tap at the top of the viewfinder:
Camera settings
Photo size Set the photo ratio and resolution for the main and selfie
cameras.
Video size Set the video resolution for the main and selfie cameras.
Capture sound Turn the shutter sound on or o.
Grid Overlay a grid to help align the subjects in your photos or
videos.
Touch capture Capture photos or videos by tapping anywhere on the
screen. Zoom by pinching with two fingers.
Water Mark Add a watermark, signature, date or time to your photos.
Storage location Choose a storage location for your photos and videos
(Phone or Memory card).
GPS location info Turn on to tag photos with a location.
Restore defaults Restore camera default settings.

Apps
Take a bokeh photo
You can use the portrait mode to add a blur eect to the background, while keeping the
main subject in perfect focus.
Find it: Camera > Bokeh
1 Line up your subjects. The closest subject is prioritized automatically. Tap the screen
to change the focal point.
2 Slide the bar to increase or decrease the background blur.
3 Tap to take the photo.
Tip: For best results, subjects should be one to six feet away.
Capture your screen
There’s more than one way to capture your phone’s screen.
» Press and hold the Power button and tap Screenshot.
» Press and hold both the Power and the Volume Down buttons at the same time.
» Set up Gestures so you can capture screenshots by touching the screen with three
fingertips.
Tip: To see the screen capture, tap Gallary > Folders > Screenshots.
Gallary Go
View, edit, and share photos.
Find it: Gallary
» View, share, or delete: Tap a thumbnail to open it, then tap to share, to delete,
or Menu for more options.
Tip: To select multiple files, open a folder, touch and hold a photo, then tap others. Or
group photos in an album and share the whole album.
» Zoom: Open a photo in your gallery, then double-tap or drag two fingers apart or
together on the screen.
Tip: Turn your phone sideways for a landscape view. To turn Auto-rotate screen on or
o, swipe up and tap Settings > Display > Advanced > Auto-rotate screen.
» Wallpaper or Contact photo: Open a photo, then tap Menu > Use as.
» Edit: Open a photo, then tap Edit.
Note: For more about Google Photos™, visit https://support.google.com/photos.
Gmail
Send and receive email from all of your personal accounts (even if they’re not Gmail
accounts). You can manage your accounts in Gmail and easily switch between them.
Find it: Swipe up and tap Gmail
Email screen listing emails for this account. Tap the magnifying icon in the top right to search email. Tap the Pencil icon in the bottom right to start a new email.
» Add Gmail accounts: The first time you turned on your phone, you probably set up
or logged in to your Google account—that sets up the Gmail app for one account.
To add more Google accounts, swipe up and tap Settings > Accounts, then tap
Add account > Google.
Apr 22
Apr 22
Apr 22
Apr 22
Apr 22
Inbox
B
A
H
Mail Meet
Compose
Search in mail
PRIMARY
Switch accounts.
Swipe left or right to
archive a message.
Touch and hold to choose
multiple messages, then
select an option at the top.
Compose a new email.

Apps
Tip: In the Gmail app, tap > Settings > Add account.
» Start or join a meeting: Tap Meet, then tap New meeting or Join a meeting.
» Add email accounts: The Gmail app manages all of your email accounts. To add
other personal email accounts to the Gmail app, swipe up and tap Settings >
Accounts > Add account. For Microsoft® Exchange server work email accounts,
tap Add account > Exchange, and enter details from your IT administrator.
» Change account settings: To change the settings for a Gmail or email account, swipe
up and tap Gmail > > Settings, then tap the account name.
» Delete accounts: Swipe up and tap Settings > Accounts, then tap the account
name and Remove account.
Duo
Sign in with your Google account to make and receive video calls.
Find it: Swipe up and tap Duo
Anna Medina
(555)555-5555
Swipe down to record a message
CONNECT ON DUO
Create group Invite friends
A
11:35
Search contacts or dial
D Daniel Lester
(666)666-6666
Choose a contact. Swipe up
to see more contacts.
View settings.
Send a friend a recorded
message.
» Start a new video call: Tap the search box, then type or tap a name in your contacts
to start the video call.
» Preview incoming calls: See live video of the caller before you answer. To turn this
o for both the caller and receiver, tap Menu > Settings > Call settings > Knock
Knock for this device.
» Change settings: Tap Menu > Settings to change the vibration setting, block
numbers, and more.
» Call anyone: Duo works across platforms, allowing you to call friends with the Duo
app on any device.
Tip: When on a video call, your phone will automatically switch from cellular network
to Wi-Fi, if available.
Calendar
See all your events, all in one place.
Find it: Swipe up and tap Calendar
March
April 2019
Nothing planned. Tap to create.
MON
APR 7 - 13
APR 14 - 20
APR 21 - 27
WED
WED
MON
SUN
Dentist appointment
4-5 PM
Jennifer’s birthday
Tax Day
1
3
10
15
Jump to a dierent month.
Add a new event.
Tap to refresh the Calendar
screen.
Go to today’s date.
Change the calendar view, adjust
settings, get help, and more.

Apps
» Change the view: Tap the month at the top to choose a date to view. Or tap to
choose Schedule, Day, 3 Day, Week, or Month.
» Go to today’s date: Tap at the top.
» Add events, tasks, reminders, or goals: Tap > Event, Task, Reminder or Goal,
enter details, then tap Save.
Tip: In most views, tap a time on the calendar to enter event details.
» Show, edit, or delete events: Tap an event to open it, then tap to edit it, or tap
Menu > Delete to remove the event.
» Show, hide, or add calendars: Tap , and select which options, such as events,
reminders or other calendars, to show or hide. You can use a computer to add or
remove calendars on your Google account at www.google.com/calendar.
More apps
Google Play
Google Play is a digital content experience from Google where you can find and enjoy
your favorite music, movies, TV shows, books, magazines, and Android apps and games.
» Download apps: Tap Play Store.
» Log in or open a Google account: Visit www.google.com/accounts.
» Google help: See www.google.com/support.
Contacts
Combine information from your Google contacts and social networks for quick access
to everyone you know.
Tip: You can find most of these features on the Contacts tab in the Phone app. See
Phone.
Find it: Swipe up and tap Contacts
Contacts screen that shows a list of contacts. Scroll bar on the far right to scroll through contacts. Tap the New Contact icon to add a contact.
» Add a contact: Tap .
» Edit or delete: Tap a contact, then tap Edit contactor tap Menu > Delete.
» Call, text, or email: Tap a contact, then tap an option. (If the contact doesn’t have an
email address, you can add one, and use Duo to video chat.)
» Search contacts: In the Contacts list, tap Search contacts.
Tip: Tap the Google search box and enter a contact’s name.
» Share a contact: Tap a contact, then tap Menu > Share to send it in a message or
email, via a Bluetooth connection, or save to Google Drive™.
» Synchronize: On your phone, swipe up and tap Settings > Accounts, choose your
Google account, then tap Account sync > Menu > Sync now.
» Add your details: To store your user profile, tap > Settings > Your info.
A
Abe
Allie
Anna Medina
Astrid Fanning
Lauren
Gracie Jo
A
Alison
G
L
A
Alison
Search contacts
Tap to view contact
information, call, send a
text message, and more.
Sort contacts, change
settings, accounts, and more.
Add a contact.
Table of contents
Other Lenovo Cell Phone manuals

Lenovo
Lenovo S660 User manual

Lenovo
Lenovo A7010 User manual

Lenovo
Lenovo S860 User manual

Lenovo
Lenovo S580 User manual

Lenovo
Lenovo A588T User manual

Lenovo
Lenovo L38111 User manual

Lenovo
Lenovo S1La40 User manual

Lenovo
Lenovo Moto Z2 FORCE User manual

Lenovo
Lenovo A2010 User manual

Lenovo
Lenovo PHAB2 How to use

Lenovo
Lenovo A6000-I User manual

Lenovo
Lenovo IDEAPHONE S890 User manual

Lenovo
Lenovo A7000-a User manual

Lenovo
Lenovo VIBE Z2 Pro User manual

Lenovo
Lenovo Moto One Hyper Installation and operating manual

Lenovo
Lenovo Lenovo S5000 User manual

Lenovo
Lenovo S60-a User manual

Lenovo
Lenovo VIBE P1 User manual

Lenovo
Lenovo Z6 Pro User manual

Lenovo
Lenovo S960 User manual