Lenovo smart lock E2 User manual

USER MANUAL

1 : ADMIN SETTINGS
a. For the first time: Wake up the keyboard and press [*] [#] in turn, the voice prompt "Please verify
administrator", press "123456", press [#] to confirm. The voice prompts "Verified passed" to start
adding the administrator.
b. After setting the administrator: press [*] [#] after waking up the keyboard, the voice prompt
"Please verify the administrator", press the administrator fingerprint, password or swipe card, and
the voice prompt "Verify passed" to start the setting.
1.1 : ENTER THE MAIN MENU
Wake up the keyboard and press [*] [#] in turn, the voice prompt "Please verify the administrator",
press the administrator fingerprint, password or swipe card, and the voice prompt "Authentication
passed". To enter the main menu, you must enter administrator information verification. Once in
the main menu, press the corresponding number keys to select the action.
1. Group Deletion
2. Delete by Number
1. Sequential Query
2. Number Query
3. Date Query
1. Time Settings
2. Language Settings
3. Volume Settings
4. Unlocking Mode
5. Anti-Prying Settings
6. Factory Reset
Press [#] to cofirm
1. Add an Administrator
2. Add Reguler Users
1
2
4
3
1. Add User
2. Delete User
3. System Settings
4. Enter The Query
12020-01-01 00:00 / YYYY-MM-DD HH:MM
21. Chinese | 2. English
32. Enlargement | 8. Reduce
41. Dual Open Mode | 2. Single Open Mode
51. Open | 2. Close
6Press [#] to confirm | Press [*] to cancel
1Sequential Queries
2Press [#] to confirm | Press [*] to cancel
3Enter the Start Date : YYYY-MM-DD
Enter the End Date : YYYY-MM-DD
1
1. Clear the non-administrator Fingerprint
2. Clear the non-admin Card
3. Clear the non-administrator Password
2Enter the number (Regular User Number or
non-current Administrator Number)
1
1. Add an Administrator Fingerprint
2. Add an Admin Card
3. Add an Administrator Password
2
1. Add a Normal User Fingerprint
2. Add a Normal User Card
3. Add a Normal User Password

2 : ADD ADMINISTRATOR
CAUTION
Press the finger you want to add in the fingerprint recognition area to add a fingerprint. When you
hear the prompt "Please remove and put it again", press the same finger again and repeat this step
4 times.
a. To enter a fingerprint, the user needs to record the fingerprint 5 times continuously.
b. When collecting fingerprints, try to collect as many times as possible from different locations on
the same finger, so that the subsequent verification of fingerprints is easier to be recognized.
3.1 : ADD FINGERPRINT
Enter the 4-10 digit password you want to add on the keyboard and press [#] to end, hear the
prompt "Please enter again", enter the same password again, and press [#] to end.
3.3 : ADD PASSWORD
Voice announces "Please swipe the card", swipe the card in the door card recognition area, and the
voice prompt "Add Successful".
3.2 : ADD CARD
1. Add an Administrator
2. Add Reguler Users
1
1. Add User
2. Delete User
3. System Settings
4. Enter The Query
1
1. Add an Administrator Fingerprint
2. Add an Admin Card
3. Add an Administrator Password
3 : ADD REGULAR USER
Press [*] and then [#] to enter the menu, and press [1] [2] to enter the add administrator information.
1. Add an Administrator
2. Add Reguler Users
1
1. Add User
2. Delete User
3. System Settings
4. Enter The Query
2
1. Add a Normal User Fingerprint
2. Add a Normal User Card
3. Add a Normal User Password
Press [*] and then [#] to enter the menu, and press [1] [1] to enter the add administrator information.

4.1 : GROUP DELETION
CAUTION
The current administrator cannot be deleted, the system guarantees that at least one administrative
user cannot be deleted, to avoid the lock being in the initial state, the lock can be opened at will, and
the user will not be able to enter the management menu.
5 : SYSTEM SETTING
1. Group Deletion
2. Delete by Number
2
1. Add User
2. Delete User
3. System Settings
4. Enter The Query
1
1. Clear the non-administrator Fingerprint
2. Clear the non-admin Card
3. Clear the non-administrator Password
Press [*] and then [#] to enter the menu, and press [2] [1] to Group Deletion. Press [1] or [2] or [3] then
Press [#] to confirm
Press [*] and then [#] to enter the menu, and press [3] to enter the system settings.
4.2 : DELETE BY NUMBER
1. Group Deletion
2. Delete by Number
2
1. Add User
2. Delete User
3. System Settings
4. Enter The Query
2Enter the number (Regular User Number or
non-current Administrator Number)
Press [*] and then [#] to enter the menu, and press [2] [2] to Delete by Number. Enter the number
(Regular User Number or non-current Administrator Number). Press [#] to confirm
4 : DELETE USER
Time Setting : Enter the time [YYYY-MM-DD HH:MM]. Eg: 2023-08-16 23:15. Press [#] to confirm.
Language Setting : Press [1] in Chinese; Press [2] in English. Press [#] to confirm.
Volume Setting : Enter the time [YYYY-MM-DD HH:MM]. Eg: 2023-08-16 23:15. Press [#] to confirm.
Unlocking Mode : Press [1] to open combination unlock; Press [2] to close the combination unlock.
Press [#] to confirm.
Anti-prying Setting : Press [1] to open; Press [2] to close. Press [#] to confirm.
Factory Setting : Factory reset and press [#] to confirm; Press [*] to cancel.
1
2
3
4
5
6

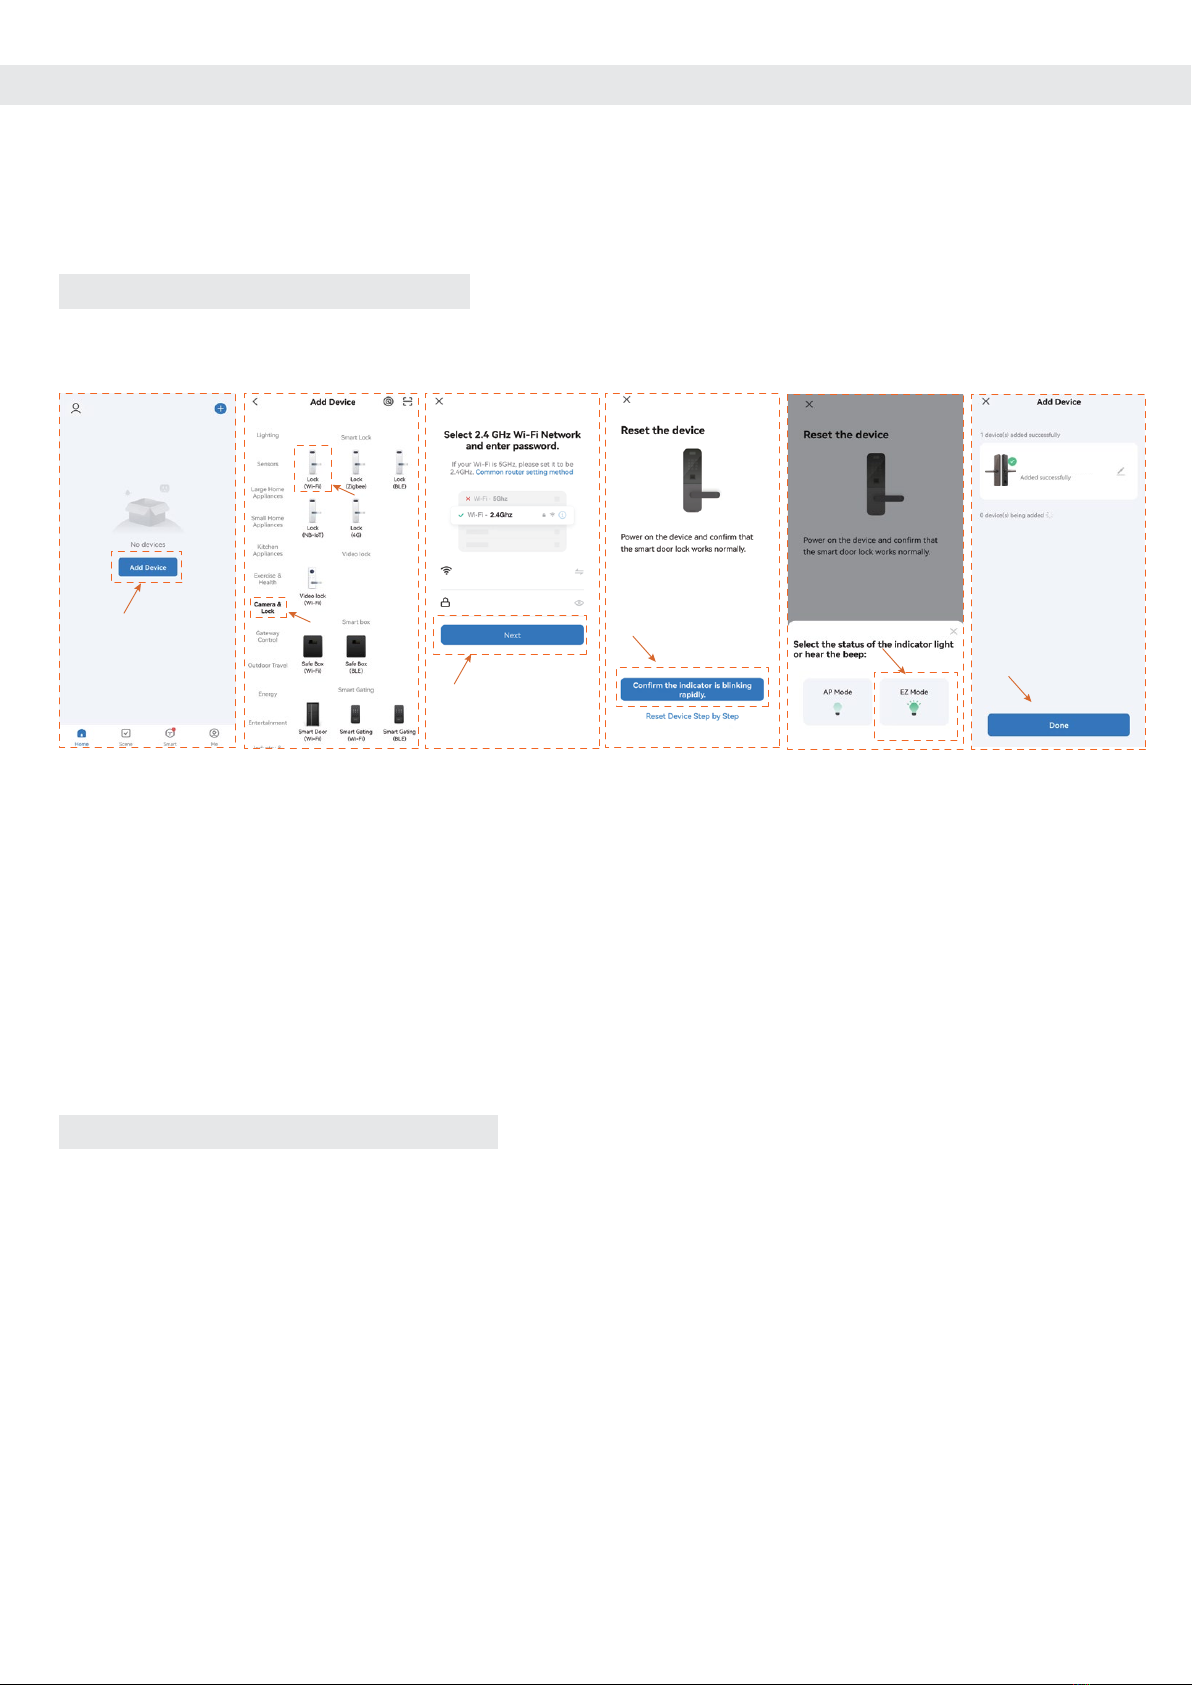
a. Select "Add Device" >"Camera & Lock" > Lock (Wi-Fi).
b. Enter the correct WiFi name and WiFi password.
c. Follow the door lock menu to enter the network settings,click“confirm the indicator is blinking rapidly”
d. Select EZ Mode,Waiting for device addition.After successful addition, Click "Done" to go to the details
page
Select a device type. On the page that appears, enter the password for connecting to the 2.4 GHz Wi-Fi
network. The location permission must be granted to automatically find Wi-Fi networks.
1. View and manage users and their associated passwords, keys, and cards.
2. Create and manage temporary passwords (unlocked for a specified period of time)
3. Normal door opening message remote notification。
4. After the coercion password/coercion fingerprint is unlocked, it can be remotely alerted (you need
to set the coerced unlocking method in user management).
5. Doorbell alarm, you can check the date, time.
6. Pressing the doorbell can trigger the mobile phone APP video docking, which can realize the mobile
phone APP remote real-time and lock video intercom
6.1 : MANUALLY ADD WI-FI DEVICES
6.2 : THE MAIN FUNCTIONS OF THE APP
Lenovo Smart Lock E2
Users can download and install the "Tuya Smart" APP on Google Play or App Store, and follow the APP
prompts to register for an account.
Note: As the APP version will be optimized on a regular basis,it shall be subject to the actual APP interface.
Note: If the above steps fail, you can choose to switch the network configuration mode in the App and follow the instructions
on the App page.
After completing the network configuration, you can modify the name of the smart lock and select the
room where it is located. Click “Finish” and then you may use the App function of the smart lock.
Notes: The following problems may cause the smart lock binding failure, please check to avoid such problems.
1. The router opens the anti-WIFI-squatter function, which may lead to the device cannot be connected normally, you can
check whether the anti-WIFI-squatter function is opened, temporarily close it when the network is matched, and then restore
the router settings after successful network configuration.
2. Dual-band router users, please ensure that the cell phone and smart lock is connected to the 2.4G band WiFi.
3. Due to the instability of the bridged network, it is recommended to connect non-bridged WiFi.
4. The smart lock does not support WAP/ WPA2 enterprise WiFi for now, please use other WiFi.
5. Android system phones need to open the GPS.
6 : NETWORK SETTING

CAUTION
The pictures in the User Manual is for reference only which shall be subject to the product in kind.
7 : RESTORE FACTORY
After the factory Settings are restored, all user data will be
cleared. Exercise caution when performing this operation.
When prompted to restore factory settings, confirm that please
press the [#] key, and press the [*] key to cancel.
Press This Key
to Restore Factory
Defaults
8 : PRODUCT INTRODUCTION
Anti-lock knob
Battery
compartment
Reset key
Anti-cat's
eye switch
PIN pad area
Key card
sensing area
Doorbell
Hands-on
Fingerprint
collection area
Keyhole &
External power hole

9.2 : FINGERPRINT UNLOCK
a. Touch your finger on the keypad to wake up the door lock.
b. Press your finger (added) on the fingerprint collector in the
correct way.
c. Voice prompt "Unlocked" turn down the handle to open the door.
9.3 : PASSCODE UNLOCK
9.4 : ENCRYPTED INDUCTION CARD
Close or paste the added proximity card close to or on the keyboard
area, and the voice prompt "Unlocked" is displayed after the sensor
card is successfully verified.
a. Touch your finger on the keypad to wake up the door lock.
b. Enter the entered password, press [#] to confirm, and the voice
prompt "has been unlocked".
c. Turn the handle down to unlock the lock.
Note: Enter the password to pay attention to the surrounding environment, pay
attention to the blocking, and prevent being peeped by the people next to you
9.1 : NORMALLY OPENING MODE
9 : OPENING METHODS
a. After unlocking, the [0] key lights up and long presses [0] and the system automatically enters
normally open mode.
b. After entering the correct fingerprint, password, and key card, the normally open mode is turned
off
9.1 : DUAL OPEN MODE
In dual-open mode, two-factor authentication is required to unlock successfully, for example: pass-
word + fingerprint, password + key card, fingerprint + key card.
a. Press [*] to enter the menu and press [3] to enter the system settings.
b. Press [4] to set the unlocking method, press [1] double opening mode; Press [2] single open mode
and press [#] to confirm.

10.1 : MECHANICAL KEY
Insert the mechanical key into the mechanical keyhole on the lock,
and turn the key to unlock the lock.
10.2 : USB EXTERNAL PORT
When the battery is exhausted and there is no key, you can connect
the external power supply and open the door according to the
normal operation steps.
11.1 : HANDLE
11.2 : ANTI-LOCK KNOB
Turn the knob to carry out anti-locking, at this time the door cannot
be opened normally from the outside, and the mechanical anti-lock
needs to be released indoors before the door can be opened
normally.
a. External locking outdoor handle rotate up
to lock
b. Internal locking chamber handle upward
rotation lock
11.3 : CAT’S EYE SWITCH
a. The anti-cat's eye switch under the indoor panel handle is turned
up, and the anti-cat's eye function is turned off.
b. The anti-cat's eye switch is set down in place, the anti-cat's eye
function is turned on, and the handle is separated, and the handle in
the door cannot be opened at this time.
10 : EMERGENCY OPENING METHODS
In case of emergency such as forgetting the password, running out of battery, or the system not
working, you can use a mechanical key to unlock the lock or use the emergency charging port to
unlock.
11 : LOCK METHODS
SHUT
DOWN
OPEN

www.lenovosmartlock.com
Table of contents
Other Lenovo Door Lock manuals
Popular Door Lock manuals by other brands

Wulian
Wulian Bern Series manual

Prime-Line
Prime-Line E-2311 installation instructions

Assa Abloy
Assa Abloy Sargent PR100 installation instructions

LOCKLY GUARD
LOCKLY GUARD DEADBOLT 728F Z installation manual

BURG-WACHTER
BURG-WACHTER TSE PRIME 5021 Assembly and user's manual

Kwikset
Kwikset Prismo 740PSK RDT 15 SMT installation guide