manuals.online logo
Brands
  1. Home
  2. •
  3. Brands
  4. •
  5. Lesro
  6. •
  7. Indoor Furnishing
  8. •
  9. Lesro Siena User manual

Lesro Siena User manual

Tools required: 9/16” ratchet or wrench. (Ratchet recommended.)
Note: These instructions are intended for various models and congurations. Your products may not
look exactly as those shown in the diagrams.
Important: The assembly process requires that some hardware be kept loose until later in the
sequence. Follow these instructions closely to ensure correct assembly.
Recommendation: Retighten all bolts on a seasonal basis to ensure your product remains strong and
stable for many years of use.
Weight Capacity: All guest chairs in these series have a weight capacity of 400 lbs. per seat, oversize
chairs 500 lbs., and loveseats 550 lbs., unless otherwise stated.
Thank you for purchasing a Lesro product.
Need assistance with assembly? Call Lesro customer service 1-800-275-7545.
Visit us on-line at www.lesro.com
Leaders in Reception Seating
Lesro Industries, Inc.
1 Grifn Road South
Bloomeld, CT
06002
Phone
860.243.3226
Fax
860.243.5392
www.lesro.com
Section 1 - Chairs & Loveseats without Arms
1. Unpack and identify all parts.
2. Attach seat to back using 2”
bolts and washers into threaded
inserts, as shown in gures 1
and 2. Keep bolts slightly loose
for now.
3. Place chair upright on a level
surface and align bottom edge
of seat with bottom edge of
back.
4. Tighten all bolts securely.
5. Your product is now assembled
and ready to use.
© 2014 Lesro Industries, Inc. June 2014
Assembly Instructions
For Siena & Ravenna Chairs, Loveseats and Sofas
Section 2 - Chairs & Loveseats with Arms
1. Follow instructions in Section 1 to
attach seat to back. Align bottom
edge of seat with bottom edge of
back and tighten bolts securely.
2. Attach arms to seat and back
using 2” bolts and washers into
threaded inserts, as shown in
gures 3 and 4. Start each bolt
rst, until all have caught a few
threads, then nger tighten only.
Hint: start with bolt in back
cushion rst, followed by front
seat bolt, then middle bolt last.
3. Place chair upright on a level
surface and align bottom edges of
seat, back and arms.
4. Tighten all bolts securely.
5. Your product is now assembled
and ready to use.
Figure 3
Align edges when
tightening bolts Figure 2
Figure 1
Figure 4
Align
edges
when
tightening
bolts
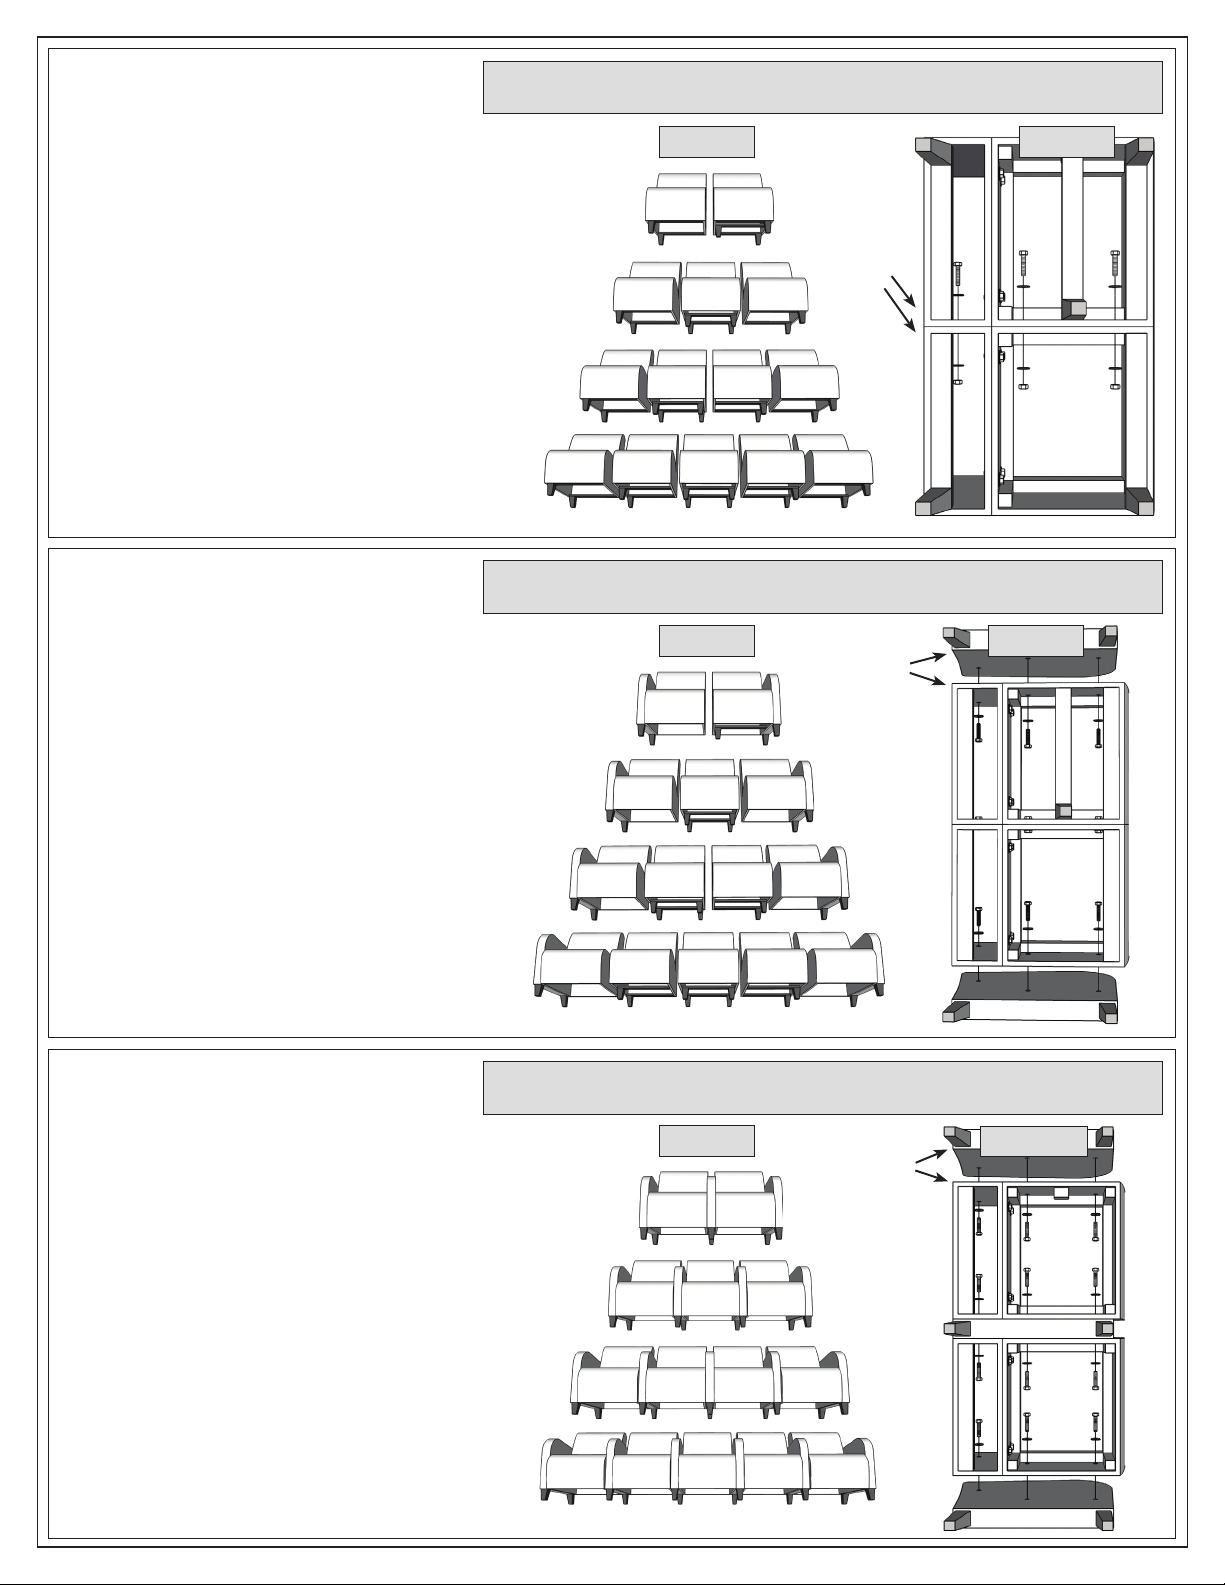
Section 3 - Sofas without Arms
1. Follow instructions in Section 1 to attach
each seat to each back. Cushions inside
each carton belong together. Do not
intermix. Align edges and tighten bolts
securely.
2. Orient chairs side-by-side, as shown in gures 5
and 6. Pay close attention to correct leg positions.
Note that center chairs have bolt holes on both
sides. End chairs have bolt holes on one side only.
3. Connect adjoining chairs using bolts, washers and
nuts. Use 2” bolts between seats and 3” bolts
between backs. Finger tighten only. Hint: start
with bolt in back cushion rst, followed by front
seat bolt, then middle bolt last.
4. Place chair assembly upright on a level surface and
align bottom edges of adjoining seats and backs.
5. Tighten all bolts securely.
6. Your product is now assembled and ready to use.
© 2014 Lesro Industries, Inc.
Section 4 - Sofas with End Arms
Figure 7
Section 5 - Connecting Chairs with Center Arms
1. Follow instructions in Section 1 to attach
seats to backs. Align edges and tighten
bolts securely.
2. Identify left, right, and center arm pieces. Center
arms have bolt holes on both sides. Left and right
arms have bolt holes on one side only.
3. Orient chairs and arms side-by-side, as shown in
gures 9 and 10.
4. Attach arms to seats and backs using 2” bolts and
washers into threaded inserts. Start each bolt rst,
until all have caught a few threads, then nger
tighten only. Hint: start with bolt in back cushion
rst, followed by front seat bolt, then middle bolt.
5. Place chair assembly upright on a level surface and
align bottom edges of adjoining seats, backs, and
arms. Tighten all bolts securely.
6. Your product is now assembled and ready to use.
Align
edges
when
tightening
bolts
1. Follow instructions in Section 3 to
attach each seat to each back and to
connect adjoining sections. Pay close
attention to correct leg positions, as
shown in gure 7. Align edges and tighten
bolts securely.
2. Attach arms to seats and backs using 2” bolts
and washers into threaded inserts, as shown
in gure 8. Start each bolt rst, until all have
caught a few threads, then nger tighten only.
Hint: start with bolt in back cushion rst,
followed by front seat bolt, then middle
bolt last.
3. Place chair assembly upright on a level
surface and align bottom edges of adjoining
seats, backs, and arms. Tighten all bolts
securely.
4. Your product is now assembled and ready
to use.
Figure 5 Figure 6
Figure 8
Figure 9
Align
edges
when
tightening
bolts
Align
edges
when
tightening
bolts
Figure 10
See www.lesro.com for an enlarged view of this gure
Recommendation: Retighten all bolts on a seasonal basis to ensure your product remains strong and
stable for many years of use.
Weight Capacity: All chairs in these series have a weight capacity of 350 lbs. per seat, unless
otherwise stated.
Thank you for purchasing a Lesro product.
Need assistance with assembly? Call Lesro customer service 1-800-275-7545.
Visit us on-line at www.lesro.com
Leaders in Reception Seating
Lesro Industries, Inc.
1 Grifn Road South
Bloomeld, CT
06002
Without Arms
© 2014 Lesro Industries, Inc. June 2014
Leg Positions
For Siena & Ravenna Series Sofas
4-Seat
2-Seat
3-Seat
5-Seat
5-Seat 2-Seat
3-Seat
4-Seat
With Arms

This manual suits for next models

1

Other Lesro Indoor Furnishing manuals

Lesro Brooklyn Guest Chair User manual

Lesro

Lesro Brooklyn Guest Chair User manual

Lesro Mystic Lounge User manual

Lesro

Lesro Mystic Lounge User manual

Lesro Amherst User manual

Lesro

Lesro Amherst User manual

Lesro Avon Connecting Center Table User manual

Lesro

Lesro Avon Connecting Center Table User manual

Lesro Gansett Guest User manual

Lesro

Lesro Gansett Guest User manual

Lesro Mystic Guest Series User manual

Lesro

Lesro Mystic Guest Series User manual

Lesro Mystic Steel Utility User manual

Lesro

Lesro Mystic Steel Utility User manual

Lesro Waterfall User manual

Lesro

Lesro Waterfall User manual

Lesro Newport Series User manual

Lesro

Lesro Newport Series User manual

Lesro 84" Rectangular Steel Frame Conference Table User manual

Lesro

Lesro 84" Rectangular Steel Frame Conference Table User manual

Lesro Steel Frame Conference Table User manual

Lesro

Lesro Steel Frame Conference Table User manual

Lesro Fremont Chair User manual

Lesro

Lesro Fremont Chair User manual

Lesro Belmont Series User manual

Lesro

Lesro Belmont Series User manual

Popular Indoor Furnishing manuals by other brands

Regency LWMS3015 Assembly instructions

Regency

Regency LWMS3015 Assembly instructions

Furniture of America CM7751C Assembly instructions

Furniture of America

Furniture of America CM7751C Assembly instructions

Safavieh Furniture Estella CNS5731 manual

Safavieh Furniture

Safavieh Furniture Estella CNS5731 manual

PLACES OF STYLE Ovalfuss Assembly instruction

PLACES OF STYLE

PLACES OF STYLE Ovalfuss Assembly instruction

Trasman 1138 Bo1 Assembly manual

Trasman

Trasman 1138 Bo1 Assembly manual

Costway JV10856 manual

Costway

Costway JV10856 manual

moss DESIGN Caisson Credenza Assembly instructions

moss DESIGN

moss DESIGN Caisson Credenza Assembly instructions

Aquaglide FULL DECK 15.0 owner's manual

Aquaglide

Aquaglide FULL DECK 15.0 owner's manual

AREBOS AR-HE-SW30 user manual

AREBOS

AREBOS AR-HE-SW30 user manual

Till-Hilft Fulda 87005.330 Assembly instructions

Till-Hilft

Till-Hilft Fulda 87005.330 Assembly instructions

Twoey Outside 2010 quick start guide

Twoey Outside

Twoey Outside 2010 quick start guide

Hettich Easys 200 operating instructions

Hettich

Hettich Easys 200 operating instructions

The bedboss RELAX 404 Series owner's manual

The bedboss

The bedboss RELAX 404 Series owner's manual

Oeseder Möbelindustrie Bern 991 720 Assembly instructions

Oeseder Möbelindustrie

Oeseder Möbelindustrie Bern 991 720 Assembly instructions

Costway HW68469 user manual

Costway

Costway HW68469 user manual

Next ALIX A27743 Assembly instructions

Next

Next ALIX A27743 Assembly instructions

BROSA Hans Assembly guide

BROSA

BROSA Hans Assembly guide

Prodigg MINIKA PBA015T-FUR installation manual

Prodigg

Prodigg MINIKA PBA015T-FUR installation manual

manuals.online logo
manuals.online logoBrands
  • About & Mission
  • Contact us
  • Privacy Policy
  • Terms and Conditions

Copyright 2025 Manuals.Online. All Rights Reserved.