Leuze AMS 107i User manual

We reserve the right to make technical changes
EN • 2022/11/07 • 50146973
Original operating instructions
AMS 107i
Optical laser measurement system

© 2022
Leuze electronic GmbH + Co. KG
In der Braike 1
73277 Owen / Germany
Phone: +49 7021 573-0
Fax: +49 7021 573-199
www.leuze.com
Leuze electronic GmbH + Co. KG AMS 107i 2

Table of contents
Leuze electronic GmbH + Co. KG AMS 107i 3
Table of contents
1 About this document ............................................................................................5
2 Safety .....................................................................................................................6
2.1 Intended use ...........................................................................................................................6
2.2 Foreseeable misuse................................................................................................................6
2.3 Competent persons.................................................................................................................7
2.4 Disclaimer ...............................................................................................................................7
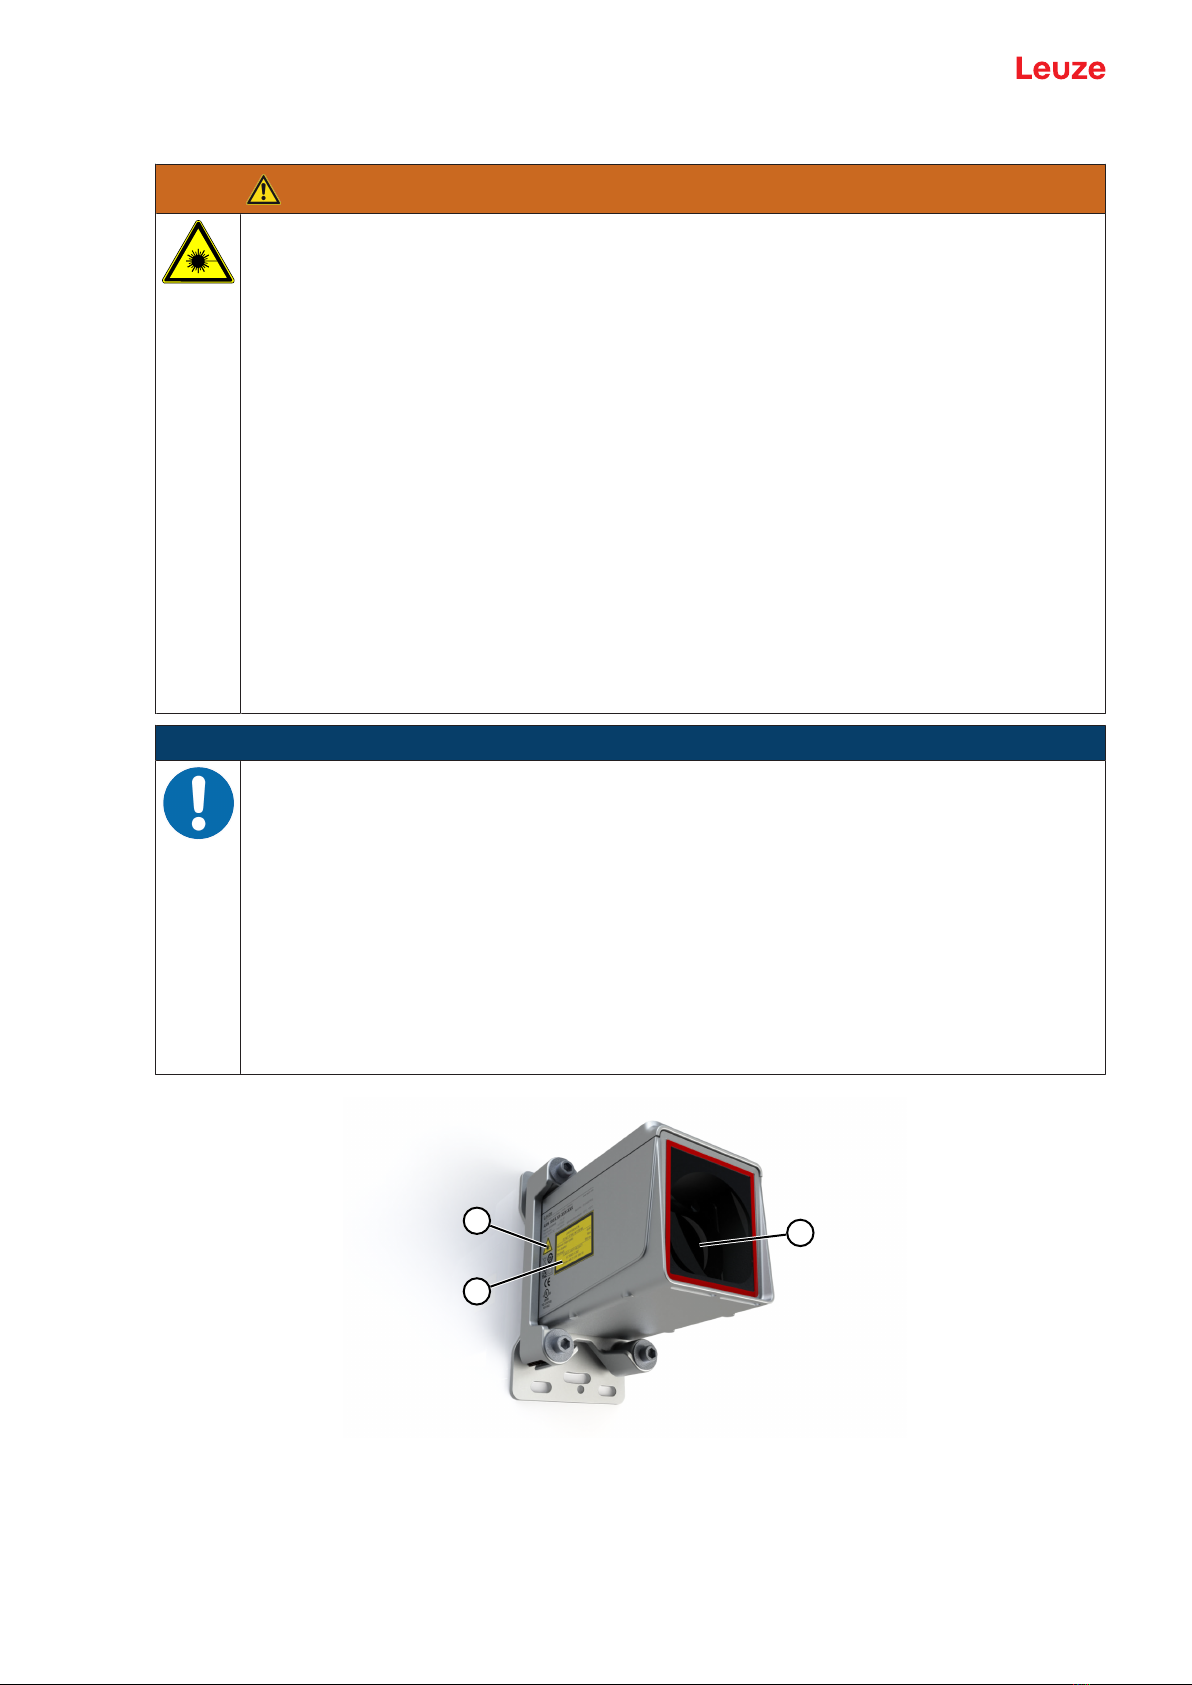
2.5 Laser safety notices ................................................................................................................8
3 Fast commissioning ...........................................................................................10
3.1 Mounting ...............................................................................................................................10
3.2 Connecting voltage supply....................................................................................................10
3.3 Display ..................................................................................................................................10
3.4 SSI interface .........................................................................................................................10
4 Device description ..............................................................................................11
4.1 Operating principle................................................................................................................11
4.2 Indicators and operational controls .......................................................................................11
4.2.1 LED status indicators.........................................................................................................11
4.2.2 Display...............................................................................................................................12
4.2.3 Control buttons ..................................................................................................................13
4.3 Menus ...................................................................................................................................14
4.3.1 Menu structure...................................................................................................................14
4.3.2 Parameter menu................................................................................................................16
4.3.3 Language selection menu .................................................................................................19
4.3.4 Diagnosis menu.................................................................................................................19
4.3.5 Operation examples ..........................................................................................................20
4.4 Reflectors..............................................................................................................................22
4.4.1 Description of the reflective tape .......................................................................................22
4.4.2 Overview of reflective tapes ..............................................................................................22
4.4.3 Selecting reflector size ......................................................................................................22
5 Mounting..............................................................................................................24
5.1 Transport and storage...........................................................................................................24
5.2 Mounting the device..............................................................................................................25
5.2.1 Mounting with pre-mounted alignment unit (BTA) .............................................................25
5.2.2 Mounting with adapter plate (BT) ......................................................................................26
5.2.3 Mounting without accessories ...........................................................................................27
5.2.4 Optional mounting bracket.................................................................................................27
5.2.5 Parallel mounting...............................................................................................................28
5.2.6 Parallel mounting of and DDLS optical data transmission ................................................30
5.2.7 Mounting with laser beam deflector units ..........................................................................30
5.3 Mounting the reflector ...........................................................................................................31
5.3.1 Pitch of the reflector...........................................................................................................31
6 Electrical connection..........................................................................................34
6.1 PWR – voltage supply / switching input/output .....................................................................35
6.2 SSI ........................................................................................................................................35
6.3 Service ..................................................................................................................................35
7 Putting into operation – SSI interface...............................................................36
7.1 Operating principle of SSI interface ......................................................................................36
7.2 Cable length depending on the data rate..............................................................................37
7.3 Default settings .....................................................................................................................37

Table of contents
Leuze electronic GmbH + Co. KG AMS 107i 4
8 Care, maintenance and disposal .......................................................................38
9 Diagnostics and troubleshooting......................................................................39
9.1 Status messages ..................................................................................................................39
9.2 LED indicators.......................................................................................................................39
9.3 Display messages.................................................................................................................40
10 Service and support ...........................................................................................41
11 Technical data .....................................................................................................42
11.1 Optical laser measurement system.......................................................................................42
11.2 Reflective tapes ....................................................................................................................44
11.2.1 Self-adhesive reflective tape .............................................................................................44
11.2.2 Reflective tape on carrier plate..........................................................................................44
11.2.3 Reflective tape with heating...............................................................................................44
11.3 Dimensioned drawings..........................................................................................................46
12 Order guide and accessories.............................................................................52
12.1 Part number code .................................................................................................................52
12.2 AMS107i type overview .......................................................................................................52
12.3 Accessories – Mounting........................................................................................................53
12.4 Accessories – Reflective tapes .............................................................................................53
12.5 Accessories – connection technology...................................................................................53
12.6 Accessories – mounting systems..........................................................................................54
13 EC Declaration of Conformity............................................................................55
14 Licenses...............................................................................................................56

About this document
Leuze electronic GmbH + Co. KG AMS 107i 5
1 About this document
Used symbols and signal words
Tab.1.1: Warning symbols and signal words
Symbol indicating dangers to persons
Symbol indicating dangers from harmful laser radiation
Symbol indicating possible property damage
NOTE Signal word for property damage
Indicates dangers that may result in property damage if the measures for dan-
ger avoidance are not followed.
CAUTION Signal word for minor injuries
Indicates dangers that may result in minor injury if the measures for danger
avoidance are not followed.
WARNING Signal word for serious injury
Indicates dangers that may result in severe or fatal injury if the measures for
danger avoidance are not followed.
Tab.1.2: Other symbols
Symbol for tips
Text passages with this symbol provide you with further information.
Symbol for action steps
Text passages with this symbol instruct you to perform actions.
Symbol for action results
Text passages with this symbol describe the result of the preceding action.

Safety
Leuze electronic GmbH + Co. KG AMS 107i 6
2 Safety
This sensor was developed, manufactured and tested in line with the applicable safety standards. It corre-
sponds to the state of the art.
2.1 Intended use
The AMS100i optical laser measurement system is an absolute measuring optical laser measurement sys-
tem for distance measurement up to 120m against a reflector.
Areas of application
The AMS100i is designed for the following areas of application:
• Positioning of automated, moving plant components
• Travel and lifting axes of stacker cranes
• Repositioning units
• Gantry crane bridges and their trolleys
• Elevators
• Electroplating plants
CAUTION
Observe intended use!
The protection of personnel and the device cannot be guaranteed if the device is operated in a
manner not complying with its intended use.
ÄOnly operate the device in accordance with its intended use.
ÄLeuzeelectronicGmbH+Co.KG is not liable for damages caused by improper use.
ÄRead these operating instructions before commissioning the device. Knowledge of the oper-
ating instructions is an element of proper use.
CAUTION
UL applications!
For UL applications, use is only permitted in Class 2 circuits in accordance with the NEC (Na-
tional Electric Code).
NOTICE
Comply with conditions and regulations!
ÄObserve the locally applicable legal regulations and the rules of the employer's liability insur-
ance association.
2.2 Foreseeable misuse
Any use other than that defined under "Intended use" or which goes beyond that use is considered im-
proper use.
In particular, use of the device is not permitted in the following cases:
• in rooms with explosive atmospheres
• in circuits which are relevant to safety
• for medical purposes

Safety
Leuze electronic GmbH + Co. KG AMS 107i 7
NOTICE
Do not modify or otherwise interfere with the device!
ÄDo not carry out modifications or otherwise interfere with the device. The device must not be
tampered with and must not be changed in any way.
ÄThe device must not be opened. There are no user-serviceable parts inside. Opening the
device voids the warranty. Warranted features cannot be guaranteed after the device has
been opened.
ÄRepairs must only be performed by LeuzeelectronicGmbH+Co.KG.
2.3 Competent persons
Connection, mounting, commissioning and adjustment of the device must only be carried out by competent
persons.
Prerequisites for competent persons:
• They have a suitable technical education.
• They are familiar with the rules and regulations for occupational safety and safety at work.
• They are familiar with the operating instructions for the device.
• They have been instructed by the responsible person on the mounting and operation of the device.
Certified electricians
Electrical work must be carried out by a certified electrician.
Due to their technical training, knowledge and experience as well as their familiarity with relevant standards
and regulations, certified electricians are able to perform work on electrical systems and independently de-
tect possible dangers.
In Germany, certified electricians must fulfill the requirements of accident-prevention regulations DGUV
(German Social Accident Insurance) provision 3 (e.g. electrician foreman). In other countries, there are re-
spective regulations that must be observed.
2.4 Disclaimer
LeuzeelectronicGmbH+Co.KG is not liable in the following cases:
• The device is not being used properly.
• Reasonably foreseeable misuse is not taken into account.
• Mounting and electrical connection are not properly performed.
• Changes (e.g., constructional) are made to the device.

Safety
Leuze electronic GmbH + Co. KG AMS 107i 8
2.5 Laser safety notices
ATTENTION
LASER RADIATION – CLASS 2 LASER PRODUCT
Do not stare into beam!
The device satisfies the requirements of IEC/EN 60825-1:2014 safety regulations for a product
of laser class 2 and complies with 21 CFR 1040.10 except for conformance with IEC 60825-1
Ed. 3., as described in Laser Notice No. 56, dated May 8, 2019.
ÄNever look directly into the laser beam or in the direction of reflected laser beams!
If you look into the beam path over a longer time period, there is a risk of injury to the retina.
ÄDo not point the laser beam of the device at persons!
ÄInterrupt the laser beam using a non-transparent, non-reflective object if the laser beam is
accidentally directed towards a person.
ÄWhen mounting and aligning the device, avoid reflections of the laser beam off reflective
surfaces!
ÄCAUTION! Use of controls or adjustments or performance of procedures other than speci-
fied herein may result in hazardous light exposure.
ÄObserve the applicable statutory and local laser protection regulations.
ÄThe device must not be tampered with and must not be changed in any way.
There are no user-serviceable parts inside the device.
Repairs must only be performed by Leuze electronic GmbH + Co. KG.
NOTICE
Affix laser information and warning signs!
Laser information and warning signs attached to the device. Also included with the device are
self-adhesive laser warning and laser information signs (stick-on labels) in multiple languages.
ÄAffix the laser information sheet to the device in the language appropriate for the place of
use.
When using the device in the US, use the stick-on label with the "Complies with
21CFR1040.10" notice.
ÄAffix the laser information and warning signs near the device if no signs are attached to the
device (e.g. because the device is too small) or if the attached laser information and warning
signs are concealed due to the installation position.
Affix the laser information and warning signs so that they are legible without exposing the
reader to the laser radiation of the device or other optical radiation.
1
3
2
1 Laser aperture
2 Laser warning sign
3 Laser information sign with laser parameters
Fig.2.1: Laser aperture, laser warning signs

Safety
Leuze electronic GmbH + Co. KG AMS 107i 9
Fig.2.2: Laser warning and information signs – supplied stick-on labels

Fast commissioning
Leuze electronic GmbH + Co. KG AMS 107i 10
3 Fast commissioning
Below you will find a short description for the initial commissioning of the AMS100i. Detailed explanations
for all listed points can be found throughout these operating instructions.
3.1 Mounting
Depending on the purchased model, the AMS100i can be mounted in various ways (see chapter 12 "Order
guide and accessories"):
• with pre-mounted alignment unit (BTA)
• with adapter plate (BT)
• with the threaded holes in the housing (without accessories)
The AMS100i and the corresponding reflector are mounted on two mutually opposing, plane-parallel, flat
walls or system parts. For error-free position measurement, there must be an unobstructed line-of-sight be-
tween the AMS100i and the reflector.
Mounting the device
Mounting with pre-mounted alignment unit (BTA):
ÄSecure the alignment unit together with mounted laser using fourM5 screws.
ÄAlign the laser using the two adjustment screws on the alignment unit. Adjust so that the laser light spot
is positioned at the center of the reflector.
If the sensor was purchased without pre-mounted alignment unit (BTA),
Äfirst mount either the adapter plate (BT) or one of the accessory parts to the sensor or
Äsecure the sensor directly using the threaded holes provided in the housing.
For further information, see chapter 5.2 "Mounting the device".
Mounting the reflector
ÄSecure the reflector with fourM5 screws.
ÄTilt the reflector by approx.1° using the enclosed spacer sleeves.
For further information, see chapter 5.3 "Mounting the reflector".
3.2 Connecting voltage supply
ÄConnect the AMS100i via the M12 connection XD1 PWR.
For further information, see chapter 6 "Electrical connection".
3.3 Display
Once the laser measurement system is supplied with voltage, the device status as well as the measured
position values can be read on the display. The display automatically switches to the display of the mea-
surement values.
Navigate using the [DOWN]/[ENTER] buttons to read off and change the data and parameters.
For further information, see chapter 4.2.2 "Display".
3.4 SSI interface
For correct data exchange between frequency inverter and AMS100i, both devices must have the same
settings for the following parameters:
• Encoding
• Number of data bits
• Resolution
• Error bit on/off
For further information, see chapter 7 "Putting into operation – SSI interface".

Device description
Leuze electronic GmbH + Co. KG AMS 107i 11
4 Device description
4.1 Operating principle
The AMS100i optical laser measurement system calculates distances to fixed as well as moving system
parts. The distance to be measured is calculated according to the principle of the propagation time of radi-
ated light. Here, the light emitted by the laser diode is reflected by a reflector onto the receiving element of
the laser measurement system. The AMS100i uses the "propagation time" of the light to calculate the dis-
tance to the reflector. The high absolute measurement accuracy of the laser measurement system and the
fast response time are designed for position control applications.
NOTICE
A list with all available device types can be found on the Leuze website www.leuze.com.
4.2 Indicators and operational controls
4.2.1
LED status indicators
PWR LED
Tab.4.1: PWR indicators
Color State Description
Off Device OFF, no supply voltage
Green Flashing • No measurement value output
• Voltage connected
• Self test running
• Initialization running
• Parameter download running
• Boot process running
Green Continuous
light
• Device ok
• Measurement value output
• Self test successfully finished
• Device monitoring active
Red Flashing • Device OK but warning message (ATT, TMP, LSR) set in display
• Light beam interruption
• Plausibility error (PLB)
Red Continuous
light
No measurement value output; for details, see display
Orange Continuous
light
• Parameter enable active
• No data on the host interface

Device description
Leuze electronic GmbH + Co. KG AMS 107i 12
NET LED
Tab.4.2: NET indicators
Color State Description
Off No supply voltage (Power)
Green Continuous
light
SSI interface is activated
Green Flashing SSI interface is being initialized
Red Continuous
light
Device starting up
4.2.2
Display
Status and warning messages are shown in the display only if status changes or faults occur at the device.
Example:
Fig.4.1: Example of status and warning message
Tab.4.3: Status and warning messages in the display
Display Type of message Meaning
1 Input1 or output1 active Function depends on configuration
2 Input2 or output2 active Function depends on configuration
LSR Laser pre-failure message warning Laser diode old, device still functional, exchange or
have repaired.
TMP Temperature monitoring warning Permissible internal device temperature exceeded /
not met
PLB Plausibility error Implausible measurement value. Possible cause:
• Light beam interruption
• Measurement range exceeded
• Permissible internal device temperature ex-
ceeded
• Traverse rate >10m/s
Depending on the configuration, either zero or the
last valid measurement value is output at the inter-
faces.
ATT Reception signal warning Laser exit window or reflector soiled or fogged by
rain, water vapor or fog. Clean or dry surfaces.
ERR Internal hardware error The device must be sent in for inspection.
Position value
The measured position value is displayed in the configured unit of measurement.
+87.000 m With the metric setting, the measurement value is always displayed in meters to three decimal
places.
+87.0 in With the inch setting, the measurement value is always displayed in inches to one decimal place.

Device description
Leuze electronic GmbH + Co. KG AMS 107i 13
4.2.3
Control buttons
Tab.4.4: Control buttons
DOWN Navigate downward/sideways
ENTER Confirm/enter value, change menu levels
Navigating within the menus
ÄUse the [DOWN] button to select the menus within a menu level.
ÄUse the [ENTER] button to activate the selected menu item.
When one of the buttons is actuated, the display illumination is activated for 10minutes.
Setting values
If a value can be entered, the display will look like the example below:
Fig.4.2: Example of value entry
ÄSet the desired value using the [DOWN] button. If you have entered an incorrect digit, press the
[DOWN] button until the desired digit appears again.
ÄSave the set value by pressing the [ENTER] button.
ÄWith multi-digit numbers, after entering a digit press the [ENTER] button to move to the next digit on the
right.
Selecting options
If an option can be selected, the display will look like the example below:
IO2
IO1
Fig.4.3: Example of option selection
ÄSelect the desired option using the [DOWN] button.
ÄActivate the option by pressing the [ENTER] button.

Device description
Leuze electronic GmbH + Co. KG AMS 107i 14
4.3 Menus
NOTICE
Terms may be shown in abbreviated form on the display. To improve readability, the terms are
written in full below.
4.3.1
Menu structure
Tab.4.5: Menu structure
Level1 Level2 Level3 Level 4 Level 5
Device information Product name
Part no.
Serial No.
HW revision
FW revision

Device description
Leuze electronic GmbH + Co. KG AMS 107i 15
Level1 Level2 Level3 Level 4 Level 5
Parameter
(see chapter 4.3.2
"Parameter menu")
Parameter handling Parameter enable
Password Activate password
Password entry
Parameters to de-
fault
SSI Activation
Encoding
Number of data bits
SSI resolution
Error bit
Error bit function
Update rate
Clock frequency
Position value Unit
Counting direction
Offset
Preset
Error delay
Position value in
the case of failure
I/O I/O1 Port configuration
Switching input Function
Activation
Switching output Function
Activation
I/O2 Port configuration
Switching input Function
Activation
Switching output Function
Activation
Limit values Max. velocity Activation
Max. velocity
Other Display dimming
Service Ethernet IP IP address
Port address
Heating control Standard (10°C –
15°C)
Extended (30°C –
35°C)

Device description
Leuze electronic GmbH + Co. KG AMS 107i 16
Level1 Level2 Level3 Level 4 Level 5
Language selection
(see chapter 4.3.3
"Language selec-
tion menu")
Diagnosis
(see chapter 4.3.4
"Diagnosis menu")
Status messages
4.3.2
Parameter menu
Parameter handling
Tab.4.6: Parameter handling submenu
Level3 Level 4 Selection/configuration options
Description
Standard
Parameter en-
able
Lock and enable parameter entry
ON/OFF
The standard setting (OFF) prevents unintended parame-
ter changes.
With parameter enable activated (ON), the display is in-
verted. In this state, it is possible to change parameters
manually.
OFF
Password Activate pass-
word
Set up password
ON/OFF
To enter a password, parameter enable must be acti-
vated.
If a password is assigned, changes to the AMS107i can
only be made after the password is entered.
The master password 507 overrides the individually set
password.
OFF
Enter pass-
word
Setting a 4-digit numerical password.
After confirmation of the password, the entered password
is shown as "000" for reasons of discretion.
Parameters to
default
Reset device to default settings
Pressing the [ENTER] button after selecting the menu
item Parameters to default resets all parameters to their
standard settings without any further security prompts.
In this case, English is selected as the display language.

Device description
Leuze electronic GmbH + Co. KG AMS 107i 17
SSI
Tab.4.7: SSI submenu
Level3 Selection/configuration options
Description
Standard
Activation ON/OFF
Activates or deactivates the AMS100i as an SSI participant.
ON
Encoding Binary/gray
Specifies the output format of the measurement value.
Gray
Number of
data bits
24-bit/25-bit/26-bit
The measurement value can be represented on the SSI interface in this
data width.
24 bit
SSI resolution 0.001 mm/0.01 mm/0.1 mm/1 mm/10 mm
The measurement value can be displayed in these resolutions.
0.1mm
Error bit ON/OFF
This parameter determines whether an error bit is also attached to the
"number of data bits". The error bit is the LSB and is not converted in the
case of gray representation of the measurement value.
ON
Error bit func-
tion
The error bit can be assigned the following status messages:
• Overflow
• Intensity (ATT)
• Temperature (TMP)
• Laser (LSR)
• Plausibility (PLB)
• Hardware (ERR)
In the case of multiple entries, the individual states in the error bit are pro-
cessed in an OR function.
Plausibility
(PLB)
Hardware
(ERR)
Update rate 1.7ms/0.2ms 1.7ms
Clock fre-
quency
50-79kHz/80-800kHz
Selection of the clock frequency
80-800kHz
Position value
Tab.4.8: Position value submenu
Level3 Selection/configuration options
Description
Standard
Unit Metric/Inch
Specifies the units of the measured distances.
The set values for preset, offset and velocity value are not automatically
converted when the unit is changed. Before changing the unit, check
these values and adjust if necessary.
Metric
Counting di-
rection
Positive/Negative
Positive: The measurement value begins at 0 and increases with increas-
ing distance.
Negative: The measurement value begins at 0 and decreases with in-
creasing distance. Negative distance values may need to be compen-
sated with an offset or preset.
Positive

Device description
Leuze electronic GmbH + Co. KG AMS 107i 18
Level3 Selection/configuration options
Description
Standard
Offset Output value = measurement value + offset
The resolution of the offset value is independent of the selected "Position
resolution" and is entered in mm or inch/100. The offset value is effective
immediately after entry.
If the preset value is activated, this has priority over the offset. Preset and
offset are not offset against each other.
Maximum
configurable
value:
+/-
120,000mm
+/-
480.000inch/
100
Preset The preset value is accepted by means of teach pulse. The teach pulse
can be placed on a hardware input of the M12 PWR connector. The hard-
ware input must be appropriately configured. See also configuration of
the I/Os.
Maximum
configurable
value:
+/-
120,000mm
+/-
480.000inch/
100
Error delay ON/OFF
Specifies whether, in the event of an error, the position value immediately
outputs the value of the "Position value in the case of failure" parameter
or the last valid position value for the configured error delay time.
ON/100ms
Position value
in the case of
failure
Last valid value / zero
Specifies which position value is output after the error delay time elapses.
Zero
I/O
Tab.4.9: I/O settings submenu
Level3 Level 4 Level 5 Selection/configuration options
Description
Standard
I/O1 Port configu-
ration
Input/Output
Defines whether I/O1 functions as an
output or input.
Output
Switching in-
put
Function No function/teach preset/laser ON/OFF No function
Activation Low active/High active Low active
Switching out-
put
Function Speed/intensity (ATT)/temperature
(TMP)/laser (LSR)/plausibility (PLB)/
hardware (ERR)
In the case of multiple entries, the indi-
vidual functions are processed in an OR
function.
Plausibility
(PLB)
Hardware
(ERR)
Activation Low active/High active Low active

Device description
Leuze electronic GmbH + Co. KG AMS 107i 19
Level3 Level 4 Level 5 Selection/configuration options
Description
Standard
I/O2 Port configu-
ration
Input/Output
Defines whether I/O2 functions as an
output or input.
Output
Switching in-
put
Function No function/teach preset/laser ON/OFF No function
Activation Low active/High active Low active
Switching out-
put
Function Speed/intensity (ATT)/temperature
(TMP)/laser (LSR)/plausibility (PLB)/
hardware (ERR)
In the case of multiple entries, the indi-
vidual functions are processed in an OR
function.
Intensity
(ATT)
Temperature
(TMP)
Laser (LSR)
Activation Low active/High active Low active
Limit values Max. velocity Activation
Max. velocity Max. configurable value: 15,000mm/s
(60,000inch/100s)
Other
Tab.4.10: Other submenu
Level3 Level 4 Selection/configuration options
Description
Standard
Display dim-
ming
10minutes/ON
The display illumination is dimmed after 5minutes and
switched off after 10minutes.
If the OFF parameter is selected, dimming is permanently
deactivated, i.e. the measurement value is always dis-
played.
10min
Service Ether-
net IP
IP address The service interface is available for Leuze-internal pur-
poses only.
192.168.60.10
1
Port address The service interface is available for Leuze-internal pur-
poses only.
7070
4.3.3
Language selection menu
The AMS100i is delivered from the factory with the display preset to English.
5display languages are available:
• German
• English
• Spanish
• French
• Italian
To change the language, no password needs to be entered and parameter enable does not need to be ac-
tivated. The display language is a passive operational control and not a function parameter.
4.3.4
Diagnosis menu
A detailed description of the individual functions can be found in see chapter 9 "Diagnostics and trou-
bleshooting".

Device description
Leuze electronic GmbH + Co. KG AMS 107i 20
4.3.5
Operation examples
Structure of menu items in display
Two menu lines, one on top of the other, are always shown in the display.
Device information
Network information
Status and measurement
data
Parameter Parameter handling Parameter enable
Language selection Password Activate password …
Service Parameters to default Password entry …
Parameter enable
During normal operation parameters can be viewed only. If parameters are to be changed, the ON menu
item in the Parameter> Parameter handling> Parameter enable menu must be activated. To do this,
proceed as follows.
Tab.4.11: Operating example for "parameter enable"
Language
Parameter
In the main menu, use the [DOWN] button to select
the menu item Parameter.
Press the [ENTER] button to enter the Parameter
menu.
SSI
Para. Managem.
Press the [DOWN] button to select the menu item
Parameter handling.
Press the [ENTER] button to enter the Parameter
handling menu.
ON
Param. enabling
In the Parameter handling menu, use the [DOWN]
button to select the menu item Parameter enable.
Press the [ENTER] button to enter the Parameter
enable menu.
ON
Param. enabling
In the Parameter enable menu, use the [DOWN]
button to select the menu item ON.
Press the [ENTER] button to activate parameter en-
able.
NOTICE
- As long as parameter enable is active, the entire AMS100i display is inverted.
- If a password was stored, parameter enable is not possible until this password is entered; see
the example below.
- For the SSI interface, communication between the control and the AMS100i is active even if
parameter enable is active.
Changes made to the SSI parameters via the display take effect immediately.
Table of contents
Other Leuze Measuring Instrument manuals

Leuze
Leuze AMS 304i User manual

Leuze
Leuze CML 720i User manual

Leuze
Leuze AMS 348i SSI User manual

Leuze
Leuze AMS 300i Parts list manual

Leuze
Leuze AMS 301i Parts list manual

Leuze
Leuze CL 730i User manual

Leuze
Leuze AMS 307i User manual

Leuze
Leuze AMS 358i User manual

Leuze
Leuze CMS 748i User manual

Leuze
Leuze AMS 338i User manual