Levante ECOPANELS500 User manual

levante-products.com
LEV0549/Page 1 of 8/Issue 1/07.18
Operation Manual
Note: These instructions must be read fully before commencing use of the heater.
Please retain these instructions for future reference.
FOR INDOOR USE ONLY
Slimline Digital Panel Heater
Models: ECOPANELS500, ECOPANELS1000, ECOPANELS1500, ECOPANELS2000
Levanté - DN4 5FB, UK
LEV0549_ECOPANELS_Instructions Manual.indd 1 03/07/2018 14:17

levante-products.com
LEV0549/Page 2 of 8/Issue 1/07.18
Warning
In order to avoid overheating,
do not cover the heater.
• If the power cord is damaged it must be replaced by
a service agent or a equivalent qualified electrician.
Do not continue to use until repaired, as it may
cause a hazard.
• This appliance is not intended to be used by young
children or disabled persons unless they have been
adequately supervised by a responsible adult to
ensure the appliance is used correctly and safely.
• Young children should be supervised to ensure they
do not play with the product.
• To protect against fire, electrical shock and injury to
persons, do not immerse the appliance power cord
or plug in water or other liquid.
• This appliance is intended for use indoor only. Avoid
overheating do not cover the heater with towels,
curtains, clothing etc.
• Never use the heater to dry clothing or similar items,
or handle the plug with wet hands.
• Ensure the heater is installed so that the switches
and other controls cannot be touched by a person in
the bath or shower.
• Ensure the appliance is securely fixed to the wall and
is correctly positioned level. The appliance should be
placed no less than 150mm from a barrier/wall on all
sides - top, bottom, left and right.
• Always unplug, wait for appliance to cool down, and
store if not to be used for prolonged periods of time.
IMPORTANT SAFEGUARDS
• When first installed you may experience a burning
smell or a little smoke, this is normal and will fade
within a few minutes.
• The surface temperature of this heater can be very
hot, do not touch when the heater is turned on.
• Only connect the product if the voltage indicated
on the product label(s) corresponds with the
mains voltage.
• The heater must not be located directly below a
wall socket.
• Do not unplug the product by pulling on the cord.
To unplug grasp the plug, not the cord.
• This product has an overheat protection safeguard
that turns off the heater whenever it begins to
overheat. If it does overheat switch off the heater,
remove mains plug from wall socket and allow to
cool down for 45 minutes. The heater will work
again when cooled. Carefully check prior to using
again that the reason for overheating was not
curtains, clothing, furniture etc covering any of the
heaters air vents.
• Turn off the appliance and unplug from socket when
not in use. Allow to cool down prior to cleaning. Use
a damp cloth for clean and a dry cloth to dry. Do not
use cleaning chemicals.
• Do not use the product in areas where petrol, paint
or flammable liquids are used or stored.
Before use, please read and follow these instructions carefully, even if you feel you are familiar with the product.
They contain important information concerning the operation, safety and maintenance when using the product.
Please retain these instructions for future use and reference.
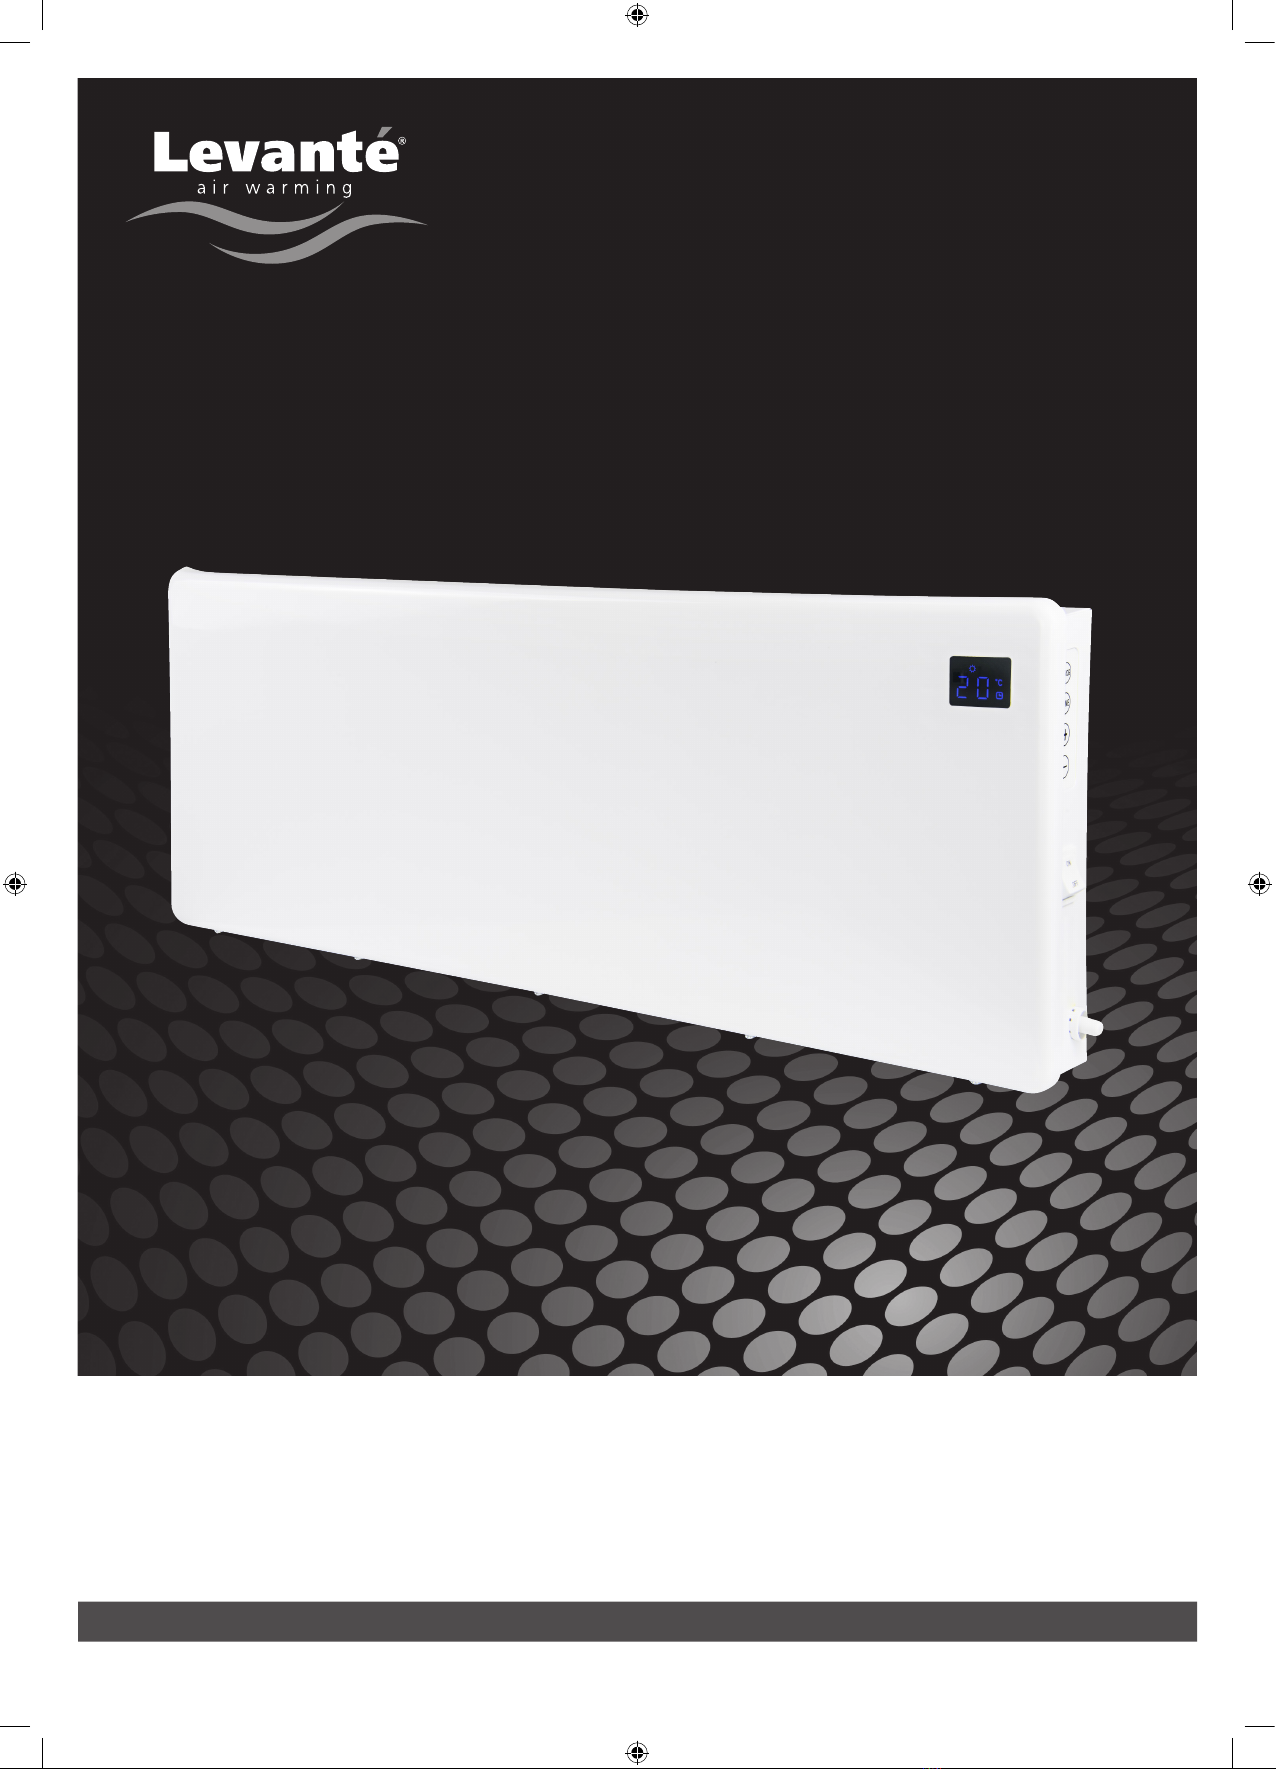
ECOPANELS500
- 500W c/w digital programmer
Suggested room size: up to 5m
2
Dimensions: 385 x 280 x 72mm
ECOPANELS1000
- 1000W c/w digital programmer
Suggested room size: 5 - 10m
2
Dimensions: 540 x 280 x 72mm
ECOPANELS1500
- 1500W c/w digital programmer
Suggested room size: 10 - 15m
2
Dimensions: 790 x 280 x 72mm
ECOPANELS2000
- 2000W c/w digital programmer
Suggested room size: 15 - 20m
2
Dimensions: 1140 x 280 x 72mm
Models covered by this instruction guide:
LEV0549_ECOPANELS_Instructions Manual.indd 2 03/07/2018 14:17

levante-products.com
LEV0549/Page 3 of 8/Issue 1/07.18
INSTALLATION GUIDE
1. When mounting the
heater on to the wall
ensure the heater is
unplugged from the
mains socket and all
power switches are
turned off. A suitable
wall mounting area
requires at least
150mm of empty clearance on ALL four sides.
3. Position the bracket on
the wall in the desired
location and mark the
holes on the wall for
drilling, making sure
the bracket is level.
Drill holes to a suitable
depth and secure the
mounting bracket to
the wall with the four mounting screws supplied.
For masonry walls use the wall plugs with
screws provided.
2. Detach the mounting
bracket from the back
of the panel heater
by pushing down on
the top bracket and
then pulling the top
brackets out. The
bottom section will
then slide down and
out, releasing the mounting bracket.
4. Hang up the heater
on the brackets and
secure; Firstly locate
the heater onto the
lower bracket and
push back to locate
and click the upper
brackets into position.
Check heater is secure
and plug heater into
mains socket.
LOT20 Compliant
Item Symbol Value Unit
HEAT OUTPUT - ECOPANELS500
Nominal Heat Output Pnom 0.50 kW
Minimum Heat Output (Indicative) Pmin 0.25 kW
Maximum Continuous Heat Output Pmax,c 0.48 kW
HEAT OUTPUT - ECOPANELS1000
Nominal Heat Output Pnom 1.00 kW
Minimum Heat Output (Indicative) Pmin 0.50 kW
Maximum Continuous Heat Output Pmax,c 0.90 kW
HEAT OUTPUT - ECOPANELS1500
Nominal Heat Output Pnom 1.50 kW
Minimum Heat Output (Indicative) Pmin 0.75 kW
Maximum Continuous Heat Output Pmax,c 1.40 kW
HEAT OUTPUT - ECOPANELS2000
Nominal Heat Output Pnom 2.00 kW
Minimum Heat Output (Indicative) Pmin 1.00 kW
Maximum Continuous Heat Output Pmax,c 1.90 kW
AUXILIARY ELECTRICITY CONSUMPTION
At Nominal Heat Output elmax N/A kW
At Minimum Heat Output elmin N/A kW
In Standby Mode elSB 0.00 kW
Item Unit
Type of heat input, for electric storage local space heaters only (Select one)
Manual Heat Charge Control, with Integrated Thermostat [No]
Manual Heat Charge Control with Room and/or Outdoor Temperature Feedback [No]
Electronic Heat Charge Control with Room and/or Outdoor Temperature Feedback [No]
Fan Assisted Heat Output [No]
Type of heat output/room temperature control (Select one)
Single Stage Heat Output and No Room Temperature Control [No]
Two or More Manual Stages, No Room Temperature Control [No]
With Mechanical Thermostat Room Temperature Control [No]
With Electronic Room Temperature Control [No]
Electronic Room Temperature Control Plus Day Timer [No]
Electronic Room Temperature Control Plus Week Timer [Yes]
Other control option (Multiple selections possible)
Room Temperature Control, with Presence Detection [No]
Room Temperature Control, with Open Window Detection [Yes]
With Distance Control Option [No]
With Adaptive Start Control [No]
With Working Time Limitation [No]
With Black Bulb Sensor [No]
LEV0549_ECOPANELS_Instructions Manual.indd 3 03/07/2018 14:17

levante-products.com
LEV0549/Page 4 of 8/Issue 1/07.18
CONTROLS
1 - Programming Button
2 - Timer Button
3 - Up button
4 - Down Button
5 - ON/OFF Button
6 - Temperature Sensor
PROG
+
TIME
6
1
2
3
4
5
Digital Display
1 - General
When first powering the heater, you will hear a beeping sound and the LED display will flash.
The factory default:
High level heat temperature 20°C - adjustable.
Low level heat temperature 5°C - non-adjustable.
2 - Setting the Day and Time
When the panel heater is first installed, or has been switched off, or disconnected from the mains supply for more than
72 hours, the Day and Time will need to be reset.
Press the “Time” button.
The LED display will display d.1, and “1” will flash.
Use the “+” or “-” buttons to choose the correct day:
1. Monday / 2. Tuesday / 3. Wednesday / 4. Thursday / 5. Friday / 6. Saturday / 7. Sunday.
Press the “Time” button.
The LED display will flash “12”.
Use the “+” or “-” button to choose the correct Hour, (0 to 23).
Press the “Time” button.
The LED display will flash “0”.
Use the “+” or “-” button to choose the correct Minute, (0 to 59).
Press the “Time” button once more to save.
The LED window will return to the set temperature, the will disappear.
For checking the time, press Time button once to show the Day, second time to show the Hour, third time to show the
Minute, the fourth time to quit and return to the temperature display.
3 - Setting the Temperature
The LED display will show the current set temperature.
Press the “+” or “-” button to choose the required temperature, (5°C to 35°C).
During low heat time periods, it will display 5°C.
When the heater is on and producing heat the symbol, will light on the LED display.
LEV0549_ECOPANELS_Instructions Manual.indd 4 03/07/2018 14:17

levante-products.com
LEV0549/Page 5 of 8/Issue 1/07.18
CONTROLS
4 - Programs
The function module is equipped with an accurate thermal cut-out when the programmed temperature is achieved.
It has a built in memory with 6 heating programs, of which 5 are pre-defined as “P1,P2,P3,P4,P5” and 1 is available
for programming by the user as “UP”.
There are 6 programs allow switching between Low Heat and High Heat at various times of the day and night. 5 of
which are pre-defined and cannot be altered. These are displayed as “P1, P2, P3, P4, P5”. The other is the”UP” program
which can be defined by the user.
The table below shows the Low/High heat setting running times for each available program.
Program Level Description Monday - Friday Saturday/Sunday
P1
Low
09:00-17:00
Routine
00:00 to 06:30
08:30 to 17:00
22:30 to 23:59
00:00 to 07:30
10:00 to 12:00
14:00 to 17:00
22:30 to 23:59
High 06:30 to 08:30
17:00 to 22:30
07:30 to 10:00
12:00 to 14:00
17:00 to 22:30
P2
Low
Office
00:00 to 06:00
17:00 to 23:59 00:00 to 23:59
High 06:00 to 17:00 -
P3
Low
Commercial
Routine
00:00 to 06:00
22:00 to 23:59
High 06:00 to 22:00
P4
Low
Constant Heat
- -
High 00:00 to 23:59
P5
Low
Frost Protection
00:00 to 23:59
High - -
UP User program – Runs at times defined by the user
LEV0549_ECOPANELS_Instructions Manual.indd 5 03/07/2018 14:17

levante-products.com
LEV0549/Page 6 of 8/Issue 1/07.18
CONTROLS
4.1 - Setting the Chosen Program
To select a program:
Press the “Prog” Button on the side of the heater. The current selected program will be displayed;
Press “+” or “-” to scroll through the available programs until you find the preferred program.
Wait 5 seconds, the selected program will be saved. The LED display will once again show the current set temperature.
4.2 - Changing the Settings for the user defined Program “UP”
The “UP” program allows the heater to be programmed to switch from low to high heat output settings at required
times. Each day of the week can have different settings. A maximum of three interval high heat output times can be
input per day. The time not covered in these 3 intervals will run at the low temperature setting (5°C)
Programming the high level heating settings for the “UP” program:
1) Press the “Prog” button and “+”or “-” until “UP”is displayed on the LED display.
2) Press the “Time” button within 5 seconds, the LED display will show “d.1” and will light on. You are now
setting the first time interval for Monday.
3) Press the “Time” button within 2 minutes, the LED display will display “1”,You are now setting the Starting hour
for the first time interval of the day.
4) Press “+”or “-”, the display will show “0” firstly, continue press “+”or “-“until the display shows the required
starting hour.
5) Press the “Time” button, the LED display will now show the number 1 hour after the starting time. press “+”
or “-” until get the required finished hour.
6) Press the “Time” button to save above setting, and LED display “2”, it comes to the 2nd time interval for high
heat output.
7) Repeat step 3) to 6) to set the 2nd and 3rd intervals.
8) On setting all three intervals the heater will then move on to d.2 and you will need to repeat the process for
each day of the week. If you only need to set 1 or 2 time intervals for the day, just press the “Time”button until
the LED Display shows the next d. number.
9) If all days have been set the unit will save the setting and will revert back to the LED display, showing the
set temperature.
Please note:
If no buttons are pressed within 2 minutes or you press the “Prog” button, it will quit setting and LED Display will show
the set temperature once again.
5 - Checking the “UP” Program Setting
1) Press the “Prog” and “+”or “-”to display “UP”, then press “Time”for 3 seconds, LED window display “d.1”,
press “+”or “-” to choose from d1. d2. d3. d4. d5. d6. d7 to get the correct day you want to check.
2) Press “Time”,the LED display “1”
3) Press “Time”,the LED display will show starting hour.
4) Press “Time”, the LED display will show finish hour.
5) Repeat step 2) to 4) to display 3rd high level heat output time interval.
6) If no time is input for a time interval, it will display“--”.
LEV0549_ECOPANELS_Instructions Manual.indd 6 03/07/2018 14:17

levante-products.com
LEV0549/Page 7 of 8/Issue 1/07.18
CONTROLS
6 - LED Light
15 seconds no operation, LED light will be decreased by half; Or press “PROG”+” TIME” buttons
at the same time for 3 seconds, LED light will be shut off.
7 - Open Window Function
Press “+” and “-” button at the same time for 3 seconds, open window function will be activated, will flash on
the display. Heater will transfer to work under Frost Protection program at +5ºC if temperature decreases +4ºC within
30 minutes. And it will recover working under previous working program if temperature recovers +2ºC. Or recover
working by pressing “+” and “-” button at the same time for 3 seconds.
8 - Child Lock
Press the “Prog” button for 5 seconds, all the buttons will be locked,The symbol “ ” will light on LED window.
Press the “Prog” button for 5 seconds again, all buttons will be unlocked.
LEV0549_ECOPANELS_Instructions Manual.indd 7 03/07/2018 14:17

levante-products.com
LEV0549/Page 8 of 8/Issue 1/07.18
LIMITED WARRANTY
This product has been made under strictest quality control procedures to ensure good performance and reliability.
This product has a warranty against defects in materials and workmanship for 12 months from the date of purchase.
PROVIDED:
1. Reasonable evidence is supplied to prove the product has been purchased within 12 months prior to the
date of claim.
2. The defect is not due to misuse, neglect, accidental damage or repair by unqualified engineers.
This warranty does not cover any claims for consequential loss or damage.
These statements do not affect your statutory rights as a customer.
EN 60335-1:2012
1. This appliance can be used by children aged from 8
years and above and persons with reduced physical,
sensory or mental capabilities or lack of experience
and knowledge if they have been given supervision
or instruction concerning use of the appliance in a
safe way and understand the hazards involved.
2. Children shall not play with the appliance.
3. Cleaning and user maintenance shall not be made
by children without supervision.
EN 60335-2-30:2009+A11
1. Children of less than 3 years should be kept away
unless continuously supervised. Children aged from
3 years and less than 8 years shall only switch
on/off the appliance provided that it has been placed
or installed in its intended normal operating position
and they have been given supervision or instruction
concerning use of the appliance in a safe way and
understand the hazards involved. Children aged
from 3 years and less than 8 years shall not plug in,
regulate and clean the appliance or perform user
maintenance.
2. Some parts of this product can become very hot and
cause burns. Particular attention has to be given
where children and vulnerable people are present.
DISPOSAL
In accordance with European Directive
2002/96/EG concerning waste electrical
and electronic equipment (WEEE), please
return any electrical equipment that you
will no longer use to the collection points
provided for their disposal.
This symbol indicates that the appliance cannot be treated
as normal domestic waste, but must be handed to a
collection point for where electric and electronic appliances
are recycled.
Information concerning where the equipment can be
disposed of can be obtained from your local authority.
CARE AND CLEANING
Ensure that the heater is unplugged from the mains and is
cool before you attempt to clean it. Wipe with a dry cloth
to remove dust or with a damp (not wet) cloth to clean
stains. Ensure that no moisture gets into the heater.
Do not use abrasive cleaning powder, metal polish or
furniture polish on any part of the heater.
CUSTOMER SERVICE
Repairs must be carried out by authorised specialists, thus
ensuring electrical safety. Please contact a service agent or
a suitably qualified electrician. Improper repairs could lead
to danger to the user.
The warranty does not cover damage of failure which
results from alteration, accident, misuse, abuse, neglect,
commercial use or improper maintenance.
In line with our policy of continuous product development
we reserve the right to change the product and
documentation specifications without notice.
LEV0549_ECOPANELS_Instructions Manual.indd 8 03/07/2018 14:17
This manual suits for next models
3
Table of contents
Other Levante Heater manuals