LG GB250g User manual

P/N : MMBB0334526 (1.0)
E N G L I S H
GB250g
User Guide
Some of the contents in this manual
may differ from your phone depending
on the software of the phone or your
service provider.
P/N : MMBB0334526 (1.0)
SPANISH
GB250g
Guía del usuario
Parte del contenido de esta guía puede no
coincidir con el teléfono, en función del
software del telé-fono o del proveedor de
servicios.

Bluetooth QD ID B015097

GB250g User guide
Some of the contents in this manual
may differ from your phone depending
on the software of the phone or your
service provider.

2
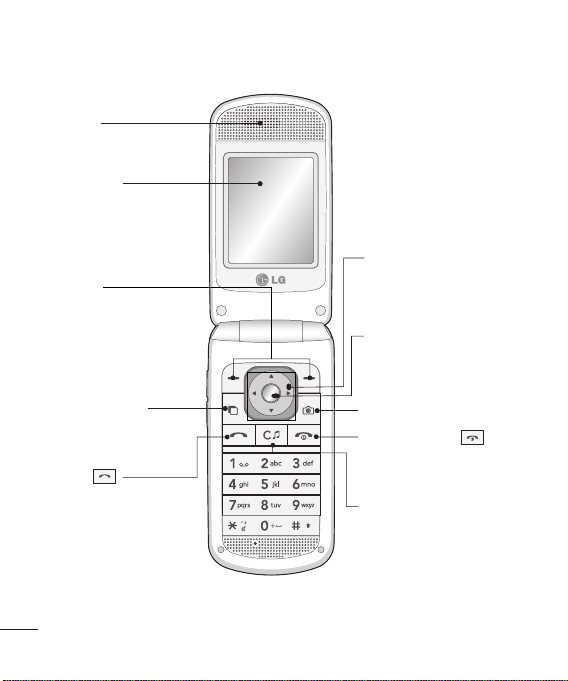
Getting to know your phone.......4
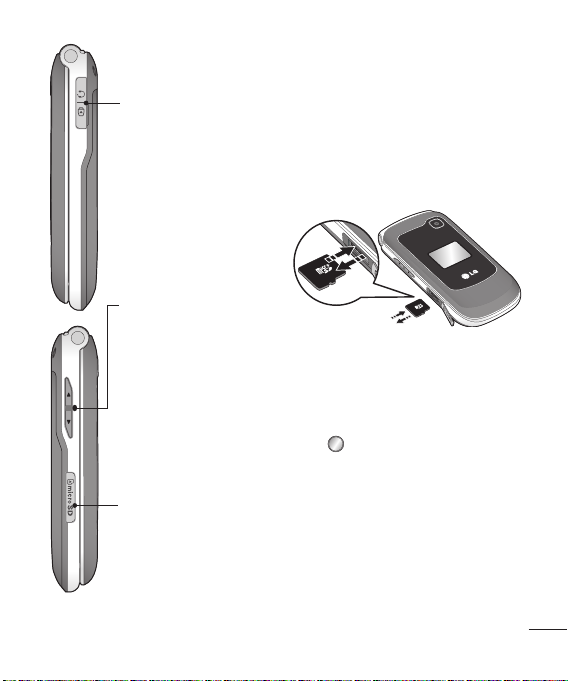
Installing a memory card ..............5
Formatting the memory card......5
Installing the SIM card and
charging the battery ....................6
Menu map .................................... 8
Your standby screen ................... 9
The status bar .................................. 9
Call .............................................. 10
Making a call ..................................... 10
M
aking a call from your contacts
.... 10
Answering and rejecting a call....10
Using the speakerphone ..............10
Speed dialing ................................... 10
Viewing your call logs ....................10
Changing the call settings ...........11
Contacts.......................................12
Searching for a contact .................12
Adding a new contact ................... 12
Adding a contact to a group .......12
Adding a picture to a contact .....12
Messaging................................... 13
Sending a message ........................ 13
Sending up your email ................. 13
Sending an email using your new
account ................................................14
Entering text ......................................14
T9 mode .............................................. 14
Abc mode ........................................... 14
123 mode ............................................14
Message folders ............................... 14
Changing your text message
settings ............................................... 15
Changing your multimedia
message settings .............................15
Changing your email settings ....16
Multimedia ................................. 17
Camera ................................................ 17
Video camera ................................... 18
MP3 player ......................................... 19
Radio .................................................... 20
Voice recorder .................................. 21
My stuff .......................................22
Images ................................................ 22
My images options menu ............ 22
Sounds .................................................23
Using a sound ................................... 23
Videos .................................................. 23
Watching a video .............................23
Using options while video is
paused ................................................. 23
Games and Applications .............. 24
Playing a game .................................24
SVG Contents .................................... 24
Others ................................................. 24
My memory card ............................ 24
Contents
Org
Ad
ca
Ad
list
Ad
Ad
Us
Too
Se
Us
Us
Co
Ad
clo
SIM
Brow
Ac
Ad
bo
Ch
se
Con
Ch
Ch
se
Pa
de
Us

3
.. 14
... 14
...14
.. 14
.. 15
...15
...16
.. 17
.. 17
. 18
.. 19
.. 20
.. 21
..22
. 22
... 22
...23
... 23
.. 23
...23
.. 23
.. 24
...24
.. 24
. 24
. 24
Organiser ....................................25
Adding an event to your
calendar .............................................. 25
Adding an item to your to do
list .......................................................... 25
Adding a memo .............................. 25
Adding a secret memo ................ 25
Using date nder .............................25
Tools ........................................... 26
Setting your alarm .......................... 26
Using the calculator ....................... 26
Using the stopwatch ..................... 26
Converting a unit ........................... 26
Adding a city to your world
clock ...... .............................................. 26
SIM Tool kit ........................................ 26
Browser .......................................27
Accessing the browser .................. 27
Adding and accessing your
bookmarks ........................................ 27
Changing the web browser
settings ............................................... 27
Connectivity ............................... 28
Changing your connectivity ....... 28
Changing your Bluetooth
settings ................................................ 28
Pairing with another Bluetooth
device ...................................................28
Using your phone as a modem ..29
Using your phone as a mass storage
device ...................................................29
PC Synchronization ........................ 30
Connecting the phone to the PC
.....30
Settings .................................... 31
Personalizing your proles .......... 31
Changing the language ................31
Power save ......................................... 31
Changing your display settings
......31
Changing your date & time .......... 31
Changing your security settings .. 31
Viewing memory status ................... 31
Resetting your phone ......................32
Changing other connectivity
settings .................................................32
Accessories.................................. 33
Guidelines for safe and efficient
use ............................................... 34

4
Getting to know your phone
Call key
It dials a phone
number and answers
incoming calls.
End/Power key
It dials a phone number and
answers incoming calls.
Main screen
Earpiece
Multitasking key
It opens the multitasking
menu.
Camera key
Soft keys
Each one of these keys
performs the functions
indicated by the text on
the display immediately
above them.
Clear key
It deletes a character with
each press. Use this key to go
back to the previous screen.
Navigation keys
Use for quick access to
phone functions.
OK key
It selects menu options
and confirms actions.

5
Installing a memory card
Lift the memory card cover
and insert a micro SD card with
the golden contact area facing
downwards. Close the memory card
cover so that it clicks shut.
To remove the memory card, gently
push it as shown in the diagram.
Note: A memory card is an optional
accessory.
Formatting the memory card
Press and select Settings.
Choose Memory manager, select
External memory and press Format.
WARNING: When you format your
memory card, all the content will be
wiped. If you do not want to lose the
data on your memory card, back it up
rst.
and
Volume keys
• When the screen is
idle: Such keys control
the volume of ring
tone.
• During a call: These
keys control the
volume of the
earpiece.
• When playing a BGM
track: Such keys
control the volume of
music.
Headset/ Charger /
USB Cable connector
microSD/memory
card slot
h
ogo
en.

6
Installing the SIM card
When you subscribe to a cellular
network, you are provided with a
plug-in SIM card loaded with your
subscription details, such as your PIN,
any optional services available and
many others.
1 Open battery cover
2 Remove the battery
WARNING: Do not remove
the battery when the phone
is switched on, as this may
damage the phone.
Installing the SIM card and charging the battery
3
4

7
3 Insert your SIM
Important: The plug-in SIM
card and its contacts
can be
easily damaged by scratches
or bending, so be careful when
handling, inserting or removing
the card. Keep all SIM cards out of
the reach of small children.
4 Install the battery
5 Close the battery cover
6 Charge your battery

8
Menu map
Organizer
1 Calendar
2 To do
3 Memo
4 Secret memo
5 Date nder
6 Settings
My stu
1 My images
2 My sounds
3 My videos
4 My games &
apps
5 SVG contents
6 Others
7 My memory card
Games & apps
1 Games & apps.
2 Settings
Yahoo
1 Yahoo! Go
Calling
1 Call logs
2 Call durations
3 Data volume
4 Call costs
5 Call divert
6 Call barring
7 Fixed dial
numbers
8 Call waiting
9 Common
settings
Messaging
1 Create new
message
2 Inbox
3 Mailbox
4 Drafts
5 Outbox
6 Sent messages
7 My folders
8 Templates
9 Emoticons
0 Settings
Settings
1 Proles
2 Phone
3 Screen
4 Date & Time
5 Network
6 Internet proles
7 Access points
8
Packet Data Conn.
9 Security
0 Memory Manager
*
Streaming settings
# Reset settings
Browser
1 Home
2 Enter address
3 Bookmarks
4 RSS Reader
5 Saved Pages
6 History
7 Settings
Tools
1 Quick menu
2 Alarms
3 Calculator
4 Stopwatch
5 Converter
6 World time
7 SIM Tool Kit
Connectivity
1 Bluetooth
2 USB connection
mode
Multimedia
1 Camera
2 Video camera
3 Music
4 Radio
5 Voice recorder
Contacts
1 Add new
2 Search
3 Speed dials
4 Groups
5 Service dial
numbers
6 Own number
7 My business card
8 Settings
You
The
Below

9
Icon Description
Network signal strength
(number of bars will vary)
No network signal
GPRS
EDGE
Flight mode activated
Incoming call
Bluetooth®activated
WAP service connected
Alarm set
Icon Description
Multitasking activated
New message
New voice message
Normal prole in use
Silent prole in use
Outdoor prole in use
Headset prole in use
Remaining battery life
Battery empty
Memory card
Your standby screen
The status bar
Below is a table explaining the meaning of some icons you’re likely to see in the status bar.

10
Calls
Making a call
1Type the number using the
keypad. To delete a digit press
.
2Press to initiate the call.
3To end the call, press .
TIP: To enter + when making an
international call, press and hold 0.
Making a call from your contacts
1Press and select Contacts, then
choose Search.
2Using the keypad, enter the first
letter of the contact you want to
call.
3Press to initiate the call.
Answering and rejecting a call
When your phone rings, press
Accept or press to answer the
call.
To mute your phone while it is
ringing, simply select Silent. This is
useful if you have forgotten to
change your profile to Silent for
a meeting.
Press or select Reject to reject
the incoming call.
TIP: You can change the settings on
your phone to answer your calls in
different ways. Press select Calling
and choose Common settings and
Answer mode. Choose from Press
send key,Open ip and Press any key.
Using the speakerphone
During a call, you can activate
speakerphone by pressing key
and you can use the handset in
hands-free.
Speed dialing
Press and select Contacts, then
choose Speed dials.
You can assign a speed dial number
to a contact you call frequently.
Viewing your call logs
Press and select Calling. Choose
Call logs.
You can check the record of missed,
received, and dialed calls only if the
network supports the Calling Line
Identification (CLI) within the service
area.
Cha
You
a ca
Pres
Call
long
both
Data
all yo
Web
Call
to yo
serv
ope
Call
wan
Call
wou
Fixe
list o
from
PUK
num
list c
Call
have
your
Com

11
n
ing
key.
y
en
ber
ose
ed,
he
e
vice
Changing the call settings
You can set the menu relevant to
a call.
Press select Calling.
Call durations - View details of how
long you have spent on your calls
both received and dialed.
Data volume - View the amount of
all your sent, received and all data for
Web, measured in kilobytes.
Call costs - View the charges applied
to your last call or all calls. This
service is network dependent, some
operators are unable to support this.
Call divert - Choose whether you
want to divert your calls or not.
Call barring – Select when you
would like calls to be barred.
Fixed dial numbers – Choose a
list of numbers that can be called
from your phone. You’ll need your
PUK2 code from your operator. Only
numbers included in the fixed dial
list can be called from your phone.
Call waiting - Be alerted when you
have a call waiting. (Depends on
your network provider.)
Common settings:
Call reject - You can set whether
you want to reject incoming calls
or not.
Send my number - Choose
whether your number will be
displayed when you call someone.
(Depends on your network
provider.)
Auto redial - Allows you to set the
auto redial function. Your phone
will automatically try to redial in
the case of failure to connect a call.
Answer mode - Allows you to set
the answering method.You can
choose between Press send key,
Open flip and Press any key.
Minute minder - Decide whether
your phone will sound each minute
when you are on the phone.
BT answer mode - Choose how
to answer a call when using a
Bluetooth headset. Select Hands-
free or Handset.
Save new number - Selecting this
option will save numbers that are
not already in your contacts upon
ending the call.

12
Contacts Me
Searching for a contact
1Press select Contacts, then
choose Search.
2Using the keypad enter the first
letter of the contact you want to
call.
3To scroll through the contacts, use
the navigation keys.
Adding a new contact
1Press and select Contacts, then
choose Add new.
2Choose whether you want to store
your new contact on your SIM or
Handset.
3Enter all the information you have
in the fields provided and select
Done.
Adding a contact to a group
You can save your contacts into
groups, for example, keeping your
work colleagues and family separate.
There are groups including Family,
Friends, Colleagues, School and VIP
already set up on the phone.
1Press and select Contacts, then
choose Groups.
2 Scroll through the group you want
to add a contact, press Options
and Add member.
3 Choose a contact from the list of
contacts by pressing Mark and
press Done.
Adding a picture to a contact
You can change the appearance of
your contacts in your list of contacts
by including a picture.
1 Press and select Contacts, then
choose Settings.
2Select Contact list settings and
choose Show picture and On.
3 Then return to the list of contacts
and select the contact you want to
add a picture to.
4Choose Options and select Edit.
5Scroll down to the image section.
Choose Edit and select No image,
Avatar, Take a picture or Use
existing image. If you select Use
existing image, you can choose
an image that is saved in your
phone memory. If you select Take
a picture, your camera viewfinder
will open. Take the picture and
press OK.
6Select Done.
Your
relat
Serv
Serv
netw
Sen
1P r
ch
2C h
or
3A
Th
an
ea
de
ed
4En
th
m
se
in
5S e
to
Sy
Na
Su
6Ch
7Ch
of

13
Messaging
of
of
cts
hen
d
cts
nt to
t.
on.
ge,
se
e
ake
der
Your GB250g includes functions
related to SMS (Short Message
Service), MMS (Multimedia Message
Service) and Email, as well as the
network’s service messages.
Sending a message
1Press select Messaging, and
choose Create new message.
2Choose Message to send an SMS
or MMS.
3A new message editor will open.
The message editor combines SMS
and MMS into one intuitive and
easy to switch between mode. The
default setting of the message
editor is SMS mode.
4Enter your message using either
the T9 predictive mode or Abc
manual mode. Consult the
section Entering text for more
information.
5Select Options and choose Insert
to add an Image, Video, Sound,
Symbols, Template, Emoticon,
Name & Number, New slide,
Subject, or More.
6Choose Send.
7Choose a contact from the list
of contacts or enter the phone
number from Options.
8Select Send.
TIP: You can select your message type
as SMS or MMS when you enter a text
longer than one page in the message
field. If you want to change the type of
message to send, press ,
Messaging, Settings, Text message
and then choose Send long text as.
WARNING: If an Image, Video, Sound,
New slide or Subject is added to the
message editor, it will be automatically
converted to MMS mode and you will
be charged accordingly.
Setting up your email
You can stay in touch on the move
using email on your GB250g. It’s
quick and simple to set up a POP3
or IMAP4 email account. Check
with your network provider more
information about this service.
1Press select Messaging, and
choose Settings.
2Select Email then Email accounts.
3Select Add then set the email
account.

14
Messaging
Sending an email using your new
account
To send/receive an email, you should
set up an email account.
1Select select Messaging and
choose Create new message.
2Choose Email and a new email will
open.
3Choose the contact you want to
send the message.
4Write a subject and the message.
5 Press Send.
Entering text
You can enter alphanumeric
characters using the phone’s keypad.
The following text input methods are
available in the phone: T9 abc/Abc/
ABC mode, abc/Abc/ABC mode and
123 mode.
Note: Some elds may allow only
one text input mode (e.g. telephone
number in address book elds).
T9 mode
T9 mode uses a built-in dictionary
to recognise words you’re writing
based on the key sequences you
press. Simply press the number
key associated with the letter you
want to enter, and the dictionary
will recognise the word once all the
letters are entered.
Abc mode
This mode allows you to enter letters
by pressing the key labeled with the
required letter once, twice, three,
four or more times until the letter is
displayed.
123 mode
Type numbers using one keystroke per
number.You can also add numbers
while remaining in letter modes by
pressing and holding the desired key.
Message folders
Press select Messaging. The folder
structure used on your GB250g is fairly
selfexplanatory.
Inbox - All the messages you receive
are placed into your inbox.
Mailbox - Contains all your email
messages.
Drafts - If you don’t have time to finish
writing a message, you can save what
you have done so far here.
Outbox - This is a temporary storage
folder while messages are being sent.
Sent
send
My f
of In
folde
mes
origi
Tem
mes
Emo
dele
emo
writi
Cha
sett
Your
pred
the s
Sett
Pres
choo
You
Text
infor
Deliv
conf
deliv

15
he
ters
the
r is
eper
s
y
ey.
lder
airly
ve
nish
hat
ge
ent.
Sent messages - All the messages you
send are placed into this folder.
My folders - You can move messages
of Inbox or Sent messages into My
folders. Also you can move those
messages of My folders into the
original message box.
Templates - A list of pre written useful
messages, useful for a quick reply.
Emoticons - You can add, edit and
delete emoticons.You can insert the
emoticon which you preferred on
writing a message.
Changing your text message
settings
Your phone message settings are
predefined, if you would like to change
the settings, you can do this using the
Settings options.
Press Menu, select Messaging, then
choose Settings and Text message.
You can make changes to:
Text message centre - Enter the
information from your message centre.
Delivery report - Choose to receive
confirmation that your message was
delivered.
Validity period - Choose how long
your message is stored at the message
centre.
Message types - Convert your text
into Voice, Fax, X.400 or Email.
Character encoding - Choose how
your characters are encoded.This
impacts the size of your message and
therefore data charges.
Send long text as - Choose whether
you want to send your message as
Multiple SMS or MMS when you
enter a text longer than 2 pages in the
message field.
Changing your multimedia
message settings
Your phone message settings are
predefined, if you would like to change
the settings, you can do this using the
Settings options.
Press Menu, select Messaging, then
choose Settings and Multimedia
message.
You can make changes to:
Retrieval mode - Choose to
automatically or manually download
multimedia messages depending on
whether you are at home or roaming.

16
Cam
Taki
1Pr
Ch
vi
2 Ho
le
ph
3Po
th
4Pr
Befo
Pres
opti
valu
(128
colo
colo
Neg
bala
your
your
whit
set t
from
Messaging Mu
Delivery report - Choose to allow
and/or request a delivery report.
Read reply -Choose to allow and/or
request a read report.
Priority - Choose the priority level of
your multimedia message.
Validity period - Choose how long
your message is stored at the message
centre.
Slide duration - Choose how long your
slides appear on screen.
Creation mode - Select which type of
multimedia messages to allow.
Delivery time - Select the time your
message will be delivered.
Multi msg centre - Select an operator
specific network profile for sending
multimedia messages.
Changing your email settings
You can adapt your email settings to
your own preferences.
1Press Menu, select Messaging and
choose Settings.
2Select Email then you can adapt the
following settings:
Email accounts - You can set up an
email account.
Allow reply email - Choose to allow
a reply email.
Request reply email - Choose to
request a reply email.
Retrieve interval
-
Choose how
often your phone checks for
new email messages.
Retrieve amount - Choose the
amount of messages your phone
will retrieve.
Include message in Fwd & Reply -
Choose to include the message
when replying or forwarding your
message.
Include attachment - Choose to
include the attachment when
replying or forwarding
your message.
Auto retrieval in roaming - Auto
retrieve the messages when you are
in roaming.
New email notification - Choose to
receive an email notification.
Signature -Create an email
signature and switch this feature on.
Priority - Choose the priority level of
your email message.

17
Camera
Taking a quick photo
1Press and select Multimedia.
Choose Camera to open the
viewfinder.
2 Holding the phone and, point the
lens towards the subject of the
photo.
3Position the phone so you can see
the subject of your photo.
4Press to take a photo.
Before you’ve taken your photo
Press Settings to access these
options:
Image size - Select a pixel
value from the numerical options
(1280x960, 640x480 or 320x240).
Colour Effect - Choose from four
color tone options: Off (normal/
color), Sepia, Black & White or
Negative.
White balance - The white
balance ensures that any white in
your photo is realistic. In order to
your camera adjust correctly the
white balance you may need to
set the light conditions. Choose
from Auto,Incandescent,Sunny,
Fluorescent or Cloudy.
Night mode - Choose On or Off.
Timer - The timer allows you to
set a delay after the capture button
is pressed. Choose from 3, 5 or 10
seconds. Great for that group photo
you want to be part of.
Shot mode - Choose Normal or
Burst shot (This enables you to take
up to 9 shots automatically in very
quick succession).
Image quality - Choose Super
fine, Fine or Normal. The finer the
quality, the sharper a photo will be.
The file size will increase as a result,
which means you will be able to
store fewer photos in your memory.
Others
Memory in use - Choose whether
you want to save your photos to
the Handset memory or External
memory.
Hide icons - Choose whether you want
to hide icons from the screen.
Shutter sound - Select one of the
three shutter sounds.
Multimedia
e
y-
ur
o
are
eto
eon.
el of

18
Multimedia
After you’ve taken your photo
Your captured photo will appear on
the screen. The name of the image is
displayed on the screen and you will
see five options.
Album - Select to look at the
other photos in your album.Your
current photo will be saved.
Send - Select to send the photo
as a Message,Email or Bluetooth.
Camera - Take another photo
straightaway.Your current photo will
be saved.
Use as - Choose to use the
selected image as Wallpaper,
Contacts image, Start up image or
Shutdown image.
Delete - Delete the photo
you have just taken and confirm by
selecting Yes. The viewfinder will
reappear.
Viewing your saved photos
1You can access your saved photos
from within the camera mode and
from the standby screen. From the
viewfinder, simply press Album.
From the standby screen you should
press Menu, then select My stuff
and My images.
2Your gallery will appear on screen.
3Use the navigation keys to select the
photo you want to view and select
View to enlarge it.
Video camera
Shooting a quick video
1Press and select Multimedia.
2Choose
Video camera.
3Point the camera lens towards the
subject of the video.
4Press to start recording.
5Rec will appear on the viewfinder
and a timer will show the length of
your video.
6 Select Stop to stop recording.
Before shooting a video
The following options will be
displayed on the screen.
Album - Select to look at the other
videos in your album.
Camera - Convert from video camera
mode to still camera mode.
Rec. - Select to record a new video.
Brig
to ad
Zoo
navi
Afte
The
the s
disp
othe
curre
you
vide
will b
aMe
have
selec
reap
Other manuals for GB250g
3
Table of contents
Languages:
Other LG Cell Phone manuals