manuals.online logo
Brands
  1. Home
  2. •
  3. Brands
  4. •
  5. LG
  6. •
  7. Speakers System
  8. •
  9. LG LAS464B Specification sheet

LG LAS464B Specification sheet

Other LG Speakers System manuals

LG NB3535A User manual

LG

LG NB3535A User manual

LG SQC1 User manual

LG

LG SQC1 User manual

LG S43A3-D User manual

LG

LG S43A3-D User manual

LG SNH5 Specification sheet

LG

LG SNH5 Specification sheet

LG SPD75YA Specification sheet

LG

LG SPD75YA Specification sheet

LG SK5Y Specification sheet

LG

LG SK5Y Specification sheet

LG SLM3D User manual

LG

LG SLM3D User manual

LG S65Q Specification sheet

LG

LG S65Q Specification sheet

LG SP11RA Specification sheet

LG

LG SP11RA Specification sheet

LG DQP5W Specification sheet

LG

LG DQP5W Specification sheet

LG LAS550H Specification sheet

LG

LG LAS550H Specification sheet

LG SK1D Specification sheet

LG

LG SK1D Specification sheet

LG SN7Y Specification sheet

LG

LG SN7Y Specification sheet

LG SPK8C-S Specification sheet

LG

LG SPK8C-S Specification sheet

LG SH4 Specification sheet

LG

LG SH4 Specification sheet

LG S40Q User manual

LG

LG S40Q User manual

LG SLM5Y User manual

LG

LG SLM5Y User manual

LG LAS453B Specification sheet

LG

LG LAS453B Specification sheet

LG FJ5 Specification sheet

LG

LG FJ5 Specification sheet

LG SN4 Specification sheet

LG

LG SN4 Specification sheet

LG S95QR User manual

LG

LG S95QR User manual

LG HLT35W User manual

LG

LG HLT35W User manual

LG SP8A User manual

LG

LG SP8A User manual

LG SH3K User manual

LG

LG SH3K User manual

Popular Speakers System manuals by other brands

JVC MX-KA3 - Mini Shelf System null

JVC

JVC MX-KA3 - Mini Shelf System null

JVC CA-MXK5R instructions

JVC

JVC CA-MXK5R instructions

JVC CA-FSH100 instructions

JVC

JVC CA-FSH100 instructions

5Core Pro Series Operation manual

5Core

5Core Pro Series Operation manual

EAW MQV1394e Specifications

EAW

EAW MQV1394e Specifications

Lynx GXR-LA10A user manual

Lynx

Lynx GXR-LA10A user manual

iLive ITB066B user guide

iLive

iLive ITB066B user guide

RDX QuickStation 4 product manual

RDX

RDX QuickStation 4 product manual

Electro-Voice S-122 Specifications

Electro-Voice

Electro-Voice S-122 Specifications

Sven SPS-619 GOLD Operation manual

Sven

Sven SPS-619 GOLD Operation manual

Pioneer CS-7070 instruction manual

Pioneer

Pioneer CS-7070 instruction manual

EAW UB82e Technical specifications

EAW

EAW UB82e Technical specifications

Sondpex Active Speaker System and Digital Music... User manual and installation instructions

Sondpex

Sondpex Active Speaker System and Digital Music... User manual and installation instructions

JVC NX-PN7 instructions

JVC

JVC NX-PN7 instructions

Yamaha NX-A01 - Speaker Sys Product bulletin

Yamaha

Yamaha NX-A01 - Speaker Sys Product bulletin

SE Audiotechnik I-LINE manual

SE Audiotechnik

SE Audiotechnik I-LINE manual

Gemini WRX-843 Series user manual

Gemini

Gemini WRX-843 Series user manual

TCL 6100 Series user manual

TCL

TCL 6100 Series user manual

manuals.online logo
manuals.online logoBrands
  • About & Mission
  • Contact us
  • Privacy Policy
  • Terms and Conditions

Copyright 2025 Manuals.Online. All Rights Reserved.

SIMPLE MANUAL
Wireless
Sound Bar
To view the instructions of advanced features,
visit http://www.lg.com and then download Owner’s Manual.
Some of the content in this manual may differ from your unit.
MODEL
LAS464B
*MFL69596804* www.lg.com
ENGLISH
Front Panel
· · · · · · · · · · · · · · · · · · · · · · · · · · · · · · · · · ·Standby / On
· · · · · · · · · · · · · · · · · · · · · · · · · · · · · · ·Selects Function
· · · · · · · · · · · · · · · · · · · · · · · · · · Adjusts Volume
Subwoofer Connection1
Rear Panel
PORT.IN · · · · · · · · · · · · · · Connect to a Portable device
OPTICAL IN · · · · · · · · · · · Connect to an Optical device
Place the wireless subwoofer near the sound bar and
follow steps below.
aConnect the power cord of wireless
subwoofer to the outlet.
bTurn on the sound bar :
The sound bar and wireless subwoofer will be
automatically connected. The subwoofer's yel-
low - green LED turns on.
Subwoofer Connection Manually
aReset the Subwoofer
If the yellow - green LED on the subwoofer
blinks quickly, skip this step and go to b
yPress and hold PAIRING button for 5 seconds.
yThe LED lights up alternately in red and
yellow - green.
yPlug out the power cord. After the LED turns
off completely, plug in the power cord again.
When the reset is completed, the subwoofer's
yellow - green LED blinks quickly.
bReset the sound bar
yAdjust volume to minimum until the red LED on
the sound bar lights up for a while.
yPress and hold (Mute) button on the remote
control for 3 seconds.
yThe red LED on the sound bar blinks quickly.
yTurn the sound bar’s power off and on while the
subwoofer’s yellow - green LED blinks.
When the connection is completed, you can see the
yellow - green LED on the subwoofer.
Keep the sound bar and the subwoofer away
from the device (ex. wireless router, microwave
oven, etc.) over 1m to prevent wireless
interference.
!P
STANDARD/VOICE/CINEMA:Select sound effet.
DRC ON/OFF: Make comfortable sound at Dolby Digital.
WOOFER LEVEL +/-:Adjusts the volume level of
subwoofer.
AUTO POWER ON/OFF:Automatically turns on by an
input source.
Replacement of battery
Specication
Power
requirements Refer to the main label.
Power
consumption
Refer to the main label.
Networked standby : 0.5 W
(If all network ports are
activated.)
Dimensions
(W x H x D)
Approx.
950 mm x 71 mm x 47 mm
Net Weight Approx. 2.47 kg
Total amplier 300 W
Design and specications are subject to change without
notice.
How to disconnect the wireless network
connection or the wireless device
Set up the AUTO POWER ON/OFF function to off and
turn off the unit.
POWER: This unit operates on a mains supply of 200-
240V~, 50/60Hz.
Wiring: This unit is supplied with a BS 1363 approved
main plug. When replacing the fuse, always use of the
same rating approved to BS 1362. Never use this plug
with the fuse cover omitted. To obtain a replacement
fuse cover contact your dealer. If the type of plug
supplied is not suitable for the mains sockets in your
home, then the plug should be removed and a suitable
type tted. Please refer to the wiring instructions below:
Warning: A mains plug removed from the mains lead
of this unit must be destroyed. A mains plug with bared
wires is hazardous if inserted in a mains socket. Do not
connect either wire to the earth pin, marked with the
letter E or with the earth symbol or coloured green
or green and yellow. If any other plug is tted, use same
rating of fuse in the plug.
Important: The wires in this mains lead are coloured in
accordance with the following codes:
- BLUE: NEUTRAL, BROWN: LIVE - As the colours
of the wires in the mains lead of this unit may not
correspond with the coloured marking identifying the
terminals in your plug, proceed as follows: The wire which
is coloured blue must be connected to the terminal
which is marked with the letter N or coloured black. The
wire which is coloured brown must be connected to the
terminal which is marked with the letter L or coloured
red.
Remote control
Additional Information
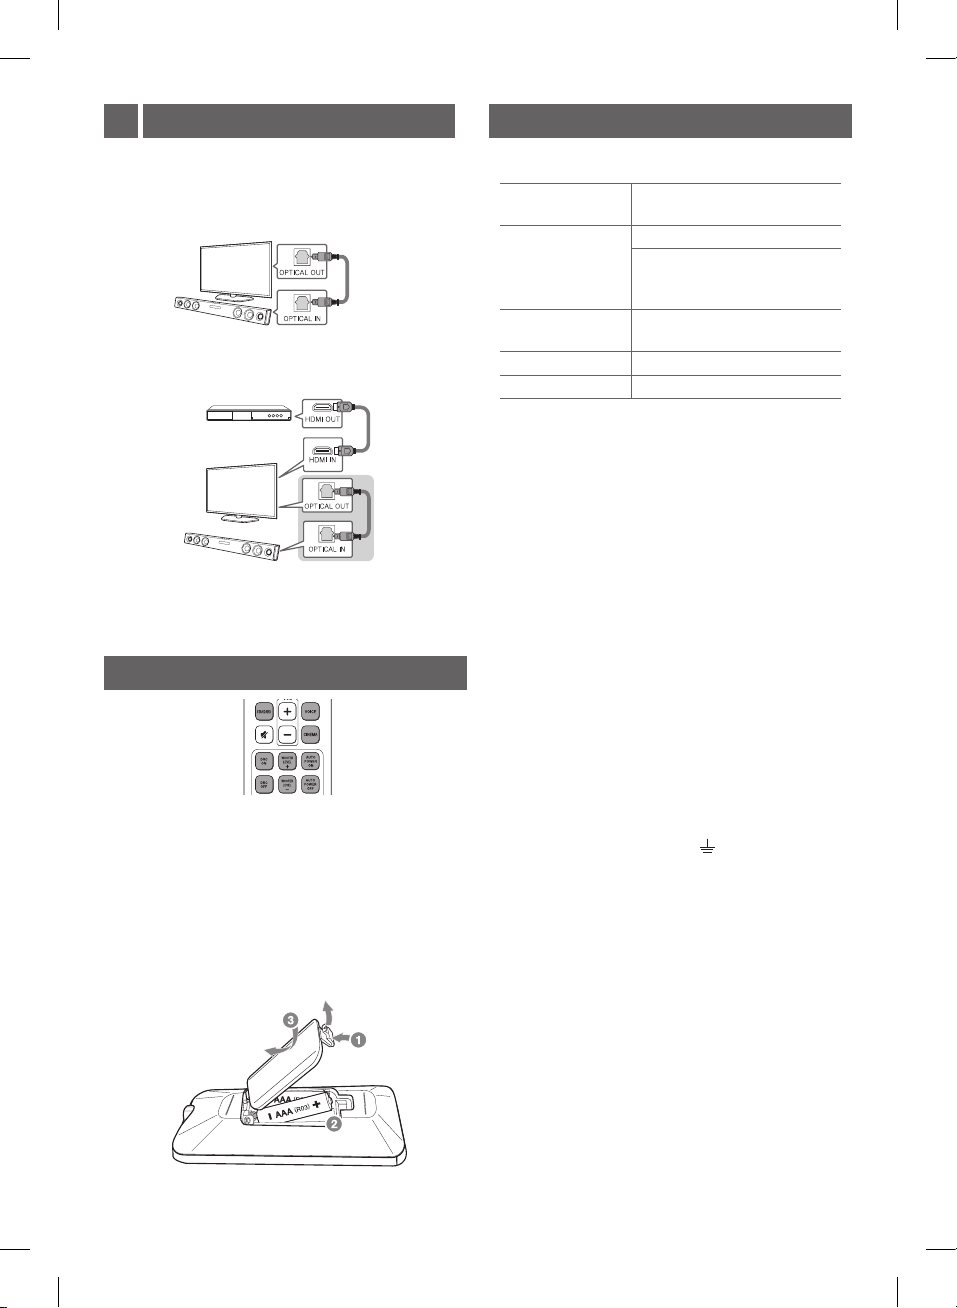
aConnect the sound bar to the TV using
Optical cable.
bSet up [External Speaker (Optical)] on
your TV setting menu.
TV Connection2
TV
Additional Device Connection
aConnect to the external device as follows.
TV
(Set-top Box,
Player etc.)
bSet the input source by pressing Fon the
remote control or unit repeatedly.