Liberty Safe HDX-250 SMART VAULT User manual

at
libertysafeHD.com/video
Reliable BIOMETRIC Access
Lighted Interior
Stores 15 Fingerprints
A/C Adapter Included
Rev 09/16
SMART VAULT
STOP!
Do not return to retailer. If you have questions about your
HDX-250 Smart Vault or need help configuring the system,
please contact us at 800.247.5625.
(PATENT APPROVED -12/31/13)
FEATURES & BENEFITS:
HOME DEFENDER SERIES
Liberty Safe and
Security Products, INC.
9g Products Division
9641 Lackman Rd
Lenexa, KS 66219
libertysafeHD.com

2
HOME DEFENDER SERIES
Thank you for purchasing the HDX-250 SMART VAULT. This smart vault incorporates
state-of-the-art biometric technology to safeguard your valuable property. It is important
that you take a few minutes to read this manual to ensure the proper function of your
HDX-250 SMART VAULT. Also, to better serve you in the future, properly register your
new vault on line at: libertysafeHD.com/warranty
WHAT IS BIOMETRIC TECHNOLOGY?
Biometric technology is the recognition of the physical characteristics of an individual.
Examples are voice patterns, iris or retina differences, handwriting technique and, of
course, fingerprints. It has been known for more than 2000 years that an individual’s
fingerprint pattern is unique. Through the use of advanced electronics, fingerprint
recognition has become a very secure, fast and economical way to determine a
person’s identity.
HDX-250 SMART VAULT
THE HDX-250 Smart Vaults allow you the ability to utilize advanced biometric
technology which allows only authorized users to access your valuables.
The HDX-250 SMART VAULT can enroll up to 15 authorized fingerprints into memory
during a simple setup process. Once these fingerprints are captured and encrypted,
they can never be stolen from the system.
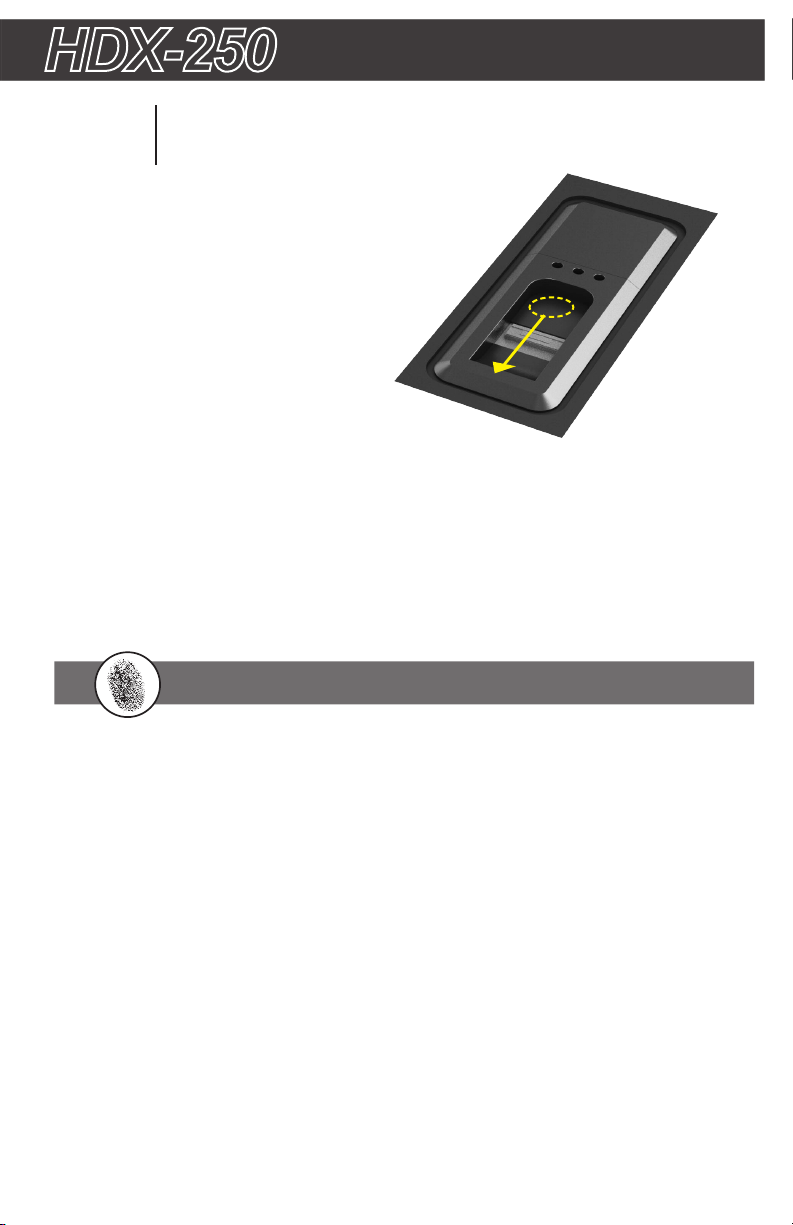
To gain access, slide your finger across the sensor. The sensor scans the fingerprint’s
data and compares it against the encrypted fingerprint data in memory. Based on the
stored fingerprint information, the HDX-250 SMART VAULT accepts or rejects access
quickly and accurately.
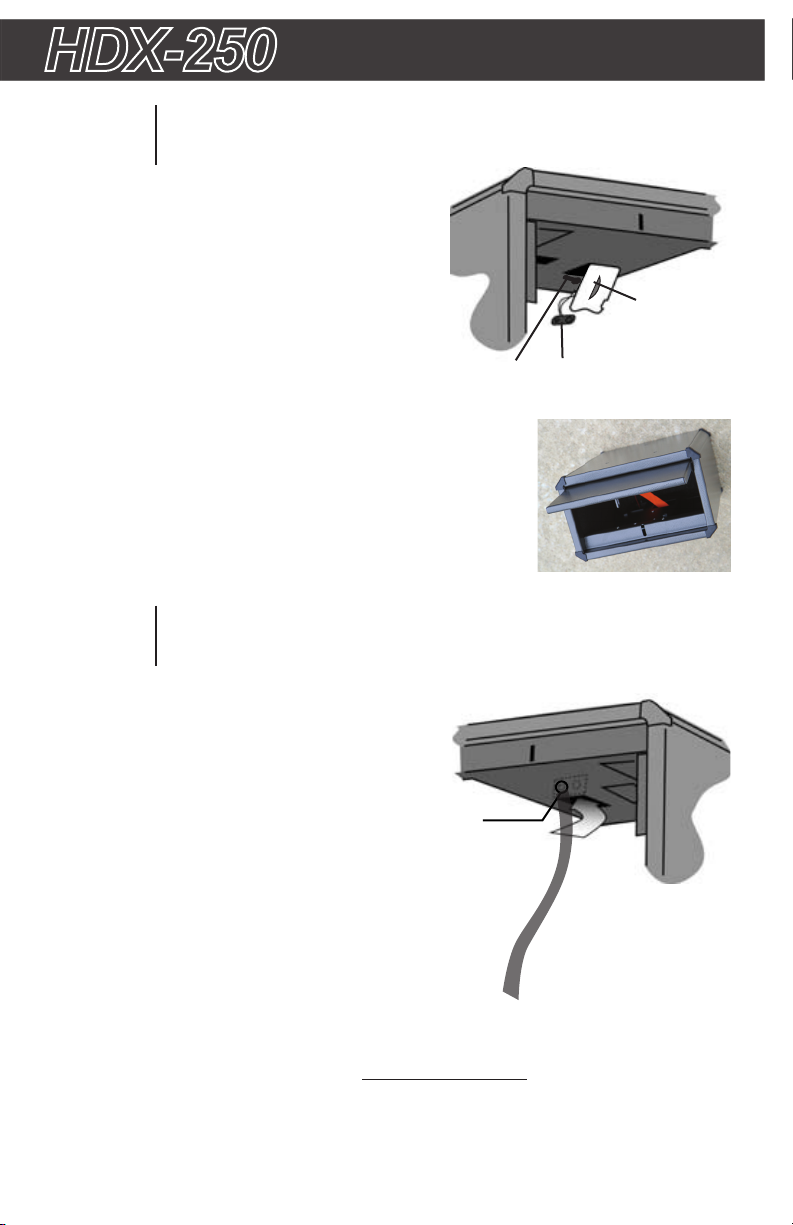
IMPORTANT
• DO NOT lock the keys inside your SMART VAULT. Store them away as backup.
• DO NOT get the sensor area wet.
• DO NOT expose to extreme heat or cold. Battery power may be affected.
• DO NOT overstuff your vault. This may cause the locking mechanism to jam. If this
occurs please use the key to unlock and cycle the biometric lock with your finger
print after you have opened to reset.
• ALWAYS check to make sure door has latched when closing.
INTRODUCTION
• Quick access (requiring only one finger)
• Rugged steel construction
• Tamper Alert
• State-of-the-art technology
• 9V battery power
• A/C adapter
• Quick and easy reconfiguration
• Recognizes up to 15 fingerprints
• Key backup
• Padded lining
HDX-250 SMART VAULT FEATURES

3
HOME DEFENDER SERIES
TECHNICAL SUPPORT
Do not return to retailer. If you have questions about your HDX-250 SMART VAULT or
need help configuring the system, please contact us at 800.247.5625.
WEB SITE
libertysafeHD.com
Refer to our web site to download a copy of the current owner’s manual and other
product information. Also, check frequently for updates on new options and
products, as well as exclusive owner information.
TO REGISTER
Go to libertysafeHD.com/warranty and fill out on-line
registration. The serial number is located on the back.
SMART VAULT
HDX-250 SMART VAULT
DIMENSIONS
CUSTOMER SERVICE
REGISTRATION
DISCLAIMERS
NEITHER SELLER NOR MANUFACTURER SHALL BE LIABLE FOR
ANY INJURY, LOSS OR DAMAGE, DIRECT OR CONSEQUENTIAL,
ARISING OUT OF THE USE OF, OR THE INABILITY TO USE, THE HDX-250 SMART VAULT.
THE USER SHALL DETERMINE THE SUITABILITY OF THE HDX-150 SMART VAULT BEFORE
THE INTENDED USE AND USER ASSUMES ALL RISK AND LIABILITY WHATSOEVER IN
CONNECTION THEREWITH.
7”
11”
12”

4
IN THE BOX
• (1) HDX-250 SMART VAULT
• (2) Backup Keys
• (1) 9 Volt Battery
• (1) A/C Adapter
• Document Package (Owner’s Manual and Keyhole Cover)
NOTE: If parts are missing or damaged, contact Technical Support at 800.247.5625.
IMPORTANT
You received two keys with your HDX SMART VAULT. These keys are an alternate
means to open the HDX-250 SMART VAULT. DO NOT STORE THE KEYS IN THE
VAULT. Store your keys in another secure location.
1
at
libertysafeHD.com/video
STEP OPEN THE SMART VAULT
using the backup key
g .1
Key Lock
Sensor
Lock Cover
HOME DEFENDER SERIES
POWER SUPPLY
HDX-250 SMART VAULTS are powered by a single 9 volt battery and/or an A/C
adapter. When using both power options the battery will act as a backup power
source.
Note: If using optional A/C adapter, continue to STEP TWO.
If installing battery only, skip to STEP THREE.
Opening the HDX SMART VAULT door
• Locate the backup keys in the plastic bag
• inserting the key into the lock and turn to release door catch (door will pop open)
CAUTION: STORE THE BACKUP KEYS IN A SECURE LOCATION AWAY
FROM THE SMART VAULT. DO NOT LOCK KEYS INSIDE THE VAULT.
CONTENTS
GETTING STARTED

5
2
STEP BATTERY INSTALLATION
HOME DEFENDER SERIES SMART VAULT
3
STEP ADMINISTRATION BUTTON
The battery is installed inside the HDX-
250 SMART VAULT to the right side of
the vault ceiling (Ref Fig 2). Place the
SMART VAULT on it’s back side, opposite
of the door, (Ref Fig 3) with the sensor
facing toward you. The door should open
away from you. Reach into your SMART
VAULT and you will see a cover with a half
moon shaped handle. Behind the handle
you will find a lever that you can rotate 180
degrees. Pull straight out on the half moon
handle. Inside you will find a 9 volt battery wire. Attach
the battery wire to the battery and put inside open box
with battery terminal facing toward door of SMART VAULT.
Reinstall the lid.
Change the battery when the RED light flashes slowly at
the end of an operation indicating that battery power is
low, or if you notice the opening process slowing.
g .2
g .4
DOOR
(with half
moon handle)
BATTERY
HOOK-UP
BUTTON
Administration Ribbon
LEVER
FUNCTIONALITY
The Administration Button has two functions:
1. Memory Reset.
2. Fingerprint Enrollment Initiation.
LOCATION
The Administration Button is located midway
back in the interior ceiling (Ref Fig 4).
1) Follow the Ribbon to find the
Administration Button
2) Press and hold to clear all memory
3) Press and release to initiate
enrollment process
CLEARING STORED FINGERPRINTS
Locate the Administration Button. Press and hold the Administration Button firmly until
the RED, YELLOW and GREEN lights rapidly flash together. This indicates that the
memory has been completely cleared and all fingerprints are erased. If the
HDX-250 SMART VAULT door is now shut without an enrolled fingerprint, the only
access is with the backup keys.
g .3

6
g .5
TIP: Finger must be FLAT on sensor
and pressed FIRMLY during swipe.
HOME DEFENDER SERIES
ENROLLMENT PROCESS
The enrollment process is extremely important. This is the process of registering
personal fingerprint(s) that will open the vault. Please take your time and become
familiar with this process.
To begin the enrollment process, again locate the Administration Button midway
back in the interior ceiling (Ref Fig 4). This is the same button used to erase or
clear the memory of enrolled or registered fingerprints.
Push and HOLD until the GREEN light AND YELLOW light appear. After both the
GREEN and YELLOW light appear release the button and begin to swipe your
finger. The YELLOW light indicates that the sensor is ready for you to swipe your
finger. Swiping should be done with the finger as flat as possible, centered on the
sensor (Ref Fig 5).
Start with the first joint of the finger and
using an even, moderate speed pull the
finger across the sensor. SMART VAULTS
will ask you to swipe the same finger at
least five times in order to successfully
enroll. If a RED light comes on solid during
the process it indicates the previous scan
was not successful. Do not restart the
process, just continue to swipe when the
YELLOW light indicates that the sensor is
ready.
When the enrollment process is complete, the solid GREEN light will blink. This
indicates the fingerprint was accepted.
Use this same procedure to enroll all fingerprints (up to 15). After 15 fingerprints
have been saved, the next fingerprint enrolled will replace the oldest saved fin-
gerprint. You may add fingerprints or erase all saved fingerprints and start over at
any time.
Note: Once you have enrollred the desired amount of fingerprints you can place
the Lock Cover over the key lock (Ref Fig 1).
4
STEP A/C ADAPTER
A/C Power: Using the A/C power supply adapter allows the sensor to skip the waking
process that is necessary when utilizing backup battery power only. Connect the
A/C power supply adapter to the A/C jack on the right side of the SMART VAULT
and plug the A/C power supply adapter into an electrical outlet.

7
g .6
HOME DEFENDER SERIES SMART VAULT
5
STEP OPEN THE SMART VAULT
using the fingerprint sensor
WHEN USING A/C ADAPTER
Place finger above the fingerprint sensor.
Drag or slide the finger that you have
previously enrolled across the fingerprint
sensor (Ref Fig 5 & 6). It is important to
drag or slide your enrolled finger exactly
as you did in the enrollment process
The fingerprint sensor scans the finger
and compares it to any and all stored
fingerprints. The door will open quickly
when a match is found. Interior light will
stay on for 30 seconds.
WHEN USING BATTERY POWER ONLY
When using the battery power only, a brief sensor “wake-up” period will occur.
A YELLOW light will appear indicating that the sensor is ready for you to slide your
finger (Ref Fig 5 & 6). The door will open quickly when a match is found. Interior
light will stay on for 10 seconds.
Red/Yellow/Green Simultaneous Flash: Memory cleared successfully.
Red Solid:The SMART VAULT needs you to reswipe your finger.
Red Continuous Slow Flashing:The HDX-250 SMART VAULT‘s battery is
low and requires changing.
Red Rapid Flashing: Your finger print scan was unsuccessful or the function
that you were trying to perform has timed out.
Yellow: The HDX-250 SMART VAULT is asking for a fingerprint swipe.
Green: The HDX-250 SMART VAULT has A/C power.
Yellow Flashing (Tamper Alert): The yellow light will flash for 10 seconds
reporting that there has been an attempted entry by an unauthorized person or
persons. This Tamper Alert only occurs after a successful scan by an authorized
person.
LIGHT INDICATIONS

8
MOST PROBLEMS OCCUR WHILE OPENING:
- when a finger is not positioned over the sensor in a similar way as it was when it
was originally enrolled. (reprogram the finger print)
- when a finger was dragged or slid over the sensor too quickly when powered only
by battery. The senor must go through a “wake-up” process when the HDX-150
SMART VAULT is powered only by battery. (touch the sensor and pause one
second before swiping your finger)
- when there is too much pressure applied at the front of the finger while dragging
or sliding a finger across the sensor. Uniform pressure is suggested.
- when a finger was dragged or slid over the sensor at too much of an angle. This
may cause the sensor to register an inaccurate reading.
Note: It is important that you practice the sequence several times to make
sure that you have the process correct. Once you have the positioning learned,
the HDX-250 SMART VAULT will open quickly and consistently.
THE HDX-250 SMART VAULT BECOMES INOPERABLE
If the HDX-250 SMART VAULT becomes inoperable, you will need to use your keys
to open the vault’s door.
Remove the lock cover to access the Key Lock. Slide or pull back the lock cover ,
insert the key into the lock and turn to release the door catch. The door will open
immediately.
HOME DEFENDER SERIES
TROUBLESHOOTING
CLEANING
To clean the surface of the HDX-250 SMART VAULT - use a mild soap and water
and soft cloth only. Avoid getting the sensor area wet.
To clean the sensor area - use a slightly damp and dust free cloth to wipe the
sensor area.
CAUTION: Products that contain ammonia or chlorine if sprayed on the fingerprint
sensor could cause difficulties reading and enrolling fingerprints and could damage
the HDX-250 SMART VAULT’s finish.
CLEANING YOUR SMART VAULT

9
1
HOME DEFENDER SERIES SMART VAULT
ACCESSORIES
at
libertysafeHD.com/video
A/C Adapter
When powered by our A/C adapter the
HDX-250 SMART VAULT is constantly
at the ready. The constant power
means the device can bypass the 1
second wake up process and open
nearly instantly.
1 2 Mounting Bracket
The HDX-250 SMART VAULT
mounting bracket is designed
to provide you a quick and easy
means of securing your HDX-250
SMART VAULT to any flat surface.
The kit includes the secure base
plate and all mounting hardware
necessary for normal installations.
As an added benefit, the HDX-
250 SMART VAULT can be quickly
removed and secured to base plates
in multiple locations and provide you
quick access anywhere you go.
2

Liberty Safe, INC. IS COMMITTED TO PROVIDING PRODUCTS OF HIGH QUALITY AND
VALUE AND MAKES EVERY EFFORT TO ENSURE ITS PRODUCTS ARE FREE FROM
DEFECTS.
Liberty Safe, Inc. guarantees your HDX-250 SMART VAULT will be free of defects in
materials or workmanship for a period of five years from the date of original purchase from an
authorized dealer. This warranty does not cover abuse, misuse, use in any manner for which
it is not designed, neglect, modification, damage inadvertently caused by the user, accidents,
and/or tampering.
If you encounter a problem with your HDX-250 SMART VAULT, contact one of our Customer
Service Representatives at 800.247.5625 for assistance. If your HDX-250 SMART VAULT is
determined to be defective, we will, at our option, have it repaired at our expense, or will send
you a new one at no cost to you. You will be required to return your existing unit as well as all
included parts (as listed on page 4 of this manual) to Liberty Safe prior to replacement of the
damaged unit along with proof of purchase.
If it is determined your HDX-250 SMART VAULT needs to be returned, a Customer Service
Representative will provide a Return Authorization Number. Please have the following
information available when you contact us:
NEITHER SELLER NOR MANUFACTURER SHALL BE LIABLE FOR ANY INJURY, LOSS
OR DAMAGE, DIRECT OR CONSEQUENTIAL, ARISING OUT OF THE USE OF, OR THE
INABILITY TO USE THE SMART VAULT.
THE USER SHALL DETERMINE THE SUITABILITY OF THE SMART VAULT BEFORE
THE INTENDED USE AND USER ASSUMES ALL RISK AND LIABILITY WHATSOEVER IN
CONNECTION THEREWITH.
- Purchaser’s name & address
- Serial number
- Copy of receipt
- Date purchased & date
received
- Authorized Dealer
- Detailed description of problem
ADDITIONAL &
UPDATED INFORMATION
CAN BE FOUND AT:
libertysafeHD.com
HOME DEFENDER SERIES
RETURN POLICY
Table of contents
Other Liberty Safe Safe manuals