lifelong FitPro User manual

FitPro
Treadmill
6 HP MAX USER
WEIGHT- 120 KGS
USB MUSIC
CONNECTOR
FOLDABLE
1 YEAR
WARRANTY

2
1. Brief Description
2. Main Technical Features
3. Tips for safety
4. Installation
5. Use and Operation
6. Maintenance
7. Guides for malfunction
8. Warranty
9. Error and self-inspection
10. Installation Sketch
Table of Contents
BRIEF DESCRIPTION
MAIN TECHNICAL FEATURES
GV-4300 motorized treadmill (diagram 1) can help complete your
goal of keeping fit together with unique and elegant appearance.
Easily read panel parameter。Easily operated folding system realizes
space-saving. Auto speed range 1-14km/h with 3 manual incline. All
makes it a hot home use fitness equipment.
Main use: Body and beauty building
This treadmill is for home use
Panel displays speed, time, distance, heart rate, calorie etc.
Display Mode:LCD
Input voltage: 220V
Frequency: 50/60Hz
Input current: ≤8A
Temperature for working: 0∽40℃
Speed range: 1∽14km/h
Incline: 3manual
Program: Time display range:0:00∽99:59(minute : second);
Distance display range:0.1~99.9kms
Machine size (L*W*H):1590x740x1300(mm)
N/W: 62KG
3

TIPS FOR SAFETY
1.Insert the power plug into the socket directly. Current load should
be less than 10A.
2. The constant running time is less than 2 hours, max weight is less
than 120kgs
3. Place your treadmill on the clean floor,not on the thick carpet,
otherwise it will not convenient for ventilation. Also please don’t put
the treadmill in the moist place or outdoors; If there is something
wrong with the electrical wire, please replace it with the electrical
wire provided by our company. For the replacement, please contact
with the local distributor.
4. The treadmill should be placed in the convenient position for
electric socket.
5. The freshman should grip the handrails when jogging and running
until familiarly. Please don’t stand on the running belt, after the
machine is power on (the safe key is at the appointed
position).Please stand on the footplates besides the treadmill, press
the “start” button, it runs at the lowest speed, at this time you can run
on the belt.
6. While running, you should dress properly. Don’t dress too loosely
in case your clothes are entangled by the machine .And please wear
sport shoes with soft sole.
7. Before taking down the protecting cover of the treadmill, please
keep the machine is power off.
8. Don’t let children and non-sportors get close to the running treadmill to
avoid unnecessary injury.
9. Please make sure one end of the safe key has been placed in the appoint-
ed position and the other one has been nipped to your clothes when you are
running on the machine. In this way, you can pull the safe key for the
machine’s sudden stop under the dangerous condition. Then you will not be
injured.
10. If you are enjoying other entertainment while running such as watching
TV, reading. Please be particularly careful. These activities will distract your
attention, which may make you lose your balance and get hurt
11. Please pull the plug off from socket and keep the safe key, when the
treadmill is unused.
12. Please don’t put anything under treadmill and don’t let your children play
near it after folding.
13. Please consult your doctor at first before running, if you have one of the
following diseases.
a) Cardiopathy, hypertension, sugar diabetes, respiratory disease, smoking,
and other chronic diseases, complication disease.
b) If you are over 35 years old and heavier than common weight.
c) Women in pregnant or in breasting period
14. Please stop exercising immediately and consult your doctor if you’re feel
giddy, surfeit, thorax ache or other symptoms.
15. Please drink adequate water after taking exercises on our treadmill for
more than 20 minutes.
45

INSTALLATION: SEE “INSTALLATION SKETCH”
USE AND OPERATION
1. start/stop
Under ready condition, press this key, it runs at the speed of
1.0km/h. Under running condition, press this key, if it runs at speed
more than 3.5km/h, it will slow down then stop. During this stopping
process, other keys are not available. If it runs at speed less than
3km/h, then it stops immediately.
2. BODYFAT
press “BODYFAT” button, “SEXà1”, which indicated “man”, will show
in the window. Then “man” (1) or “woman” (2) can be selected by
“speed up” and “speed down” buttons.
Press “mode” button again, “AGEà25”- the initial age, will show in the window.
Then age can be selected by “speed up ” and “speed down” buttons, range
from 10 to 99 years old.
Press “mode” button again, “HEIGHT” with initial value 170cm. will show in the
window. Then height can be selected by “speed up” and “speed down”
buttons, range from 50 to 250cm.
Press “mode” key again “WEIGHT” with initial value 60kgs, will show in the
window. Then press weight can be selected by “speed up” and “speed down”
buttons, range from 20 to 150KGS.
Press “mode” key again, “BMI” will show in the window. The BODYFAT figure
will display on the window once the heart-rate sensor on both handlebars are
grasped. To quit this program, only press “MODE/BODYFAT” button.
Please note: the following explanation as guidance only :( Please refer to GP
if you have any concerns about your results)
Explanation:
Bodyfat < 19: underweight.
Bodyfat 19~25: normal
Bodyfat 26~30: overweight
Bodyfat > 30: obes
6
7

3. Speed Down
Under running condition, press this key, speed can be speeded
down to the one you need.
4. Speed up
Under running condition, press this key, speed can be speeded up to
the one you need.
5. PROG(could be pressed continuously to your expected
mode)
Press the “PROG” key once again to enter “24 direct selected
programs”. So please choose carefully.
6. Mode
Under ready condition, press this key to set time, distance and
calorie accordingly. Press “set-up” or “set-down” keys to set the
value of time, distance and calorie. Then press “start” key, the
machine will run at 1.0km/h. And the set figures will be counted
down, when it comes to “0”, machine stops.
7. Next
When you use USB function, press this key to choose the next song
in your USB.
8. pre
When you use USB function, press this key to choose the previous
song in your USB
9. Set up
Under the “mode “condition, we only could press the “set up “key to up speed.
10. Set down
Under the “mode” condition, we only could press the ”set down” to down the
speed.
11. VOL +
When the amplify is open, press this key to increase the voice.
12. VOL -
When the amplify is open, press this key to down the invoice.
13. Safety Key
Under urgent condition, pull this key, machine stops immediately.
1. Insert power plug into the socket with earth wire, turn the switch to “1”
position which is on the fram.
2. Put the safe key in the right position, then circuit is on, press “on/off”, keep
it run in unload condition. Test the condition of running belt (testing from low
speed to high ones), after testing, press “on/off”
3. If everything is ok, then start to run.
8 9
UNLOAD OPERATING

5.3.1
1. Insert power plug into the socket with earth wire, turn the switch
to “1” position which is on the frame. Place the safe key to the
appointed position. After a few seconds, panel will show that the
machine is ready.
2. Nip another end of safe key to your clothes, and stand on the
footplate on both sides.
3. Press “on/off” key, running belt moves at the lowest speed
(1.0km/h). Speed windows will display your running speed.
4. Start to run.
5. Press speed key or incline key to adjust speed and incline, speed
window and incline window will display your speed and incline.
6. To end your exercise in a safe way, please first press “on/off” key
to close the treadmill. Please leave the running belt until it stops
slowly. Turn off the power.
5.3.2 Heart Rate Testing
Our treadmill can test your heart rate via the heart rate sensor. The
data is only for reference.
FOLDING AND OPENING TREADMILL
1. Folding
Firstly lift and fold the back part of the frame board by hand till you
hear a light sound, which means the folding system has been
locked. At this time running board can’t be turned to the opposite
direction.
2. Opening
Put the folded treadmill in a capacious position when you want to run. Then
pull the adjusting parts by hand to keep it is unlocked. Press the back part by
your hands down to about 10%, release it, then it will open automatically.
1. Identification ways for the degree of tightness of running belt and poly
V-belt.
When the running belt skips, please follow the steps as follows to make sure
which belt needs to be adjusted, running belt or poly V-belt.
a) Cut off power, screw off the bolt on cover of protection. Then take down the
protecting cover from the treadmill.
b) Turn the speed to be around 3km/h, step on the running belt by pressure
and try your best to make the running belt stop. If running belt stops, together
with the front roll, but the motor still runs, under this condition, it means the
poly V-belt needs to be adjusted.
c) Turn the speed to be around 3km/h, step on the running belt by pressure
and try your best to make the running belt stop. If running belt stops, but front
roll still runs, under this condition, it means the running belt needs to be
adjusted.
10
METER OPERATING INSTRUCTION
11
MAINTENANCE

13
The running belt will be deflected more or less under using. Then it needs to
be adjusted. The steps are as follows:
a) Place the treadmill on a horizontal floor, turn the speed to be 5.6km/h for
running.
b) If the running belt is deflected to the right, adjust the bolt on the right by
turning it for half an circle clockwise, then adjust the bolt on the left by turning
it for half an circle.(see diagram 3)
c) If the running belt is deflected to the left, adjust the bolt on the left by
turning it for half an circle clockwise, then adjust the bolt on the right by
turning it for half an circle.(see diagram 4).
d) After the adjustment, the running belt still keeps deflecting, please repeat
the steps above. running belt deflected to right running belt deflected to left.
The adjustment for right deflection (diagram 3) The adjustment for left deflection (diagram 4)
12
Cut off power firstly and take down the cover of protection.
a) Loosen the four screws for the motor, adjust them in a circuit clockwise,
then screw down the loose screws.
b) Keep the power on, and adjust the poly V-belt is loose or not following
the point 3.1 above, if yes, please repeat the action same to point a)
above.
a) Turn the speed to be 5.6km/h. for runnin.
b) Turn the bolts at both right and left sides to be half a circuit or a circuit by
the 8mm spanner. ( diagram1 and diagram 2).
c) After adjustment, running belt still skips, please repeat the steps above.
Tighten the running belt(diagram 1) loosen the running belt(diagram 2
THE ADJUSTMENT STEPS FOR POLY V-BEL THE ADJUSTMENT STEPS FOR RUNNING BELT DEFLECTION
ADJUSTMENT STEPS FOR RUNNING BELT

15
Depositng
The treadmill should be deposited indoor in case of being damp. Water
can’t be spattered and nothing can be laid and inserted on the treadmill.
Please keep the air a little humid in winter. And please void the big static
electricity, it may disturb the operation of meters or even damage them.
ANALYZING AND ELIMINATING MALFUNCTION
14
RUNNING BOARD LUBRICATION
GUIDES FOR MALFUNCTION
The treadmill is equipped with lubricated running board, which needs
constant maintenance. The friction between running board and running
belt has a great effect on the treadmills’ e life. So please lubricate your
machine termly. The steps are as follows:
a) Cut off the power
b) Wipe out the dust between running board and running belt with a clean
cloth.
c) Daubing the Silicon oil on the running board and running belt equably.
d) While adding lubrication oil, please keep your clothes away from the
machine for avoiding the injury.
CLEANING
a) Please power off and pull the plug cap out before cleaning.
b) Wipe out the dust stuck on the surface and running board frequently.
c) Please clean the surface of frame and running belt with a soft cloth
dipped with suds, don’t use things like eradicator and naphtha.(After
cleaning, please dry it for use).
d) Please take the protecting cover off every two month, use vacuum
dust-collector to suck the dust remaining inside of the protecting
cover.(The dust will make the components of circuitry board short circuit).
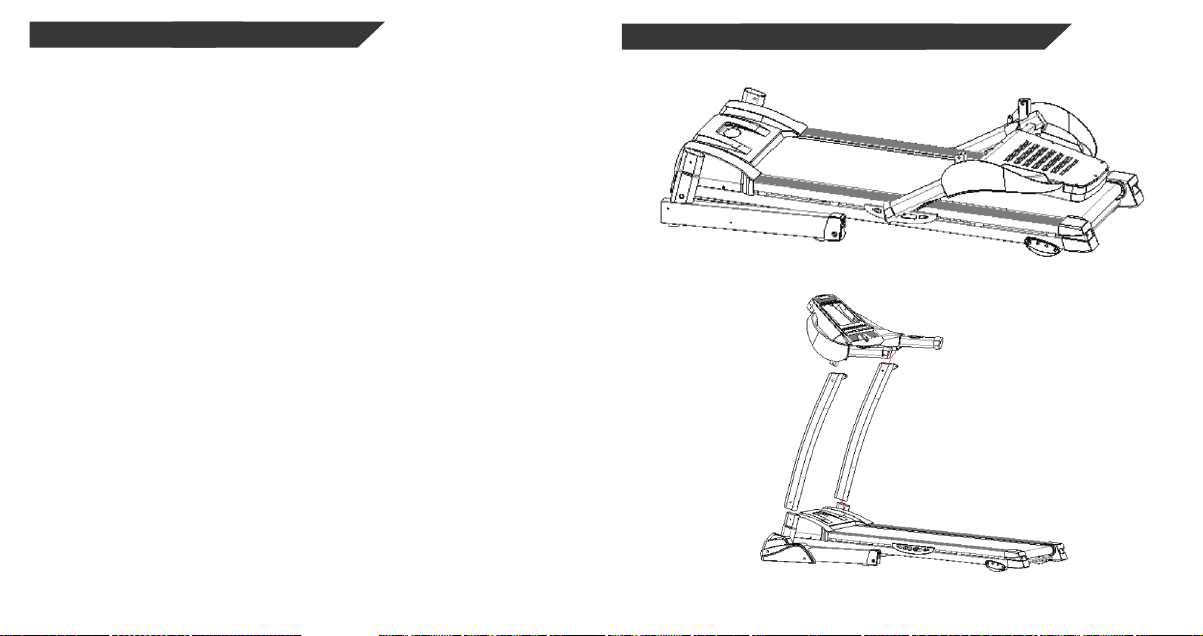
CAUTIONS, FOLDING, DEPOSITING
Cautions
Please make sure that the plug cap has been pulled out before cleaning or
maintenance.
ITEM
1
2
3
4
5
6
7
MALFUNCTION
Treadmill can’t be started.
Meter can’t display
Heart rate can’t be displaye
Incline doesn’t work
Running belt runs faster or
slower than what has been
displayed
Running belt slips
Running belt is deflected
REASONS
The safe key isn’t in the right
position
The electrical switch is placed
to “0”
creepage switch is not right
The meter control line and
control panel are unconnected
The pole of heart rate sensor is
not wet enough.
Disturbed by electromagnetis
The motor wire is not well
connected
Unadjusted
Running belt is not tight
enough
The running belt is unadjusted
SOLUTION
Put the safe key in the right
position
Turn the electrical switch to “1”
Replace creepage switch
Pull the bolt out and open the
motor cover and reconnect it
Turn on the meter and
reconnect
Wet the pole with water or
liquor for hard contact lenses
Stay away from
electromagnetism
Open the motor cover and
reconnect it
Readjust it
Please read point 3.3
Adjustment steps for tightening
running belt for reference
Please read point 3.4 The steps
for adjusting the deflected
running belt for reference

ERROR AND SELF-INSPECTION
WARRANTY
17
16
If you still can’t solve the problems after taking the solutions above, we
hope that you can contact our dealer or company as soon as possible.
1. We have assigned well-trained professionals at the dealers’. They are
ready to serve for you at any time. You can purchase any spare parts you
need.
2. Within the warranty time, and under your correct operations, our techni-
cians will replace or repair the defective accessories in free.. But you will
have to pay our technicians for the cost of broken parts if the warranty is
expired or you use them in an incorrect way.
3. The warranty for spare parts under the correct operation.
a) Frame: 1 year
b) Control board: 1 years
c) Motor: 3 year
CONDITION BEYOND MANUFACTURER’S WARRANTY:
If the product you purchase has the problems as follows, the manufactur-
er’s warranty is not effective:
a) Improper operating, negligence, accident
b) Wrong adjustment of running belt and poly V-belt
c) Unauthorized take-down
d) Improper maintenance
Error:Treadmill gives the following error code if anything wrong,please
contact the professional service people soon if it happens.
ERROR CODE
E00
E01
E02
E03
E04
E05
E06
REASON
please check if the safety key was in the right position,
without any shifting.
Please check if the main line was in good connection.
Change the MCB if still with the problems after restarted
the treadmill.
Please check if the speed sensor on the motor was in the
right position, without any shifting.
Self-inspection if both incline motor and connect line were
well,if still not OK, please change the MCB
Change the MCB if still with the problems after restarted
the treadmill.
Change the MCB if still with the problems after restarted

19
MOTORIZED TREADMILL INSTALLING SKETCH
BODY FAT TEST
18
SELF-INSPECTION
No need to self-inspect unless special situation. If necessary, please do it
under the instruction of professional technical people or sales because of
the high voltage.
a,open the red power switch, pull out the safe key.
b,Press the “start/stop” and ”speed +” key at the same time and keep it,
meanwhile, use another hand to put on the safe key ,then release the
button. of “start” and “speed+” and press the “mode” key, then the LCD
start to show all the data inside.
c,after the LCD display finished, then press the “mode” key again.
d,the treadmill runs from the lowest speed to highest speed , meanwhile,
the incline is also from lowest to highest. Then treadmill stopped.
The whole self-inspection process takes about 2 minutes
MALFUNCTION
Treadmill can’t be started.
Meter can’t display
Heart rate can’t be displaye
Incline doesn’t work
Running belt runs faster or
slower than what has been
displayed
Running belt slips
Running belt is deflected

21
MOTORIZED TREADMILL INSTALLATION SKETCH MAP
Proofreading has been carefully done to the manual, if there are printing
mistakes, please kindly understand. If pictures and the real product
doesn’t match, please take the product as the final and correct one.
If any improvement on function and specification, please kindly under-
stand if you are not informed.
20

Terms and Conditions:
1.This warranty is void if:
a. The completely filled warranty card is not presented
at the time of servicing the product.
b. The product is not operated according to the
instructions given under the user manual.
C. Damages are caused by lightning, abnormal
voltage, water or other liquid intrusion, fire, flood,
accident, negligence or improper handling.
d. Product has been damaged due to installation,
repairs, alterations or modifications by unauthorized
service organizations or persons.
e. Product label specifying the model number, serial
number and production code has been removed
and altered.
f. Defects or parts requiring replacement due to
ordinary wear and tear, corrosion, rust or stains,
scratches, dents on the casing or paintwork of the
product.
g. Claims damaged and/or missing parts
(accessories) after 7 days from the original date of
goods received.
h. Defects or faults in product which have been used
for commercial/industrial purposes or which have
been rented/leased or have been otherwise subject
to non-household/non-domestic use.
2. Repairs or replacements will be carried out by
authorized service provider.
3. During the limited warranty period, Lifelong or its
authorized service provider will repair without charge
the defective unit inclusive of labor and parts and
restore the unit to its optimum working condition. All
defective parts used for the warranty repair should be
surrendered to Lifelong and/or its authorised servicer.
4. All expenses incurred in collecting the unit (s) or
part(s) thereof from authorised service provider as will
as any other expenses and incidentals will be borne
by the consumer.
5. Lifelong obligations are limited to the repair and
replacement of the defective product. Except as set
forth above, there are no other express or implied
warranty and all warrantied, conditions or other terms
implied by statute or common law (including any
warranty of satisfactory quality, merchantability or
fitness for a particular purpose) are excluded to the
fullest extent permitted by the lass.
6. Lifelong total liability for damages relating to or arising
out of the purchase or use of the product regardless of
the type or cause of such damage of the form of
characterization of the claim asserted (e.g. contract or
tort) shall not exceed the original purchase price paid
for the product.
7. However in no event shall Lifelong and Lifelong
authorized distributors be liable for any punitive, special
incidental, indirect or consequential losses or damages
whatsoever (including without limitation, damages for
the loss of revenue, business, profits, goodwill, or
contracts, business interruptions, loss of business
information or any other pecuniary loss.) Whether or
not Lifelong has been advised of the possibility of such
damages.These limitations shall apply not with
standing the failure of the essential purpose of any
limited warranty. This limited warranty does not affect
consumer's statutory rights under the law.
8. No carrier, dealer or employee is thereof authorized to
make modifications to this warranty and you should not
reply on any such representation. Lifelong reserves the
right to amend the terms and conditions if necessary.
Manufactured for & Marketed by :
Lifelong Online Retail Private Limited
For queries and complaints:
www.lifelongindiaonline.com
Consumer Warranty Card
Dear Customer,
Thank you for choosing a Lifelong consumer product. All Lifelong Consumer
products are designed and manufactured to the highest standards to deliver high
quality performance, as well as easy installation and use. At Lifelong, we believe in
providing not only service, but adding value to your purchase. The warranty has
therefore been designed especially for you with your interest at heart.
Warranty Service
All Lifelong consumer products are covered against manufacturing defects from
them date of purchase.
Name of the product:
Model:
Warranty coverage: 1 year
Please note: Purchase receipt is necessary for warranty verification.
Customer Details
Name:
Address:
Home Number:
Office Number:
E-mail Address:
Product Details
Model No.:
Serial No.:
Purchase Date:
Invoice Number:
Online Site:
Please log onto to www.lifelongindiaonline.com and complete the online warranty form with your
personal and product details within 14 days.
22 23
Other manuals for FitPro
3
Table of contents
Other lifelong Treadmill manuals