liftup RAIZER II User manual

Liftup A/S | Hagensvej 21| DK-9530 Støvring | Danmark | T: +45 96 86 30 20 | M: [email protected] | www.liftup.dk
User Manual
RAIZER®II
USER MANUAL –RAIZER® II –GB VERSION 1.1

Liftup A/S | Hagensvej 21 | DK-9530 Støvring | Denmark | T: +45 96 86 30 20 | M: support@liftup.dk | www.liftup.dk | CVR DK-1015 3964
2
USER MANUAL –RAIZER® II –GB VERSION 1.1
Contents
1. Foreword...................................................................................................................................................4
1.1 Electronic version ..............................................................................................................................4
2. EC declaration of conformity...............................................................................................................5
3. Labelling of the equipment....................................................................................................................6
4. Terms of use.............................................................................................................................................7
5. Technical specifications..........................................................................................................................8
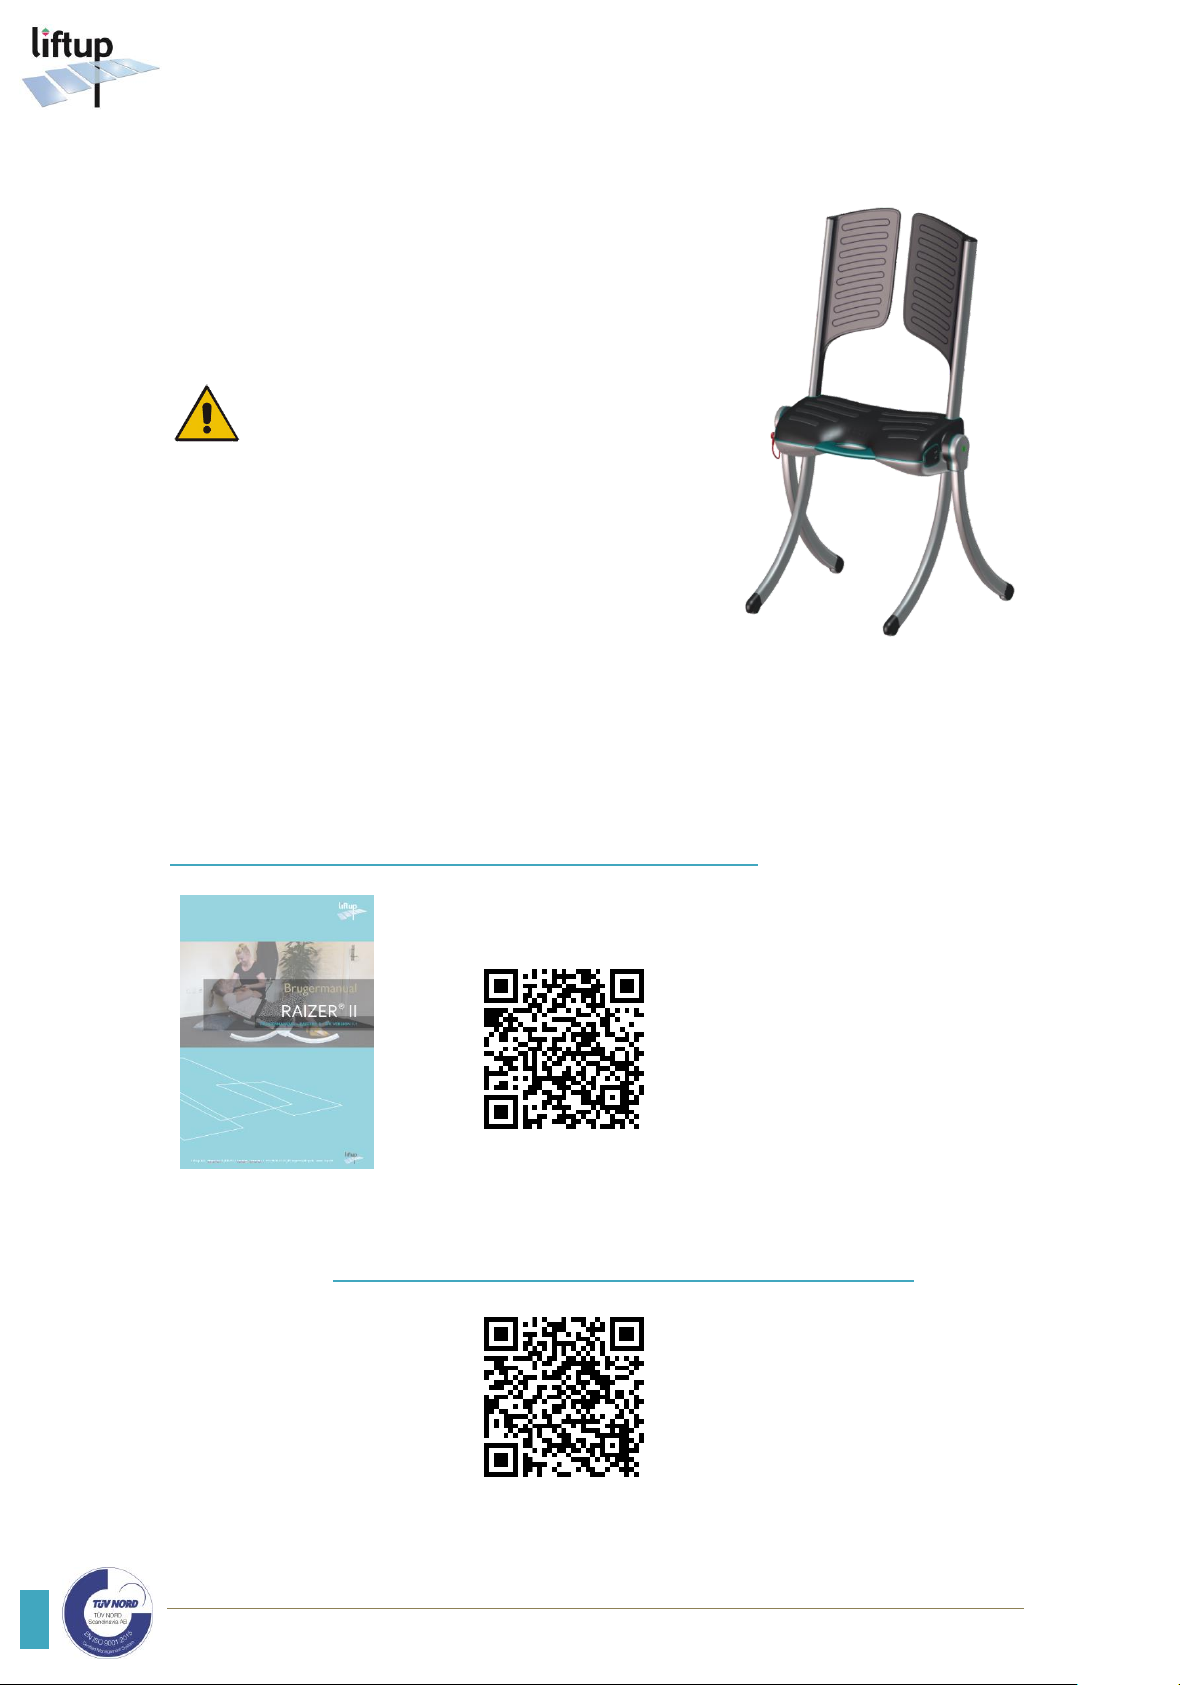
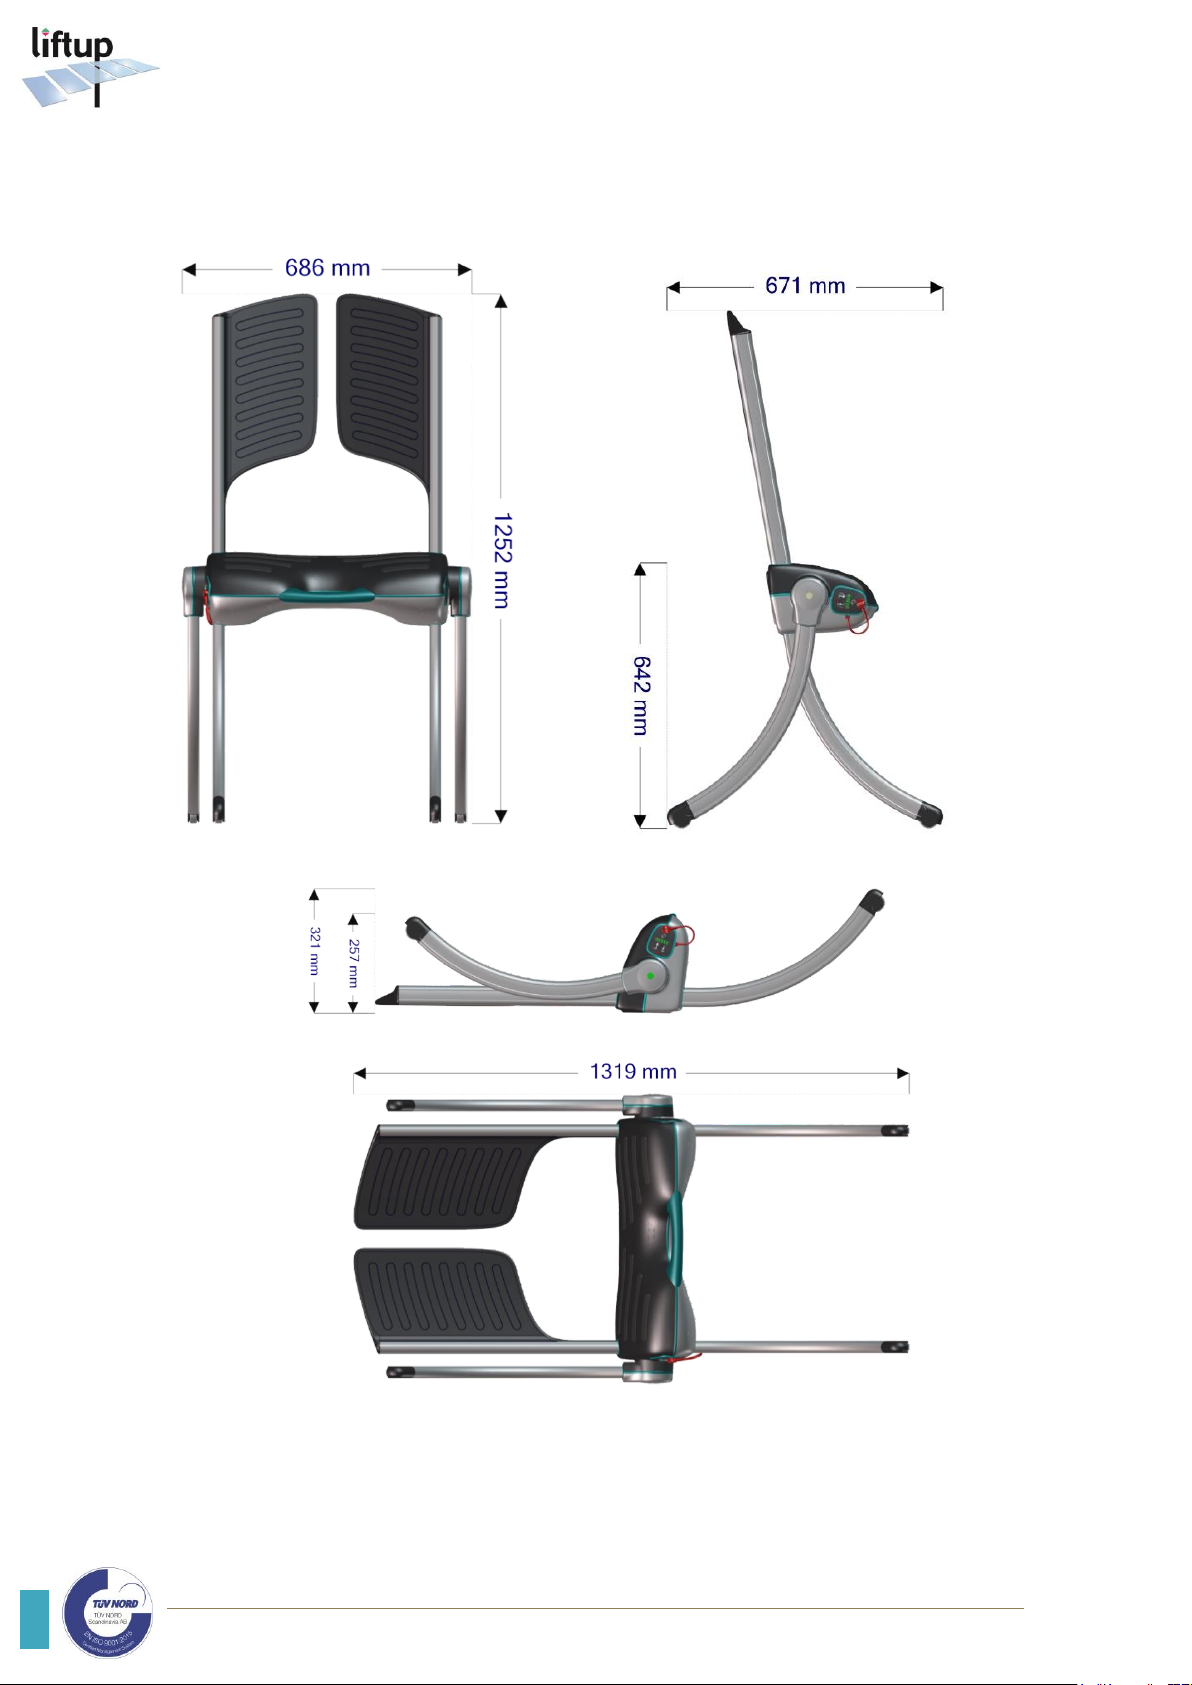
5.1 Dimensional drawings .......................................................................................................................8
5.2 Technical specifications.....................................................................................................................9
5.3 Technical specifications USB charger............................................................................................9
5.4 Technical specifications charger .....................................................................................................9
5.5 Technical specifications radio components .................................................................................9
5.6 Patents and design registration.....................................................................................................10
6. Safety instructions.................................................................................................................................11
6.1 Avoid personal injury ......................................................................................................................11
6.2 Overload ............................................................................................................................................11
6.3 Personal safety..................................................................................................................................11
6.4 Safety belt ..........................................................................................................................................11
6.5 Handling..............................................................................................................................................12
7. Functionality ...........................................................................................................................................13
8. Prior to use.............................................................................................................................................13
8.1 Charging the Raizer .........................................................................................................................13
8.2 Operating the Raizer.......................................................................................................................14
9. Operation................................................................................................................................................16
9.1 Assembling the Raizer.....................................................................................................................16
9.2 Placing the Raizer .............................................................................................................................17
9.3 Mounting the seat belt....................................................................................................................18
9.4 Mounting the backrests ..................................................................................................................19
9.5 Mounting the legs.............................................................................................................................20
9.6 Alerts prior to lifting .......................................................................................................................21
9.7 Lifting a person .................................................................................................................................22
10. Disassembly ............................................................................................................................................24
11. Charging the Raizer ..............................................................................................................................25
12. Maintenance............................................................................................................................................26
12.1 Cleaning..............................................................................................................................................26
12.2 Mechanical maintenance.................................................................................................................26

Liftup A/S | Hagensvej 21 | DK-9530 Støvring | Denmark | T: +45 96 86 30 20 | M: support@liftup.dk | www.liftup.dk | CVR DK-1015 3964
3
USER MANUAL –RAIZER® II –GB VERSION 1.1
12.3 Maintenance of the transport bags ..............................................................................................26
12.4 Pairing the transmitter and the receiver (remote control) ...................................................27
12.5 The remote control.........................................................................................................................28
13. Service inspections................................................................................................................................29
14. Service logbook .....................................................................................................................................31
15. Spare parts and accessories................................................................................................................32
16. Troubleshooting ....................................................................................................................................39
17. Electrical diagram...................................................................................................................................40
18. Disposal ...................................................................................................................................................41
19. Right of complaint.................................................................................................................................41
September 2019

Liftup A/S | Hagensvej 21 | DK-9530 Støvring | Denmark | T: +45 96 86 30 20 | M: support@liftup.dk | www.liftup.dk | CVR DK-1015 3964
4
USER MANUAL –RAIZER® II –GB VERSION 1.1
1. Foreword
Congratulations on your purchase of the Raizer.
This is an original user manual for your new Raizer II.
Hereinafter we use the term Raizer for Raizer II, if nothing else
is specifically indicated.
It is important to read this manual before
using the Raizer.
The Raizer is a battery-powered mobile lifting chair which
helps a lying person up to an almost standing position in a few
minutes. The Raizer can be operated by only a single assistant
and requires no physical effort from the assistant aside from a
helping hand.
The Raizer is simple to operate by means of the control panel mounted on the side of the seat,
or with the remote control.
1.1 Electronic version
We offer an online version of the user manual which can always be accessed by scanning the
below QR code or from our website:
https://www.liftup.dk/en/products/accessories/raizer-quick-guides/
Scan to open or download
the user manual
On our website we also offer some helpful videos which will provide you with
information on alarms/signals and troubleshooting, assembly and disassembly of the
Raizer: https://www.liftup.dk/en/products/accessories/raizer-video-guide/
Scan to go to online
videos

Liftup A/S | Hagensvej 21 | DK-9530 Støvring | Denmark | T: +45 96 86 30 20 | M: support@liftup.dk | www.liftup.dk | CVR DK-1015 3964
5
USER MANUAL –RAIZER® II –GB VERSION 1.1
2. EC declaration of conformity
Manufacturer: Liftup A/S
Address: Hagensvej 21, DK-9530 Støvring
Phone: +45 9686 3020
Reg. No.523867 - Danish Medicines Agency
hereby declares that
Equipment: RAIZER®II
Battery-powered mobile lifting chair
Year: 2019
The Raizer is in compliance with:
Medical Device Directive MDD 93/42/EEC. Medical devices under class 1 (according to rule
1 of annex IX of the Council Directive MDD 93/42/EEC). Conformity assessment was per-
formed according to Annex VII.
EMC Directive 2014/30/EU
ROHS Directive 2011/65/EU
RED 2014/53/EU, Radio Equipment Directive
The Raizer meets the relevant requirements notably in following standards:
EN/ISO 10535:2006 Hoist for the transfer of disabled persons. Confirmed by Danish
Technological Institute, certificate no. 222
EN 12182:2012 Assistive products for persons with disability - General require-
ments and test methods
EN 300 440 Electromagnetic compatibility and Radio spectrum Matters
(ERM)
The above product is manufactured under the following management system:
EN ISO 9001: 2015 Quality management, Certificate No. 5749-3027770-01-02-01
EN 14971: 2012 Application of risk management to medical devices
CEO
Søren Elisiussen
Position
Name
Liftup A/S, Hagensvej 21, DK-9530 Støvring, Denmark
Place
17 September 2019
Date
Signature

Liftup A/S | Hagensvej 21 | DK-9530 Støvring | Denmark | T: +45 96 86 30 20 | M: support@liftup.dk | www.liftup.dk | CVR DK-1015 3964
6
USER MANUAL –RAIZER® II –GB VERSION 1.1
3. Labelling of the equipment
Insert copy of
CE certification mark here

Liftup A/S | Hagensvej 21 | DK-9530 Støvring | Denmark | T: +45 96 86 30 20 | M: support@liftup.dk | www.liftup.dk | CVR DK-1015 3964
7
USER MANUAL –RAIZER® II –GB VERSION 1.1
4. Terms of use
The Raizer should only be used to bring a person lying on the floor to a seated or almost standing
position, if the person is unable to do so by him-/herself. The person may require relocation
from this position.
The max. load of the Raizer is stated on the CE mark on the rear of the seat. The Raizer can be
used approx. 40 times at full load on a full charge. A charger is included with your Raizer.
Movable parts: Be careful not to get crushed. Service inspections must always
be undertaken by a qualified service technician. The owner of the device is
obliged to maintain it according to the maintenance guide in section 12. It is
strictly forbidden to modify the product as this may endanger people’s
personal safety.
The Raizer’s parts may be hot or cold to touch in case they have been stored
in the baggage compartment of a car or in direct sunlight. Please consider this
before using the device.
Lifting capacity: Max. 150 kg (330.7 lbs)
Do not push or transport the lifting chair while the person is sitting in it
Do not stand on the lifting chair
Never flush the lifting chair with water and never immerse it in water. General
cleaning may only be done using a well-wrung cloth or sponge.
Read the user manual thoroughly before using the lifting chair
Do not dispose of batteries or electrical or electronic equipment with
unsorted household rubbish. When disposing of this device, ensure com-
pliance with local ordinances and regulations.

Liftup A/S | Hagensvej 21 | DK-9530 Støvring | Denmark | T: +45 96 86 30 20 | M: support@liftup.dk | www.liftup.dk | CVR DK-1015 3964
8
USER MANUAL –RAIZER® II –GB VERSION 1.1
5. Technical specifications
5.1 Dimensional drawings

Liftup A/S | Hagensvej 21 | DK-9530 Støvring | Denmark | T: +45 96 86 30 20 | M: support@liftup.dk | www.liftup.dk | CVR DK-1015 3964
9
USER MANUAL –RAIZER® II –GB VERSION 1.1
5.2 Technical specifications
Battery: LiFePo4, 12V, 5AH
Number of lifts on a full charge: 40 with a max. load. Approx. 80 with an average load
Duty cycle: 1 min. / 5 min.
Charging time: Up to 6 hours with the provided charger
Charging of depleted battery: 10–15 min = 1 lift
Dimensions (L x W x H): Standing 671 x 686 x 1252 mm
Lying 1319 x 686 x 321 mm
Weight: Motor unit/seat 8,5 kg –Backrest and legs 4,5 kg = total 13 kg
Lifting capacity: Max. 150 kg
Lifting time: 20-30 sec.
Noise level: < 70 dB A
Dust and water IP 52 (protected from limited dust ingress; protected from
water spray)
Working temperature: +5ºC to +40ºC
Storage temperature: -25ºC to +70ºC
Materials: Motor unit/seat: PolyCarbonate + ABS
Backrests: ABS
Legs: Aluminium
5.3 Technical specifications USB charger
USB Type A Min. 5Volt 1 Ampere
5.4 Technical specifications charger
Type 2241 4-cell LiFePO4 charger
Input Volt: 100-240V nom. Min. Max. 90-264 VAC
Power: Max 15W
Output Volt: 14,6V
Dimensions (L x W x H): 120 x 47 x 70mm / 4,8 x 1,85 x 2,75 in.
Weight: 170 g (0,38 lbs.)
Working temperature: +5ºC to +40ºC/ 41ºF to 104ºF
Storage temperature: -25ºC to +70ºC / 13ºF to 158ºF
Water and dust: IP 4x
Expected service life: >5 years
5.5 Technical specifications radio components
All radio components comply with the following standards:
EU2014/53/EU, Radio Equipment Directive (RED)
FCC (USA) CFR 47 Part 15
EN 62479:2010 Human exposure
EN 300 440, v2.1.1 Electromagnetic compatibility + Radio spectrum Matters
Draft EN 301489-1, v2.2.0 Electromagnetic compatibility + Radio spectrum Matters
Draft EN 301489-17, v3.2.0 Electromagnetic compatibility + Radio spectrum Matters
AS/NZS 4268 Radio Equipment and Systems –Short Range devices
AS/NZS 2772.2 Radio Frequency Fields (mean power < 1 mW)

Liftup A/S | Hagensvej 21 | DK-9530 Støvring | Denmark | T: +45 96 86 30 20 | M: support@liftup.dk | www.liftup.dk | CVR DK-1015 3964
10
USER MANUAL –RAIZER® II –GB VERSION 1.1
MODULE1:
2,4GHz Short Range device Receiver Class 3; FCC ID:2AK8H-MODULE1
Dimensions (L x W x H): 72 x 33 x 10mm / 2,83 x 1,30 x 0,40 in.
Weight: 10 g (0,035 lbs.)
Frequencies: 2,410GHz 2,435GHz and 2,460GHz
Duty cycle: < 1%(only TX for pairing Remotes)
Power: < 0,6mW Controlled environment
Supply: 5,6 Volt 30mA
Water and dust: IP xx (Shall be mounted inside Liftup products)
Working temperature: +5ºC to+40ºC/ 41ºF to 104ºF
Storage temperature: -25ºC to +70ºC / 13ºF to 158ºF
Expected service life: >5 years
Handheld REMOTE1:
2,4GHz Short Range device Receiver Class 3; FCC ID:2AK8H-REMOTE1
Dimensions (L x W x H): 80 x 60 x 21mm / 3,15 x 2,36 x 0,82 in.
Weight: 47 g (0,10 lbs.)
Frequencies: 2,410GHz 2,435GHz and2,460GHz
Duty cycle: <1%
Power: <0,6mW Controlled environment, Hold to run
Battery: 3 Volt CR2032
Water and dust: IP 42
Working temperature: +5ºCto+40ºC/ 41ºF to104ºF
Storage temperature: -25ºCto+70ºC/13ºF to158ºF
Expected service life: >5years
We reserve the right to make technical modifications
5.6 Patents and design registration
The following patents apply to the product:
•EP2911637
•PCT/DK2015/050041
•US 09561144
•US 09980866
•US-2018-0042791-A1
•52936AU01
The product is protected by the following design registrations:
•D55542EU01
•DM/087 953

Liftup A/S | Hagensvej 21 | DK-9530 Støvring | Denmark | T: +45 96 86 30 20 | M: support@liftup.dk | www.liftup.dk | CVR DK-1015 3964
11
USER MANUAL –RAIZER® II –GB VERSION 1.1
6. Safety instructions
6.1 Avoid personal injury
Even though the Raizer comes fitted with various safety features, never use it if
persons or animals unintendedly are close by, as this may lead to the risk of crushing.
Never allow children to play with the Raizer.
6.2 Overload
In order to avoid damage to the device in the event of overload (max. 150 kg), the Raizer is
fitted with an overload cutout, which when triggered halts the lifting chair and issues an audible
alarm. In the event of overload, run the chair down to the horizontal position/floor level.
For safety reasons the Raizer is designed to sink slowly under heavy loads which is completely
normal. This feature has been introduced in order to avoid mechanical breakage in the event of
overload.
6.3 Personal safety
•To avoid personal injury, it is NOT permitted to use the lifting chair when someone or
something is at risk of being injured by crushing, cutting, falling, slipping, or similar.
•It is important that the assistant ensures that the chair can move without putting anyone or
anything at risk.
•Be extra careful when there are children and physically or mentally challenged people on or
near the chair, as these groups cannot always be expected to be able to foresee the possible
consequences of its movements.
•Never load more on the chair than the 150 kg stated on the loading sign as the maximum
load.
•Our recommendation is to never use the lifting chair if the person is not secured with the
seat-fitted safety belt.
6.4 Safety belt
•The Raizer is fitted with a safety belt when delivered. The safety belt will help to keep the
person in position during the lift. It is not necessary to use the safety belt, but we
recommend it. The safety belt offers safety and security to the person during the lift.
•However, it is important to note that the safety belt is not meant to support the person
100 %. This means that in case the person is unable to keep the upper body/torso in an
upright position, you should use a breast belt or several safety belts (optional equipment)

Liftup A/S | Hagensvej 21 | DK-9530 Støvring | Denmark | T: +45 96 86 30 20 | M: support@liftup.dk | www.liftup.dk | CVR DK-1015 3964
12
USER MANUAL –RAIZER® II –GB VERSION 1.1
6.5 Handling
The Raizer will normally be supplied by your dealer. The lifting chair is ready for use upon
delivery.
The Raizer can be transported in the 2 provided bags.
One is a protective cover for the seat itself.
The seat is carried in the turquoise handle.
The backrest and legs are carried in the bag by using carrying straps for hand or back (long strap
for shoulders or two straps as a backpack).
Do not subject the Raizer to severe knocks or blows as this can affect product functionality.
Keep the accompanying remote control dry and do not subject it to severe blows, such as by
throwing it or dropping it, etc. Cleaning may only be done using a well-wrung cloth.
NEVER use a high-pressure jet or running water to rinse the chair and NEVER
immerse it in water, as this can damage the product.

Liftup A/S | Hagensvej 21 | DK-9530 Støvring | Denmark | T: +45 96 86 30 20 | M: support@liftup.dk | www.liftup.dk | CVR DK-1015 3964
13
USER MANUAL –RAIZER® II –GB VERSION 1.1
7. Functionality
The Raizer is a battery-powered mobile lifting chair which raises a fallen person up to an almost
standing position in a few minutes. It can be operated by only a single assistant and requires no
physical effort from the assistant aside from a helping hand.
The lifting chair works by the assistant assembling the Raizer around the fallen person and is
operated by using the control panel on the seat or by means of the remote control. The assistant
can raise the fallen person to a sitting or almost standing position ready for relocation.
To use the Raizer, hold down the button for the entire lift. The lifting will stop if the button is
released.
8. Prior to use
Make sure that the Raizer is always fully charged. A charger and an adapter cable for
USB charging are supplied with the device, and we recommend that the Raizer
always be charged and ready for use. You should check the Raizer for power at
least once every 6 months and recharge if necessary. See also section 11.
8.1 Charging the Raizer
The Raizer should be charged for at least 6
hours prior to its first-time use, as required
and as a miniumum every 6 months with the
provided charger).
It is advisable to check the battery indicator on
the side of the lifting chair to verify the level of
the charger.
Charging may also be done using the USB
cable; however, this takes considerably longer
than with the charger (approx. 20 hours for a
full charge.

Liftup A/S | Hagensvej 21 | DK-9530 Støvring | Denmark | T: +45 96 86 30 20 | M: support@liftup.dk | www.liftup.dk | CVR DK-1015 3964
14
USER MANUAL –RAIZER® II –GB VERSION 1.1
Battery indicator
Check that the chair is charged prior to use.
The battery indicator must not flash red.
The Raizer can be stored anywhere you like. However, lifting speed will be reduced if the battery
temperature falls below 0ºC. In practice, though, if charged, the Raizer will always be able to
perform its task, even if stored in a vehicle in a severe frost (-15ºC). However, you must bear
in mind that components which are either very hot or cold, may be uncomfortable to touch.
8.2 Operating the Raizer
The control panel is situated on the right side
of the seat.
To turn on the Raizer, press the on/off button
or the UP/DOWN arrow keys on the side of
the chair. Check that the chair is charged prior
to use. The battery indicator must not flash
red.
Battery indicator

Liftup A/S | Hagensvej 21 | DK-9530 Støvring | Denmark | T: +45 96 86 30 20 | M: support@liftup.dk | www.liftup.dk | CVR DK-1015 3964
15
USER MANUAL –RAIZER® II –GB VERSION 1.1
The remote control
Drives the Raizer upwards
Drives the Raizer downwards
The remote control is placed in a pocket on
the side of the seat and fixed with a magnet. It
is released with a light push to the upper part
of the remote control.
BE CAREFUL not to lose the remote con-
trol when releasing it from the Raizer.
Battery indicator
Drives the Raizer down
On/off button
Stop button
Drives the Raizer up
Service indicator
Ready signal

Liftup A/S | Hagensvej 21 | DK-9530 Støvring | Denmark | T: +45 96 86 30 20 | M: support@liftup.dk | www.liftup.dk | CVR DK-1015 3964
16
USER MANUAL –RAIZER® II –GB VERSION 1.1
1. Press the UP arrow (↑) to drive the lifting
chair upwards.
The Raizer will only run for as long as the
button is activated.
NOTE:
The Raizer must be turned on for the
remote control to work (by a light push of
the on/off button on the side of the chair).
2. The stop button is activated when it is
required to stop any movement of the
Raizer. Pull the button or the cord to
release the button from its position.
The Raizer can only be reactivated when
the stop button has been remounted.
9. Operation
9.1 Assembling the Raizer
On our website we offer some helpful videos which will provide you with information
on alarms/signals and troubleshooting, assembly and disassembly of the Raizer:
https://www.liftup.dk/en/products/accessories/raizer-video-guide/
IMPORTANT!
Please observe that the backrest should be attached at first. If the legs are attached at
first, it will disturb the fitting of the backrest. Fit one side at a time.
Correct assembly
(first mount the backrest)
Incorrect assembly
(DO NOT mount the legs at first)

Liftup A/S | Hagensvej 21 | DK-9530 Støvring | Denmark | T: +45 96 86 30 20 | M: support@liftup.dk | www.liftup.dk | CVR DK-1015 3964
17
USER MANUAL –RAIZER® II –GB VERSION 1.1
9.2 Placing the Raizer
1. Arrival and approach
2. Place the seat on the floor next to the
lying person.
Lift the thighs to an angle
Carefully push the seat under the thighs.
NOTE!
Always attach the backrest at first. If the legs are attached at first, it will disturb the fitting of the
backrest.
Take care that the backrest is attached into the correct hole

Liftup A/S | Hagensvej 21 | DK-9530 Støvring | Denmark | T: +45 96 86 30 20 | M: support@liftup.dk | www.liftup.dk | CVR DK-1015 3964
18
USER MANUAL –RAIZER® II –GB VERSION 1.1
9.3 Mounting the seat belt
1. If the seat belt has not already been fitted on the backrest, mount it by pushing the fitting
downwards over the backrest profile with a sliding movement. The fitting can be mounted
from both ends (see illustrations).
2. Fasten the seat belt. A distinct click will
be heard.
3. WARNING! Never lead the seat belt
under the rear legs of the Raizer, as this
may cause the person to be crushed. (The
seat belt clip however will break off before
any personal damage).

Liftup A/S | Hagensvej 21 | DK-9530 Støvring | Denmark | T: +45 96 86 30 20 | M: support@liftup.dk | www.liftup.dk | CVR DK-1015 3964
19
USER MANUAL –RAIZER® II –GB VERSION 1.1
9.4 Mounting the backrests
Left backrest
1. Turn the person carefully by the shoulder,
with a light push to the elbow.
Push the backrest carefully under the
shoulder of the person.
2. Click the backrest into place in the seat
with a sliding movement.
If necessary, place your foot in front of the
seat to stop it from slipping forward.
A confirmation tone will sound, when the
backrest has been correctly fitted ().
Right backrest
1. Turn the person carefully by the shoulder,
with a light push to the elbow.
Push the backrest carefully under the
shoulder of the person.
2. Click the backrest into place in the seat
with a sliding movement.
If necessary, place your foot in front of the
seat to stop it from slipping forward.
A confirmation tone will sound, when the
backrest has been correctly fitted ().

Liftup A/S | Hagensvej 21 | DK-9530 Støvring | Denmark | T: +45 96 86 30 20 | M: support@liftup.dk | www.liftup.dk | CVR DK-1015 3964
20
USER MANUAL –RAIZER® II –GB VERSION 1.1
9.5 Mounting the legs
NOTE! All 4 legs are identical and may be fitted in any sequence
Left rear leg
Insert the leg carefully, until it klicks into
place. A confirmation tone will sound,
when the leg has been correctly fitted
().
Left front leg
Insert the leg carefully, until it klicks into
place. A confirmation tone will sound,
when the leg has been correctly fitted
().
Right rear leg
Insert the leg carefully, until it klicks into
place. A confirmation tone will sound,
when the leg has been correctly fitted
().
Right front leg
Insert the leg carefully, until it klicks into
place. A double confirmation tone will
sound, when the last leg has been
correctly fitted ().
Other manuals for RAIZER II
1
Table of contents
Popular Fitness Equipment manuals by other brands

Christopeit Sport
Christopeit Sport AX 6000 Assembly and exercise instructions

Skandika Fitness
Skandika Fitness Rower CAMBRIDGE Setup and user's manual

True
True SPL-0400 owner's manual

Keys Fitness
Keys Fitness KF-PTO owner's manual

CAPITAL SPORTS
CAPITAL SPORTS 10028893 manual

THERA-Trainer
THERA-Trainer THERA-VITAL Instructions for use