manuals.online logo
Brands
  1. Home
  2. •
  3. Brands
  4. •
  5. LIGMAN
  6. •
  7. Lighting Equipment
  8. •
  9. LIGMAN LADOR 48 User manual

LIGMAN LADOR 48 User manual

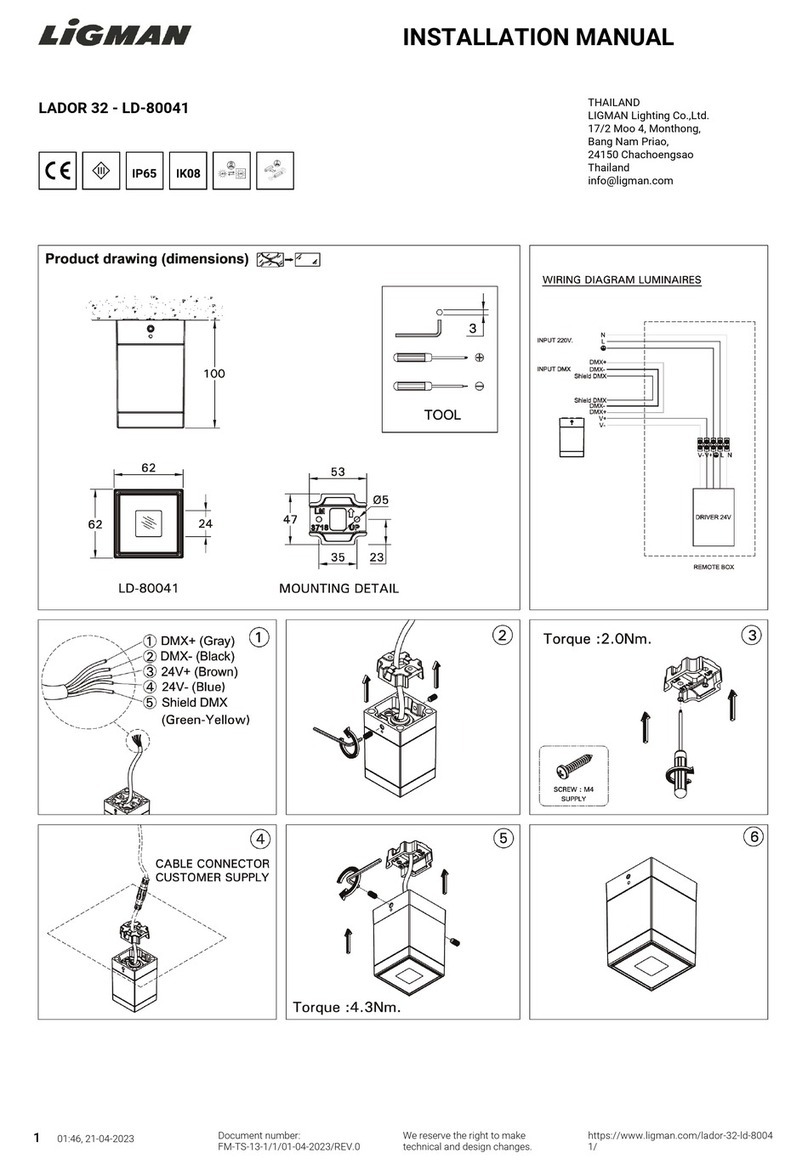
INSTALLATION MANUAL
1 01:46, 21-04-2023 Document number:
FM-TS-13-1/1/01-04-2023/REV.0
We reserve the right to make
technical and design changes.
https://www.ligman.com/lador-48-ld-5026
1/
LADOR 48 - LD-50261 THAILAND
LIGMAN Lighting Co.,Ltd.
17/2 Moo 4, Monthong,
Bang Nam Priao,
24150 Chachoengsao
Thailand
[email protected]
INSTALLATION MANUAL
2 01:46, 21-04-2023 Document number:
FM-TS-13-1/1/01-04-2023/REV.0
We reserve the right to make
technical and design changes.
https://www.ligman.com/lador-48-ld-5026
1/
INSTALLATION MANUAL
3 01:46, 21-04-2023 Document number:
FM-TS-13-1/1/01-04-2023/REV.0
We reserve the right to make
technical and design changes.
https://www.ligman.com/lador-48-ld-5026
1/
INSTALLATION MANUAL
4 01:46, 21-04-2023 Document number:
FM-TS-13-1/1/01-04-2023/REV.0
We reserve the right to make
technical and design changes.
https://www.ligman.com/lador-48-ld-5026
1/
EN
- Input voltage: 220-240 V 50/60 Hz
- Constant current (CC)
- Integral control gear
- Operating temperature: -20 °C to 40 °C
SINGLE LIGHTING REGULATION & ENERGY
LABELLING REGULATION
- Replaceable (LED only) light source by a
professional
- Replaceable control gear by a professional
STANDARDS
- LIGMAN luminaires are designed to
conform EN 60598-1:2015+A1:2018 / IEC
60598-1:2014+A1:2017 standards.
SAFETY INFORMATION
- Before carrying out maintenance and
installation on the luminaire, disconnect
from the mains supply and also from any
other DALI control wiring, and ensure that
all power is switched off.
- Outdoor and indoor use.
FACTORY RECOMMENDATION
- Installation and commissioning may only
be carried out by authorized specialists and
wired in accordance with the latest national
standards.
- The manufacturer, shall not be liable for
any damage resulting from inappropriate
modifications to the luminaire or faulty
installation.
- Read the instructions carefully before
installation and commissioning.
- Leave the instructions for
users/customers for future reference.
- Ensure that the powder coating is not
damaged during installation or
maintenance work. Any damage, which
becomes wet, can result in corrosion
occurring.
- Maximum mounting height is 7 m.
CLEANING
- Always clean carefully using a soft cloth
and a commercially available, ph-neutral,
alcohol-free, non-abrasive cleaning agent.
(Except Stainless steel and Special
Finishes).
- All parts of products in contact with soil
(post bases, etc.) must not be covered by
soil and must not be in contact with
aggressive chemical elements (ex.
fertilisers, herbicides, lime).
- Clean periodically the parts near ground in
order to remove possible soil heap on
bases or screw heads.
DIMMING
- Please check the luminaire dimming
protocol, if there is any, no responsibility is
accepted for the use of dimmers that are
unsuitable for the luminaire.
- You can connect dim cables after the
installation.
DISPOSAL
- In accordance with EU Directive WEEE
(Waste Electrical and Electronic
Equipment), luminaires must not be
disposed of with other household waste.
- At the end of their life, luminaires must be
taken to the appropriate local facility
available for the disposal or recycling of
electronic products.
NOTES
- In order not to damage the luminaire
during the installation, please check the
torque values to apply on each step.
SINGLE LIGHTING REGULATION (SLR)
- Procedure for removing / replacing the
light source (LS) / the control gear (CG)
- SLR 1: Turn off the power
- SLR 2: Open the cover
- SLR 3: Disconnect the cables
- SLR 4: Loosen the fixing screws and
replace the light source (LS) if needed
- - CAUTION! Check if the +/- polarity is
correct according to the symbol / cable
colour
- - Install in the original position and fix the
screws back
- SLR 5: Loosen the fixing screws and
replace the control gear (CG) if needed
- - Install in the original position and fix the
screws back
- SLR 6: Re-connect the cables
- SLR 7: Close the cover
- - CAUTION! Be careful not to damage the
cable when closing the cover
- SLR 8: Turn on the power
FR
- Tension d'entrée: 220-240 V 50/60 Hz
- Courant continue (CC)
- Driver incorporé
- Température de fonctionnement: -20 °C to
40 °C
RÈGLEMENT SUR L'ÉCLAIRAGE UNIQUE ET
RÈGLEMENT SUR L'ÉTIQUETAGE
ÉNERGÉTIQUE
- Source lumineuse remplaçable (LED
uniquement) par un professionnel
- Appareillage de contrôle remplaçable par
un professionnel
NORMES
- Les luminaires LIGMAN sont conçus pour
se conformer aux normes EN
60598-1:2015+A1:2018 / IEC
60598-1:2014+A1:2017.
INFORMATION SUR LA SÉCURITÉ
- Avant d'effectuer la maintenance et
l'installation sur le luminaire, débranchez-le
de l'alimentation secteur ainsi que de tout
autre câblage de commande DALI, et
assurez-vous que toute l'alimentation est
coupée.
- Utilisation en extérieure et en intérieure.
RECOMMANDATION D'USINE
- L'installation et la mise en service ne
peuvent être effectuées que par des
spécialistes agréés et câblées
conformément aux dernières normes
nationales.
- Le fabricant décline toute responsabilité
pour les dommages résultant de
modifications inappropriées du luminaire
ou d'une installation défectueuse.
- Lisez attentivement les instructions de
montage avant l'installation et la mise en
service.
- Laissez les instructions aux
utilisateurs/clients pour référence future.
- Assurez-vous que le revêtement en poudre
n'est pas endommagé lors des travaux
d'installation ou de maintenance. Tout
dommage, avec l'humidité, peut entraîner
l'apparition de corrosion.
- La hauteur de montage maximum est de 7
m.
NETTOYAGE
- Toujours nettoyez soigneusement à l'aide
d'un chiffon doux et d'un produit de
nettoyage disponible dans le commerce, au
ph neutre, sans alcool et non abrasif. (Sauf
Inox et Finitions Spéciales)
- Toutes les parties des produits en contact
avec le sol (bases de poteaux, etc.) ne
doivent pas être recouvertes de terre et ne
doivent pas être en contact avec des
éléments chimiques agressifs (ex. engrais,
herbicides, chaux)
- Nettoyer périodiquement les pièces à
proximité du sol afin d'éliminer d'éventuels
amas de terre sur les socles ou les têtes de
vis.
ATTÉNUATION
- Veuillez vérifier le protocole de gradation
du luminaire, s'il y en a, aucune
responsabilité n'est acceptée pour
l'utilisation de drivers inadaptés au
luminaire.
- Vous pouvez connecter des câbles
dimables après l'installation
DISPOSITION
- Conformément à la directive européenne
DEEE (Déchets d'équipements électriques
et électroniques), les luminaires ne doivent
pas être jetés avec les autres déchets
ménagers.
- À la fin de leur durée de vie, les luminaires
doivent être rapportés à l'entité appropriée
pour l'élimination ou le recyclage des
produits électroniques.
REMARQUES
- Afin de ne pas endommager le luminaire
lors de l'installation, veuillez vérifier les
valeurs de couple à appliquer à chaque
étape
SINGLE LIGHTING REGULATION (SLR)
- Procédure de dépose / remplacement de
la source lumineuse (LS) / du ballast (CG)
- SLR 1 : coupez l'alimentation
- SLR 2 : ouvrez le couvercle
- SLR 3 : Débranchez les câbles
- SLR 4 : Desserrez les vis de fixation et
remplacez la source lumineuse (LS) si
besoin
- - AVERTIR! Vérifiez si la polarité +/- est
correcte selon le symbole / la couleur du
câble
- - Installer dans la position d'origine et fixer
les vis en arrière
- SLR 5 : Desserrer les vis de fixation et
remplacer le ballast (CG) si besoin
- - Installer dans la position d'origine et fixer
les vis en arrière
- SLR 6 : Rebranchez les câbles
- SLR 7 : Fermez le couvercle
- - AVERTIR! Attention à ne pas
endommager le câble lors de la fermeture
du capot
- SLR 8 : Mettez l'appareil sous tension
ES
- Voltaje de entrada: 220-240 V 50/60 Hz
- Corriente constante (CC)
- Equipo de control integral
- Temperatura operacional: -20 °C to 40 °C
REGULACIÓN DE ILUMINACIÓN ÚNICA Y
REGULACIÓN DE ETIQUETADO
ENERGÉTICO
- Fuente de luz reemplazable (solo LED) por
un profesional
- Equipo de control reemplazable por un
profesional
ESTÁNDARES
- Las luminarias LIGMAN están diseñadas
para cumplir con las normas EN 60598-1:
2015 + A1: 2018 / IEC 60598-1: 2014 + A1:
2017.
INFORMACIÓN DE SEGURIDAD
- Antes de realizar el mantenimiento y la
instalación de la luminaria, desconéctela de
la red eléctrica y también de cualquier otro
cableado de control DALI, y asegúrese de
que toda la alimentación esté apagada.
- Uso interior y exterior.
RECOMENDACIÓN DE FÁBRICA
- La instalación y la puesta en servicio solo
pueden ser realizadas por especialistas
autorizados y cableadas de acuerdo con las
últimas normas nacionales.
- El fabricante no se responsabiliza de los
daños derivados de modificaciones
inapropiadas de la luminaria o de una
instalación defectuosa.
- Lea atentamente las instrucciones antes
de la instalación y puesta en servicio.
- Deje las instrucciones para los usuarios /
clientes para futuras consultas.
- Asegúrese de que el recubrimiento en
polvo no se dañe durante los trabajos de
instalación o mantenimiento. Cualquier
daño que se moje puede provocar
corrosión.
- La altura máxima de montaje es de 7 m.
LIMPIEZA
- Siempre limpie cuidadosamente con un
paño suave y un producto de limpieza no
abrasivo, sin alcohol, de ph neutro
disponible en el mercado. (Excepto acero
inoxidable y acabados especiales)
- Todas las partes de los productos en
contacto con el suelo (bases de postes,
etc.) no deben estar cubiertas por tierra y
no deben estar en contacto con elementos
químicos agresivos (ej. Fertilizantes,
herbicidas, cal)
- Limpiar periódicamente las piezas
cercanas al suelo para eliminar posibles
restos de suciedad en bases o cabezas de
tornillos.
ATENUACIÓN
- Consulte el protocolo de atenuación de la
luminaria, si lo hubiera, no se acepta
responsabilidad por el uso de atenuadores
que no sean adecuados para la luminaria.
- Puede conectar cables dimables después
de la instalación
DISPOSICIÓN
- De acuerdo con la Directiva de la UE WEEE
(Residuos de aparatos eléctricos y
electrónicos), las luminarias no deben
desecharse con otros residuos domésticos.
- Al final de su vida útil, las luminarias
deben llevarse a la instalación local
adecuada disponible para la eliminación o
el reciclaje de productos electrónicos.
NOTAS
- Para no dañar la luminaria durante la
instalación, verifique los valores de torque a
aplicar en cada paso
SINGLE LIGHTING REGULATION (SLR)
- Procedimiento para quitar / reemplazar la
fuente de luz (LS) / el equipo de control
(CG)
- SLR 1: apague la alimentación
- SLR 2: abra la tapa
- SLR 3: desconecte los cables
- SLR 4: Afloje los tornillos de fijación y
reemplace la fuente de luz (LS) si es
necesario
- - ¡PRECAUCIÓN! Compruebe si la
polaridad +/- es correcta según el símbolo /
color del cable
- - Instale en la posición original y vuelva a
fijar los tornillos.
- SLR 5: Afloje los tornillos de fijación y
reemplace el equipo de control (CG) si es
necesario
- - Instale en la posición original y vuelva a
fijar los tornillos.
- SLR 6: vuelva a conectar los cables
- SLR 7: cierre la tapa
- - ¡PRECAUCIÓN! Tenga cuidado de no
dañar el cable al cerrar la tapa
- SLR 8: encienda la alimentación
IT
- Tensione di ingresso: 220-240 V 50/60 Hz
- Corrente costante (CC)
- Attrezzatura di controllo integrale
- Temperatura di esercizio: -20 °C to 40 °C
REGOLAMENTO UNICO
SULL'ILLUMINAZIONE E REGOLAMENTO
SULL'ETICHETTATURA ENERGETICA
- Sorgente luminosa sostituibile (solo LED)
da un professionista
- Alimentatore sostituibile da un
professionista
STANDARD
- Gli apparecchi di illuminazione LIGMAN
sono progettati per conformarsi agli
standard EN 60598-1:2015+A1:2018 / IEC
60598-1:2014+A1:2017.
INFORMAZIONI SULLA SICUREZZA
- Prima di eseguire la manutenzione e
l'installazione sull'apparecchio, scollegare
dall'alimentazione di rete e anche da
qualsiasi altro cablaggio di controllo DALI e
assicurarsi che tutta l'alimentazione sia
spenta.
- Uso esterno ed interno.
RACCOMANDAZIONE DI FABBRICA
- L'installazione e la messa in servizio
possono essere eseguite solo da specialisti
autorizzati e cablati secondo le ultime
norme nazionali.
- Il fabbricante, non è responsabile per
eventuali danni derivanti da modifiche
inadeguate all'apparecchio o da
un'installazione errata.
- Leggere attentamente le istruzioni prima
dell'installazione e della messa in servizio.
- Lascia le istruzioni per gli utenti/clienti per
riferimento futuro.
- Assicurarsi che la verniciatura a polvere
non venga danneggiata durante i lavori di
installazione o manutenzione. Qualsiasi
danno sul prodotto con l'umidità può
provocare corrosione.
- L'altezza massima di montaggio è di 7 m.
PULIZIA
- Sempre pulire accuratamente utilizzando
un panno morbido ed un detergente
disponibile in commercio, a ph neutro,
senza alcool e non abrasivo. (Eccetto
Acciaio Inox e Finiture Speciali)
- Tutte le parti dei prodotti a contatto con il
terreno (basamento dei pali, ecc.) non
devono essere ricoperte da terra e non
devono essere a contatto con elementi
chimici aggressivi (es. fertilizzanti, erbicidi,
calce)
- Pulire periodicamente le parti vicine al
suolo per rimuovere eventuali accumuli di
terra sui basamenti o sulle teste delle viti.
OSCURAMENTO
- Si prega di controllare il protocollo di
regolazione dell'apparecchio, se esiste, non
si assume alcuna responsabilità per l'uso di
dimmer non adatti all'apparecchio.
- È possibile collegare i cavi dim dopo
l'installazione
DISPOSIZIONE
- In conformità alla Direttiva UE WEEE
(Rifiuti di apparecchiature elettriche ed
elettroniche), gli apparecchi di illuminazione
non devono essere smaltiti con altri rifiuti
domestici.
- Alla fine del loro ciclo di vita, gli
apparecchi di illuminazione devono essere
INSTALLATION MANUAL
5 01:46, 21-04-2023 Document number:
FM-TS-13-1/1/01-04-2023/REV.0
We reserve the right to make
technical and design changes.
https://www.ligman.com/lador-48-ld-5026
1/
portati presso la struttura locale
appropriata disponibile per lo smaltimento
o il riciclaggio dei prodotti elettronici.
APPUNTI
- Per non danneggiare l'apparecchio
durante l'installazione, verificare i valori di
coppia da applicare ad ogni livello
SINGLE LIGHTING REGULATION (SLR)
- Procedura per la rimozione/sostituzione
della sorgente luminosa (LS) / del gruppo di
alimentazione (CG)
- SLR 1: Spegnere l'alimentazione
- SLR 2: Apri il coperchio
- SLR 3: Scollegare i cavi
- SLR 4: Allentare le viti di fissaggio e
sostituire la sorgente luminosa (LS) se
necessario
- - ATTENZIONE! Controllare se la polarità
+/- è corretta in base al simbolo/colore del
cavo
- - Installare nella posizione originale e
fissare le viti indietro
- SLR 5: Allentare le viti di fissaggio e
sostituire l'alimentatore (CG) se necessario
- - Installare nella posizione originale e
fissare le viti indietro
- SLR 6: Ricollegare i cavi
- SLR 7: chiudi il coperchio
- - ATTENZIONE! Fare attenzione a non
danneggiare il cavo quando si chiude il
coperchio
- SLR 8: accendere l'alimentazione
DE
- Eingangsspannung: 220-240 V 50/60 Hz
- Konstantstrom (CC)
- Integriertes Vorschaltgerät
- Betriebstemperatur: -20 °C to 40 °C
EINHEITLICHE
BELEUCHTUNGSVERORDNUNG UND
VERORDNUNG ZUR
ENERGIEVERBRAUCHSKENNZEICHNUNG
- Austauschbare (nur LED) Lichtquelle durch
einen Fachmann
- Austauschbares professionelles
Vorschaltgerät
NORMEN
- Die LIGMAN-Leuchten entsprechen den
Normen EN 60598-1:2015+A1:2018 / IEC
60598-1:2014+A1:2017.
SICHERHEITSINFORMATION
- Bevor Sie Wartungs- und
Installationsarbeiten an der Leuchte
durchführen, trennen Sie die Leuchte vom
Stromnetz und auch von allen anderen
DALI-Steuerleitungen und stellen Sie sicher,
dass alle Gerätschaften vom Netz getrennt
worden sind.
- Für den Außen- und Innenbereich.
WERKSEMPFEHLUNG
- Die Installation und Inbetriebnahme darf
nur von autorisiertem Fachpersonal
durchgeführt und nach den neuesten
nationalen Normen verdrahtet werden.
- Der Hersteller haftet nicht für Schäden, die
durch unsachgemäße Veränderungen an
der Leuchte oder durch fehlerhafte
Montage entstehen.
- Lesen Sie die Anleitung vor der Installation
und Inbetriebnahme sorgfältig durch.
- Hinterlassen Sie die Anweisungen für
Benutzer/Kunden zur späteren
Bezugnahme.
- Achten Sie darauf, dass die
Pulverbeschichtung bei Montage- oder
Wartungsarbeiten nicht beschädigt wird.
Jede Beschädigung, die nass wird, kann
zum Auftreten von Korrosion führen.
- Die maximale Montagehöhe beträgt 7 m.
REINIGUNG
- Reinigen Sie immer vorsichtig mit einem
weichen Tuch und einem handelsüblichen,
ph-neutralen, alkoholfreien, nicht
scheuernden Reinigungsmittel. (Außer
Edelstahl und Sonderoberflächen)
- Alle erdberührten Teile der Produkte
(Pfostensockel usw.) dürfen nicht mit Erde
bedeckt sein und nicht mit aggressiven
chemischen Elementen (z. B. Düngemitteln,
Herbiziden, Kalk) in Berührung kommen
- Reinigen Sie regelmäßig die Teile in
Bodennähe, um eventuelle Erdanhäufungen
an Sockeln oder Schraubenköpfen zu
entfernen.
DIMMEN
- Bitte überprüfen Sie das Dimmprotokoll
der Leuchte, falls vorhanden, wird keine
Verantwortung für die Verwendung von
Dimmern übernommen, die nicht für die
Leuchte geeignet sind.
- Sie können Dimmkabel nach der
Installation anschließen
VERFÜGUNG
- Gemäß der EU-Richtlinie WEEE (Waste
Electrical and Electronic Equipment) dürfen
Leuchten nicht mit dem übrigen Hausmüll
entsorgt werden.
- Am Ende ihrer Lebensdauer müssen die
Leuchten zu der entsprechenden örtlichen
Einrichtung gebracht werden, die für die
Entsorgung oder das Recycling von
elektronischen Produkten zur Verfügung
steht.
ANMERKUNGEN
- Um die Leuchte bei der Installation nicht
zu beschädigen, überprüfen Sie bitte die
anzuwendenden Drehmomentwerte bei
jedem Schritt
SINGLE LIGHTING REGULATION (SLR)
- Vorgehensweise zum Entfernen /
Austauschen der Lichtquelle (LS) / des
Betriebsgeräts (CG)
- SLR 1: Schalten Sie das Gerät aus
- SLR 2: Öffnen Sie die Abdeckung
- SLR 3: Trennen Sie die Kabel
- SLR 4: Lösen Sie die
Befestigungsschrauben und tauschen Sie
die Lichtquelle (LS) bei Bedarf aus
- - VORSICHT! Prüfen Sie, ob die +/-
Polarität gemäß Symbol / Kabelfarbe
korrekt ist
- - In der ursprünglichen Position einbauen
und die Schrauben wieder befestigen
- SLR 5: Befestigungsschrauben lösen und
ggf. Vorschaltgerät (CG) austauschen
- - In der ursprünglichen Position einbauen
und die Schrauben wieder befestigen
- SLR 6: Schließen Sie die Kabel wieder an
- SLR 7: Schließen Sie die Abdeckung
- - VORSICHT! Achten Sie beim Schließen
der Abdeckung darauf, das Kabel nicht zu
beschädigen
- SLR 8: Schalten Sie das Gerät ein
CS
- Vstupní napětí: 220-240 V 50/60 Hz
- Stejnosměrný proud (CC)
- Integrovaný driver
- Provozní teplota: -20 °C to 40 °C
REGULACE SVÍTIDEL A NAŘÍZENÍ O
ŘÁDNÉM ENERGETICKÉM OZNAČENÍ
- Profesionálem vyměnitelný zdroj světla
(pouze LED).
- Profesionálem vyměnitelné ovládací
zaříznení
STANDARDY
- LIGMAN svítidla jsou navržena v souladu
se EN 60598-1:2015+A1:2018 / IEC
60598-1:2014+A1:2017 standardy.
BEZPEČNÁ INFORMACE
- Před instalací nebo údržbou svítidla jej
odpojte od hlavního přívodu a od jakékoliv
další DALI kabeláže, ujistěte se, že je vypnut
veškerý přívod proudu.
- Použití ve vnitřních a venkovních
prostorách.
TOVÁRNÍ DOPORUČENÍ
- Instalace a uvedení do provozu může
provádět pouze ověřený specialista.
Kabeláž musí být v souladu s nejnovějšími
národními standardy.
- Výrobce nenese žádnou odpovědnost
plynoucí z nesprávné modifikace svítidla
nebo jeho nesprávné instalace.
- Před instalací a uvedením do provozu si
dobře přečtěte instrukce.
- Instrukce pro uživatele/zákazníky si
ponechejte pro budoucí referenci.
- Ujistěte se, že práškovací lak není
poškozený, a to během instalace nebo
údržby. Jakékoliv poškození, které zvlhne
může mít za následek rezivění.
- Maximální montážní výška je 7 m.
ČIŠTĚNÍ
- Čištění vždy provádějte opatrně
prostřednictvím jemného hadříku a
komerčně dostupného čistícího prostředku,
který je ph neutrální, bez alkoholu a
neabrazivní. (Výjimkou je Nerezová ocel a
Speciální dokončení)
- Veškeré části produktu v kontaktu s půdou
(nad základnou apod.) nesmí být půdou
překryty a nesmí přijít do kontaktu s
agresivními chemickými prvky (např.
hnojivem, herbicidy, vápnem)
- Části v blízkosti země se doporučuje čistit
s pravidelností, důvodem je odstranění
možného hromadění půdy u základny nebo
v hlavicích šroubů.
STMÍVÁNÍ
- Zkontrolujte si prosím protokol stmívání
svítidla, pokud je dostupný. Není příjmáná
žádná odpovědnost za použití stmívačů,
které nejsou pro svítidlo vhodné.
- Kabely pro stmívače je možné připojit po
instalaci.
LIKVIDACE
- V souladu s nařízením EU WEEE (Směrnice
o odpadních elektrických a elektronických
zařízeních) není povoleno vyhazovat svítidla
s ostatním komunálním odpadem
domácnosti.
- Na konci životnosti musí být svítidla
produkt vyhozen na příslušném lokálním
dostupném místě určeném pro likvidaci
nebo recyklaci elektronických produktů.
POZNÁMKY
- Aby bylo možné předejít možnému
poškození svítidla během instalace si
prosím řádně zkontrolujte hodnoty točivého
momentu, kterých je možné pro každý krok
použít.
SINGLE LIGHTING REGULATION (SLR)
- Postup demontáže / výměny světelného
zdroje (LS) / předřadníku (CG)
- SLR 1: Vypněte napájení
- SLR 2: Otevřete kryt
- SLR 3: Odpojte kabely
- SLR 4: Povolte upevňovací šrouby a v
případě potřeby vyměňte světelný zdroj (LS)
- - POZOR! Podle barvy symbolu / kabelu
zkontrolujte, zda je správná polarita +/-
- - Instalujte do původní polohy a
zašroubujte šrouby zpět
- SLR 5: Povolte upevňovací šrouby a v
případě potřeby vyměňte předřadník (CG)
- - Instalujte do původní polohy a
zašroubujte šrouby zpět
- SLR 6: Znovu připojte kabely
- SLR 7: Zavřete kryt
- - POZOR! Při zavírání krytu dávejte pozor,
abyste nepoškodili kabel
- SLR 8: Zapněte napájení
PL
- Napięcie wejściowe: 220-240 V 50/60 Hz
- Prądem stałym (CC)
- Zintegrowany sterownik
- Temperatura robocza: -20 °C to 40 °C
UNIJNE ROZPORZĄDZENIA DOTYCZĄCE
JEDNOLITEGO OŚWIETLENIA ORAZ
ETYKIET ENERGETYCZNYCH
- Źródło światła (tylko LED) wymieniane
przez profesjonalistę
- Osprzęt sterujący wymieniany przez
profesjonalistę.
NORMY
- Oprawy LIGMAN zostały zaprojektowane
zgodnie z normami EN
60598-1:2015+A1:2018 / IEC
60598-1:2014+A1:2017.
INFORMACJE DOTYCZĄCE
BEZPIECZEŃSTWA
- Przed przeprowadzeniem konserwacji i
instalacji na oprawie należy odłączyć
zasilanie sieciowe, a także inne przewody
sterujące DALI i upewnić się, że zasilanie
zostało wyłączone.
- Do użytku na zewnątrz i wewnątrz.
ZALECENIE FABRYCZNE
- Instalacja i uruchomienie mogą być
wykonywane wyłącznie przez uprawnionych
specjalistów, a przewody połączone
zgodnie z aktualnymi normami krajowymi.
- Producent nie ponosi odpowiedzialności
za jakiekolwiek szkody wynikające z
niewłaściwych modyfikacji oprawy lub
wadliwej instalacji.
- Przeczytaj uważnie instrukcje przed
instalacją i uruchomieniem.
- Pozostaw instrukcje dla
użytkowników/klientów do wykorzystania w
przyszłości.
- Upewnij się, że powłoka proszkowa nie
jest uszkodzona podczas instalacji lub
konserwacji. Wszelkie uszkodzenia, mogą
prowadzić do korozji w wyniku ekspozycji
na wilgoć.
- Maksymalna wysokość montażu wynosi 7
m.
CZYSZCZENIE
- Należy ostrożnie przetrzeć miękką
szmatką z nieściernym, bezalkoholowym
środkiem czyszczącym neutralnym PH. (Za
wyjątkiem stali nierdzewnej i specjalnych
wykończeń)
- Wszystkie części mające kontakt z glebą
(podstawy słupowe itp.) nie mogą być
pokryte glebą oraz mieć styczności z
agresywnymi pierwiastkami chemicznymi
(np. nawozy, herbicydy, wapno).
- Należy okresowo czyścić części w pobliżu
podłoża, aby usunąć ewentualne
nagromadzenie gleby przy podstawie lub na
śrubach.
ŚCIEMNIANIE
- Należy sprawdzić instrukcję ściemniania
oprawy (jeśli istnieje). Ligman nie ponosi
odpowiedzialności za zastosowanie
ściemniaczy niekompatybilnych z oprawą.
- Po instalacji można podłączyć kable dim.
SPRZEDAŻ
- Zgodnie z unijną dyrektywą WEEE (dot.
zużytego sprzętu elektrycznego i
elektronicznego) opraw oświetleniowych
nie wolno wyrzucać wraz z innymi
odpadami z gospodarstwa domowego.
- Po zakończeniu okresu eksploatacji
oprawy oświetleniowe muszą zostać
przewiezione do odpowiedniego lokalnego
zakładu dostępnego do unieszkodliwiania
lub recyklingu produktów elektronicznych.
UWAGI
- Aby nie uszkodzić oprawy podczas
instalacji, należy sprawdzić wartości
momentu obrotowego dla każdego
mocowania
SINGLE LIGHTING REGULATION (SLR)
- Procedura demontażu/wymiany źródła
światła (LS)/osprzętu sterującego (CG)
- SLR 1: Wyłącz zasilanie
- SLR 2: otwórz pokrywę
- SLR 3: Odłącz kable
- SLR 4: Poluzuj śruby mocujące i w razie
potrzeby wymień źródło światła (LS)
- - OSTROŻNOŚĆ! Sprawdź, czy polaryzacja
+/- jest prawidłowa zgodnie z symbolem /
kolorem kabla
- -Zainstaluj w oryginalnej pozycji i przykręć
śruby z powrotem
- SLR 5: Poluzuj śruby mocujące i w razie
potrzeby wymień osprzęt sterujący (CG)
- -Zainstaluj w oryginalnej pozycji i przykręć
śruby z powrotem
- SLR 6: Podłącz ponownie kable
- SLR 7: Zamknij pokrywę
- - OSTROŻNOŚĆ! Uważaj, aby nie
uszkodzić kabla podczas zamykania
pokrywy
- SLR 8: włącz zasilanie
DA
- Input volt: 220-240 V 50/60 Hz
- Konstant strøm (CC).
- Indbygget forkobling
- Driftstemperatur: -20 °C to 40 °C
FORORDNING OM ENKELTBELYSNING OG
ENERGIMÆRKNING
- Udskiftelig lyskilde (kun LED) af en
professionel
- Udskifteligt kontroludstyr af en
professionel
STANDARDER
- LIGMAN-armaturer er designet til at
overholde EN 60598-1: 2015 + A1: 2018 /
IEC 60598-1: 2014 + A1: 2017-standarder.
SIKKERHEDSOPLYSNINGER
- Inden du udfører vedligeholdelse og
installation på armaturet, skal du afbryde
strømforsyningen og også alle andre DALI-
styreledninger og sikre, at al strøm er
slukket.
- Udendørs- og indedørs brug
FABRIKSANBEFALING
- Installation og idriftsættelse må kun
udføres af autoriserede specialister og
kables i overensstemmelse med de nyeste
nationale standarder.
- Producenten er ikke ansvarlig for skader,
der skyldes ukorrekte ændringer af
armaturet eller defekt installation.
- Læs instruktionerne omhyggeligt inden
installation og idriftsættelse.
- Efterlad instruktionerne til brugere /
kunder til fremtidig reference.
- Sørg for, at pulverbelægningen ikke
beskadiges under installation eller
vedligeholdelse. Enhver skade, som bliver
våd, kan resultere i korrosion.

This manual suits for next models

1

Other LIGMAN Lighting Equipment manuals

LIGMAN MC-20001-LC User manual

LIGMAN

LIGMAN MC-20001-LC User manual

LIGMAN SANDY 7 User manual

LIGMAN

LIGMAN SANDY 7 User manual

LIGMAN COLUMBUS 1 Instruction Manual

LIGMAN

LIGMAN COLUMBUS 1 Instruction Manual

LIGMAN LADOR 43 User manual

LIGMAN

LIGMAN LADOR 43 User manual

LIGMAN LIGHTSOFT 19 User manual

LIGMAN

LIGMAN LIGHTSOFT 19 User manual

LIGMAN LADOR 45 User manual

LIGMAN

LIGMAN LADOR 45 User manual

LIGMAN OTTAWA 4 User manual

LIGMAN

LIGMAN OTTAWA 4 User manual

LIGMAN ODESSA 11 User manual

LIGMAN

LIGMAN ODESSA 11 User manual

LIGMAN ATLANTIC 5 User manual

LIGMAN

LIGMAN ATLANTIC 5 User manual

LIGMAN ZAAB 1 User manual

LIGMAN

LIGMAN ZAAB 1 User manual

LIGMAN AA-70087-2 User manual

LIGMAN

LIGMAN AA-70087-2 User manual

LIGMAN FOR-10042 User manual

LIGMAN

LIGMAN FOR-10042 User manual

LIGMAN JET 48 User manual

LIGMAN

LIGMAN JET 48 User manual

LIGMAN KWH-50003 User manual

LIGMAN

LIGMAN KWH-50003 User manual

LIGMAN PITTSBURGH 3 PIB-50025 User manual

LIGMAN

LIGMAN PITTSBURGH 3 PIB-50025 User manual

LIGMAN KWH 10 User manual

LIGMAN

LIGMAN KWH 10 User manual

LIGMAN DU-10216-1 User manual

LIGMAN

LIGMAN DU-10216-1 User manual

LIGMAN ZAAB 2 User manual

LIGMAN

LIGMAN ZAAB 2 User manual

LIGMAN LALUNA 3 User manual

LIGMAN

LIGMAN LALUNA 3 User manual

LIGMAN TANGO 30 User manual

LIGMAN

LIGMAN TANGO 30 User manual

LIGMAN MILLENNIUM 1 User manual

LIGMAN

LIGMAN MILLENNIUM 1 User manual

LIGMAN PRAGUE 1 User manual

LIGMAN

LIGMAN PRAGUE 1 User manual

LIGMAN ODESSA 24 User manual

LIGMAN

LIGMAN ODESSA 24 User manual

LIGMAN VANCOUVER 14 User manual

LIGMAN

LIGMAN VANCOUVER 14 User manual

Popular Lighting Equipment manuals by other brands

Life 39.9F70020C quick start guide

Life

Life 39.9F70020C quick start guide

EuroLite LED ML-20 user manual

EuroLite

EuroLite LED ML-20 user manual

Home Accents Holiday 1002461144 instructions

Home Accents Holiday

Home Accents Holiday 1002461144 instructions

Experia IRiS Ripple Light instruction manual

Experia

Experia IRiS Ripple Light instruction manual

Erco Gecko Mounting instructions

Erco

Erco Gecko Mounting instructions

Inter-lux ZTA.100.Surface Installation and maintenance instructions

Inter-lux

Inter-lux ZTA.100.Surface Installation and maintenance instructions

Whelen Engineering Company TN Series installation guide

Whelen Engineering Company

Whelen Engineering Company TN Series installation guide

IKEA BJÖRKSPIREA manual

IKEA

IKEA BJÖRKSPIREA manual

Toolland PM 6640 instruction manual

Toolland

Toolland PM 6640 instruction manual

GTD GTD-LP200 user manual

GTD

GTD GTD-LP200 user manual

LIVARNO home 1105-W-UK manual

LIVARNO home

LIVARNO home 1105-W-UK manual

ProLights EclPar IPMFC user manual

ProLights

ProLights EclPar IPMFC user manual

Velvet EVO Series user manual

Velvet

Velvet EVO Series user manual

IDTOLIGHT GENT installation instructions

IDTOLIGHT

IDTOLIGHT GENT installation instructions

MAYTONI S35 installation manual

MAYTONI

MAYTONI S35 installation manual

MaxLite MLFP14DP4535 user manual

MaxLite

MaxLite MLFP14DP4535 user manual

SLV Elektronik 550621 instruction manual

SLV Elektronik

SLV Elektronik 550621 instruction manual

Iluminarc Logic MR16 DN S Quick reference guide

Iluminarc

Iluminarc Logic MR16 DN S Quick reference guide

manuals.online logo
manuals.online logoBrands
  • About & Mission
  • Contact us
  • Privacy Policy
  • Terms and Conditions

Copyright 2025 Manuals.Online. All Rights Reserved.