LIM DeviaLIM User manual

LIM SAS
86 rue de la Poudrette F-69100 Villeurbanne
Tel: +33 (0)4 72 14 68 30 Fax: +33 (0)4 72 37 72 76
http://www.lim.eu
DeviaLIM
User
Guide
Date Affected
pages Author Description
17 01 2012 toutes Christophe Denis Initial issue
Revision history
DeviaLIM Creation : 17/01/2012 Page 1
User Guide
Update : 26/0 /2014 of 13
Author : Christophe Denis
Open document Status: Complete
DeviaLIM_user_guide_EN.odt

Index
1. General presentation........................................................................4
2. Performance of the product.............................................................5
3. Operating / using the device............................................................5
3.1 Turning the device on...........................................................................5
3.2 Turning the device off...........................................................................5
4. Recording drilling deviations..........................................................6
4.1 Preparing to Record.............................................................................6
4.2 Measuring.............................................................................................7
4.3 Additional Information...........................................................................7
5. Results of the recording...................................................................
5.1 Data Menu............................................................................................8
5.2 View Menu............................................................................................8
5.3 Info Menu.............................................................................................8
6. Main Menu.........................................................................................9
7. File explorer menu..........................................................................10
. Configuration...................................................................................11
9. Connection to a PC via the USB....................................................12
10. Angles conventions......................................................................13
DeviaLIM Creation : 17/01/2012 Page 2
User Guide
Update : 26/0 /2014 of 13
Author : Christophe Denis
Open document Status: Complete
DeviaLIM_user_guide_EN.odt

List of figures
Figure 1 : HMI casing...........................................................................................................4
Figure 2 : Start menu...........................................................................................................5
Figure 3 : Acquisition menu, stand-by mode ......................................................................6
Figure 4 : Enter inclination set point...................................................................................6
Figure 5 : Enter azimuth set point........................................................................................6
Figure 6 : Enter file prefix ....................................................................................................6
Figure 7 : Enter file number ................................................................................................6
Figure 8 : Overwrite confirmation request..........................................................................6
Figure 9 : Acquisition Menu, recording in progress.............................................................7
Figure 10: Acquisition Menu, communication error.............................................................7
Figure 11 : Data Menu.........................................................................................................8
Figure 12 : View Menu.........................................................................................................8
Figure 13 : Info Menu...........................................................................................................8
Figure 14 : Main Menu.........................................................................................................9
Figure 15 : Explorer Menu.................................................................................................10
Figure 16 : Setup Menu.....................................................................................................11
Figure 17 : Screen displayed when device is connected to a PC via a USB....................12
Figure 18 : Inclination........................................................................................................13
Figure 19 : Azimuth...........................................................................................................13
DeviaLIM Creation : 17/01/2012 Page 3
User Guide
Update : 26/0 /2014 of 13
Author : Christophe Denis
Open document Status: Complete
DeviaLIM_user_guide_EN.odt

1. GENERAL PRESENTATION
The DeviaLIM consists of an HMI casing (1) and a probe connected together by an
electro- mechanical cable.
Figure 1 : HMI casin
A. Socket for the probe sensor, USB cable,
and area
B. Front face of the device in anodized
aluminium
C. Screen LCD
D. Button 1 and on/off function
(Slightly pressing on this button turns on the
DeviaLIM, and pressing it in a prolonged
manner turns it off. )
E. Increment button or upward scroll button
F. Validation button
G. Decrement button or scroll down button
H. Button 2
I. Mechanical box in H.D.P.E.
DeviaLIM Creation : 17/01/2012 Page 4
User Guide
Update : 26/0 /2014 of 13
Author : Christophe Denis
Open document Status: Complete
DeviaLIM_user_guide_EN.odt 1. General presentation

2. PERFORMANCE OF THE PRODUCT
The probe is suspended by a flexible cable in a vertical borehole which has a
diameter greater than the diameter of the probe. It is impossible to have an accurate
measurement of the angle. The variation of the angle may be 1.5 °.
For correct measurement in a vertical drilling, we recommend repeating the
measurement by trying to stick the probe on one side of the drill.
3. OPERATING / USING THE DEVICE
Figure 2 : Start menu
3.1 Turning the device on
•Connect the probe's cable to the casing.
•Slightly press the On Off button.
•The start menu (2) appears, and the following information will be displayed:
Serial number of the device
Firmware version
Number of files stored in the memory card
Remaining battery life (expressed in %)
Date and time
•After a few seconds, the display automatically returns to the Acquisition menu.
3.2 Turning the device off
•To turn off the DeviaLIM, press on the On Off button until the device turns off.
•To save battery life, the DeviaLIM automatically turns off after 5 minutes of no activity.
DeviaLIM Creation : 17/01/2012 Page 5
User Guide
Update : 26/0 /2014 of 13
Author : Christophe Denis
Open document Status: Complete
DeviaLIM_user_guide_EN.odt 3. Operating / using the device

4. RECORDING DRILLING DEVIATIONS
This chapter describes in detail the procedures to fully record deviation
measurements of drilling.
Figure 3 : Acquisition menu, stand-by mode
4.1 Preparing to Record
•Go to Acquisition menu. This is now on stand-by mode (3); this means that the DeviaLIM
is not recording any measurement.
•Check the acquisition parameters displayed at the top left side of the screen (direction
and acquisition footprint).
If they are not correct, modify them in the Setup menu.
•Adjust the depth from the start of recording (generally 0.0m for descend recording, and
the bottom of the borehole for ascend recording) by pressing the up down arrows.
•Ensure that communication with the probe is working (instantaneous inclination and
azimuth measurements are displayed at the top right of screen).
•Press on Start.
•The screens below follow in sequence:
•Enter inclinaison set point (4)
•Enter azimuth set point (5)
•Enter file prefix (6)
•Enter file number (7)
•[Overwrite confirmation request] ( , optional screen)
Figure 4 :
Enter inclination
set point
Figure 5 :
Enter azimuth
set point
Figure 6 :
Enter file
prefix
Figure 7 :
Enter file
number
Figure 8 :
Overwrite
confirmation
request
DeviaLIM Creation : 17/01/2012 Page 6
User Guide
Update : 26/0 /2014 of 13
Author : Christophe Denis
Open document Status: Complete
DeviaLIM_user_guide_EN.odt 4. Recording drilling deviations

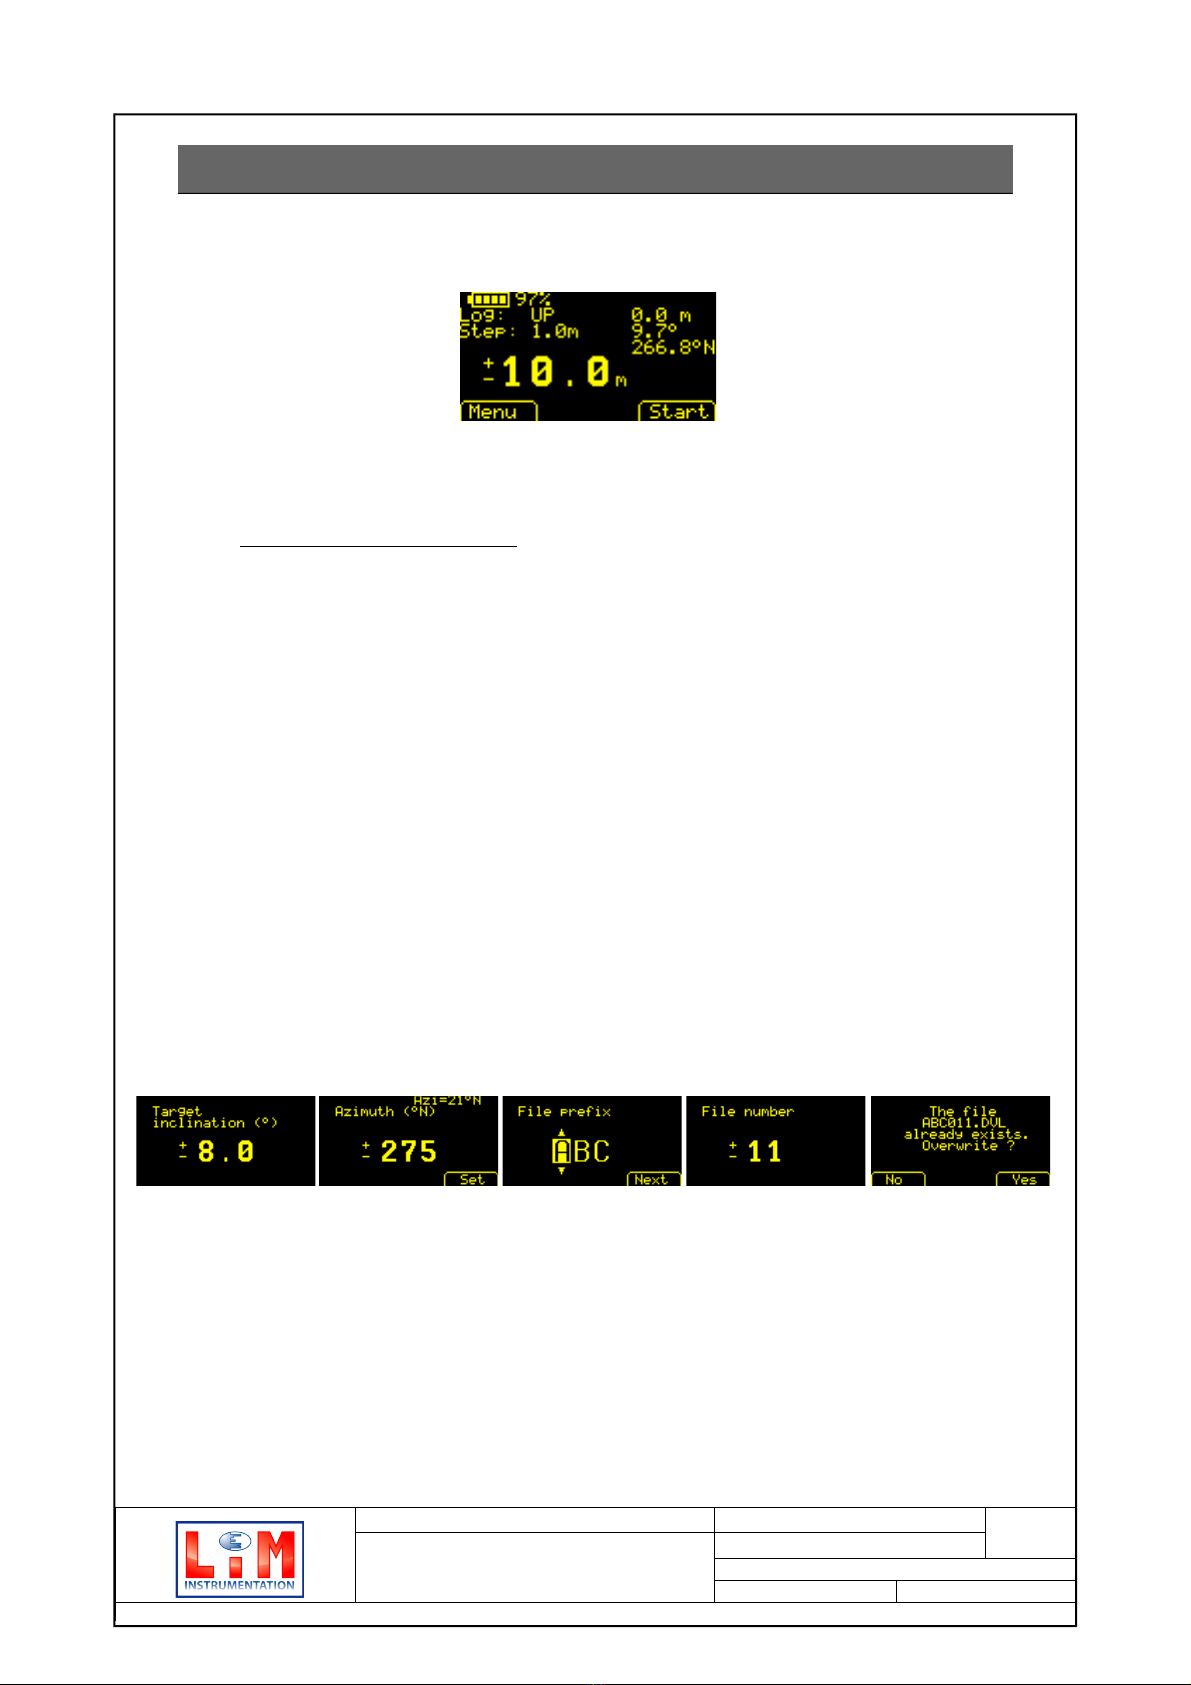
•To change a numeric value, adjust the value by pressing the up down arrows. Hold down
the button for quick scrolling. Confirm by pressing OK.
•When entering the azimuth set point, the azimuth measured by the probe is displayed at
the top right. Press Set to apply the set point, or manually edit it by using the up down
arrows.
•To change the file prefix, scroll through the characters by pressing the up down arrows; go
to the next character by pressing Next. Confirm entry by pressing OK.
•If a file with the same name already exists, a menu appears asking if the file name is to be
overwritten. ( ).
•Once the file number is validated, the name of the file just created appears at the bottom
of the acquisition screen indicating that a recording is in progress (9). During recording
the End button replaces the Start button.
Figure : Acquisition Menu,
recordin in pro ress
Figure 10 : Acquisition Menu,
communication error
4.2 Measuring
•Place the probe at the depth indicated in bold characters and validate the measurement
by pressing OK.
•The last recorded measurement is shown at the top right of the screen.
•Place the probe at the next depth, validate, and continue in the same way until the end of
drilling. The depth can be refined manually at any time by pressing on the up down
arrows. Once the last measurement is taken, stop the recording by pressing End.
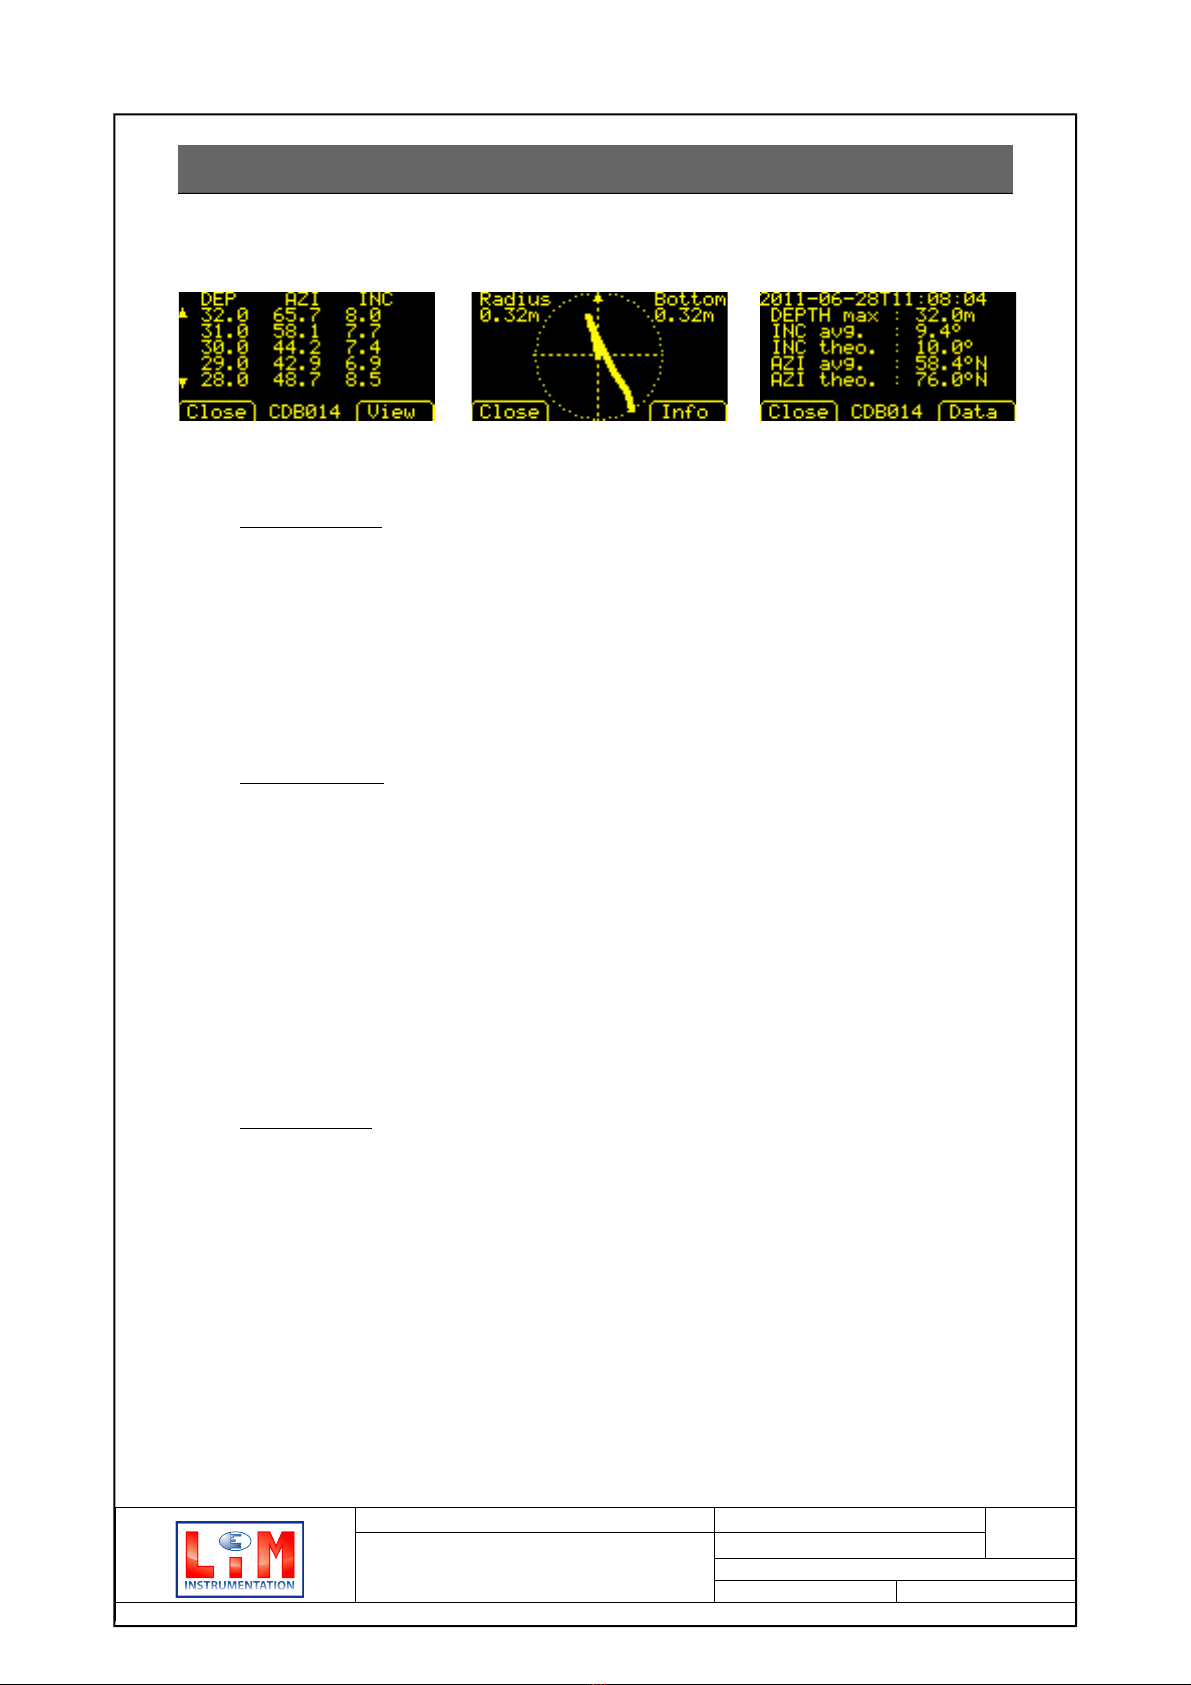
•The deviation measurement results are then displayed.
4.3 Additional Information
•The up down buttons have a quick scroll feature when the button is held down.
•If the recording is stopped and no data is logged, the Acquisition menu returns to stand-
by mode.
•When the probe is not connected to the casing or when a communication problem with
the probe occurs, the words Comm error appear at the top right of the screen as shown
in 10. If this is the case, check the connections and the battery.
•When battery life is lower than 5%, it is no longer possible to start a new recording.
Recharge the battery.
DeviaLIM Creation : 17/01/2012 Page 7
User Guide
Update : 26/0 /2014 of 13
Author : Christophe Denis
Open document Status: Complete
DeviaLIM_user_guide_EN.odt 4. Recording drilling deviations

5. RESULTS OF THE RECORDING
The results of the recorded deviations of the drilling are contained in the menus
described below:
Figure 11 : Data Menu Figure 12 : View Menu Figure 13 : Info Menu
5.1 Data Menu
•This menu (11) displays the recorded deviation measurements following three columns:
Depth (DEP column)
Azimuth (AZI column)
nclination (INC column)
•The Close button returns to the File Explorer menu (15)
5.2 View Menu
•This menu (12) traces the drilling representation following its axis set point.
•For example, the arrow will indicate the axis set point if the azimuth set point entered is
0°N, the arrow then indicates North; West is located at the left; and East is at the right.
•The maximum deviation of the drilling in terms of its axis set point is indicated in meters at
the top left of the screen. This data also corresponds to the radius of the circle traced on
the screen. The deviation from the bottom of the drilling in terms of its axis set point is
indicated in meters at the top right of the screen.
•The Close button returns to the File Explorer menu (15), or to the Acquisition menu (3) if
the View menu was accessed at the end of the recording.
5.3 Info Menu
•This menu (13) displays a summary of the information relating to drilling and recording.
•Details of the information displayed on the screen as seen in the example - 13:
2011-06-28T11:08:04 Date and time of recording
DEPTH max: 32.0m Maximum recorded depth
INC avg.: 9.4° Average measured inclination of the drilling
INC theo.: 10.0° Theoretical inclination of the drilling (set point)
A I avg.: 58.4°N Average measured azimuth of the drilling
A I theo.: 76.0° Theoretical azimuth of the drilling (set point)
•The Close button takes you back to the File Explorer menu (15).
DeviaLIM Creation : 17/01/2012 Page
User Guide
Update : 26/0 /2014 of 13
Author : Christophe Denis
Open document Status: Complete
DeviaLIM_user_guide_EN.odt 5. Results of the recording

6. MAIN MENU
Figure 14 : Main Menu
Access to the main menu (14) is done via the Menu button (button 1) in the
Acquisition, Explorer and Setup menus.
The main menu provides access to the following menus:
•Acquisition (Acquisition)
•File Explorer (Explorer)
•Configuration (Setup)
DeviaLIM Creation : 17/01/2012 Page 9
User Guide
Update : 26/0 /2014 of 13
Author : Christophe Denis
Open document Status: Complete
DeviaLIM_user_guide_EN.odt 6. Main Menu

7. FILE EXPLORER MENU
Figure 15 : Explorer Menu
•The file explorer (15) allows you to view the contents of the memory card.
•Select an item by pressing on the up down buttons, and open the file you selected by
pressing on Open (button 2).
DeviaLIM Creation : 17/01/2012 Page 10
User Guide
Update : 26/0 /2014 of 13
Author : Christophe Denis
Open document Status: Complete
DeviaLIM_user_guide_EN.odt 7. File explorer menu

. CONFIGURATION
Figure 16 : Setup Menu
•The Setup menu (16) allows you to configure the following:
Date
Time
Back lighting
Time delay for screen sleep mode
Log step
Log direction
•Select an item by pressing on the up down buttons, and go to the edit menu by pressing
Open (button 2).
Notes:
•The time stored is based on the 24-hour format.
•The time delay for the screen's start-stop (also called stand-by) is indicated in seconds. It
allows you to configure the time of inactivity starting from the time the DeviaLIM is put on
standby. During this period, the casing is on (visible on the On Off button which is lit); only
the screen and the probe are turned off to save battery life. Pressing on any button ends
the start-stop function and takes you back to the last displayed menu preceding the start-
stop or stand-by.
DeviaLIM Creation : 17/01/2012 Page 11
User Guide
Update : 26/0 /2014 of 13
Author : Christophe Denis
Open document Status: Complete
DeviaLIM_user_guide_EN.odt . Configuration

9. CONNECTION TO A PC VIA THE USB
Figure 17 : Screen displayed when device is connected to a PC via a USB
•When the DeviaLIM is connected to a PC via its USB cable, the screen, as shown in 17,
appears and remains on display as long as the cable is connected. It is therefore normal
that the screen is static (freezes). It will update once the cable is disconnected.
•The DeviaLIM's battery is activated as soon as the USB cable of the DeviaLIM is
connected to a PC, where a power source via an adaptor (for example 220VAC=>USB or
12VDC=>USB). During the battery's activation, the battery block icon is turned on.
•The PC recognizes the DeviaLIM as a mass storage peripheral (USB key type). It does
not require the installation of any particular driver or software.
•The contents of the DeviaLIM's memory can be read and modified via the computer's file
explorer.
•The data files created by the DeviaLIM are named based on the following syntax:
| ABC | 123 | .DVL |
| Préfix | File number | Extension |
•The files can be read using a text editor (e.g. Notepad)
Note :
Recharging with the 220VAC mains-transformer supplied by LIM is at least two times
faster than the USB.
Be careful if you don't safety remove the devialim on the pc you can damage the file
system.
DeviaLIM Creation : 17/01/2012 Page 12
User Guide
Update : 26/0 /2014 of 13
Author : Christophe Denis
Open document Status: Complete
DeviaLIM_user_guide_EN.odt 9. Connection to a PC via the USB

10. ANGLES CONVENTIONS
The DeviaLIM's angle conventions are defined as follows:
•Inclination expressed from 0.0° to 180.0° (1 ):
0°: vertical probe, pointing downward
90°: horizontal probe
180°: vertical probe, pointing upward
•Azimuth expressed from 0.0°N to 359.9°N (19)
0°N: probe pointing North
90°N: probe pointing East
180°N: probe pointing South
270°N: probe pointing West
Figure 18 : Inclination Figure 1 : Azimuth
DeviaLIM Creation : 17/01/2012 Page 13
User Guide
Update : 26/0 /2014 of 13
Author : Christophe Denis
Open document Status: Complete
DeviaLIM_user_guide_EN.odt 10. Angles conventions
Up
Down
W
Table of contents