Lindy 38120 User manual

© LINDY ELECTRONICS LIMITED & LINDY-ELEKTRONIK GMBH - FIRST EDITION (JUNE 2010)
HDMI High Speed Digital Signage Extender
User Manual English
Benutzerhandbuch Deutsch
Manuel Utilisateur Français
Manuale d’uso Italiano
LINDY No. 38120
www.lindy.com
User Manual English
2
Introduction
Thank you for purchasing the LINDY HDMI High Speed Digital Signage Extender 100m! It
supports uncompressed FullHD 1080p HDMI signal transmission with high resolution for
computer graphics as well as for fluent video transmission! This Extender allows you to extend
signals up to 100m using high quality Cat.6/Cat.7 RJ45 cable. For best results and especially
longer distances, we recommend using our Cat.7 S/FTP PiMF cable (No.12047).
This extender functions as a HDMI over Cat.6 extender, RS232 extender, Infrared over Cat.6
Extender and as a 3 Port Ethernet Switch extender.
Package Contents
1 x Transmitter, 1 x Receiver
Multi-Country Power Adapter (100…240VAC / 24V DC/1A)
IR Transmitter with 1.5m cable
This User Manual
Features
Extends uncompressed HDMI or DVI-D signals up to 100m via its “Gigalink” connection
HDMI FullHD 1080p or DVI-D up to 1920 x 1200 (using a HDMI to DVI adapter or cable)
Supports 10/100 Base-T Ethernet via the “Gigalink” connection (2x 3 Port 10/100 Ethernet)
Supports hardware RS232 link function and Infrared remote signal transmission
Supports a local HDMI monitor at the transmitter
Suitable for use with 3D/HDTV Home Theater, professional HDTV installations, Computer
Systems, Multimedia and Control Center system installations.
Specification
Max. 12Gbit/s. total bandwidth over its 800MHz “Gigalink” connection using RJ45 cable. The
“Gigalink” connection is a dedicated cable connection, it is not a Gigabit Ethernet
connection!
Maximum cable length for the “Gigalink” connection: 100m (approx.)
Compatible with HDMI 1.2, 1.3a/b/c, 1.4 and DVI 1.0 with HDCP, up to 10.2 Gbps / 340MHz
per link
FullHD 1080p with up to 36/12 bit colour depth with 3D support and HDMI CEC support
Supported resolutions: 640x480i, 720x480i/p, 720x576i/p, 1024x768, 1280x720i/p,
1280x960, 1280x1024, 1600x1200, 1920x1080i/p, 1920x1200
Supported audio: multi-channel including all HDMI supported protocols, DTS-HD Master
Audio, Dolby Digital Plus, Dolby TrueHD
IR sensor on TX unit and IR transmiter on RX unit with up to 15m signal distance
RS232 DB-9 Connector on TX and RX with Bi-directional transfer up to 192000 Bit/s
Transmitter and Receiver each have a 3 RJ45 ports switch for 10/100 Ethernet support. The
10/100 switches are also connected via the “Gigalink” connection
The receiver is powered via the “Gigalink” connection from the transmitter
Dimensions: 15 x 7 x 5cm (L x W x H) ; Weight: 0.46kg (each unit)

User Manual English
3
Installation
Important! Before starting the installation, please ensure that all devices are powered off.
The following steps are for an installation using HDMI equipment, if you are using DVI
equipment, please substitute the HDMI cables for DVI to HDMI cables where required.
1. Connect your HDMI source to the HDMI Extender Transmitter unit using a HDMI cable
(maximum length 5m). If required you may also connect a local HDMI monitor.
2. Connect one end of the Cat.6/7 cable (max. length 100m) to the Gigalink port on the
Transmitter and the other end to the Gigalink port of the Receiver. Use solid core installation
cable of at least Cat.6 UTP. For best results and especially longer distances, we recommend
using our Cat.7 S/FTP PiMF cable (No.12047).
3. Use another HDMI cable (maximum length 5m) to connect your HDMI display device to the
HDMI output port on the Receiver unit.
4. For RS232 Extender functionality, connect a DB-9 cable on the Transmitter and on the
Receiver. The RS232 device connected to the Receiver will be the remote device.
5. For additional Infrared remote signal functionality, connect the included IR transmitter to the
Receiver unit and place the transmitter in front of the HDMI device IR receiver
6. For Ethernet functionality, connect your devices to the 10/100Base-T ports.
7. Plug the DC power supply into the HDMI transmitter unit and swtich on.
8. Power on your HDMI Source and Display to complete the installation.
Troubleshooting
There is no display on the screen.
Check that the DC plug and jack used by external power supply are firmly connected.
Check that the Cat.6/7 cable is plugged in correctly and that the Link Status LED is lit.
Check that the HDMI source and display are both powered on and active.
Power off all the devices, then power on in this order: first, the transmitter unit, then the
display and finally the source.
For several HDMI devices it may be helpful to unplug and replug their HDMI connection to
re-initiate the HDMI handshake and recognition.
Reduce the length of Cat.6/7 or HDMI cable used, or use a higher quality cable.
Handbuch Deutsch
4
Einführung
Mit dem LINDY HDMI High Speed Digital Signage Extender 100m haben Sie ein erstklassiges
Produkt erworben. Es unterstützt die Übertragung von unkomprimierten FullHD 1080p Signalen
mit hoher Auflösung für Grafikausgabe als auch mit flüssiger Videowiedergabe! Signale können
bis zu 100m bei Verwendung hochwertiger Cat.6/7 RJ45 Kabel übertragen werden. Für beste
Resultate besonders bei großen Distanzen empfehlen wir als Verbindungskabel das LINDY
Cat.7 S/FTP PiMF Kabel Art.-Nr.12047.
Der Extender arbeitet sowohl als HDMI wie auch als RS232, Infrarot IR-Fernbedienungs-, und
10/100 Ethernet Extender.
Lieferumfang
1x Transmitter, 1x Receiver
Multi-Country Netzteil (100…240VAC / 24V DC/~1A)
IR-Transmitter mit ca.1,5m Kabel für Receiver
Dies Handbuch
Eigenschaften
Sendet unkomprimierte HDMI oder DVI-D Signale über seine “Gigalink” Verbindung
HDMI FullHD 1080p oder DVI-D bis 1920x1200 (bei Verwendung von HDMI/DVI Kabeln)
Unterstützt 10/100 Base-T Ethernet über die “Gigalink” Verbindung (2x 3 Port 10/100)
Unterstützt Hardware RS232 Verbindung und Übertragung der IR-Fernbedienungssignale
Unterstützt einen lokalen HDMI Monitor am Transmitter
Ideal geeignet zum Einsatz im Bereich 3D/HDTV Home Theater, bei professionellen HDTV
Installationen, Computersystemen, Multimedia und Control Center Installationen.
Spezifikationen
Max. 12Gbit/s. totale Bandbreite über die 800MHz “Gigalink” Verbindung via RJ45 Kabel.
Der “Gigalink” ist ein dedizierte Verbindung und nicht eine Gigabit Ethernet Verbindung!
Maximale Kabellänge der “Gigalink” Verbindung ca. 100m
Kompatibel mit HDMI 1.2, 1.3a/b/c, 1.4 und DVI 1.0 mit HDCP, bis 10.2Gbps / 340MHz Link
FullHD 1080p bis 36/12 Bit Farbtiefe mit 3D und HDMI CEC Unterstützung
Unterstützte Auflösungen: 640x480i, 720x480i/p, 720x576i/p, 1024x768, 1280x720i/p,
1280x960, 1280x1024, 1600x1200, 1920x1080i/p, 1920x1200
Unterstützte Audioformate: Multi-Channel inkl. aller HDMI unterstützten Protokolle, DTS-
HD Master Audio, Dolby Digital Plus, Dolby TrueHD
IR-Sensor am Transmitter und IR-Sender am Receiver, transparent ohne Protokollbindung
~20…80kHz, Reichweite bis15m
RS232 DB-9 Anschlüsse mit Unterstützung für bidirektionalen Datentransfer bis 192000Bit/s
Transmitter und Receiver verfügen jeweils über einen RJ45 3 Port 10/100 Ethernet Switch.
Die Switches werden ebenfalls über die “Gigalink” Verbindung gekoppelt
Der Receiver wird über die “Gigalink” Verbindung vom Transmitter mit Strom versorgt
Abmessungen ca.: 15 x 7 x 5cm (B x T x H) ; Gewicht ca.: 0.46kg (je Einheit)
Temperaturbereich: 0-70°C, Verwendung nur in gesch lossenen Räumen (Innenbereich)

Handbuch Deutsch
5
Installation und Inbetriebnahme
ACHTUING! Bitte schalten Sie vor Beginn alle Geräte aus.
Die folgenden Schritte beschreiben die Installation mit HDMI Geräten. Bei Verwendung von DVI
Geräten ersetzen Sie bitte die HDMI-Kabel durch HDMI-DVI-Kabel.
1. Verbinden Sie Ihre HDMI Signalquelle mit dem HDMI Extender Transmitter mit einem
HDMI Kabel (max. Länge 5m). Falls gewollt schließen Sie ebenfalls einen HDMI Monitor an
2. Schließen Sie das eine Ende des Cat.6/7 Kabels (max. Länge 100m) am „Gigalink“ Port am
Transmitter und das andere Ende am „Gigalink“ Port am Receiver an. Verwenden Sie
Installationskabel mit starren Adern (solid core) mindestens der Qualität 22/24AWG Cat.6
UTP. RJ45-Belegung analog zu 568-B. Besonders bei großen Distanzen empfehlen wir als
Verbindungskabel unbedingt das LINDY Cat.7 S/FTP PiMF Kabel Art.-Nr.12047
3. Verwenden Sie ein weiteres HDMI Kabel (max. 5m Länge) zum Anschluss Ihres HDMI
Displays an den Receiver
4. Zur Nutzung der RS232 Funktion schließen Sie bitte ihre Geräte mit DB-9 Anschlusskabeln
(1:1 Verbindung) an. Das RS232 Gerät am Receiver is das Remote Gerät
5. Zur zusätzlichen Ausgabe von IR-Fernbedieungssignalen am Receiver schließen Sie das
beiliegende IR Transmitterkabel an und platzieren Sie den IR-Sender entsprechend
6. Zur Nutzung der Ethernetfunktion müssen Sie lediglich ihre Geräte anschließen
7. Schließen Sie das Netzteil am Transmitter an und schalten Sie ein
8. Schalten Sie anschließend Ihre HDMI Signalquelle und den Monitor ein
Fehlersuche und -behebung
Der Monitor zeigt kein Bild.
Prüfen Sie dass das Netzteil korrekt angeschlossen ist. Sowohl am Transmitter als auch am
Receiver müssen die Power LEDs leuchten.
Prüfen Sie dass das Cat.6/7 Kabel korrekt angeschlossen ist und dass die Link Status LEDs
leuchten. Es MUSS eine direkte Kabelverbindung sein, eine Netzwerkverbindung kann
NICHT verwendet werden!
Schalten Sie alle Geräte aus und in der folgenden Reihenfolge wieder ein: zuerst den
Transmitter (der Receiver wird dann auch sofort über die Gigalink Verbindung mit Strom
versorgt), dann den HDMI Monitor und dann die HDMI Quelle.
Bei verschiedenen HDMI Geräten kann es erforderlich sein nochmals das HDMI Kabel
abzuziehen um den HDMI Handshake Link erneut zu initialisieren.
Verringern Sie die Kabellänge des Cat.6/7 Kabels oder verwenden Sie ein höherwertiges
Verbindungskabel wenn die Link LEDs nicht leuchten. Kontrollieren Sie ob die RJ45 Stecker
korrekten Kontakt und die richtige Pinbelegung analog zu 568-B verwenden.
Verwenden Sie kürzere HDMI Kabel bei Problemen mit den HDMI Geräten.
User Manual Français
6
Introduction
Merci d’avoir choisi l’extender LINDY HDMI High Speed Digital Signage 100m! Il supporte la
transmission de signaux HDMI non compressés en FullHD 1080p! Cet extender vous permet
d’étendre des signaux jusqu’à 100m en utilisant des câbles réseau cat.6/Cat.7 RJ45. Pour de
meilleurs résultats et surtout de longues distances, nous recommandons d’utiliser notre câble
cat.7 S/FTP PiMF (N°Art. 12047).
Cet extender fonctionne comme un extender HDMI cat.6, extender RS232, extender infrarouge
cat.6 et comme extender Ethernet avec switch 3 ports.
Contenu
1x émetteur, 1x récepteur
Alimentation multi pays (100…240VAC / 24V DC/~1A)
Emetteur IR avec 1.5m de câble
Ce manuel
Caractéristiques
Etend des signaux HDMI ou DVI-D non compressés jusqu’à 100m via sa connexion
“Gigalink”
HDMI FullHD 1080p ou DVI-D jusqu’à 1920 x 1200 (en utilisant un adaptateur HDMI vers
DVI)
Supporte Ethernet 10/100 Base-T via la connexion “Gigalink” (2x 3 ports 10/100 Ethernet)
Supporte la transmission de signaux RS232 et infrarouge
Supporte un écran local HDMI pour le boîtier récepteur
Convient pour les installations Home Cinéma 3D/HDTV, ordinateurs.
Spécifications
Bande passante totale: 12Gbit/s via la connexion RJ45 “Gigalink” de 800MHz. La connexion
“Gigalink” est dédiée, ce n’est pas une connexion Gigabit Ethernet!
Longueur maximale du câble pour la connexion “Gigalink”: 100m (environ)
Compatible HDMI 1.2, 1.3a/b/c, 1.4 et DVI 1.0, HDCP, jusqu’à 10.2Gbps / 340MHz
FullHD 1080p avec jusqu’à 36/12 bits en profondeur de couleur, avec support 3D et
HDMI CEC
Résolutions supportées: 640x480i, 720x480i/p, 720x576i/p, 1024x768, 1280x720i/p,
1280x960, 1280x1024, 1600x1200, 1920x1080i/p, 1920x1200
Formats audio supportés: multi canal incluant tous les protocoles HDMI, DTS-HD Master
Audio, Dolby Digital Plus, Dolby TrueHD
Capteur infrarouge sur l’unité émettrice et émetteur infrarouge sur l’unité réceptrice, avec
jusqu’à 15m de câble, ~20…80kHz
Prise RS232 DB-9 sur les deux unités avec transfert bidirectionnel, jusqu’à 192000 Bit/s
Les deux unités ont chacune un switch 3 ports RJ45 10/100. Ces deux switchs 10/100 sont
donc connectés via la liaison “Gigalink”
Le récepteur est alimenté par la connexion “Gigalink” de l’émetteur
Dimensions: 15 x 7 x 5cm (P x L x H) ; poids: 0.46kg (chaque unité)
Température d’utilisation: 0-70°C. A utiliser à l’intérieur uniquement

User Manual Français
7
Installation
Important! Avant de démarrer l’installation, merci de vérifier que tous les appareils sont éteints.
Les étapes suivantes sont pour l’installation d’un équipement HDMI, si vous êtes en DVI, merci
de remplacer vos câbles HDMI par des câbles DVI vers HDMI.
9. Connectez votre source HDMI à l’extender HDMI Emetteur en utilisant un câble HDMI
(longueur maximale : 5m). Si nécessaire, vous pouvez connecter un écran local HDMI.
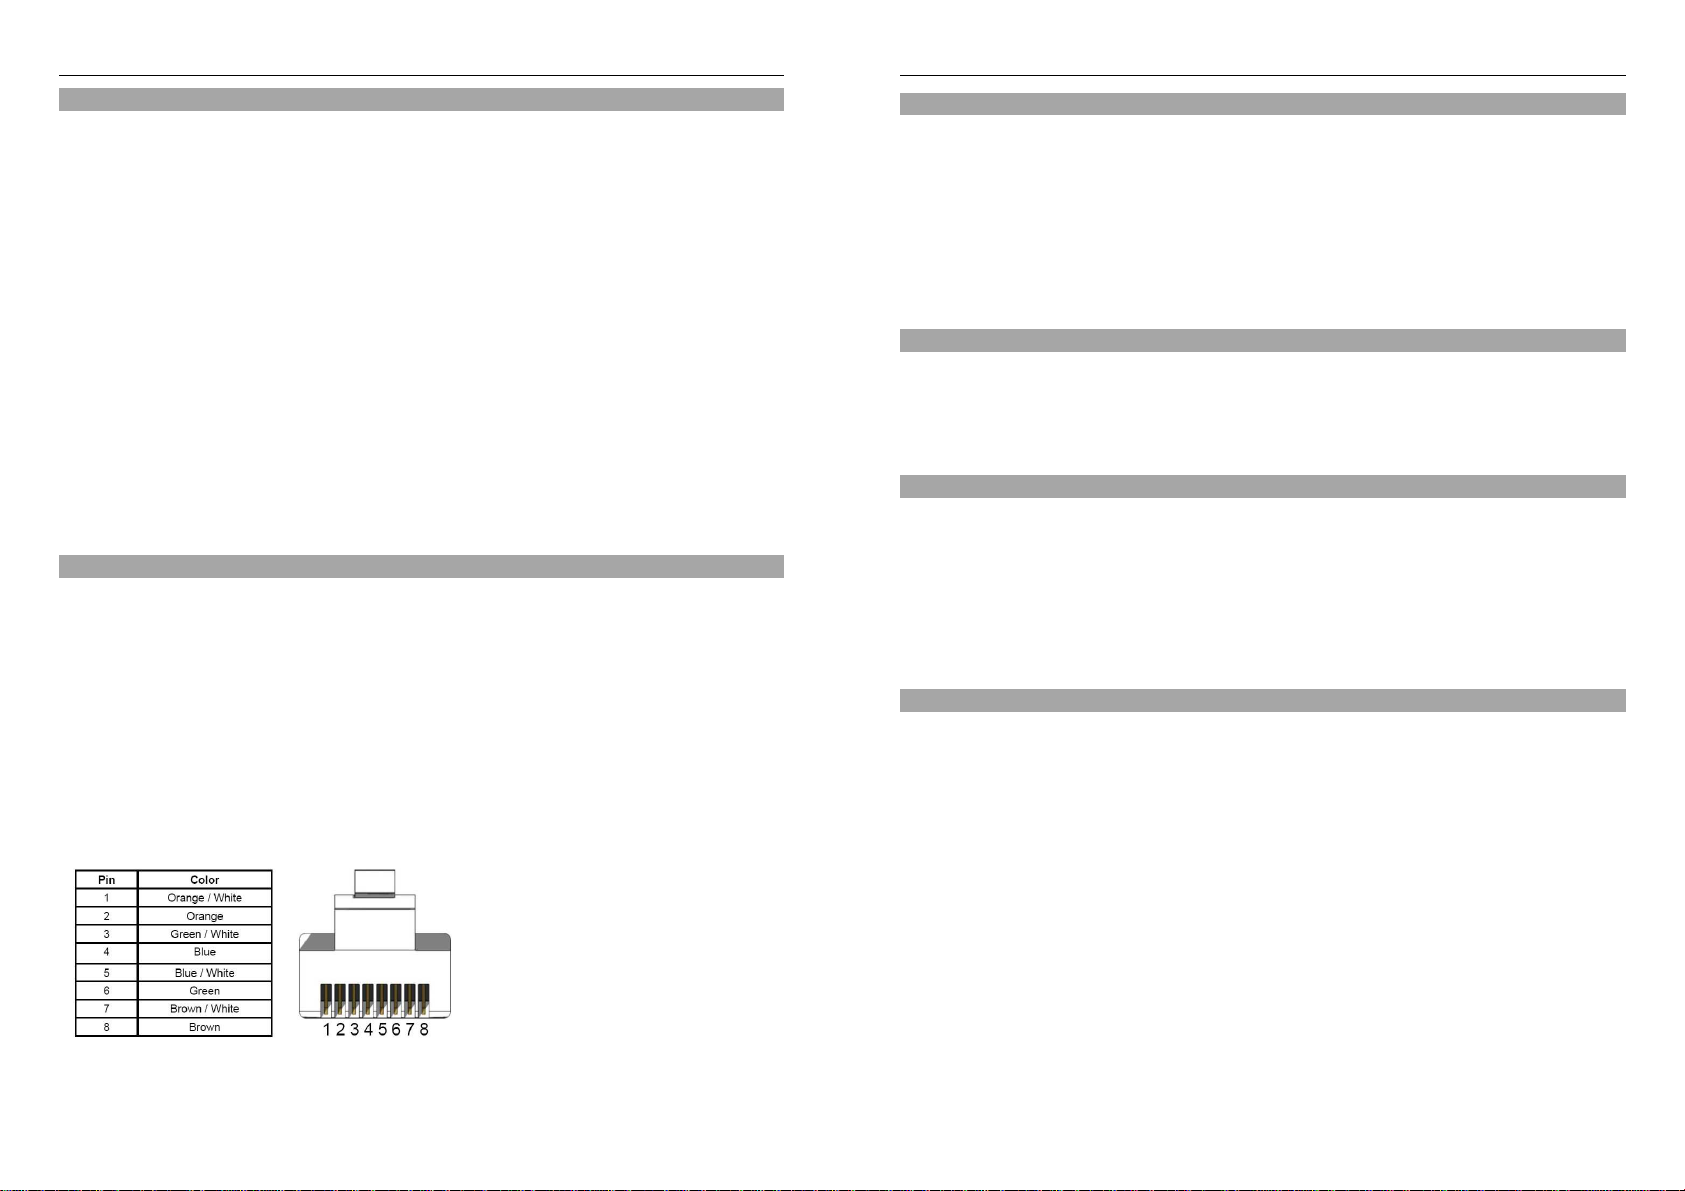
10.Connectez une extrémité du câble cat.6/7 (longueur maximale: 100m) sur le port Gigalink
du Récepteur et l’autre sur port Gigalink du Récepteur. Utilisez des câbles réseau monobrin,
au mieux 22/24AWG cat.6 UTP; en respectant la connectique RJ45 568-B. Pour de
meilleurs résultats sue de longues distances, nous recommandons d’utiliser des câbles cat.7
S/FTP PiMF (N°Art. 12047).
11.Utilisez un autre câble HDMI (longueur maximale: 5m) pour connecter votre écran HDMI
vers le port de sortie de l’unité réceptrice.
12.Pour la fonction extender RS232, connectez un câble DB-9 (droit 1:1) sur l’Emetteur et sur
le Récepteur. Le périphérique RS232 connecté au Récepteur sera le périphérique distant.
13.Pour le support infrarouge, connectez l’émetteur IR à l’unité réceptrice, puis placez
l’émetteur IR en face du récepteur IR
14.Pour le support Ethernet, connectez vos appareils réseau aux ports 10/100Base-T.
15.Connectez l’alimentation DC dans l’émetteur HDMI et allumez-le.
16.Allumez la source HDMI et l’écran pour terminer l’installation.
Dépannage
Il n’y a pas d’affichage sur l’écran.
Vérifiez que la prise DC de l’alimentation est correctement connectée.
Vérifiez que le câble cat.6/7 est bien connecté et que la LED “Link Status » soit allumée.
Vérifiez que la source HDMI et l’écran soient allumés et actifs.
Eteignez tous les appareils, puis allumez les dans cet ordre: d’abord l’émetteur, le récepteur
(le récepteur est immédiatement alimenté par le lien Gigalink venant de l’émetteur), puis
l’écran et finalement la source.
Pour plusieurs appareils HDMI, il peut être utile de déconnecter/connecter leur connexion
HDMI pour réinitialiser la synchro HDMI.
Réduisez la longueur de câbles cat.6/7 utilisés, ou utilisez-en de meilleure qualité. Vérifiez si
les connecteurs RJ45 soient bien maintenus par le câble et qu’ils utilisent un câblage 568-B.
Utilisez des câbles HDMI plus courts pour des problèmes avec les appareils HDMI.
Manuale Italiano
8
Introduzione
Grazie per aver scelto il LINDY HDMI High Speed Digital Signage Extender 100m! Supporta
segnali FullHD 1080p HDMI non compressi ad alta risoluzione per trasmissioni di alta qualità!
Questo Extender consente di inviare segnali a 100m con cavi RJ45 Cat.6/Cat.7 di alta qualità.
Per ottenere le migliori performance specialmente su lunghe distanze consigliamo l’utilizzo del
nostro cavo Cat.7 S/FTP PiMF (Art.12047). Questo prodotto funziona come extender HDMI,
extender RS232, extender infrarossi e come Ethernet Switch extender 3 porte.
Contenuto della confezione
1 trasmettitore, 1 ricevitore
Alimentatore Multi-Country (100…240VAC / 24V DC/~1A)
Trasmettitore IR con cavo da 1.5m
Questo manuale
Caratteristiche
Estende segnali HDMI o DVI-D non compressi fino a 100m tramite cavo di rete
HDMI FullHD 1080p o DVI-D fino a 1920 x 1200 (tramite un adattatore HDMI / DVI)
Supporto Ethernet 10/100 Base-T via connessione “Gigalink” (2x 3 porte 10/100 Ethernet)
Supporta la trasmissione si segnali RS232 e a infrarossi
Supporta la connessione di un monitor HDMI locale sul trasmettitore
Ideale per Home Theater 3D/HDTV, installazioni HDTV professionali, Computer,
applicazioni multimediali e sistemi di controllo centralizzato.
Specifiche
Larghezza di banda massima 12Gbit/s tramite connessione “Gigalink” a 800MHz via cavo
RJ45. “Gigalink” è una connessione via cavo dedicata, non è una connessione Gigabit
Ethernet!
Lunghezza massima del cavo per una connessione “Gigalink”: 100m ca.
Compatibile con gli standard HDMI 1.2, 1.3a/b/c, 1.4 e DVI 1.0, HDCP, 10.2Gbps / 340MHz
FullHD 1080p profondità colori 36/12 bit con supporto 3D e HDMI CEC
Risoluzioni supportate: 640x480i, 720x480i/p, 720x576i/p, 1024x768, 1280x720i/p,
1280x960, 1280x1024, 1600x1200, 1920x1080i/p, 1920x1200
Supporto audio: multi-channel compreso i protocolli HDMI, DTS-HD Master Audio, Dolby
Digital Plus, Dolby TrueHD
Sensore IR sull’unità TX e trasmettitore IR sull’unità RX, portata massima 15m, trasparente,
nessun protocollo, ~20…80kHz
Connettore RS232 DB-9 su entrambe le unità, trasferimento dati bi-direzionale fino a
192000 Bit/s
Trasmettitore e ricevitore con 3 porte RJ45 ciascuno, switch con supporto Ethernet 10/100.
Gli switch 10/100 possono essere collegati anche tramite connessione “Gigalink”
Il ricevitore è alimentato tramite la connessione “Gigalink” dal trasmettitore
Dimensioni: 15 x 7 x 5cm ; Peso: 0.46kg (ogni unità)
Temperatura operativa: 0-70°C. Solo per uso interno

Manuale Italiano
9
Installazione
Importante! Prima di iniziare l’installazione assicuratevi che tutti i dispositivi siano spenti.
I passaggi seguenti sono riferiti ad un’installazione tipo con dispositivi HDMI, se utilizzate
apparecchiature DVI considerate cavi DVI / HDMI al posto di cavi HDMI dove indicato.
17.Collegate la vostra sorgente HDMI al Trasmettitore con un cavo HDMI (lunghezza massima
5m). Potete anche collegare un monitor HDMI locale in aggiunta.
18.Collegate un capo del cavo Cat.6/7 (lungo fino a 100m) alla porta Gigalink sul Trasmettitore
e l’altro capo alla porta Gigalink del Ricevitore. Utilizzate un cavo 22/24AWG Cat.6 UTP;
RJ45 conforme alla codifica 568-B. Per le migliori performance specialmente su lunghe
distanze consigliamo l’utilizzo del nostro cavo Cat.7 S/FTP PiMF (Art.12047).
19.Utilizzate un altro cavo HDMI (lungo non più di 5m) per collegare il monitor HDMI all’uscita
HDMI sul Ricevitore.
20.Per utilizzarlo come extender RS232 collegate un cavo DB-9 (1:1) sul Trasmettitore e sul
Ricevitore. Il dispositivo RS232 collegato al Ricevitore è da considerarsi periferica remota.
21.Per inviare segnali a infrarossi collegate il trasmettitore IR al Ricevitore e posizionate il
trasmettitore di fronte al dispositivo HDMI con il ricevitore IR
22.Per la funzione Ethernet, collegate i vostri dispositivi alle porte 10/100Base-T
23.Collegate l’alimentazione al trasmettitore HDMI ed accendetelo
24.Accendete anche la sorgente HDMI e il monitor per completare l’installazione
Soluzione Problemi
Non compare nessun segnale video.
Controllate che il connettore dell’alimentatore sia inserito correttamente.
Controllate che il cavo Cat.6/7 sia inserito correttamente e che il relativo LED sia accesso.
Controllate che la sorgente HDMI e il monitor siano entrambi accesi ed attivi.
Spegnete tutti i dispositivi e riaccendeteli nel seguente ordine: prima il trasmettitore (il
ricevitore si accende automaticamente tramite il collegamento Gigalink), quindi il monitor e
in fine la sorgente.
Per molti dispositivi HDMI può essere necessario scollegare e ricollegare i cavi HDMI per
riavviare il riconoscimento HDMI.
Ridurre la lunghezza del cavo Cat.6/7 oppure utilizzarne uno di qualità superiore. Controllate
che i connettori RJ45 siano installati correttamente al cavo secondo la codifica 568-B.
Utilizzate cavi HDMI più corti.
Radio Frequency Energy, Certifications, Recycling Information
FCC Warning
This equipment has been tested and found to comply with the limits for a Class B digital device, pursuant to part 15 of the FCC
Rules. These limits are designed to provide reasonable protection against harmful interference in a residential installation.
This device complies with part 15 of the FCC Rules.
Operation is subject to the following two conditions:
1. This device may not cause harmful interference, and
2. This device must accept any interference received, including interference that may cause undesired operation.
CE Certification
This equipment complies with the requirements relating to electromagnetic compatibility, EN 55024 and EN55022 ITE.
WEEE (Waste of Electrical and Electronic Equipment),
Recycling of Electronic Products
In 2006 the European Union introduced regulations (WEEE) for the collection and recycling of all waste electrical and electronic
equipment. It is no longer allowable to simply throw away electrical and electronic equipment. Instead, these products must
enter the recycling process.
Each individual EU member state has implemented the WEEE regulations into national law in slightly different ways. Please
follow your national law when you want to dispose of any electrical or electronic products. More details can be obtained from
your national WEEE recycling agency.
Germany / Deutschland
Die Europäische Union hat mit der WEEE Direktive umfassende Regelungen für die Verschrottung und das Recycling von
Elektro- und Elektronikprodukten geschaffen. Diese wurden in Deutschland im Elektro- und Elektronikgerätegesetz – ElektroG
in deutsches Recht umgesetzt. Dieses Gesetz verbietet das Entsorgen von entsprechenden, auch alten, Elektro- und
Elektronikgeräten über die Hausmülltonne! Diese Geräte müssen den lokalen Sammelsystemen bzw. örtlichen Sammelstellen
zugeführt werden! Dort werden sie kostenlos entgegen genommen. Die Kosten für den weiteren Recyclingprozess übernimmt
die Gesamtheit der Gerätehersteller.
France
En 2006, l'union Européenne a introduit la nouvelle réglementation (DEEE) pour le recyclage de tout équipement électrique et
électronique.
Chaque Etat membre de l’ Union Européenne a mis en application la nouvelle réglementation DEEE de manières légèrement
différentes. Veuillez suivre le décret d’application correspondant à l’élimination des déchets électriques ou électroniques de
votre pays.
Italy
Nel 2006 l’unione europea ha introdotto regolamentazioni (WEEE) per la raccolta e il riciclo di apparecchi elettrici ed elettronici.
Non è più consentito semplicemente gettare queste apparecchiature, devono essere riciclate. Ogni stato membro dell’ EU ha
tramutato le direttive WEEE in leggi statali in varie misure. Fare riferimento alle leggi del proprio Stato quando si dispone di un
apparecchio elettrico o elettronico.
Per ulteriori dettagli fare riferimento alla direttiva WEEE sul riciclaggio del proprio Stato.
LINDY No 38120
1
st
Edition, June 2010
www.lindy.com
Table of contents
Other Lindy Extender manuals