Lindy 38301 User manual

© LINDY ELECTRONICS LIMITED & LINDY-ELEKTRONIK GMBH - FOURTH EDITION (April 2016)
Fibre Optic DVI-D Extender
User Manual English
Benutzerhandbuch Deutsch
Manuel Utilisateur Français
Manuale d’uso Italiano
LINDY No. 38301
www.lindy.com

This product contains visible laser beams.
The radiation is not harmful under normal conditions.
Innerhalb dieses Produktes wird sichtbare Laserstrahlung erzeugt. Unter normalen
Bedingungen ist die Strahlung ungefährlich.
Ce produit contient un faisceau laser visible
Le rayonnement n'est pas dangereux dans le cadre d'une utilisation normale.
Questo prodotto produce raggi laser visibili.
Le radiazioni non sono dannose in normali condizioni di utilizzo.
MAX OUTPUT: < 1 mW
WAVE LENGTH: 850nm
CLASS 1 LASER PRODUCT

User Manual English
Introduction
Thank you for purchasing the LINDY Fibre Optic DVI-D Extender!
This Fibre Optic Extender allows you to transmit DVI-D Single Link signals up to maximum
resolutions of 1920x1200 up to a distance of 500m/1600 feet using two standard multimode
50/125µm LC Duplex fibre cables.
Features
Extends DVI-D signals up to 500m/ 1600 feet
Supports DVI-D Single Link, resolutions up to 1920x1200@60Hz, HDCP not supported
Suitable for use with Computer, Video Wall and presentation equipment
May be used with two standard LC Duplex or a 4x LC fibre cables (not included)
Preset EDID data set and Self-EDID learning feature
Package Contents
LINDY Fibre Optic DVI-D Extender x 2 (1x Transmitter, 1x Receiver)
Multi-Country Power Adapter (5VDC) x 1
This User Manual
Pre-Installation Remarks
The EDID preset timings stored in the extender are the following:
1360x768@60Hz; 1920x1080@60Hz; 1920x1200@60Hz; 1600x1200 @60Hz; 1280x1024
@60Hz; 1280x960 @60Hz; 1152x864 @75Hz; 1280x720 @60Hz; 1440x900 @60Hz;
720x400 @70Hz; 640x480 @60Hz; 640x480 @72Hz; 640x480 @75Hz; 800x600 @60Hz;
800x600 @72Hz; 800x600 @75Hz; 1024x768 @60Hz; 1024x768 @70Hz; 1024x768 @75Hz;
1280x1024 @75Hz; 1152x870 @60HZ
Interlaced resolutions and HDCP protected content are not supported.
If the resolution or the timing requirement of your monitor is not included above, the EDID data of
the monitor can be stored into the transmitter by self-learning EDID function, using the steps on
the next page.
Do NOT introduce strain or stress to the fibre optic LC cable and connectors!
Do NOT bend the fibre cable below the minimum allowed radius, approximately 5cm -
see supplier’s specification!
CAUTION!
The Extender may get hot during operation!
Avoid touching it directly and install it with adequate ventilation!

User Manual English
Installation
1. If the resolution of your displaydoes not match with the EDID preset timings perform the EDID
self-learning / copying procedure as following
a. Power on the display.
b. Plug the power adapter into the Transmitter (TX).
c. Connect the TX to the display (not to the source!).
d. Push the self-EDID button on TX with a narrowpin. The green LED will blink to indicate
the copy process has begun. When this LED stops blinking, the EDID copying
procedure is complete.
e. Disconnect the TX from the display and from its power adapter.
2. Connect each optical fibre connector as shown below on the ports on Transmitter (TX) and
Receiver (RX). Notice that you connect the cables cross over from a -> d, b -> c, c -> b and
d -> a, make sure that no dust gets inside and keep the protective caps in a secure place!
3. Connect the power adapter to the RX. The TX is powered via the DVI port provided it can
output ~200mA, a power adapter is only required in case of unreliable operation, or if the
power LED on the TX is not lit properly (additionally power supply NOT included).
4. Plug the TX and RX directly into the DVI receptacle of the DVI source and sink. Do NOT use
any intermediate cable or adapter in between, this might cause unreliable operation.
5. Turn on the power of DVI source and sink.
Troubleshooting Tips
If you have problems with the correct resolution repeat the EDID self-learning steps as
described in the Installation section.
If the extender works erratically and if you have not connected the power supply to the TX
please install the power supply to the TX because the TX might not get sufficient power from
the DVI source causing erratic behaviour (additional power supply NOT included).
Check that the fibre connectors are seated correctly. Check if port 1 on the TX is connected
directly to port 1 on the RX –some Duplex LC fibre cables may be configured as a cross over
connection. In such case exchange the connectors on one end of the cable with each other.
Check if the LC cable has any kinks to make sure the problem is not caused by a faulty LC
cable. Regard the handling and minimum bend radius requirements for fibre optic cables!
Recovery of default EDID setting: Plug the power adapter into the TX and disable all DVI
connections. Push the self-EDID button with a narrowpin. The green LED will blink to indicate
the recovery has begun. When the LED stops blinking the EDID has been restored.

Benutzerhandbuch Deutsch
Einführung
Wir freuen uns, dass Ihre Wahl auf ein LINDY-Produkt gefallen ist und danken Ihnen für Ihr
Vertrauen. Sie können sich jederzeit auf unsere Produkte und einen guten Service verlassen.
Dieser Extender kann DVI-D Signale unkomprimiert und in voller Auflösung sowie Qualität über
zwei optische Multimode LC Duplexkabel (50/125µm) bis zu 500m weit übertragen. Er
unterstützt DVI-D Single Link bis 1920 x 1200.
Eigenschaften
Überträgt DVI-D Signale über zwei LWL LC Duplex Kabel bis 500m Kabellänge
Unterstützt DVI-D Single Link bis 1920x1200 @60Hz
Einsetzbar für Computer Equipment, Video Walls und Präsentations-Installationen
Kann Standard Netzwerk LC Duplex Fibre Optic LWL Kabel verwenden
EDID Standarddatensatz sowie Monitor-EDID Selbstlern- & Kopierfunktion
Lieferumfang
LINDY Fibre Optic DVI-D Extender (1 x Transmitter, 1 x Receiver)
1x Steckernetzteil mit auswechselbaren Steckern / Multi-Country Power Adapter (5V DC)
Dieses Handbuch
Installation –Vorbemerkungen
WICHTIG! Vor Beginn der Arbeiten schalten Sie die beteiligten Geräte bitte aus!
Die vorgespeicherten EDID Timings Im Transmitter sind folgende:
1360x768@60Hz; 1920x1080@60Hz; 1920x1200@60Hz; 1600x1200 @60Hz; 1280x1024
@60Hz; 1280x960 @60Hz; 1152x864 @75Hz; 1280x720 @60Hz; 1440x900 @60Hz;
720x400 @70Hz; 640x480 @60Hz; 640x480 @72Hz; 640x480 @75Hz; 800x600 @60Hz;
800x600 @72Hz; 800x600 @75Hz; 1024x768 @60Hz; 1024x768 @70Hz; 1024x768 @75Hz;
1280x1024 @75Hz; 1152x870 @60HZ
Interlaced Signale sowie HDCP geschützte Inhalte werden nicht unterstützt.
Falls die Auflösungen oder „Timing Requirements“ Ihres Monitors abweichen, müssen Sie das
EDID Selbstlern-Feature des Transmitters verwenden um die Monitoreigenschaften in den
Transmitter zu kopieren:
Vermeiden Sie unbedingt Zug- oder andere Krafteinwirkungen auf das LC Kabel!
Biegen Sie das LC Kabel niemals kleiner als mit seinem zulässigen
Mindestbiegeradius, etwa 5cm –Details siehe Herstellerangabe!
ACHTUNG!
Der Extender wird im Betrieb sehr heiss! Vermeiden Sie direkten Kontakt und
verwenden Sie ihn ausschließlich an einm gut durchlüfteten Ort!

Benutzerhandbuch Deutsch
Installation
1. Wenn die Auflösung Ihres Displays nicht mit den Preset EDID Timing Daten übereinstimmt
müssen sie als erstes den EDID Self Learning Copy Prozess durchführen:
a. Schalten Sie Ihren Monitor ein.
b. Schließen Sie das Netzteil an den Transmitter an.
c. Schließen Sie den Transmitter an den Monitor an (nicht an die Signalquelle!).
d. Drücken Sie den Self-EDID Schalter mit einem spitzen Gegenstand (Büroklammer)
durch die kleine Öffnung im Transmitteretikett. Die LED wird während des
Kopierprozesses blinken. Sie erlischt nach Abschluss des Kopiervorganges.
e. Ziehen Sie Netzteil und Monitor vom TX ab
2. Schließen Sie die beiden LC Duplexkabel an die Ports von Transmitter (TX)und Receiver (RX)
an. Achten Sie hierbei darauf, dass Sie die Kabel „cross over“ von a -> d, b -> c, c -> b und d
-> a angeschlossen werden (siehe Grafik). Stellen Sie sicher, dass kein Staub in die
Anschlüsse gerät! Bewahren Sie die Staubkappen an einem sicheren Platz auf!
3. Schließen Sie das Netzteil an RX an. Der TX kann alternativ durch die DVI Quelle mit Strom
versorgt werden sofern sie etwa 200mA liefern kann; das Netzteil wird jedoch benötigt wenn
die PWRLED nicht richtig leuchtet oder wenn keine stabile zuverlässige Verbindung aufgebaut
werden kann (ein zusätzliches Netzteil ist NICHT im Lieferumfang enthalten).
4. Schließen Sie TX und RX direkt an Ihre DVI Geräte an. Verlängerungskabel oder Adapter
können möglicherweise eine unzuverlässige Verbindung hervorrufen.
5. Schalten Sie zum Abschluss der Installation alles ein.
Fehlersuche und -behebung
Sollten Sie Probleme mit der Auflösung haben oder die gewollte Auflösung nicht einstellen
können, führen Sie die EDID Self Learning Prozedur durch wie oben beschrieben.
Prüfen Sie die LC Kabel auf korrekten Sitz und 1:1 Verbindung (Port 1 an Port 1, usw.).
Duplex LC Kabel können für eine Cross Over Verbindung konfiguriert sein, in diesem Falle
tauschen Sie die Portanschlüsse an einem Ende des Kabels miteinander.
Stellen Sie sicher, dass Sie den Biegeradius der LC Kabel nicht unterschreiten. Wenn die
PWR LEDs alle hell leuchten versuchen Sie ein anderes kurzes LC Kabel. Falls dies
funktioniert ist ihr langes LC Kabel fehlerhaft.
Wiederherstellung der originalen EDID Voreinstellung
Schließen Sie das Netzteil an den Transmitter an und ziehen Sie alle anderen Anschlüsse
ab. Drücken Sie den Self-EDID Schalter mit einem spitzen Gegenstand (Büroklammer).
Nach Abschluss des Vorganges hört die LED auf zu blinken.

Manuel Utilisateur Français
Introduction
Merci d’avoir choisi l’extender DVI-D sur fibre optique LINDY (Fibre Optic DVI-D Extender) !
Cet extender sur fibre optique vous permet de transmettre des signaux DVI-D Single Link jusqu’à
une résolution maximale de 1920x1200, jusqu’à 500m en utilisant deux fibres optiques multimode
50/125µm LC Duplex standard.
Caractéristiques
Transmet les signaux DVI-D jusqu’à 500m
Prend en charge les résolutions DVI-D Single Link, jusqu’à 1920x1200@60Hz, HDCP non
pris en charge
Convient à un usage avec ordinateur, murs d’écrans et équipements de présentation
Peut être utilisé avec deux fibres optiques standard LC Duplex ou 4x LC (non fournis)
Présélection de données EDID et fonction d’apprentissage Self-EDID
Contenu de l’emballage
Extender DVI-D sur fibre optique LINDY x 2 (1x émetteur (Transmitter), 1x récepteur(
Receiver))
Alimentation multi-pays (5VDC) X 1
Ce manuel
Remarques relatives à l’installation
Les présélections EDID suivantes sont stockées dans l’extender:
1360x768@60Hz; 1920x1080@60Hz; 1920x1200@60Hz; 1600x1200 @60Hz; 1280x1024
@60Hz; 1280x960 @60Hz; 1152x864 @75Hz; 1280x720 @60Hz; 1440x900 @60Hz;
720x400 @70Hz; 640x480 @60Hz; 640x480 @72Hz; 640x480 @75Hz; 800x600 @60Hz;
800x600 @72Hz; 800x600 @75Hz; 1024x768 @60Hz; 1024x768 @70Hz; 1024x768 @75Hz;
1280x1024 @75Hz; 1152x870 @60HZ
Les résolutions entrelacées et les contenus protégés en HDCP ne sont pas pris en charge.
Si la résolution ou la fréquence exigée par votre écran ne sont pas inclus ci-dessus, les données
EDID de l'écran peuvent être stockées dans l'émetteur par la fonction d'auto-apprentissage EDID,
en utilisant les étapes de la page suivante.
NE PAS appliquer de contrainte ou de traction sur la fibre optique LC ou ses
connecteurs !
NE PAS appliquer un rayon de courbure en dessous du minimum accepté, environ
5cm –voir spécifications fabricant !
ATTENTION !
L’extender peut devenir très chaud pendant son utilisation !
Évitez de le toucher directement et installez-le dans un endroit suffisamment ventilé !

Manuel Utilisateur Français
Installation
1. Si la résolution de votre écran ne correspond pas avec les présélections EDID, effectuez la
procédure EDID self learning / copying suivante
a. Démarrez l’écran.
b. Branchez le connecteur d’alimentation dans le Transmitter (TX).
c. Connectez le TX à l’écran (PAS à la source !).
d. Appuyez sur le bouton self-EDID sur le TX avec un trombone par exemple. La LED
verte va clignoter pour indiquer que la procédure de copie à débuter. Lorsque cette
LED cesse de clignoter, la procédure de copie EDID est terminée.
e. Déconnectez le TX de l’écran et de son alimentation.
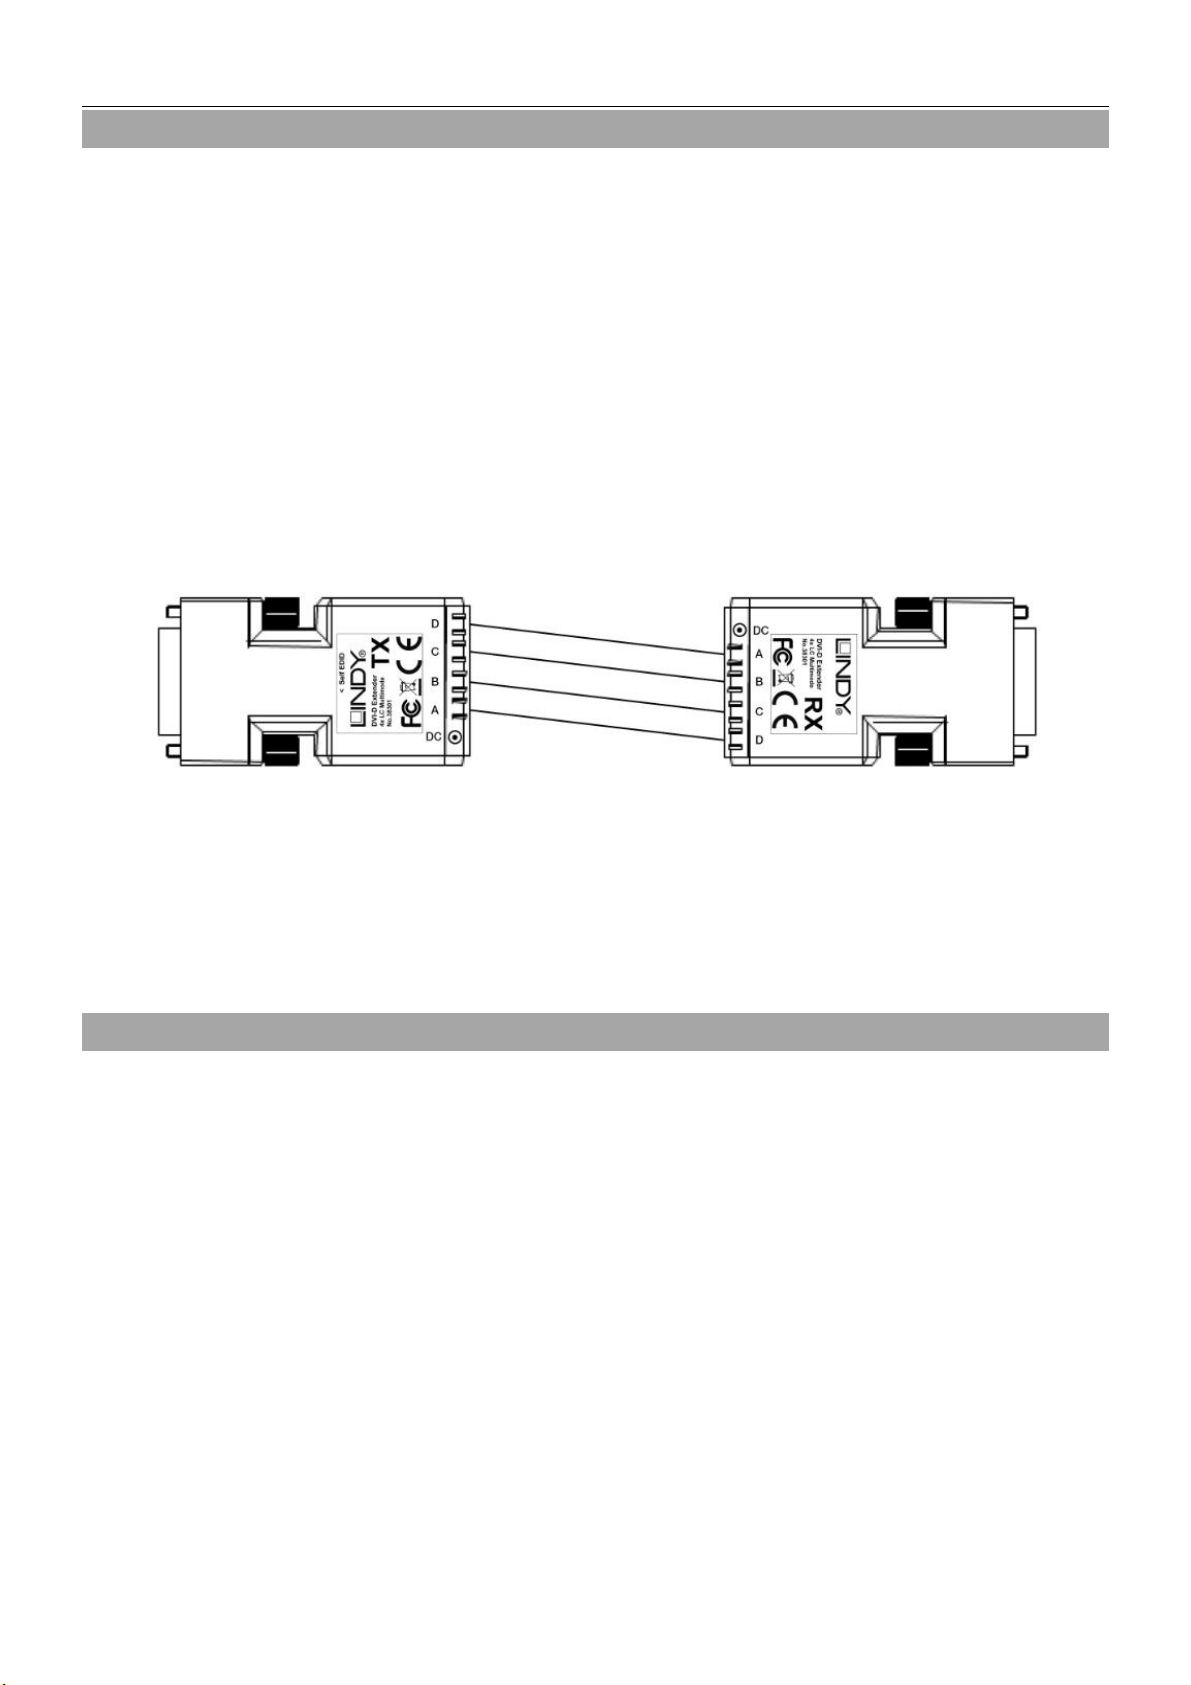
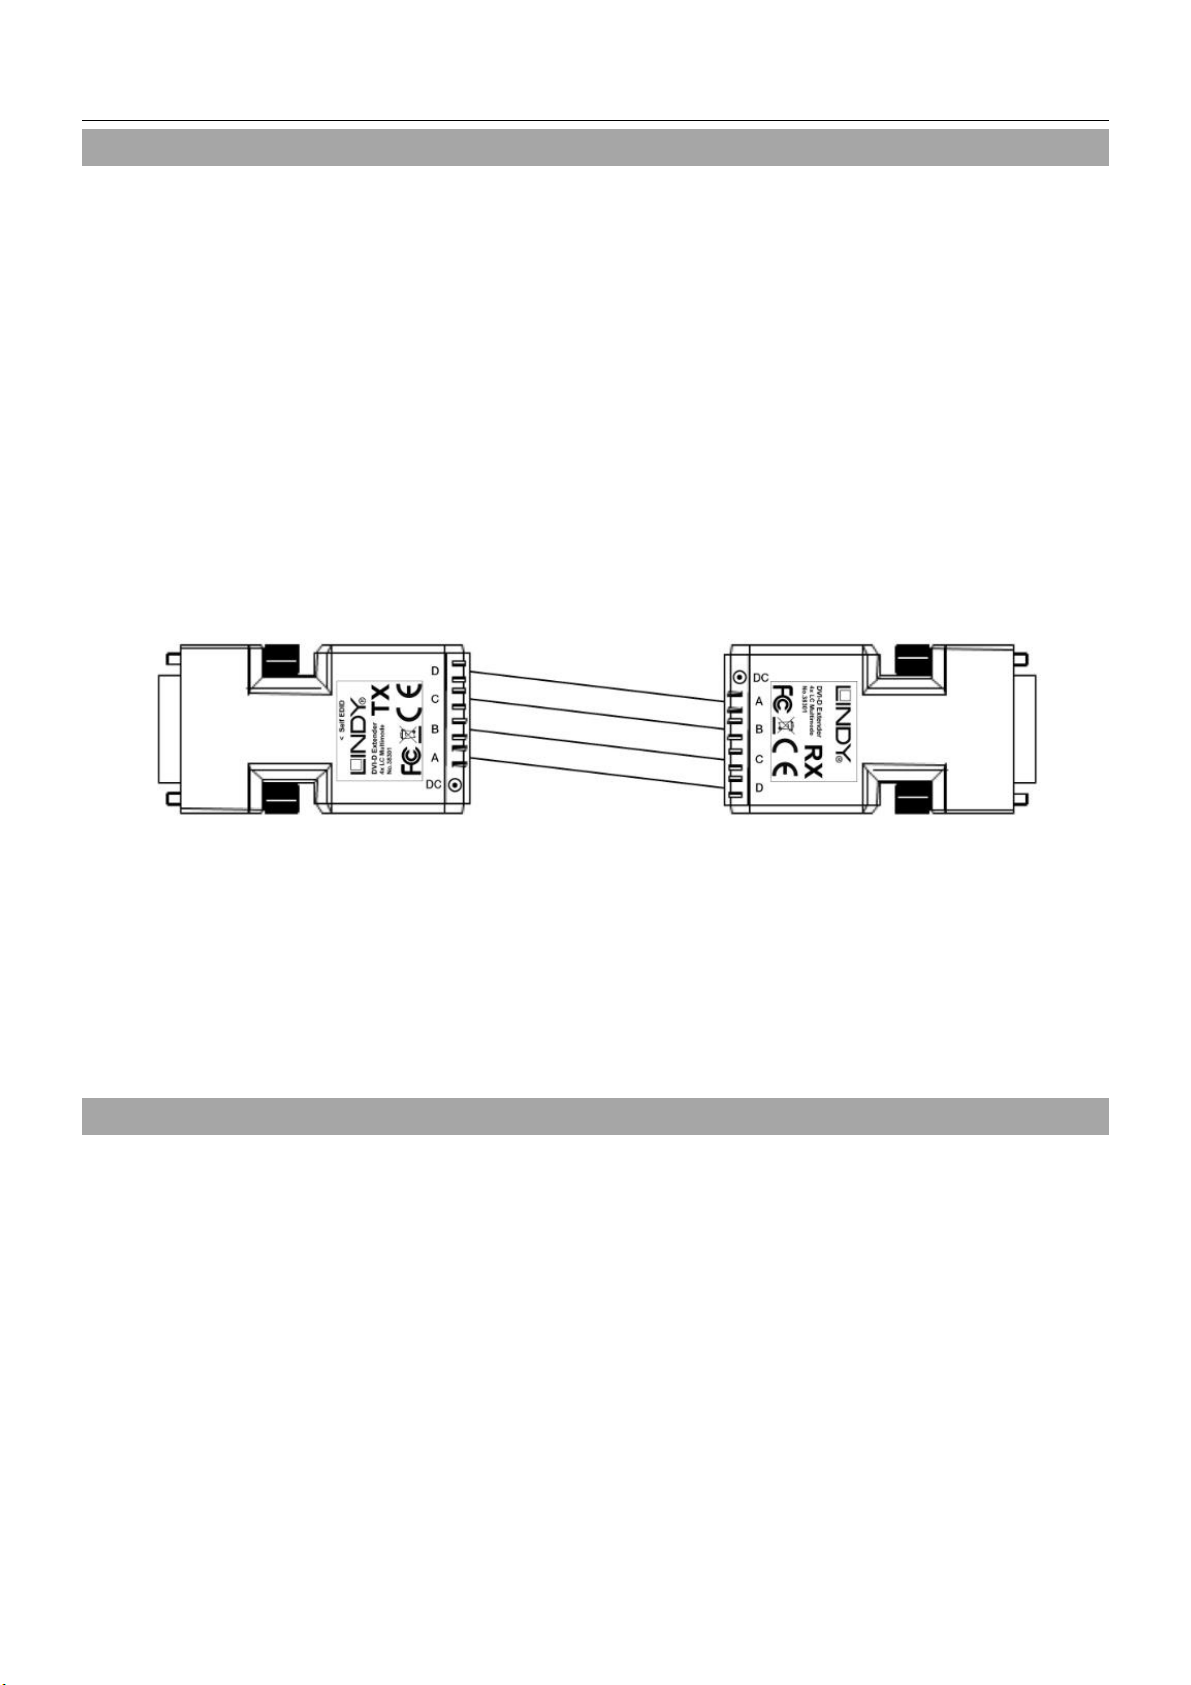
2. Connectez chaque fibre optique comme indiqué ci-dessous sur les ports sur le Transmitter
(TX) et Receiver (RX). Notez que vous connectez les fibres de façon croisée de a -> d, b ->
c, c -> b et d -> a, assurez-vous qu’aucune poussière ne pénètre les connexions et conservez
les capuchons de protection dans un lieu sûr !
3. Connectez les alimentations aux RX. Le TX peut également être alimenté via le port DVI s’il
peut fournir ~200mA, l’alimentation secteur n’est requise que si le fonctionnement n’est pas
fiable, ou si la LED d’alimentation sur le TX n’est pas allumée correctement.
4. Branchez le TX et RX directement aux ports DVI de la source et de l’affichage. NE PAS
utiliser de câbles ou d’adaptateurs intermédiaires, cela pourrait provoquer des problèmes de
fonctionnement.
5. Mettez la source et l’affichage DVI sous tension.
Conseils de dépannage
Si vous rencontrez des problèmes avec la bonne résolution, répétez les étapes relatives à
l’apprentissage de l’EDID comme décrit plus haut.
Si l’extender fonctionne de façon erratique et si vous n’avez pas connecté d’alimentation au
TX, veuillez installer une alimentation sur le TX, l’alimentation provenant du port DVI de la
source peut ne pas être suffisante (alimentation additionnelle non fournie).
Vérifiez la connexion des fibres optiques. Vérifiez que le port 1 sur le TX est connecté
directement au port 1 sur le RX –certaines fibres Duplex LC peuvent avoir une connexion
croisée. Si cela est le cas, échangez les connecteurs à une extrémité de la fibre.
Vérifiez qu’il n’y a pas de cassure sur la fibre LC, pour s’assurer que le problème ne vienne
pas d’une fibre défectueuse. Tenez compte des exigences de manipulations en ce qui
concerne les fibres optiques !
Restauration des paramètres EDID par défaut: branchez l’alimentation du TX et
déconnectez toutes les connexions DVI. Appuyez sur le bouton self-EDID avec un trombone
par exemple. La LED verte clignotera pour indiquer la restauration des informations EDID par
défaut. La procédure sera terminée lorsque cette LED cessera de clignote.

Manuale d’uso Italiano
Introduzione
Vi ringraziamo per aver acquistato l’Extender su Fibra Ottica DVI-D LINDY! Questo dispositivo vi
permetterà di trasmettere un segnale DVI-D Single Link fino ad una distanza di 500m/1600 piedi
alla risoluzione massina di 1920x1200 utilizzando due cavi standard duplex multimode 50/125um
LC-LC.
Caratteristiche
Estende segnali DVI-D fino a 500m/ 1600 piedi
Supporta segnali DVI-D Single Link con risoluzioni fino a 1920x1200@60Hz. HDCP NON
SUPPORTATO
Utilizzabile con Computer, Video Wall e sistemi di presentazione
Può essere utilizzato con due cavi standard LC Duplex o un cavo a 4 fibre terminate con
connettori LC (non inclusi)
Contiene un Set di EDID standard e include una funzione di autoapprendimento dei dati
EDID
Contenuto della confezione
Extender DVI-D su fibra ottica LINDY x 2 (1x Trasmettitore, 1x Ricevitore)
Alimentatore Multi-Country (5VDC) x 1
Questo manuale utente
Raccomandazioni Pre-Installazione
Le informazioni EDID memorizzate nel prodotto sono le seguenti:
1360x768@60Hz; 1920x1080@60Hz; 1920x1200@60Hz; 1600x1200 @60Hz; 1280x1024
@60Hz; 1280x960 @60Hz; 1152x864 @75Hz; 1280x720 @60Hz; 1440x900 @60Hz;
720x400 @70Hz; 640x480 @60Hz; 640x480 @72Hz; 640x480 @75Hz; 800x600 @60Hz;
800x600 @72Hz; 800x600 @75Hz; 1024x768 @60Hz; 1024x768 @70Hz; 1024x768 @75Hz;
1280x1024 @75Hz; 1152x870 @60HZ
Tutte le risoluzioni interlacciate e i segnali con protezione HDCP NON sono supportate.
Se la risoluzione o la frequenza del vostro video non è fra quelli indicati sopra, le informazioni
EDID del monitor possono essere salvate nel trasmettitore grazie alla funzione di
autoapprendimento EDID seguendo i passaggi descritti nella pagina seguente.
NON sottoponete il cavo a fibra ottica ed i connettori a trazioni o stress meccanici di
qualsiasi tipo!
NON piengate il cavo in fibra al di sotto del raggio minimo consentito! (di solito circa
5cm –fate riferimento alla documentazione del produttore)
ATTENZIONE!
L’Extender può diventare molto caldo durante l’utilizzo!
Evitate di toccarlo e posizionatelo in una zona adeguatamente ventilata!

Manuale d’uso Italiano
Installazione
1. Se la risoluzione del vostro monitor non è inclusa nella tabella EDID del prodotto effettuate
la procedura di auto apprendimento dell’EDID descritta di seguito:
a. Accendete il monitor.
b. Collegate l’alimentatore all’unità trasmittente (TX).
c. Collegate l’unita TX al monitor (non alla sorgente!).
d. Premete il pulsante self-EDID sull’unità TX con un oggetto sottile (per esempio una
clip). Il LED verde lampeggerà indicando l’avvio della procedura che sarà completa
non appena il LED smetterà di lampeggiare.
e. Disconnettete l’unità TX dal monitor e dall’alimentatore.
2. ATTENZIONE: Collegate i cavi in fibra ottica alle unità TX e RX secondo lo schema seguente:
(vanno inseriti secondo lo schema a -> d, b -> c, c -> b e d -> a). Assicuratevi che non penetri
polvere nelle porte e conservate i tappi di protezione in posto sicuro!
3. Collegate l’alimentatore all’unità RX. L’unità TX può essere alimentata dalla porta DVI nel
caso questa riesca a fornire ~200mA di corrente. L’alimentatore è necessario solo nel caso
la comunicazione diventi instabile o se il LED Power sull’unità non si accende alla massima
luminosità.
4. Collegate le unità TX e RX direttamente nella porta DVI della sorgente e del monitor senza
utilizzare nessun cavo o adattatore intermedio per evitare instabilità di funzionamento.
5. Accendete sorgente e monitor DVI
Risoluzione dei Problemi
Se avete problemi ad impostare la risoluzione corretta ripetete la procedura di auto
apprendimento dell’EDID descritta sopra.
Se l’extender non funziona con continuità e non avete collegato un alimentatore aggiuntivo
all’unità TX vi preghiamo di procurarvelo e connetterlo (venduto separatamente: NON
incluso) perché la porta DVI potrebbe non fornire sufficiente corrente.
Controllate che i connettori in fibra siano connessi nell’ordine corretto e controllate che gli
stessi non siano già configurati in versione cross over. In questo cavo invertite da un lato i
connettori fra loro
Controllate che i cavi LC non siano difettosi o danneggiati. Fate attenzione al raggio minimo
di curvatura e alle raccomandazioni di utilizzo ed installazione dei cavi in fibra!!
RIPRISTINO DELLA TABELLA EDID ORIGINALE: disconnettete l’unità TX dalla porta DVI
e collegando l’alimentatore. Procedete poi a premere il pulsante self-EDID con un oggetto
sottile (per esempio una clip). Il LED verde inizierà a lampeggiare per indicare l’inizio del
ripristino e si fermerà non appena l’operazione sarà completata.

Technical and Legal Information
Dimensions: ~ 69 x 40 x 15 mm³
Parameter
Value
Remark
Maximum Resolution
1600 x 1200
4:3
1920 x 1200
16:10
1920 x 1080p
16:9
Maximum Length
500m @ 1920x1200/1080p
50/125 µm MMF
EDID Support
Preset & self learning
HDCP Support
No
Power Requirement
5VDC ~200mA
TX
5VDC ~200mA
RX
Optical properties
4 channels 850nm @ -6dBm
+/- 3dBm
Operating Temperature
0°C … 70°C
Storage Temperature
-20°C … 85°C
Environmental conditions
For inhouse use only
Humidity: non condensing
Weight
96g
Each, TX and RX
LINDY Herstellergarantie –Hinweis für Kunden in Deutschland
LINDY gewährt für dieses Produkt über die gesetzliche Regelung in Deutschland hinaus eine zweijährige Hersteller-
garantie ab Kaufdatum. Die detaillierten Bedingungen dieser Garantie finden Sie auf der LINDY Website aufgelistet
bei den AGBs.
CE Konformitätserklärung
Dieses Produkt entspricht den einschlägigen EMV Richtlinien der EU für IT-Equipment und darf nur zusammen mit
abgeschirmten Kabeln verwendet werden.
Diese Geräte wurden unter Berücksichtigung der RoHS Vorgaben hergestellt.
Die formelle Konformitätserklärung können wir Ihnen auf Anforderung zur Verfügung stellen

Legal and Recycling Information
FCC Warning
This device complies with part 15 of the FCC Rules.
Operation is subject to the following two conditions:
1. This device may not cause harmful interference, and
2. This device must accept any interference received, including interference that may cause undesired operation.
CE Certification
This equipment complies with the requirements relating to electromagnetic compatibility, EN 55024 and EN55022
class A for ITE, EN61000-3-2/-3 the essential protection requirement of Council Directive 89/336/EEC on the
approximation of the laws of the Member States relating to electromagnetic compatibility.
Hersteller / Manufacturer (EU): LINDY Electronics Ltd.
LINDY-Elektronik GmbH Sadler Forster Way
Markircher Str. 20 Teesside Ind. Est., Thornaby
68229 Mannheim Stockton-on-Tees, TS17 9JY
GERMANY UNITED KINGDOM
T: 0049 (0)621 470050 T: +44 (0) 1642 754000
WEEE (Waste of Electrical and Electronic Equipment),
Recycling of Electronic Products
United Kingdom
In 2006 the European Union introduced regulations (WEEE) for the collection and recycling of all waste electrical
and electronic equipment. It is no longer allowable to simply throw away electrical and electronic equipment. Instead,
these products must enter the recycling process.
Each individual EU member state has implemented the WEEE regulations into national law in slightly different ways.
Please follow your national law when you want to dispose of any electrical or electronic products. More details can
be obtained from your national WEEE recycling agency.
Germany / Deutschland
Die Europäische Union hat mit derWEEEDirektive umfassende Regelungen für die Verschrottung und das Recycling
von Elektro- und Elektronikprodukten geschaffen. Das deutsche Elektro- und Elektronikgerätegesetz –ElektroG
verbietet das Entsorgen von Elektro- und Elektronikgeräten über die Hausmülltonne! Diese Geräte müssen den
lokalen Sammelsystemen bzw. örtlichen Sammelstellen zugeführt werden! Dort werden sie kostenlos entgegen
genommen. Die Kosten für den weiteren Recyclingprozess übernimmt die Gesamtheit der Gerätehersteller.
France
En 2006, l'union Européenne a introduit la nouvelle réglementation (DEEE) pour le recyclage de tout équipement
électrique et électronique.
Chaque Etat membre de l’ Union Européenne a mis en application la nouvelle réglementation DEEE de manières
légèrement différentes. Veuillez suivre le décret d’application correspondant à l’élimination des déchets électriques
ou électroniques de votre pays.
Italy
Nel 2006 l’unione europea ha introdotto regolamentazioni (WEEE) per la raccolta e il riciclo di apparecchi elettrici ed
elettronici. Non è più consentito semplicemente gettare queste apparecchiature, devono essere riciclate. Ogni stato
membro dell’ EU ha tramutato le direttive WEEE in leggi statali in varie misure. Fare riferimento alle leggi del proprio
Stato quando si dispone di un apparecchio elettrico o elettronico.
Per ulteriori dettagli fare riferimento alla direttiva WEEE sul riciclaggio del proprio Stato.
LINDY No. 38301
4th Edition, April 2016
www.lindy.com
Table of contents
Languages:
Other Lindy Extender manuals

Lindy
Lindy 38328 V2 User manual

Lindy
Lindy 38349 User manual

Lindy
Lindy 38264 User manual

Lindy
Lindy 42805 User manual

Lindy
Lindy 38209 User manual

Lindy
Lindy 39378 User manual

Lindy
Lindy 32917 User manual

Lindy
Lindy 38300 User manual

Lindy
Lindy DVI-D Dual Link Extender 500m 4x LC 50/125um User manual

Lindy
Lindy 42805 User manual