Lindy 39221 User manual

No.39221, 39222, 39223, 39224 © LINDY – 4
th
EDITION (SEP 2013)
4
Tested to comply with FCC Standards FOR COMMERCIAL USE ONLY!
WEEE (Waste of Electrical and Electronic Equipment), Recycling
In 2006 the European Union introduced regulations (WEEE) for the collection and recycling of all waste electrical and electronic equipment. It is no
longer allowable to simply throw away electrical and electronic equipment. Instead, these products must enter the recycling process.
Each individual EU member state has implemented the WEEE regulations into national law in slightly different ways. Please follow your national
law when you want to dispose of any electrical or electronic products. More details can be obtained from your national WEEE recycling agency.
FCC Statement
Shielded cables must be used with this equipment to maintain compliance with radio frequency energy emission regulations and ensure a suitably
high level of immunity to electromagnetic disturbances.
FCC Warning
This equipment has been tested and found to comply with the limits for a Class A digital device, pursuant to part 15 of the FCC Rules. These limits
are designed to provide reasonable protection against harmful interference when the equipment is operated in a commercial environment.
This equipment generates, uses, and can radiate radio frequency energy and, if not installed and used in accordance with the instruction manual,
may cause harmful interference to radio communications. Operation of this equipment in a residential area is likely to cause harmful interference in
which case the user will be required to correct the interference at their own expense.
CE Statement
Shielded cables must be used with this equipment to maintain compliance with radio frequency energy emission regulations and ensure a suitably
high level of immunity to electromagnetic disturbances.
This equipment complies with the requirements relating to Electromagnetic Compatibility Standards EN55022/EN55024 and the further
standards cited therein. It must be used with shielded cables only.
It has been manufactured under the scope of RoHS compliance.
Continued: Firmware Update for KVM extender DVI & USB
To enter the update OSD menu, press the "Scroll lock" / "ScrLk" key consecutively for 5 times. The
OSD menu will be visible on the upper left side of the screen. If the remote part is powered for more
than 5-10 minutes, switch it off and on again. This is a safety feature. The update menu can only be
activated in the first 5-10 power on minutes.
Please make sure the mouse cursor is not on the .bmp firmware image that is displayed on
the center of the screen (zoom factor 100%, program window maximized).
Now press "U" on your keyboard to start the update.
If you get an error message immediately before the update starts and if you have the impression that
the colors on your monitor are slightly wrong especially with no pure black (or white) background
behind the firmware picture, please see the remark for HDMI monitors in the chapter Installation as
well as the remark for Windows 7/8 above.
10 passes are automatically done at the local and remote part. Pass 1 to 9 can be interrupted at any
time. Do not interrupt pass 10, otherwise both units will be permanently damaged and must be
returned for repair.
Press "Q" to quit and reboot your system.
After rebooting you can check the actual firmware version via the OSD menu (by pressing 5x "Scroll
Lock" key; only works within the first 5-10 minutes after reboot/switch-on). Press "Q" to quit the menu.
In case you have purchased and upgraded with a new USB 2.0 Memory (mass storage) option
firmware you need to enter the additional activation "matching code" dependent on the extender ID
displayed in the OSM. This code can be obtained at a cost from LINDY upon request.
Solution of problems
Should you have any further problems with your extender please contact any of our support teams
worldwide. Please find the contact information on our website www.lindy.com. Or send an email to
Cat.5 KVM Extender DVI & USB 2.0
Manual
No.39221, 39222, 39223,39224 © LINDY – 4
th
EDITION (SEP 2013)
1
Tested to comply with FCC Standards FOR COMMERCIAL USE ONLY!
Introduction and Features
Thank you for purchasing the LINDY KVM Extender DVI & USB. This extender can transmit digital
monitor and USB signals over distances up to 130m respectively 500m (No. 39224). Using digital
transmission the extender has no loss of quality over long distances unlike traditional analog VGA
extenders.
The connection is made by an inexpensive Cat.5/6/7 cable or fiber LC Duplex cable (No. 39224).
The extender supports DVI-D digital single link monitor signals up to a resolution of 1920x1200. Due
to space requirements on the models 39221 and 39222 HDMI sockets are used and appropriate
DVI/HDMI adapter cables are included to connect to your devices. HDMI features like Audio,
YUV/YCbCr, Deep Colour and HDCP content protection are not supported.
In addition to monitor signals USB 1.1/2.0 signals are also extended. The basic versions of 39221,
39223 and 39224 support almost any USB 1.1/2.0 devices except USB Mass Storage like USB
sticks, USB HDD enclosures/drives. No. 39222 also supports USB 2.0 Mass Storage and all other
models can be upgraded at a cost to full USB 2.0 support including mass storage protocol. Please
refer to section Firmware Upgrade and contact LINDY Technical Support for costs. Also see No.
09220.
A VGA option can be upgraded at a cost for model 39223 and 39224. The transmitter will accept
VGA signals then convert them and transmit digital video and the receiver will output digital DVI. For
conversion back to VGA an external converter is required.
Audio support for models 39223 and 39224 also can be upgraded at a cost via firmware upgrade.
The fiber SFP module of version 39224 can be exchanged with a Single Mode fiber SFP module to
allow for larger distances – please contact LINDY support for a special make quotation.
Packaging Contents
Installation and Use
Installation and use of these extenders are plug and play. Simply connect and switch on.
The USB 2.0 Memory (mass storage protocol) option, audio as well as the VGA option for 39223 and
39224 should be installed prior to field installation – please see section Firmware Upgrade.
1x Transmitter
1x Receiver
2x Multi country PSU (EU/UK/US/AUS/CN)
2x DVI-HDMI resp. DVI-DVI cables, 2m
1x USB cable A/B, 2m
8x rubber feet
4x Self adhesive hook-and-loop tape
Manuals (EN, DE, FR, IT)
This manual refers to
th
e following 4 models
:
39221/39222: DVI & USB 2.0 without/with USB mass storage support,
39223: version with optional Audio and VGA support;
39224: version with fiber optic SFP module for distances up to 500m

This product underlies permanent technological development.
OSD and the functionality may slightly vary from the descriptions above
2
Continued: Installation and Use
The Extender consists of a transmitter, receiver and accessories. The transmitter (see product label
or front panel printing Local / PC) connects to the PC or signal source that will be remotely used. Use
the supplied DVI/HDMI and USB A/B cables to connect the transmitter. In addition the transmitter
provides a local monitor control port.
The receiver (see product label or front panel printing Remote / Mon) connects to the remote user's
console. The monitor is connected using the supplied second DVI/HDMI cable. The receiver offers
four USB ports for direct device connections. It also supports USB hubs.
When required, the transmitter and receiver can be secured using the supplied self-adhesive hook-
and-loop tape on the base of the units. Additionally accessories, mounting rails, DIN rails and a
19” rack mount shelf are available upon demand.
For connecting the transmitter and receiver of No. 39221, 39222, 39223, Category 5e/6/7 RJ45 STP
cable provides the best results. For model 39224, use optical multimode 50µm LC Duplex cable,
easily available from LINDY in different lengths.
For large distances and best quality Cat.6/7 solid core installation cable like LINDY No.12047/12048
should be used. For standard distances also STP patch cables may be used. See www.LINDY.com
for our range of appropriate cables.
Now connect the power supplies and switch on all your devices. Transmitter and receiver will perform
an automatic Cat.5/6/7 cable initialization and self-adjustment that takes around 5 to 10 seconds.
During this time the front LED on the units will be flashing red. When completed the LED changes to
solid green and the extender is ready for regular operation.
When using HDMI monitors or HDMI/DisplayPort graphic cards, the monitor may show wrong colors.
This is caused by the HDMI EDID signal of the monitor being passed to the graphic card. In such
case, make sure your graphic card signal is set to RGB signal, max. 32 bit (or 8 bit per channel) color
depth and no HDCP (DVI compliant signal) or use a DVI port.
USB connections are hot plug. It is normal that after plugging a USB device some time is required for
device recognition and driver installation. This process requires a slightly longer time for devices
connected to the extender.
Troubleshooting
If you are faced any unexpected problems with the extender please don't hesitate to contact LINDY
Support. You can reach us worldwide under the contact information provided on our website. Or send
us an email to support@lindy.com.
On Screen Menu - Firmware Update & Upgrade
The On Screen Menu (OSM) is used to manage the extender and view its properties. It can also be
used to update the firmware and to upgrade the basic versions with USB 2.0 Memory (mass
storage) support.
For security reasons the OSM can only be invoked during the first
5-10 minutes of operation after the extender has been switched on.
To invoke the OSM press the "Scroll Lock" key on the keyboard 5
times. A blue OSM window should appear on your screen. If this
does not happen please disconnect the extender from the power
supply, reconnect it and try again.
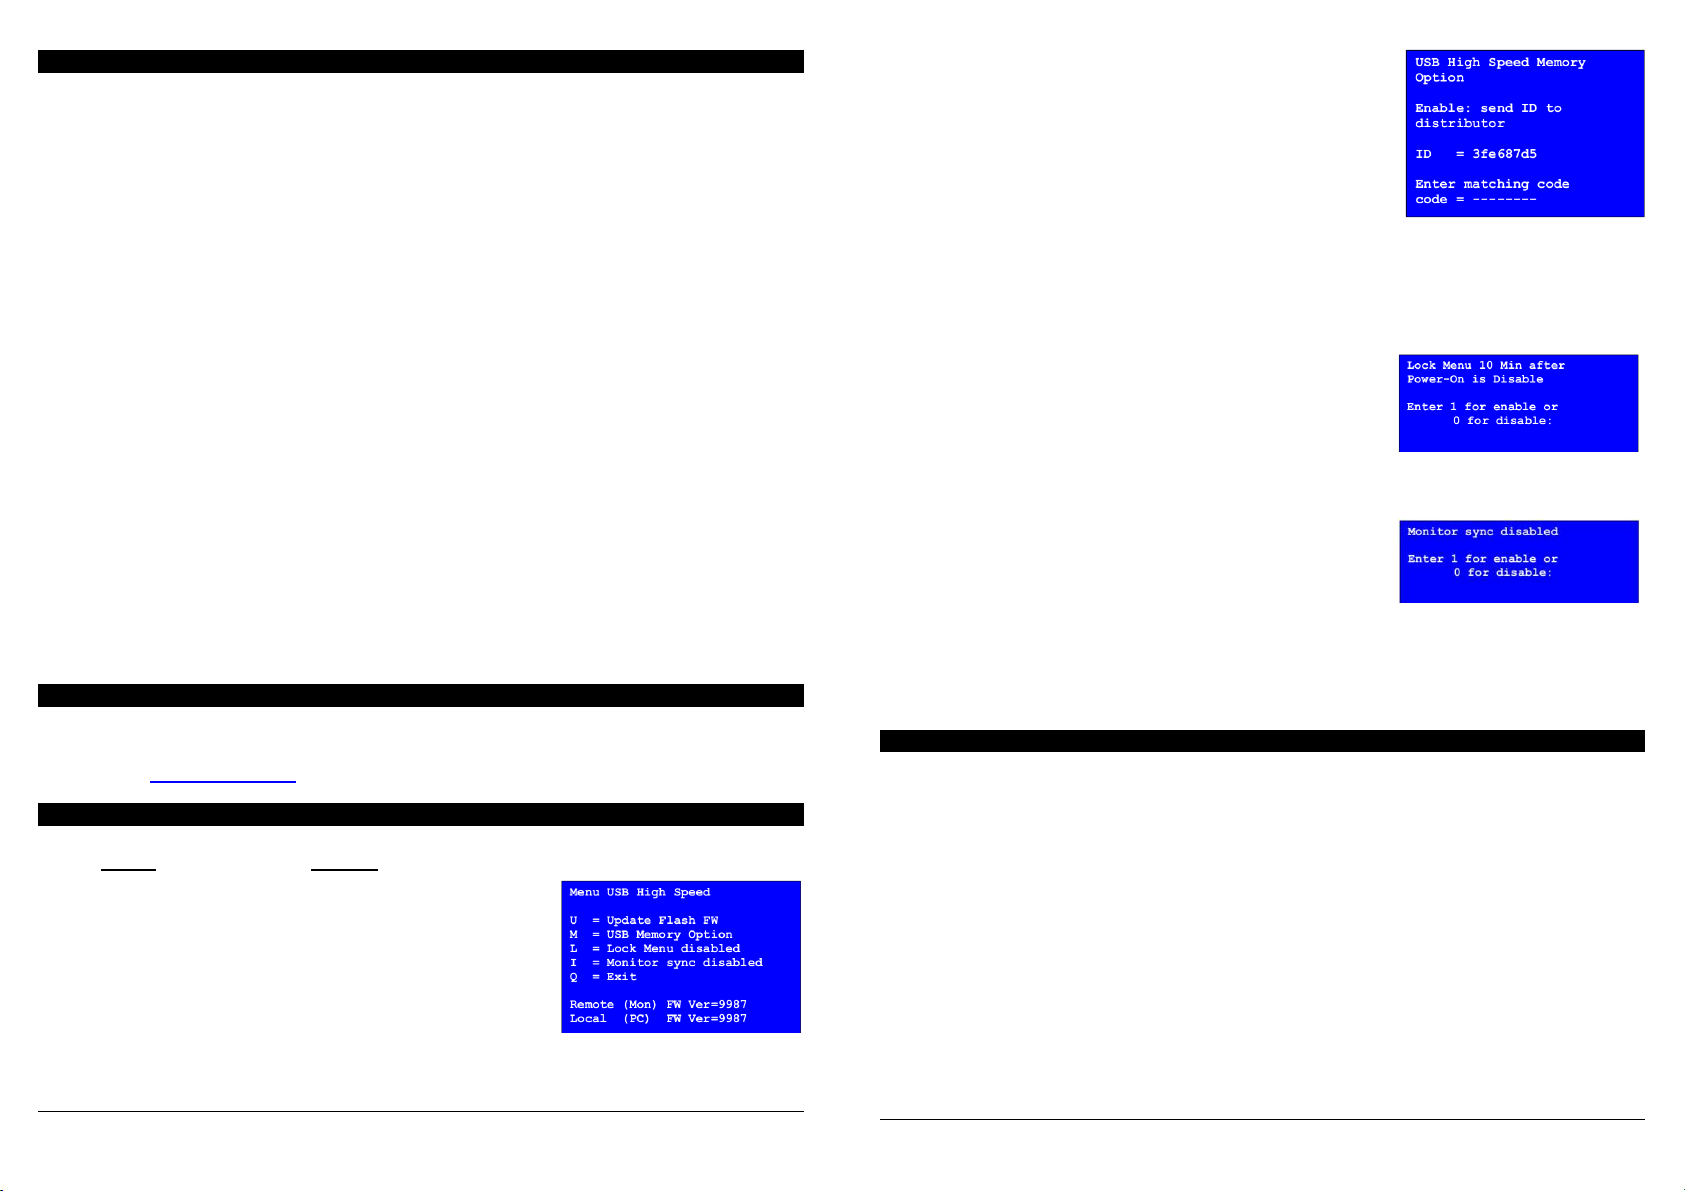
Menu item "U" allows you to update the firmware - see further
below. The most recent version can be obtained from LINDY technical support team upon request. A
detailed instruction is found further below.
3
Menu item "M" allows you to activate and deactivate the USB 2.0
memory option. It allows you to connect USB 2.0 storage devices
and flash drives as well across the extender. If the extender already
has the USB 2.0 option enabled it can be enabled and disabled at
any time. If the extender does not have this option installed (No.
39221, 39223, 39224) this option can be added via a Firmware
upgrade at some additional cost. To order the upgrade from LINDY
you need the device ID as displayed in the OSM (here: 3fe687d5).
Please contact the LINDY support team and ask for a quotation for
the upgrade (No. 09220) for the unit with this ID. Please also ask the support team for the most up to
date firmware because this should be installed prior (see below). When the upgrade has been
installed the extender will still operate in non-Memory option mode. The LINDY Support team will
provide you the invoice and a "Matching Code" that needs to be entered in the OSM to activate the
USB 2.0 function. The extender must be restarted after entering the matching code and will then
display the USB Memory Option in the OSM.
Menu item "L" allows to lock (default) and unlock the OSM. When
locked, the OSM is accessible only during the first 5 - 10 minutes
after boot up. This prevents from unauthorized access to the OSM
and to other features of the extender. In the "Lock Menu" you can
press 0 to disable and 1 to enable the locking feature.
Menu item "I" switches the monitor synchronization on and off. This option allows you to synchronize
and match the frame rate of the graphics card with the frame rate of the monitor. This may help
especially in situations where dynamic picture content like video or
other multimedia content must be transmitted. On the other hand
not every monitor and graphics card may correctly support this
feature. Pressing 1 activates and 0 disables this feature. If the
monitor picture starts to show errors, it should be switched off.
Models 39223 and 39224 provide the additional OSD menu
functions O and V. V allows to adjust the VGA display if the VGA option is installed. O allows to
select the DVI DDC data. Either the DDC can be read from the local or from the remote monitor, or it
can be selected between fixed preset resolutions 1280x768/1024, 1680x1050, 1920x1080/1200.
Pressing "Q" key in the OSM closes the menu.
Firmware Update for KVM extender DVI-D & USB
Connect the extender set normally to a PC. Transmitter (Local / PC) and Receiver (Remote / Mon)
need to be connected to each other. The update is initiated at the receiver / remote part of the
extender.
Connect your USB keyboard and mouse to the Remote / Mon unit. Please check if it works correctly
with the operating system. The monitor signal needs to be displayed correctly and the keyboard must
work.
Now display the firmware bitmap file (.bmp file included in the zip file) in 1:1 non-scaled resolution
on the monitor, e.g. using Windows image or fax viewer in 100% view of the .bmp file.
The program window must be maximized!!! It should be the only window displayed on the screen.
The zoom factor must be set to 100%!!!
No parts of the bitmap picture must be blocked!!!
Otherwise the extender will be damaged by the firmware upgrade and has to be returned for repair!
Remark for Win 7/8 users: in Full HD mode with 1920x1080 some Windows drivers reduce the video
signal level by 10% causing an error when trying to update the firmware. In this case please reduce
the video signal resolution to 1280x1024 or similar.
This manual suits for next models
3
Other Lindy Extender manuals

Lindy
Lindy 38105 User manual

Lindy
Lindy DVI-D Dual Link Extender 500m 4x LC 50/125um User manual

Lindy
Lindy Smart User manual

Lindy
Lindy 38343 User manual

Lindy
Lindy 38403 User manual

Lindy
Lindy 70456 User manual

Lindy
Lindy 32157 User manual

Lindy
Lindy 38017 User manual

Lindy
Lindy 42700 User manual

Lindy
Lindy 42802 User manual