manuals.online logo
Brands
  1. Home
  2. •
  3. Brands
  4. •
  5. Lindy
  6. •
  7. PCI Card
  8. •
  9. Lindy 51115 User manual

Lindy 51115 User manual

_________________________________________ ________________________________
PCI Card
2 Ports SATA & 1 Port PATA
User Manual English
LINDY No. 51115
www.LINDY.com
© LINDY ELECTRONICS LIMITED & LINDY-ELEKTRONIK GMBH - FIRST EDITION (AUG. 2009)
Features
Raid Controller
Support RAID Level 0, Raid Level 1, 0+1 and JBOD
PCI Bus Interface
Compliant with PCI Specification revision 2X.
Supports up to 33/66 MHz PCI interface clock.
Supports PCI native modes
Serial-ATA Interface
Supports SATA 1.0 (High Speed Serialized AT Attachment, Revision 1.0), 1.5 Gbit/s
data rate
Supports internal PHY, with each PHY supporting up to SATA devices
Parallel-ATA Interface
Supports Ultra DMA Mode Transfers up to Mode 6 Timing (133 Mbytes/sec).
Supports PIO Modes up to Mode 4 Timings.
Multiword DMA Mode 0,1,2 with Independent Timing of up to 4 drives.
System Requirements
Hardware:
•A Pentium, Pentium Pro, PentiumIII, IV or later, Pentiumcompatible computer
•One PCI slot
This I/O card is made exclusively for the IBM-PC or compatible line of computer. If you are
not sure what type of computer you have, check your system documentation for
compatibility. This I/O card requires an available PCI slot inside your computer.
Software:
•Windows® 98SE/ME •Windows® NT/2000/XP/Server 2003
Package Contents
This PCI Card package includes the following:
•Installation Guide •CD Driver
Hardware:
•PCI Ultra ATA Card
Configuration
The Serial ATA PCI Card
V-E(1PATA+1 ESATA external+1 SATA internal)
Windows® 98SE/ME Drivers Installation Instructions
1. Start Windows.
2. When Windows detects VIA SATA PCI Controller in the system, a dialog box named
Add New Hardware Wizard will show on the screen. Select the Specify the location
of the driver (Advanced) option then click “Next” to continue to setup.
3. Insert the Controller Driver diskette into the CD drive then select Search for the best
driver for your device (Recommended) from the following dialog box and type
D:\WIN9X on the field designating the file’s location. Press “Next” to continue to setup.
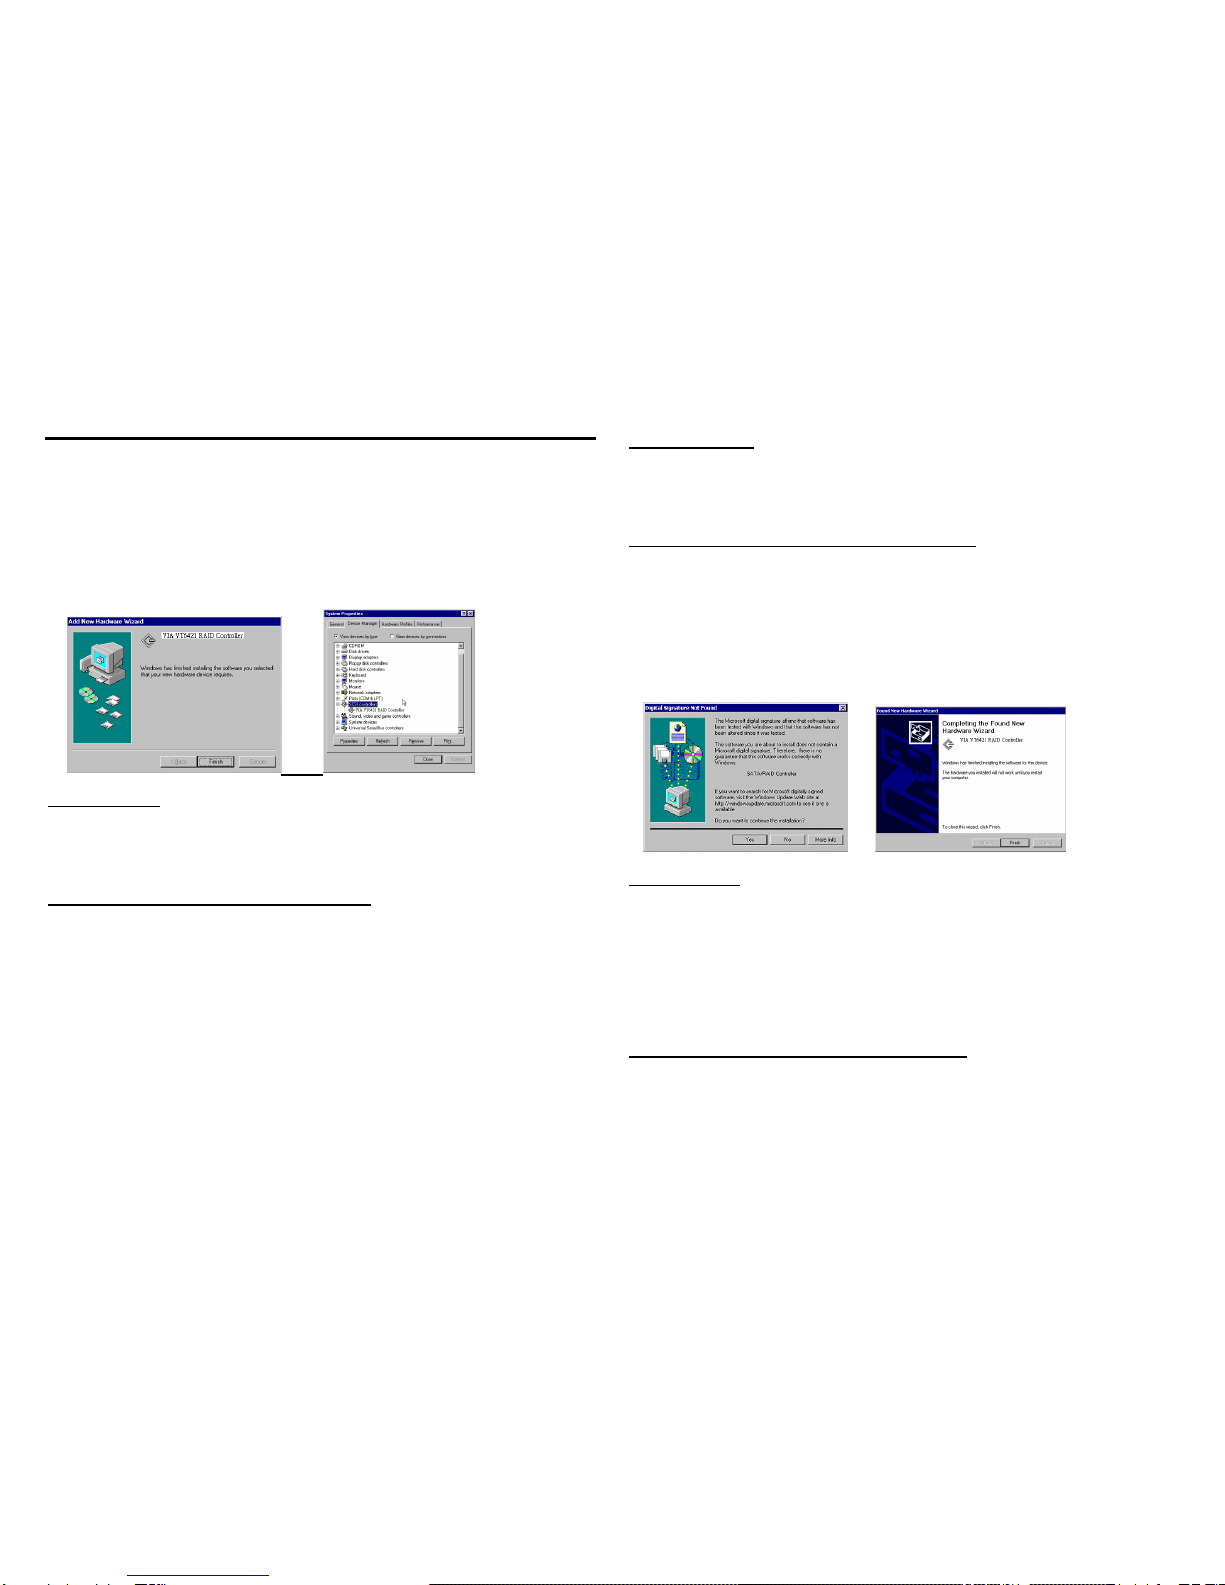
4. The driver for VIA VT6421 RAID Controller is found. Press “Next” to continue to setup.
5. The driver installation has finished. Press “Finish” to continue.
6. Follow the instruction to restart the computer then the driver will take effect.
Verify Installation
1. Right-click My Computer icon on Desktop. Select the Properties option from the form.
2. Select the Device Manager panel from the System Properties window. If VIA VT6421
RAID Controller device is shown below the SCSI
controllers item (see the following
figure), it means that the driver has been installed successfully.
Windows® NT Drivers Installation Instruction
Start Windows NT installation.
1. Select Settings from the Start menu then choose the Control Panel option
from the Settings form.
2. In the Control Panel window, double-click on the SCSI Adapters icon.
3. Choose the Drivers tab from the SCSI Adapters window then press “Add” to
continue.
4. Click Have Disk from the Install Driver window.
5. Insert the VIASATA/RAID PCI Controller Driver CD into the CD drive then type
D:\WINNT4.0 on the field designating the file’s location. Press “OK” to continue to
setup.
6. Select VIA VT6421 RAID Controller from the window then click “OK” to continue.
7. Click Have Disk from the Install Driver window.
8. Follow the instruction to restart the computer then the driver will take effect.
Verify Installation
1. Follow step1 to step3 described in the previous section to activate the SCSI
Adapters option.
2. If the VIA VT6421 RAID Controller device is shown on the Devices panel as
shown below, it means that the driver has been installed successfully.
Windows® 2000 Drivers Installation Instructions
1. Start Windows 2000 installation.
2. When Windows detects VIASATA PCI Controller in the system, a dialog box named
Found New Hardware Wizard will show on the screen. Select the Install from a
list or specific location (Advanced) option then click “Next” to continue to setup.
3. Select the option “Specify the location “ and type in “D:\WINXP” then click on “Next”
4. Click “Next” and then “Finish” respectively.
5. Remove the diskette, then select “Yes” to restart the computer for the setup to take
effect.
6. Follow the instruction to restart the computer then the driver will take effect.
7.
Verify Installation
1. Right-click My Computer icon on Desktop. Select the Properties option from the
form.
2. Select the Hardware tab from the System Properties window then click the Device
Manager button on the panel. If VIA VT6421 RAID Controller device is shown
below the SCSI and RAID controllers item (see the following figure), it means that
the driver has been installed successfully.
3. If there is a marking ! or ? in front of the VIA SATA PCI Controller device, it
indicates that the driver has not been correctly installed. User should remove the
device and reinstall.
Windows® XP Drivers Installation Instructions:
1. Start Windows XP installation.
2. When Windows detects VIASATA PCI Controller in the system, a dialog box named
Found New Hardware Wizard will show on the screen. Select the Install from a
list or specific location (Advanced) option then click “Next” to continue to setup.
3. Insert the VIASATA PCI Controller Driver diskette into the CD drive then type
D:\WINXP on the field designating the file’s location. Press “Next” to continue to setup.
4. The driver installation has finished. Press “Finish” to continue.
5. Follow the instruction to restart the computer then the driver will take effect.
Verify Installation
1. Right-click My Computer icon on Desktop. Select the Properties option from the
form.
2. Select the Hardware tab from the System Properties window then click the Device
Manager button on the panel. If VIA VT6421 RAID Controller device is shown
below the SCSI and RAID controllers item (see the following figure), it means that
the driver has been installed successfully.
3. If there is a marking ! or ? in front of the VIA SATA PCI Controller device, it
indicates that the driver has not been correctly installed. User should remove the
device and reinstall.
CE Statement
This device complies with the European Regulations for Electromagnetic
Compatibility (EMC) of the European Union and it is equipped with the CE mark.
This unit has to be used with high quality shielded connection cables. Only if such
high quality shielded cables are used can you be sure that the EMC compatibility
is not adversely influenced.
FCC Statement
Shielded cables must be used with this equipment to maintain compliance with
radio frequency energy emission regulations and ensure a suitably high level of
immunity to electromagnetic disturbances.
FCC Warning
This equipment has been tested and found to comply with the limits for a Class B
Digital device, pursuant to part 15 of the FCC Rules. These limits are designed
to provide reasonable protection against harmful interference in a residential
installation. This equipment generates, uses, and can radiate radio frequency
energy and, if not installed and used in accordance with the instructions, may
cause harmful interference to radio communications. However, there is no
guarantee that interference will not occur in a particular installation. If this
equipment does cause harmful interference to radio or television reception, which
can be determined by turning the equipment off and on, the user is encouraged to
try to correct the interference by one or more of the following measures:
Reorient or relocate the receiving antenna
Increase the separation between the equipment and receiver
Connect the equipment into an outlet on a circuit different from that to which
the receiver is connected
Consult the dealer or an experienced technician for help
You are cautioned that changes or modifications not expressly approved by the
party responsible for compliance could void your authority to operate the
equipment.
WEEE (Waste of Electrical and Electronic Equipment),
Recycling of Electronic Products
United Kingdom
In 2006 the European Union introduced regulations (WEEE) for the collection and
recycling of all waste electrical and electronic equipment. It is no longer allowable
to simply throw away electrical and electronic equipment. Instead, these products
must enter the recycling process.
Each individual EU member state has implemented the WEEE regulations into
national law in slightly different ways. Please follow your national law when you
want to dispose of any electrical or electronic products.
More details can be obtained from your national WEEE recycling agency.
Germany / Deutschland
Die Europäische Union hat mit der WEEE Direktive umfassende Regelungen für
die Verschrottung und das Recycling von Elektro- und Elektronikprodukten
geschaffen. Diese wurden von der Bundesregierung im Elektro- und
Elektronikgerätegesetz – ElektroG in deutsches Recht umgesetzt.
Dieses Gesetz verbietet vom 24.März 2006 an das Entsorgen von
entsprechenden, auch alten, Elektro- und Elektronikgeräten über die
Hausmülltonne! Diese Geräte müssen den lokalen Sammelsystemen bzw.
örtlichen Sammelstellen zugeführt werden! Dort werden sie kostenlos entgegen
genommen. Die Kosten für den weiteren Recyclingprozess übernimmt die
Gesamtheit der Gerätehersteller.
France
En 2006, l'union Européenne a introduit la nouvelle réglementation (WEEE)
pour le recyclage de tout équipement électrique et électronique.
Chaque Etat membre de l’ Union Européenne a mis en application la nouvelle
réglementation WEEE de manières légèrement différentes. Veuillez suivre le
décret d’application correspondant à l’élimination des déchets électriques ou
électroniques de votre pays.
Italy
Nel 2006 l’unione europea ha introdotto regolamentazioni (WEEE) per la raccolta
e il riciclo di apparecchi elettrici ed elettronici. Non è più consentito
semplicemente gettare queste apparecchiature, devono essere riciclate.
Ogni stato membro dell’ EU ha tramutato le direttive WEEE in leggi statali in varie
misure. Fare riferimento alle leggi del proprio Stato quando si dispone di un
apparecchio elettrico o elettronico.
Per ulteriori dettagli fare riferimento alla direttiva WEEE sul riciclaggio del proprio
Stato.
No. 51115
www.lindy.com

Other Lindy PCI Card manuals

Lindy SD-CBALINEC-4E6I User manual

Lindy

Lindy SD-CBALINEC-4E6I User manual

Lindy 70536 User manual

Lindy

Lindy 70536 User manual

Lindy 70538 User manual

Lindy

Lindy 70538 User manual

Lindy 51275 User manual

Lindy

Lindy 51275 User manual

Lindy 70674 User manual

Lindy

Lindy 70674 User manual

Lindy 51082 User manual

Lindy

Lindy 51082 User manual

Lindy 70939 User manual

Lindy

Lindy 70939 User manual

Lindy 70584 User manual

Lindy

Lindy 70584 User manual

Lindy 51170 User manual

Lindy

Lindy 51170 User manual

Lindy 70555 User manual

Lindy

Lindy 70555 User manual

Lindy 51097 User manual

Lindy

Lindy 51097 User manual

Lindy 51127 User manual

Lindy

Lindy 51127 User manual

Lindy 51125 User manual

Lindy

Lindy 51125 User manual

Lindy 70586 User manual

Lindy

Lindy 70586 User manual

Lindy 70576 User manual

Lindy

Lindy 70576 User manual

Lindy ATA/100 User manual

Lindy

Lindy ATA/100 User manual

Lindy USB 2.0 4+1 Port PCI Card 51084 User manual

Lindy

Lindy USB 2.0 4+1 Port PCI Card 51084 User manual

Lindy 51068 User manual

Lindy

Lindy 51068 User manual

Lindy FireWire 800 User manual

Lindy

Lindy FireWire 800 User manual

Lindy 70578 User manual

Lindy

Lindy 70578 User manual

Lindy RS-422/485 User manual

Lindy

Lindy RS-422/485 User manual

Lindy 51246 User manual

Lindy

Lindy 51246 User manual

Lindy 51245 User manual

Lindy

Lindy 51245 User manual

Lindy 51095 User manual

Lindy

Lindy 51095 User manual

Popular PCI Card manuals by other brands

Black Box IC142C Specifications

Black Box

Black Box IC142C Specifications

Planet WNL-9331 user manual

Planet

Planet WNL-9331 user manual

Contec AD16-64(LPCI)LA user guide

Contec

Contec AD16-64(LPCI)LA user guide

Q-See QSDT8PCRP user manual

Q-See

Q-See QSDT8PCRP user manual

Contec COM-4(PCI)H user manual

Contec

Contec COM-4(PCI)H user manual

Black Box LH1390C-SC-R2 manual

Black Box

Black Box LH1390C-SC-R2 manual

PowerWalker Mini AS400 user manual

PowerWalker

PowerWalker Mini AS400 user manual

Rocket Fish RF-P2USB3 Quick setup guide

Rocket Fish

Rocket Fish RF-P2USB3 Quick setup guide

Hamlet Wireless PCI Card IEEE 802.11n 300Mbps user manual

Hamlet

Hamlet Wireless PCI Card IEEE 802.11n 300Mbps user manual

Lava 2SP-PCI installation manual

Lava

Lava 2SP-PCI installation manual

DAQ PCI-DSP01 Reference manual

DAQ

DAQ PCI-DSP01 Reference manual

Digital Equipment EtherWORKS Turbo PCI User information

Digital Equipment

Digital Equipment EtherWORKS Turbo PCI User information

Kunbus DF PROFINET IO cPCI installation instructions

Kunbus

Kunbus DF PROFINET IO cPCI installation instructions

Handlink Technologies HL-11N user manual

Handlink Technologies

Handlink Technologies HL-11N user manual

Vantec eSATA PCI & PCI-E Card & CardBus user manual

Vantec

Vantec eSATA PCI & PCI-E Card & CardBus user manual

Alldaq ADQ-22 PXI manual

Alldaq

Alldaq ADQ-22 PXI manual

Encore ENEGA-1320 Quick installation guide

Encore

Encore ENEGA-1320 Quick installation guide

SIIG Duet Parallel PCI Installation

SIIG

SIIG Duet Parallel PCI Installation

manuals.online logo
manuals.online logoBrands
  • About & Mission
  • Contact us
  • Privacy Policy
  • Terms and Conditions

Copyright 2025 Manuals.Online. All Rights Reserved.