Lindy 38000 User manual

© LINDY ELECTRONICS LIMITED & LINDY-ELEKTRONIK GMBH - FIRST EDITION (Apr 2008)
HDMI Switch / Extender
Manual
English
Benutzerhandbuch
Deutsch
Manuel
Français
Manuale Uso
Italiano
LINDY No. 38000
www.lindy.com


Table of Contents
English Manual Page 2
Deutsch Benutzerhandbuch Page 4
Francais Manuel Page 6
Italiano Manuale Uso Page 8
CE/FCC & Recycling Information Page 10

Manual English
2
Introduction
Thank you for purchasing the LINDY HDMI Extender with Switch function. This 2 port switch
also extends your high definition signal up to 70m when using FTP network cable. The extender
supports both HDMI and DVI devices (when using adapters for DVI) and is also fully HDCP
compliant.
With two HDMI inputs you can switch between high definition sources and then extend the
signal up to 70m from the source at Full HD 1080p or 1920 x 1200 for PCs. Switching between
devices is achieved using the push button on the switch.
Features
•HDMI 1.2, HDCP 1.1 and DVI 1.0 compliant
•Supports HDTV resolutions: 480i, 576i, 480p, 576p, 720p, 1080i and 1080p
•Supports DVI-D resolutions of up to 1600 x 1200 and WUXGA (1920 x 1200) @ 60Hz
when used with PC graphic cards
•Transmitter:
•Input Ports: 2 x HDMI Female
•Output Port: 2 x RJ45
•Receiver:
•Input Ports: 2 x RJ45
•Output Port: 1 x HDMI Female
•Device Selection by push button (local only)
•Channel select LED
•Supports High Definition audio, Dolby Digital True HD and DTS-HD
•Built in automatic signal enhancement improves the signal quality when using longer
length cables
Package Contents
•HDMI CAT5 Transmitter / Switch
•HDMI CAT5 Receiver
•5V DC Power Supply x 2 pcs
•LINDY Manual
Installation
1. Make sure all your devices are switched off before connecting any cables
2. Connect your display to the receiver
3. Connect your sources to the 2 port transmitter
4. Connect your FTP network cables between the transmitter and receiver
5. Plug the 5V power supply into the transmitter and receiver
6. Turn on all devices
7. You should now see a picture on the screen from your selected port.

Manual English
3
Installation Example:
What kind of network cable should I be using?
We recommend using shielded CAT6 network cables rated at 350MHz or higher. (FTP, STP or S/FTP)
I’m getting no video on the display, what can I check?
Always make sure the network cables are connected correctly at each end and that the DDC port is linked with the
DDC port. If this does not work, try testing with shorter length cables or reduced resolution to 480i.
Occasionally the picture blanks out, how do I fix this?
Flickering or a blinking image is the result of a loss of sync between the display and the source. Try lowering the
resolution to see if that helps, if it does, the network cables you are using are unable to handle the bandwidth of the
high resolution. Try using a higher quality shielded network cable on the video line to reduce interference.
Why is there a green or pink tint to my picture?
A tint of green or pink in the picture is a result of incorrect colour space being transmitted. This can be resolved by
switching the HDMI source off and on again. If this does not help, the DDC data containing the colour space is not
being transmitted correctly due to loss in the network cable, try replacing the DDC cable with higher quality
shielded cable.
Two HDMI Sources
HDTV
Network cable up to 70m
Note: We recommend using shielded network cables for better
performance results. The network cables must not be crossed.

Benutzerhandbuch Deutsch
4
Einführung
Vielen Dank für den Erwerb des LINDY HDMI Extenders mit Switch Funktion. Bei Verwendung
eines FTP Netzwerkkabels können Sie mit diesem Extender HDMI Signale über Kabelstrecken
bis zu 70 Metern bei voller HDTV 1080p Auflösung übertragen.
Der Extender unterstützt neben HDMI- auch DVI-Signale, sofern entsprechende DVI/HDMI-
Adapter oder –Adapterkabel benutzt werden. Er ist HDCP kompatibel.
Mit zwei HDMI Eingängen können sie zwischen zwei hoch auflösenden HDMI Bildquellen hin-
und her wechseln und das Signal problemlos bei hoher Auflösung bis zu 1920x1200 oder HDTV
1080p vom HDMI-Transmitter bis zum HDMI-Receiver übertragen. Die beiden verschiedenen
Signalquellen können sie über eine Umschalttaste am HDMI-Transmitter auswählen und so
zwischen ihnen hin und her wechseln.
Features
•HDMI 1.2, HDCP 1.1 und DVI 1.0 kompatibel
•Unterstützt HDTV Auflösungen: 480i, 576i, 480p, 576p, 720p, 1080i und 1080p
•In Kombination mit dem Computer sind DVI-D Auflösungen bis zu 1600 x 1200 bzw.
1920x1200 bei WUXGA //@ 60Hz möglich
•Transmitter / Sender:
•Eingänge: 2 x HDMI Buchse
•Ausgang: 2 x RJ45
•Receiver / Empfänger:
•Eingang: 2 x RJ45
•Ausgang: 1 x HDMI Buchse
•Gerätewahl durch Drücken der Umschalttaste
•LED zeigt ausgewählten Port / Kanal an
•Unterstützt HDTV Video-, Audio- und HDCP-Signale
•Bei Verwendung großer Kabellängen passt eine integrierte automatische
Signalverstärkung die Qualität der Signale an
Lieferumfang
•HDMI Cat.5 Transmitter mit Switch
•HDMI Cat.5 Receiver
•5V DC Netzteil, 2 Stück
•Dieses LINDY Handbuch
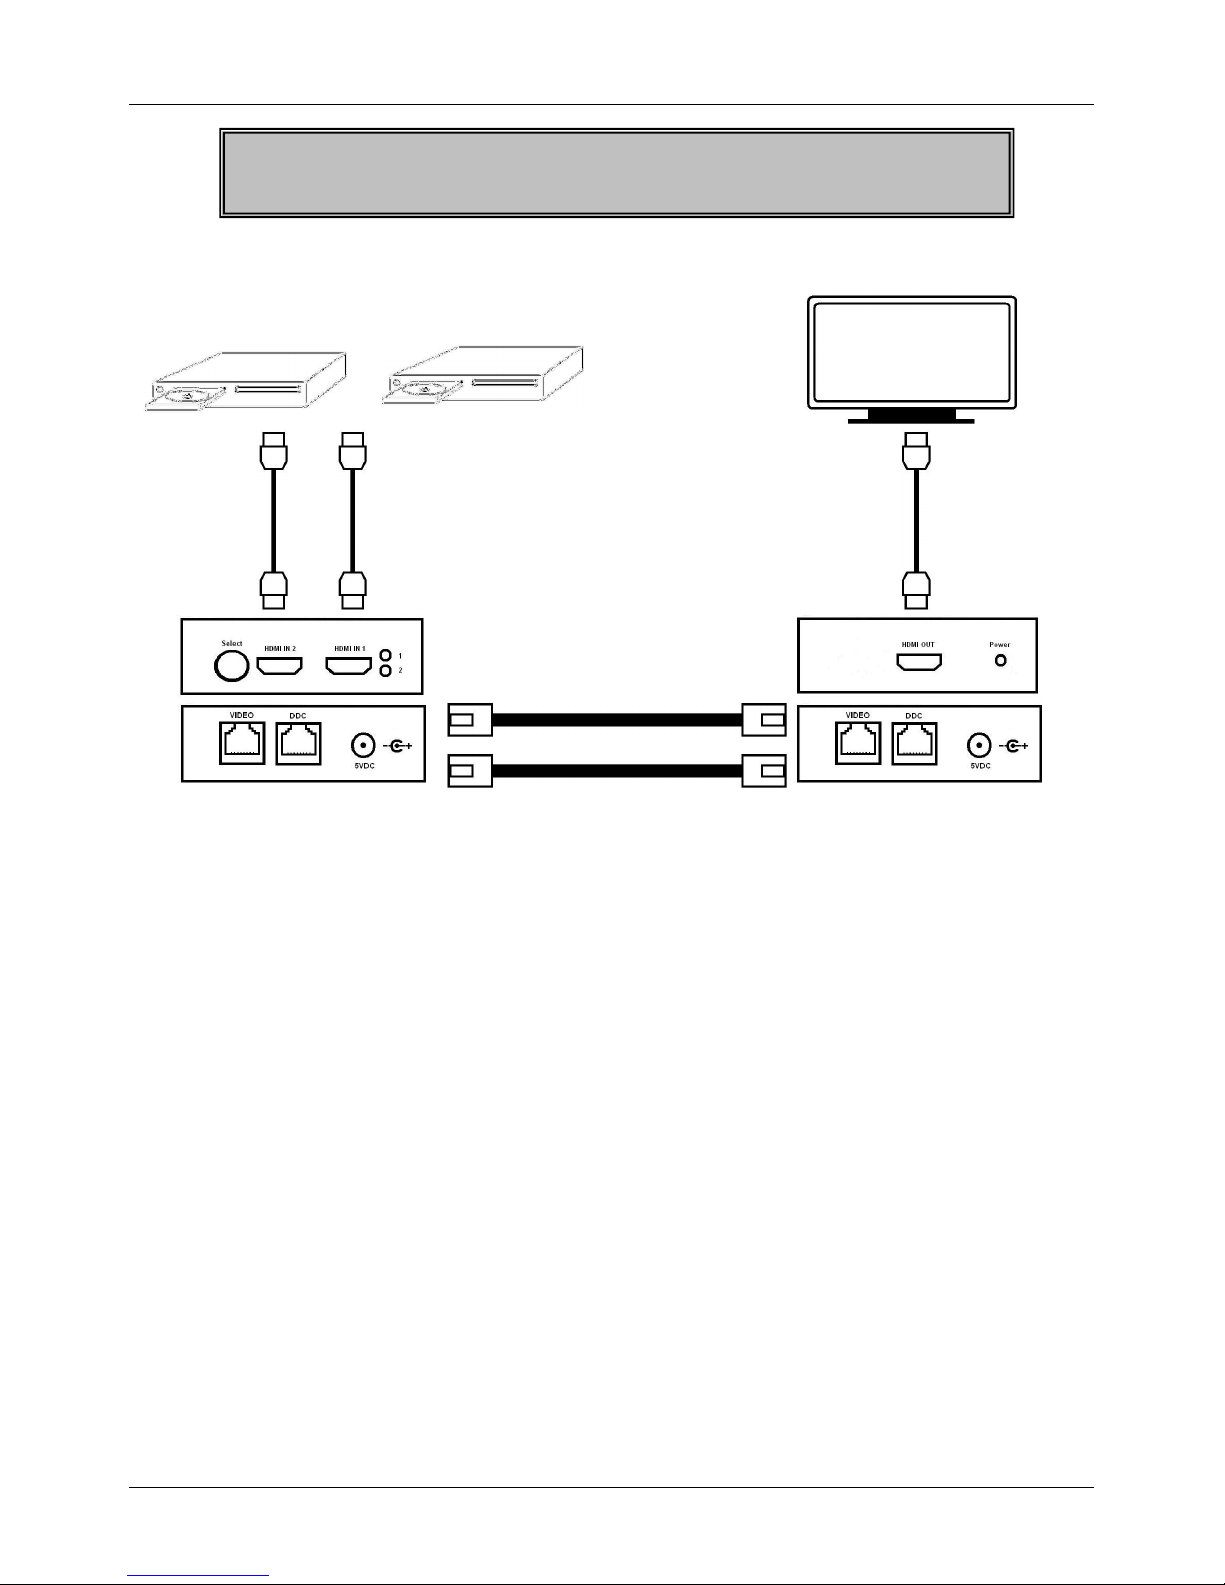
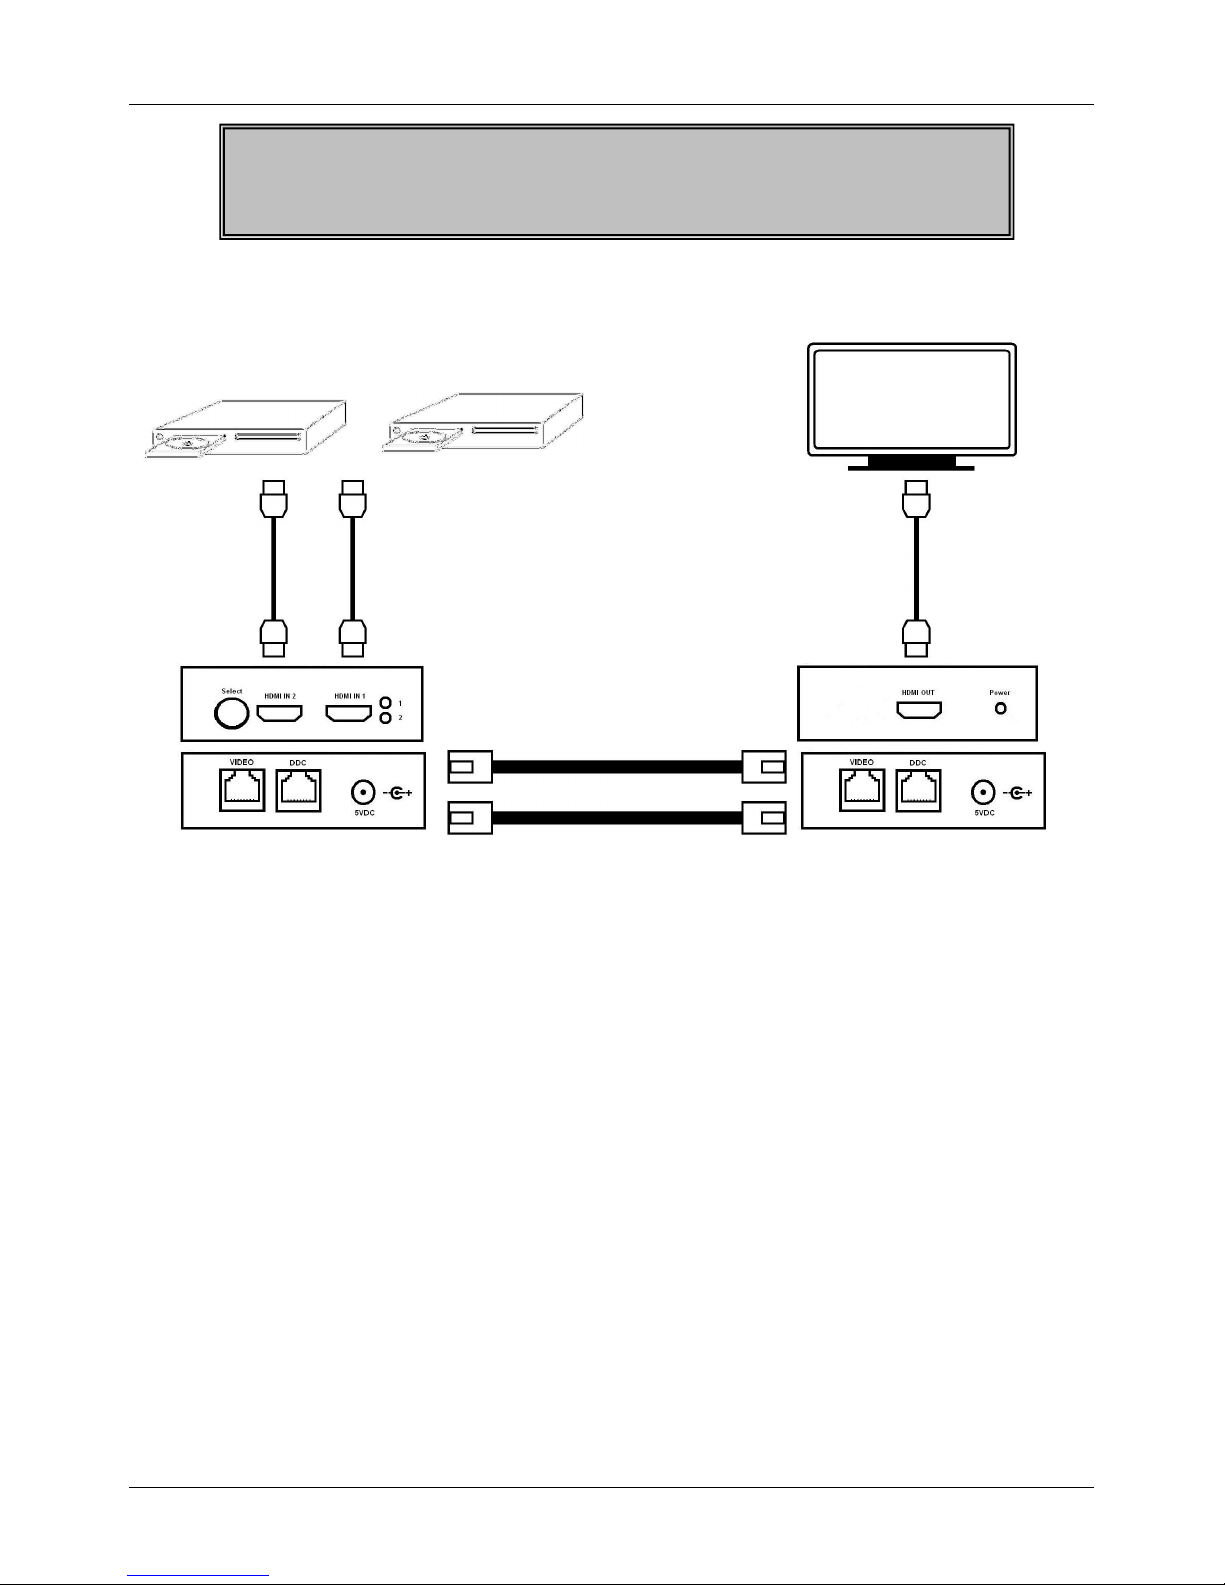
Installation
1. Stellen Sie sicher dass alle Geräte ausgeschaltet sind, bevor sie sie miteinander
verbinden
2. Verbinden sie das Ausgabegerät / Display mit dem Receiver
3. Verbinden sie ihre Signalquellen mit den Transmitter/Umschalter
4. Verbinden sie Transmitter und Receiver (Empfänger) mit den beiden FTP
Netzwerkkabeln
5. Schließen Sie die Netzteile für Transmitter und Receiver an
6. Schalten sie alle Geräte ein
7. Sie sollten jetzt ein Bild vom ausgewählten HDMI-Port auf ihrem Bildschirm sehen

Benutzerhandbuch Deutsch
5
Installationsbeispiel:
Welches Netzwerkkabel sollte ich am Besten verwenden?
Wir empfehlen Cat.6 Netzwerk Kabel (350 MHz oder höher; FTP, STP oder S/FTP). Besonders bei großen
Distanzen ist die Qualität dieses Kabels wichtig und entscheidet ob der Extender funktioniert oder nicht
Ich sehe kein Bild auf dem Display, was kann ich tun?
Vergewissern sie sich, dass die beiden Netzwerkkabel an beiden Enden richtig angeschlossen und nicht
miteinander vertauscht sind. Sollte es dennoch nicht funktionieren, versuchen sie es mit kürzeren Kabeln oder
verringern sie die Auflösung schrittweise auf 480i. Wenn dies zum Erfolg führt benötigen Sie für höhere
Auflösungen bessere Netzwerkkabel.
Zeitweise fällt das Bild einfach aus, wie kann ich dies beheben?
Flackernde oder blinkende Bilder sind das Resultat eines temporären Signalverlustes zwischen der Bildquelle und
dem Display. Falls eine niedrigere Auflösung das Problem behebt ist es wahrscheinlich, dass das benutzte
Netzwerkkabel die Bandbreite der hohen Auflösung nicht bewältigen kann. Verwenden sie in diesem Fall ein
höherwertiges abgeschirmtes Netzwerkkabel, um mögliche Störungen und Überlagerungen zu vermindern.
Woher kommt der grüne oder rötliche Farbstich auf meinem Bildschirm und was kann ich dagegen tun?
Ein grüner oder rötlicher Farbstich im Bild könnte auf eine fehlerhafte Übertragung des DDC-Signals und des
Farbraums zurückzuführen sein. Sie können dies beheben, indem sie dien HDMI-Signalquelle aus- und wieder
einschalten. Sollte dies nicht helfen und der Farbraum weiterhin fehlerhaft übertragen werden, ersetzen sie das
Netzwerkkabel für das DDC-Signal durch ein höherwertiges abgeschirmtes Netzwerkkabel.
Zwei HDMI Quellen:
HDTV
2x Netzwerkkabel bis 70m
HINWEIS: Zur Erzielung der besten Bildqualität sowie großer Distanzen
empfehlen wir dringend die Verwendung abgeschirmter Netzwerkkabel
möglichst hoher Qualität !

Manuel Français
6
Introduction
Merci d’avoir choisi l’extender LINDY HDMI avec fonction switch. Ce switch 2 ports étend la
définition du signal jusqu’à 70m en utilisant du câble réseau FTP. L’extender supporte des
sources HDMI et DVI (en utilisant des adaptateurs pour DVI) ainsi que le codage HDCP.
Avec deux entrées HDMI, vous pouvez commuter entre les sources haute définition, puis
étendre le signal jusqu’à 70m depuis la source en Full HD 1080p ou 1920 x 1200 pour les PCs.
La commutation entre les sources est effectuée en utilisant le bouton poussoir du switch.
Caractéristiques
•Supporte HDMI 1.2, HDCP 1.1 et DVI 1.0
•Full HD: 480i, 576i, 480p, 576p, 720p, 1080i et 1080p
•Utilisé avec des ordinateurs, résolutions DVI-D maxi: 1600 x 1200 and WUXGA
(1920 x 1200) @ 60Hz
•Emetteur:
•Ports d’entrée: 2 x HDMI femelle
•Port de sortie: 2 x RJ45
•Récepteur:
•Port d’entrée: 2 x RJ45
•Port de sortie: 1 x HDMI femelle
•Sélection de la source par le bouton poussoir (localement uniquement)
•LED de canal sélectionné
•Supporte le son haute définition, Dolby Digital True HD et DTS-HD
•Amélioration automatique du signal lors de l’utilisation de longs câbles
Contenu du package
•Emetteur / switch HDMI CAT5
•Récepteur HDMI CAT5
•2 alimentations 5V DC
•Manuel LINDY
Installation
1. Assurez vous que les sources soient éteintes avant de connecter les câbles
2. Connectez l’écran au récepteur
3. Connectez vos sources aux 2 ports de l’émetteur
4. Connectez le câble réseau FTP entre l’émetteur et le récepteur
5. Connectez l’alimentation 5V sur le récepteur et l’émetteur
6. Allumez les sources
7. Vous devriez voir une image à l’écran sur le port sélectionné.

Manuel Français
7
Exemple d’installation:
Quel type de câble réseau dois je utiliser?
Nous recommandons l’utilisation de câbles réseau blindés CAT6 avec bande passante de 350MHz ou supérieure.
(FTP, STP ou S/FTP)
Je n’obtiens aucune vidéo sur l’écran, que vérifier?
Toujours vous assurer que les câbles réseau sont correctement connectés à chaque extrémité et que le port DDC
est connecté à l’autre port DDC. Si cela ne fonctionne pas, merci de tester avec des câbles plus courts ou une
résolution réduite à 480i.
Parfois l’image tremble ou scintille, comment le résoudre?
L’image tremblante ou clignotante est le résultat d’une perte de synchro entre l’écran et la source. Essayez de
réduire la résolution pour voir si cela aide, sinon les câbles réseau utilisés ne sont pas capables de supporter la
bande passante de la haute résolution. Essayer d’utiliser un câble réseau blindé de meilleure qualité, pour réduire
l’interférence.
Pourquoi y a t’il une teinte verte sur l’image?
Une teinte verte ou rose sur l’image est le résultat d’un mauvais espace de couleur transmis. Cela peut être résolu
en allumant/éteignant la source HDMI. Sinon, la donnée DDC contenant cet espace de couleur n’est pas
correctement transmise à cause de la perte dans le câble réseau, essayez de remplacer le câble DDC avec un
câble blindé de meilleure qualité.
Deux sources HDMI
HDTV
Câble réseau jusqu’à 70m
Note: nous recommandons l’utilisation de câbles réseau blindés pour
de meilleurs résultats. Les câbles réseau ne doivent pas être croisés.

Manuale Uso Italiano
8
Introduzione
Grazie per aver scelto il LINDY Switch/Extender HDMI. Questo switch 2 porte può anche
estendere segnali ad alta definizione fino a 70m tramite cavi di rete FTP. L’Extender supporta
segnali sia HDMI che DVI (utilizzando gli adattatori appropriati) ed è compatibile con la codifica
HDCP. Grazie a due ingressi HDMI è possibile commutare tra due dispositivi ed inviare questi
segnali fino a 70m di distanza mantenendo le risoluzioni Full HD 1080p o 1920 x 1200 per PC.
La commutazione avviene tramite il tasto sullo switch.
Caratteristiche
•Compatibile HDMI 1.2, HDCP 1.1 e DVI 1.0
•Supporta risoluzioni HDTV 480i, 576i, 480p, 576p, 720p, 1080i e 1080p
•Se utilizzato con computer, supporta risoluzioni DVI-D fino a 1600 x 1200 e
WUXGA (1920 x 1200) @ 60Hz
•Transmitter:
•Ingressi: 2 x HDMI Femmina
•Uscite: 2 x RJ45
•Receiver:
•Ingressi: 2 x RJ45
•Uscite: 1 x HDMI Femmina
•Commutazione tramite tasto sullo Switch
•LED di stato per canale selezionato
•Supporto audio ad alta definizione, Dolby Digital True HD e DTS-HD
•Ripetitore del segnale integrato per garantire un’elevata qualità video e audio anche su
lunghe distanze
Contenuto della confezione
•HDMI CAT5 Transmitter / Switch
•HDMI CAT5 Receiver
•Alimentatore 5V DC x 2 pz
•Manuale
Installazione
1. Assicurarsi che tutti i dispositivi siano spenti prima di collegare i cavi
2. Collegare il Monitor al receiver
3. Collegare i 2 dispositivi alle porte del transmitter
4. Collegare i cavi di rete FTP tra il transmitter e il receiver
5. Inserire l’alimentatore nel transmitter e nel receiver
6. Accendere i dispositivi
7. L’immagine della porta selezionata dovrebbe apparire sul monitor.

Manuale Uso Italiano
9
Esempio di installazione:
Che tipo di cavo di rete è consigliabile utilizzare?
Consigliamo l’utilizzo di cavi di rete CAT6 schermati da 350MHz o superiori (FTP, STP o S/FTP).
Non compare nessun segnale video sul monitor, cosa devo controllare?
Assicurarsi che i cavi di rete siano collegati correttamente ad ogni capo e che le porte DDC siano collegate. Se non
si ottiene l’immagine, provare con cavi più corti o ridurre la risoluzione a 480i.
Si presentano spesso problemi nella visualizzazione dell’immagine, come posso risolvere?
I problemi nella visualizzazione dell’immagine possono essere dovuti alla sincronizzazione tra il monitor e il
dispositivo. Provare a ridurre la risoluzione, se la situazione migliora significa che il cavo di rete utilizzato non è in
grato di gestire la larghezza di banda di alte risoluzioni. Utilizzare un cavo di rete schermato di qualità superiore
sulla linea video per ridurre le interferenze.
Perché l’immagine si presenta in tinte di colore verde o rosa?
L’immagine in tinte verdi o rosa è il risultato di uno scorretto allineamento dei colori. E’ possibile risolvere questo
problema spegnendo e riaccendendo il dispositivo HDMI. Se questo non aiuta significa che i dati trasmessi nel
canale DDC contenente il segnale del colore non viene trasmesso correttamente dal cavo di rete, utilizzare un
cavo di rete schermato di qualità superiore sulla linea DDC.
Due dispositivi HDMI
HDTV
Cavi di rete (70m max.)
N.B.: si consiglia di utilizzare cavi di rete schermati per ottenere le
migliori performance. I cavi di rete non devono essere incrociati.

CE/FCC & Recycling Information
10
CE Certification
This equipment complies with the requirements relating to electromagnetic compatibility, EN55022/EN55024 class B for
IEC/EN61000-4-2/3 the essential protection requirement of Council Directive 89/336/EEC on the approximation of the laws of
the Member States relating to electromagnetic compatibility.
FCC Certification
This equipment has been tested and found to comply with the limits for a Class B digital device, pursuant to part 15 of the FCC
Rules. These limits are designed to provide reasonable protection against harmful interference in a residential installation.
This equipment generates, uses, and can radiate radio frequency energy and, if not installed and used in accordance with the
instructions, may cause harmful interference to radio communications. However, there is no guarantee that interference will not
occur in a particular installation. If this equipment does cause harmful interference to radio or television reception, which can be
determined by turning the equipment off and on, the user is encouraged to try to correct the interference by one or more of the
following measures:
•Reorient or relocate the receiving antenna
•Increase the separation between the equipment and receiver
•Connect the equipment into an outlet on a circuit different from that to which the receiver is connected
•Consult the dealer or an experienced technician for help
You are cautioned that changes or modification not expressly approved by the party responsible for compliance could void your
authority to operate the equipment.
This device complies with part 15 of the FCC Rules.
Operation is subject to the following two conditions:
1. This device may not cause harmful interference, and
2. This device must accept any interference received, including interference that may cause undesired operation.
WEEE (Waste of Electrical and Electronic Equipment),
Recycling of Electronic Products
United Kingdom
In 2006 the European Union introduced regulations (WEEE) for the collection and recycling of all waste electrical and electronic
equipment. It is no longer allowable to simply throw away electrical and electronic equipment. Instead, these products must
enter the recycling process.
Each individual EU member state has implemented the WEEE regulations into national law in slightly different ways. Please
follow your national law when you want to dispose of any electrical or electronic products. More details can be obtained from
your national WEEE recycling agency.
Germany
Die Europäische Union hat mit der WEEE Direktive umfassende Regelungen für die Verschrottung und das Recycling von
Elektro- und Elektronikprodukten geschaffen. Diese wurden von der Bundesregierung im Elektro- und Elektronikgerätegesetz –
ElektroG in deutsches Recht umgesetzt. Dieses Gesetz verbietet vom 24.März 2006 an das Entsorgen von entsprechenden,
auch alten, Elektro- und Elektronikgeräten über die Hausmülltonne! Diese Geräte müssen den lokalen Sammelsystemen bzw.
örtlichen Sammelstellen zugeführt werden! Dort werden sie kostenlos entgegen genommen. Die Kosten für den weiteren
Recyclingprozess übernimmt die Gesamtheit der Gerätehersteller.
France
En 2006, l'union Européenne a introduit la nouvelle réglementation (DEEE) pour le recyclage de tout équipement électrique et
électronique.
Chaque Etat membre de l’ Union Européenne a mis en application la nouvelle réglementation DEEE de manières légèrement
différentes. Veuillez suivre le décret d’application correspondant à l’élimination des déchets électriques ou électroniques de
votre pays.
Italy
Nel 2006 l’unione europea ha introdotto regolamentazioni (WEEE) per la raccolta e il riciclo di apparecchi elettrici ed elettronici.
Non è più consentito semplicemente gettare queste apparecchiature, devono essere riciclate. Ogni stato membro dell’ EU ha
tramutato le direttive WEEE in leggi statali in varie misure. Fare riferimento alle leggi del proprio Stato quando si dispone di un
apparecchio elettrico o elettronico.
Per ulteriori dettagli fare riferimento alla direttiva WEEE sul riciclaggio del proprio Stato.
LINDY No. 38000
1
st
Edition April 2008
www.lindy.com
Table of contents
Languages:
Other Lindy Switch manuals

Lindy
Lindy 38034 User manual

Lindy
Lindy 32166 User manual

Lindy
Lindy CPU Switch Duo Quick start guide

Lindy
Lindy CPU IP Access Switch Plus User manual

Lindy
Lindy SC5-IP User manual

Lindy
Lindy 39300 Installation and operating instructions

Lindy
Lindy 38272 User manual

Lindy
Lindy CPU Switch Duo User manual

Lindy
Lindy 38270 User manual

Lindy
Lindy 32251 and use Quick start guide
Popular Switch manuals by other brands

CDI
CDI 116-7323 Installation and troubleshooting guide

Ocean Matrix
Ocean Matrix OMX-SW8X8NT instruction manual

TP-Link
TP-Link TL-SG108PE installation guide

Vimar
Vimar 01796.2 manual

Extron electronics
Extron electronics SW 2 AR MX Specifications

Nortel
Nortel Passport 7400 Hardware installation, maintenance, and troubleshooting