manuals.online logo
Brands
  1. Home
  2. •
  3. Brands
  4. •
  5. Lindy
  6. •
  7. Switch
  8. •
  9. Lindy 43149 User manual

Lindy 43149 User manual

USB 3.0 Switch – 2 Port
User Manual English
Benutzerhandbuch Deutsch
Manuel Utilisateur Français
Manuale Italiano
www.lindy.com
LINDY© - Second Edition (MAY 2015)
English Manual
Deutsches Benutzerhandbuch
Hersteller / Manufacturer (EU):
LINDY Electronics Ltd.
LINDY-Elektronik GmbH Sadler Forster Way
Markircher Str. 20 Teesside Ind. Estate, Thornaby
68229 Mannheim Stockton-on-Tees, TS17 9JY
Germany United Kingdom
T: +49 (0)621 470050 T: +44 (0) 1642 754000
[email protected] postmas[email protected]
In
t
roduct
ion
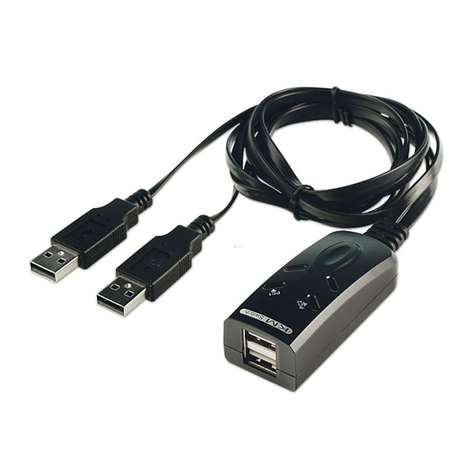
Thank you for purchasing this LINDY USB 3.0 Switch. The LINDY USB
3.0 2 Port Switch allows you to quickly and easily share a USB 3.0
peripheral device between two computers.
Package Contents
•USB 3.0 Switch
•This Manual
Features
•USB 3.0 peripheral device sharing
•USB 3.0 interface - max. data transfer rates of 5Gbps,
backwards compatibility with USB 2.0/1.1
•Hot Key – Quick Switching between computers (PC only)
•LEDs indicate active port
•Bus Powered – Powered from your computers USB port
•Compatible with USB computers: PC & Mac
Installation
•Turn Off all the computers & peripheral device you intend to
connect together via the switch before continuing with the
installation.
•Connect the USB Switch to your peripheral device and computers
with suitable USB 3.0 cables. (Sold separately)
•Power up your computers and the peripheral device
•Your peripheral device will now be ready to switch between
computers
Note - If you want to share multiple USB peripheral devices between
computers connect a USB Hub to the USB Switch, connecting the
peripheral devices to the hub. (As with any peripheral device connected
to the Switch, install the necessary drivers on the connected computers
before use.)
Operation
•To switch peripheral devices between computers simply press the
button located at the side of the USB Switch.
•If you are using a computer running a Windows Operating System
then you can also switch between computers by pressing the
Scroll Lock key twice in quick succession.
•The LED on the USB Switch will indicate which computer is
currently accessing the peripheral device.
Troubleshooting
•The maximum cable length between the Switch & peripheral
devices or the Switch and a computer is 2m. Do Not switch to a
computer that is in the process of booting.
•Computers must be “awake” before it is possible to switch to them
•Before switching ensure that the attached USB device is not in use
– read/writing discs, printing etc.
Einführung
Vielen Dank für den Kauf des LINDY USB 3.0 Switch. Durch Einsatz
dieses Switches können sich zwei Computer ein USB Device teilen.
Packungsinhalt
•USB 3.0 Switch
•Dieses Handbuch
Eigenschaften
•Zwei Computer teilen sich ein USB 3.0 Device
•USB 3.0 Schnittstelle (max. 5 Gbit/s), abwärts kompatibel
mit USB 2.0/1.1
•Schnelles Umschalten auch durch Tastatur-Hotkey (nur PC)
•LEDs zeigen den aktiven Port an
•Bus powered – Stromversorgung über den USB Port
•Kompatibel mit Computern mit USB-Schnittstelle: PC & Mac
Installation
•Vergewissern Sie sich vor der Installation dass alle
Computer und Peripheriegeräte ausgeschaltet sind.
•Schließen Sie den USB Switch mit USB 3.0-Kabeln (nicht
enthalten) an ihrem Peripheriegerät und an den beiden
Computern an.
•Schalten Sie Computer und Peripheriegerät ein.
•Nun können Sie das Peripheriegerät abwechslend an
beiden Computern verwenden.
Sie können auch noch einen USB Hub am Switch anschließen und
dann wiederum zusätzliche Devices am Hub. Denken Sie daran, die
Treiber für die Peripheriegeräte auf den Computern zu installieren.
Inbetriebnahme
•Zum Umschalten zwischen den Computern drücken Sie
einfach auf die Taste an der Seite des Switches.
•Windows-Computer können auch über Tastatur-Hotkey (2x
Taste „Rollen“) umgeschaltet werden.
•Die LEDs am Switch zeigen an, welcher Computer gerade
auf das Peripheriegerät zugreift.
Fehlerbehebung
Die Kabellänge zwischen Computer und Switch bzw. Switch und
Device/Hub sollte nicht mehr als 2m betragen.
Befindet sich ein Computer im Schlafmodus, dann können Sie diesen
nur umschalten, wenn Sie ihn zuerst aufwecken.
Achten Sie immer darauf, dass sich das angeschlossene USB Device
nicht gerade im Einsatz befindet, wenn Sie umschalten wollen.
Versuchen Sie auch nie zwischen Computern umzuschalten wenn ein
Computer gerade startet.
For Home and Office Use
Tested to Comply with FCC Standards
CE/FCC & Recycling Information
CE Certification
This equipment complies with the requirements relating to Electromagnetic Compatibility
Standards EN55022/EN55024 and the further standards cited therein. It must be used with
shielded cables only. It has been manufactured under the scope of RoHS compliance.
CE Konformitätserklärung
Dieses Produkt entspricht den einschlägigen EMV Richtlinien der EU für IT-Equipment und
darf nur zusammen mit abgeschirmten Kabeln verwendet werden. Diese Geräte wurden
unter Berücksichtigung der RoHS Vorgaben hergestellt. Die formelle Konformitätserklärung
können wir Ihnen auf Anforderung zur Verfügung stellen.
FCC Warning
This equipment has been tested and found to comply with the limits for a Class B digital
device, pursuant to part 15 of the FCC Rules. Operation is subject to the following two
conditions:
1. This device may not cause harmful interference, and
2. This device must accept any interference received, including interference that may
cause undesired
WEEE (Waste of Electrical and Electronic
Equipment),
Recycling of Electronic Products
Europe, United Kingdom
In 2006 the European Union introduced regulations (WEEE) for the collection and recycling
of all waste electrical and electronic equipment. It is no longer allowable to simply throw
away electrical and electronic equipment. Instead, these products must enter the recycling
process.
Each individual EU member state has implemented the WEEE regulations into national law
in slightly different ways. Please follow your national law when you want to dispose of any
electrical or electronic products. More details can be obtained from your national WEEE
recycling agency.
Germany / Deutschland
Die Europäische Union hat mit der WEEE Direktive Regelungen für die Verschrottung und
das Recycling von Elektro- und Elektronikprodukten geschaffen. Diese wurden im Elektro-
und Elektronikgerätegesetz – ElektroG in deutsches Recht umgesetzt. Dieses Gesetz
verbietet das Entsorgen von entsprechenden, auch alten, Elektro- und Elektronikgeräten
über die Hausmülltonne! Diese Geräte müssen den lokalen Sammelsystemen bzw.
örtlichen Sammelstellen zugeführt werden! Dort werden sie kostenlos entgegen
genommen. Die Kosten für den weiteren Recyclingprozess übernimmt die Gesamtheit der
Gerätehersteller.
France
En 2006, l'union Européenne a introduit la nouvelle réglementation (DEEE) pour le
recyclage de tout équipement électrique et électronique.
Chaque Etat membre de l’ Union Européenne a mis en application la nouvelle
réglementation DEEE de manières légèrement différentes. Veuillez suivre le décret
d’application correspondant à l’élimination des déchets électriques ou électroniques de
votre pays.
Italia
Nel 2006 l’unione europea ha introdotto regolamentazioni (WEEE) per la raccolta e il riciclo
di apparecchi elettrici ed elettronici. Non è più consentito semplicemente gettare queste
apparecchiature, devono essere riciclate. Ogni stato membro dell’ EU ha tramutato le
direttive WEEE in leggi statali in varie misure. Fare riferimento alle leggi del proprio Stato
quando si dispone di un apparecchio elettrico o elettronico.
Per ulteriori dettagli fare riferimento alla direttiva WEEE sul riciclaggio del proprio Stato.
LINDY Herstellergarantie – Hinweis für Kunden in Deutschland
LINDY gewährt für dieses Produkt über die gesetzliche Regelung in Deutschland hinaus
eine zweijährige Herstellergarantie ab Kaufdatum. Die detaillierten Bedingungen dieser
Garantie finden Sie auf der LINDY Website aufgelistet bei den AGBs.
LINDY No. 43149
© LINDY - Second Edition - MAY 2015
Manuel Utilisateur
Manuale
Introduction
Merci d’avoir choisi le Switch USB 3.0 LINDY. Le Switch USB 3.0
2ports LINDY vous permet de partager de façon simple et rapide un
périphérique USB 3.0 entre deux ordinateurs.
Contenu de l’emballage
•Switch USB 3.0
•Ce manuel
Caractéristiques
•Partage de périphérique USB 3.0
•Interface USB 3.0 – taux de transfert de données maximal
de 5Gbit/s, rétrocompatible USB 2.0/1.1
•Fonction raccourci clavier – commutation rapide entre les
ordinateurs (PC Windows uniquement)
•Indication LED pour le port actif
•Alimenté par le bus USB des ordinateurs connectés
•Compatible avec PC Windows et Mac équipés de port USB
Installation
•Mettez Hors Tension tous les ordinateurs & périphériques que
vous vous apprêtez à raccorder via le switch, avant de continuer
l’installation.
•Connectez le Switch USB à votre périphérique et aux ordinateurs
avec des câbles USB 3.0 appropriés. (vendus séparément)
•Démarrez vos ordinateurs et le périphérique
•Votre périphérique peut à présent être commuté entre les
ordinateurs
Note – si vous désirez partager plusieurs périphériques USB entre les
ordinateurs, connectez un Hub USB au Switch USB, et raccordez les
périphériques au Hub USB. (Comme pour tout périphérique connecté
au Switch, installez les pilotes nécessaires sur les ordinateurs
connectés avant utilisation.)
Utilisation
•Pour commuter les périphériques entre les ordinateurs, appuyez
simplement sur le bouton situé sur le côté du Switch USB.
•Si vous utilisez un ordinateur sous Windows, vous pourrez
également commuter entre les ordinateurs en appuyant deux fois
sur la touche “Arrêt défil.’’.
•La LED sur le Switch USB indique quel ordinateur accède
actuellement au périphérique.
Dépannage
•La longueur maximale de câble entre Switch & périphérique ou
Switch et un ordinateur est de 2m. Ne pas commuter vers un
ordinateur qui est entrain de démarrer.
•Les ordinateurs ne doivent pas être en veille pour pouvoir être
commutés
•Avant de commuter, assurez-vous que le périphérique USB n’est
pas en cours d’utilisation (lecture/écriture sur disque, impression)
Introduzione
Grazie per aver acquistato lo Switch USB 3.0 LINDY. Gli switch USB
3.0 2 porte permettono di condividere una periferica USB 3.0 su due
computer.
Contenuto della confezione
•Switch USB 3.0
•Questo manuale
Caratteristiche
•Condivisione di periferiche USB 3.0
•Interfaccia USB 3.0 – velocità massima di trasferimento
dati di 5Gbps, retrocompatibile con USB 2.0/1.1
•Hot pluggable - facilmente spostabile da un PC (solo PC)
•LED di indicazione dello stato
•Bus-powered, non necessita di un alimentatore esterno
•Compatibile con computer USB: PC & Mac
Installazione
•Spegnere tutti i computer e le periferiche che avete intenzione
di collegare allo switch prima di continuare con l’istallazione
•Collegare lo Switch alle vostre periferiche USB e al computer
con un cavo USB 3.0 (in vendita separatamente)
•Accendere il computer e le periferiche
•Ora le vostre periferiche saranno pronte per lavorare su due
computer
Nota - Se si desidera condividere più periferiche USB su i computer,
collegare un hub USB allo Switch. (Come per qualsiasi periferica
collegata allo switch, installare i driver necessari sui computer
collegati prima dell'uso.)
Operazioni
•Per commutare le periferiche tra un computer e l’altro, è
sufficiente premere il tasto corrispondente al computer
desiderato, direttamente sullo switch
•Se si sta utilizzando un computer con sistema operativo
Windows è possibile commutare le periferiche digitando due
volte il tasto Scroll Lock
•Il LED sullo Switch indicherà quale computer è correttamente
collegato alle periferiche
Risoluzione dei problemi
•La lunghezza massima del cavo tra lo switch e dispositivi
periferici e del computer è di 2m. Non commutare i computer
durante la fase di avvio.
•I computer devono essere attivi per poter commutare tra loro
•Prima di passare da un computer all’altro , assicurarsi che I
dispositive USB collegati non siano in uso (lettura dischi,
stampanti ecc.)
Tested to comply with
FCC Standards.
For Home and Office Use
Other Lindy Switch manuals

Lindy IPower Control 2x6 User manual

Lindy

Lindy IPower Control 2x6 User manual

Lindy 39336 User manual

Lindy

Lindy 39336 User manual

Lindy 25010 User manual

Lindy

Lindy 25010 User manual

Lindy 39632 User manual

Lindy

Lindy 39632 User manual

Lindy 38034 User manual

Lindy

Lindy 38034 User manual

Lindy 39306 User manual

Lindy

Lindy 39306 User manual

Lindy 32647 User manual

Lindy

Lindy 32647 User manual

Lindy U8 User manual

Lindy

Lindy U8 User manual

Lindy 38420 User manual

Lindy

Lindy 38420 User manual

Lindy 38429 User manual

Lindy

Lindy 38429 User manual

Lindy 43329 User manual

Lindy

Lindy 43329 User manual

Lindy P16-IP User manual

Lindy

Lindy P16-IP User manual

Lindy 25051 User manual

Lindy

Lindy 25051 User manual

Lindy KVM 42339 User manual

Lindy

Lindy KVM 42339 User manual

Lindy CPU Switch Smart DVI Quick start guide

Lindy

Lindy CPU Switch Smart DVI Quick start guide

Lindy 38269 User manual

Lindy

Lindy 38269 User manual

Lindy 43228 User manual

Lindy

Lindy 43228 User manual

Lindy 39300 Installation and operating instructions

Lindy

Lindy 39300 Installation and operating instructions

Lindy 43154 User manual

Lindy

Lindy 43154 User manual

Lindy 38156 User manual

Lindy

Lindy 38156 User manual

Lindy 42887 User manual

Lindy

Lindy 42887 User manual

Lindy Switch User manual

Lindy

Lindy Switch User manual

Lindy 32520 User manual

Lindy

Lindy 32520 User manual

Lindy 38032 User manual

Lindy

Lindy 38032 User manual

Popular Switch manuals by other brands

König Electronic CMP-USB2HUB55 manual

König Electronic

König Electronic CMP-USB2HUB55 manual

EtherWAN EX17908A installation guide

EtherWAN

EtherWAN EX17908A installation guide

Juniper EX8200 Series Installing

Juniper

Juniper EX8200 Series Installing

Linkskey LDV-342ARC Quick installation guide

Linkskey

Linkskey LDV-342ARC Quick installation guide

Altelix BMP-YLK1 installation guide

Altelix

Altelix BMP-YLK1 installation guide

Panasonic S24GPWR Operation manual

Panasonic

Panasonic S24GPWR Operation manual

Votek UT-6408 user manual

Votek

Votek UT-6408 user manual

Inline A3H manual

Inline

Inline A3H manual

HP J3128A AdvanceStack 10Base-T Hub-8E Installation and reference guide

HP

HP J3128A AdvanceStack 10Base-T Hub-8E Installation and reference guide

LEGRAND 0065403 quick start guide

LEGRAND

LEGRAND 0065403 quick start guide

ATEN Master View CS-172 user manual

ATEN

ATEN Master View CS-172 user manual

Contro l4 LOZ-5S1-W installation guide

Contro l4

Contro l4 LOZ-5S1-W installation guide

Belkin F1DN102K-3 user manual

Belkin

Belkin F1DN102K-3 user manual

TP-Link JetStream TL-SG3210XHP-M2 installation guide

TP-Link

TP-Link JetStream TL-SG3210XHP-M2 installation guide

Ruijie Networks RG-N18014 Hardware  installation and reference guide

Ruijie Networks

Ruijie Networks RG-N18014 Hardware installation and reference guide

Cisco CATALYST 6500 WS-X6066-SLB-S-K9 Installation note

Cisco

Cisco CATALYST 6500 WS-X6066-SLB-S-K9 Installation note

3Com SuperStack 3 4400 SE 3C17206 Getting started guide

3Com

3Com SuperStack 3 4400 SE 3C17206 Getting started guide

Emcotec DPSI Ampere operating manual

Emcotec

Emcotec DPSI Ampere operating manual

manuals.online logo
manuals.online logoBrands
  • About & Mission
  • Contact us
  • Privacy Policy
  • Terms and Conditions

Copyright 2025 Manuals.Online. All Rights Reserved.