Lipco KSM 130 User manual


Instructions
Compact disc mower KSM 130
2 - 22
140050-01-EN BA KSM 130 / 04.06.2020
1. Introduction
Dear Customer,
We thank you for having chosen a LIPCO Compact disc mower KSM
130. We hope that you will be happy with your choice.
In order that your LIPCO Compact disc mower KSM 130 will serve you
well for many years, we ask you to pay close attention to the operating
instructions which you will find in this manual. This will help you to
prevent breakdowns and accidents resulting from non-observance of
the operating instructions, for which our company will not accept
responsibility.
This Instruction and Maintenance Manual is to be considered an
integral part of the machine itself and therefore it must always
accompany the machine when it is sold, even in the event of its sale
to third parties.
If you keep this manual in a safe place and in good condition, you -
and whoever must use the machine - will be able to have a complete
reference on hand at all times.
Note:
The illustrations, descriptions and specifications in this manual are not
binding. LIPCO reserves the right to make modifications without
notice.

Instructions
Compact disc mower KSM 130
3 - 22
140050-01-EN BA KSM 130 / 04.06.2020
2. Contents page
1. Introduction 2
2. Contents 3
3. Designated use 4
4. Warning signs attached to the machine 5
5. Safety regulations 6
6. Accident prevention 7
7. Connection to the engine-driven machine 10
8. Technical Data 12
9. Operation of the cutter bar / prior to mowing 13
10. Operation of the cutter bar / after mowing 13
11. Maintenance 14
12. Oil change 16
13. Cutting operation faults 17
14. Instructions for repair shops 18
15. After use 19
16. Warranty 20
17. EC Declaration of Conformity 21

Instructions
Compact disc mower KSM 130
4 - 22
140050-01-EN BA KSM 130 / 04.06.2020
3. Designated use
The LIPCO Compact disc mower KSM 130, when connected to single
axle tractors / power movers, is designed to mow grassland and
meadows.
Any other use for purposes other than those described here is
considered contrary to the designated use. The manufacturer cannot
be held liable for damage resulting from such use; the risk for such
use lies entirely with the user.
Operating the unit within the limits of its designated use also means
following the instructions for operation, transport and maintenance
described by the manufacturer.
Any work, maintenance and repair on the LIPCO Compact disc mower
KSM 130 must be carried out by persons who are familiar with the unit
and have been informed about possible risks!
The relevant accident prevention regulations as well as the other
generally recognised maintenance, safety, industrial medicine and
road traffic rules and instructions must be observed.
The manufacturer cannot be held liable for damage resulting from
unauthorised modifications of the LIPCO Compact disc mower KSM
130.
Instructions
Compact disc mower KSM 130
5 - 22
140050-01-EN BA KSM 130 / 04.06.2020
4. Warning signs attached to the machine
Before starting operation, the personnel must have
read the operating and safety instructions and must
observe them.
Before commencing maintenance and repair work,
switch off the engine and pull the key.
With the drive switched on and the tractor motor
running, maintain sufficient distance to rotating tools.
With the motor running, there is a risk of parts being
hurled away –maintain safety distance.
Wear eye protection.
Wear ear protectors.

Instructions
Compact disc mower KSM 130
6 - 22
140050-01-EN BA KSM 130 / 04.06.2020
5. Safety regulations
The operation of machines with rotating and moving parts always
bears risks. Please always follow the safety regulations:
•Before starting operation, the personnel must have read the
operating and safety instructions and observe them.
•Never remove or alter the safety devices!
•Do not touch rotating or moving parts!
•Never lie down beneath the unit for repair or control purposes
when the unit has not been carefully secured beforehand!
•Use the machine only in technically perfect condition!
•For maintenance work switch off the device!
•Maintain safety distance! (Attach danger sign on the side of the
machine)
•Any work, maintenance and repair on the LIPCO Compact disc
mower must be carried out by persons who are familiar with the
unit and have been informed about possible risks!
•The relevant accident prevention regulations as well as the other
generally recognised maintenance, safety, industrial medicine
and road traffic rules and instructions must be observed!
•The warnings and signs attached to the unit give important
information on safe operation; observing these instructions
ensures your safety!

Instructions
Compact disc mower KSM 130
7 - 22
140050-01-EN BA KSM 130 / 04.06.2020
6. Accident prevention
•Before starting the machine and the tractor check, road and
operating safety!
•Please observe, apart from the instructions given in these
operating instructions, also the generally applicable safety and
accident prevention regulations!
•The warnings and signs attached to the unit give important
information on safe operation; observing these instructions
ensures your safety!
•Before commencing work, familiarize yourself with all devices and
operating elements and their functions!
•Never stay in the rotating and pivoting area of the unit!
•Before leaving the engine-driven machine, switch off engine and
pull the ignition key, if present.
•Nobody is allowed to stay between the engine-driven machine and
the unit!
•Before working or continuing work with the unit, any damage must
be repaired!
•Check oil levels / lubrications!
•Wear ear protection and safety goggles!
•When connecting the unit, it is absolutely necessary that the
connecting flanges (drives) of single axle tractor/power mower
and the unit coincide or are made to coincide!
•Before switching on the engine-driven machine/power takeoff
shaft, make sure nobody is in the danger area of the unit!
Take into account the direction of rotation of the power takeoff!

Instructions
Compact disc mower KSM 130
8 - 22
140050-01-EN BA KSM 130 / 04.06.2020
•Driving behaviour, steering and braking capabilities are affected
by attached units and ballast weights! Ensure sufficient steering
and braking capabilities!
•Prior to maintenance and repair work on the lifted unit, secure it
by mechanical means using suitable supporting elements! Turn
off the engine and pull the ignition key!
•Check nuts and screws for tight seat and, if necessary, retighten
them. First check after about 5 operating hours.
•Spare parts must at least comply with the technical requirements
specified by the manufacturer! This is only guaranteed for LIPCO
original spare parts!
•A safe operation of the cutter bar can only be guaranteed if the
blades have been mounted according to regulations. For
mounting, the special tools included in the delivery must be used!
•Check cutter system before each startup for damaged, missing
and worn-out blades and, if necessary, replace them!
•Replace missing and damaged blades always in sets, to avoid the
formation of dangerous imbalances!
•The protection devices must be checked regularly, and worn-out
or damaged protection devices must be replaced!
•The protective devices on the cutter system, for example cloths
and hoods, protect against flying rocks and the like and protect the
access to dangerous places! This is why they must be put into the
protective position before commencing work!
•Prior to startup and during work, the sliding blocks must lie on the
ground!

Instructions
Compact disc mower KSM 130
9 - 22
140050-01-EN BA KSM 130 / 04.06.2020
•While the engine of the engine-driven vehicle is running, nobody
must stay in the working/danger area of the cutter system!
•Even when the cutter system is operated according to its
designated use, rocks and the like can be hurled away. Therefore
nobody must stay in the danger zone (about 30 m). Caution is
called for when working close to streets and buildings!
•After switching off the drive, the tools of the cutter system run on
for a certain period. Approach them only after they have come to
a halt!
•After driving onto an obstacle, immediately switch off the cutter
system and check it for damage!

Instructions
Compact disc mower KSM 130
10 - 22
140050-01-EN BA KSM 130 / 04.06.2020
7. Connection to the engine-driven machine
Before attaching the machine flange (Fig. 1, Ref. A) corresponding to
the type of engine-driven machine you have, it is recommended to
spread grease on the outer diameter of the machine hub (Fig. 1, Ref.
B). Then insert the flange with its two threaded pins (Fig. 1, Ref. C)
and the lock nuts. To attach the flange to the hub, proceed as follows:
•Screw the threaded pins in as far as possible and then unscrew
them by one turn. Tighten the lock nuts. After this operation, make
sure that the flange oscillates freely without squeezing or blocking.
•After having greased the connecting shaft (Fig. 1, Ref. D), insert it
on the machine shaft of the Compact Disc Mower. When these
steps are complete, move the engine-driven machine close to the
unit. Ensure the toothed wheel work of the connecting shaft
engages correctly with the power takeoff shaft of the engine-
driven machine and the flange has a centered contact with the
engine-driven machine. Then secure the connection between the
engine-driven machine and the unit.
•Before commencing work, the drive flange must be lubricated.
(Fig. 1, Ref. E)
Fig. 1
B
E

Instructions
Compact disc mower KSM 130
11 - 22
140050-01-EN BA KSM 130 / 04.06.2020
•An optimum mowing result can only be obtained by exact
adjustment of the cutter system inclination. The cutter system
should be inclined forward in the driving direction. This is
accomplished by adjusting the cutter system via the threaded
spindle (Fig. 2).
Spindle for inclination
adjustment
Fig. 2

Instructions
Compact disc mower KSM 130
12 - 22
140050-01-EN BA KSM 130 / 04.06.2020
8. Technical Data
Type
Weight
(kg)
Required
power (kW / hp)
Number of discs/blades
(pcs.)
KSM 130
125
10 / 14
3 / 6
Main dimensions
L1
L2
B
H
KSM 130
750
290
1850
445

Instructions
Compact disc mower KSM 130
13 - 22
140050-01-EN BA KSM 130 / 04.06.2020
9. Operation of the cutter bar / prior to mowing
•Regularly check blades and blade holders for perfect condition
and correct mounting right/left.
(Refer to chapter “11. Maintenance”).
•Never mow without having attached all protective devices.
Protective devices are subject to wear and must be replaced in
good time.
10. Operation of the cutter bar / after mowing
•Clean cutter bar to remove soil and remaining grass. Check all
blades and blade holders with respect to their condition.
Immediately change damaged parts. Do not spray the bearing
areas directly with high-pressure cleaner. Maintenance
instructions (refer to chapter 11.

Instructions
Compact disc mower KSM 130
14 - 22
140050-01-EN BA KSM 130 / 04.06.2020
11. Maintenance
Replacement of the blades
•Insert mounting key (1) between cutting disc (2) and blade holder
(3), press downward and replace blades (4).
(Fig. 3)
•If a cutting edge has become worn out, the blade is only rotated
and used again at the same place. Prior to each use for mowing
and upon rotating them, the blades must be checked for damage
by foreign matter (e.g. rocks). Damaged blades must be replaced
immediately (risk of breaking!).
•For reasons of safety, use original spare parts only. When
replacing the blades, always replace both blades of each cutting
disc (risk of imbalance!).
Fig. 3
Driving
direction
Instructions
Compact disc mower KSM 130
15 - 22
140050-01-EN BA KSM 130 / 04.06.2020
Replacement of the blade holders
•The continuous movement of
the blade will cause the bolt to
become worn. If the hole of a
new blade reaches to the edge
of the cutting disc and is visible
from above, the blade holder
must be replaced immediately.
In this case, the bolt diameter
is worn out to about 30%. To
replace the blade holders, the
disc must be unscrewed.
(Fig. 4)
Before each use for mowing and after each replacement of the
blades, the blade holders must be checked for wear.
•For reasons of safety, use LIPCO original spare parts only.
Lubrication
•The cardan joint must be
lubricated via the lubricating
nipples especially provided for
this purpose (Fig. 5).
•Drive flange: Lubricate once a month and turn it –must run
smoothly when turning. (see Fig. 1 - E)
•Remove drive flange once a year, clean it to remove dirt and
regrease it.
Fig. 4
Fig. 5
Lubricating nipple

Instructions
Compact disc mower KSM 130
16 - 22
140050-01-EN BA KSM 130 / 04.06.2020
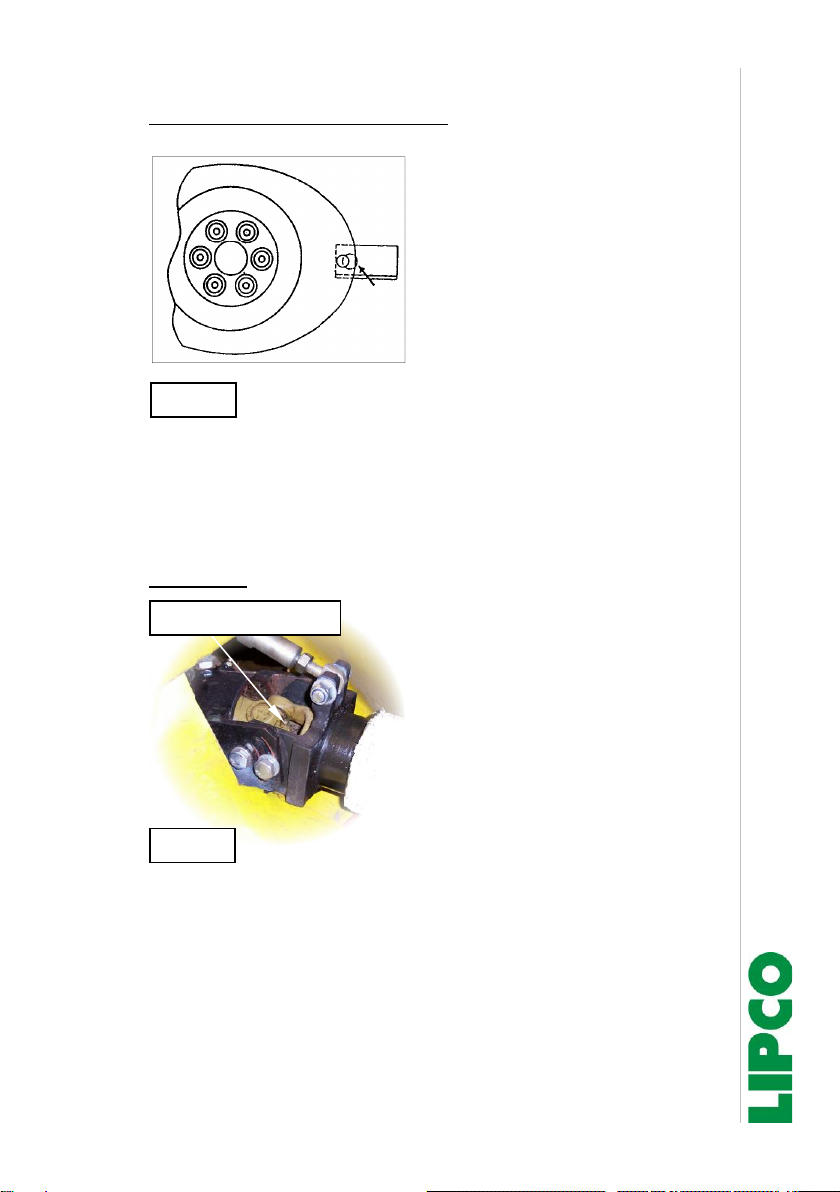
12. Oil change
•Change the oil in the cutting bar and angular gear after the first 50
operating hours and then every 200 operating hours, but at least
once a year. Change oil while warm but not while hot (risk of
burning!). Use high-grade mineral gear oil SAE 80 or 90.
•The oil level must be checked every 20 operating hours.
•The oil temperature can be 80 –100°C in the angular gear and 40
–50°C in the cutter bar without causing any damage.
Caution! There is a risk of burning if the angular gear is
touched!
•In case of longer downtimes, we recommend depositing the
cutting unit with the cutter bar horizontally in working position, to
allow the cogwheels to become wetted by the oil.
Oil in the cutter bar:
•The oil charging screw (A) for the cutter bar is located between
the middle cutter discs.
•Perform oil level check with the cutter bar in exactly horizontal
position.
•The oil level, as measured in the oil charging hole, should be 12
mm.
•The drain screw (B) is located at the lower end of the cutter bar
under the first cutter disc.
Fig. 6
A
B

Instructions
Compact disc mower KSM 130
17 - 22
140050-01-EN BA KSM 130 / 04.06.2020
•For the cutter bar, high-grade mineral gear oil SAE 80 or 90 must
be used.
Filling amount:
Oil in the angular gear:
•Check the oil level in the angular gear. This is done by tilting the
unit by 90 degrees, so that the bore for the oil charging screw of
the angular gear points upwards.
Oil filling level of angular gear: 2 -3 cm
Attention: Support the machine sufficiently against tilting.
•First oil change after 30–50 operating hours and then every 200
operating hours, but at least once a year. Use gear oil SAE 90.
Filling amount: 0.3 L
•However, it is extremely important to observe the above-
mentioned oil change intervals!
•The used oil must be disposed of in accordance with current legal
regulations.
13. Cutting operation faults
Striations, Marcelling
•Resharpen blades or use new ones. Ensure correct mounting with
respect to clockwise/counterclockwise rotation.
•Set cutter bar inclination!
•When doing so, observe the safety regulations in chapter 5. When
replacing the blades, follow the instruction given in chapter “11.
Maintenance”.
Instructions
Compact disc mower KSM 130
18 - 22
140050-01-EN BA KSM 130 / 04.06.2020
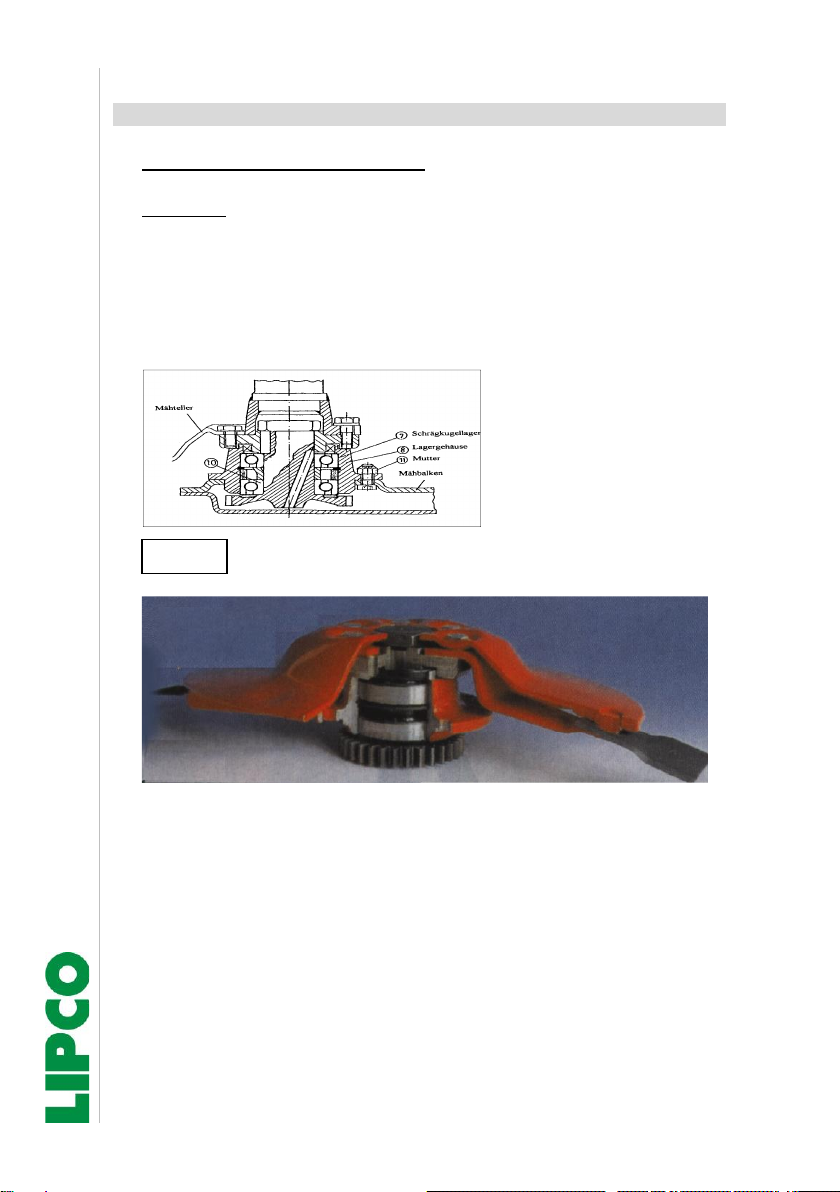
14. Instructions for repair shops
Repair of the cutter disc bearing
Attention!
Here, too, it is imperative to use original spare parts only (owing to
special tolerance).
After removing the cutter discs, the bearing housing (8) can be
removed from the cutter bar toward the top by unscrewing the nut
(11). No further dismounting of the cutter bar necessary.
Angular ball bearing:
The drive cutter disc located directly under the angular gear is
housed on 2 angular ball bearings (7). (For all other cutter discs,
deep groove ball bearings must be used.) The angular ball bearing
must be mounted in the bearing housing (8) such that the bearing
inner rings face each other with their smaller side (10).
Fig. 7

Instructions
Compact disc mower KSM 130
19 - 22
140050-01-EN BA KSM 130 / 04.06.2020
Attention! Removing the angular ball bearings will destroy them and
make it necessary to replace them in any case!
Do not forget the spacer rings between the bearings!
Replacement of the idle wheel and the ball bearings inside the
cutter bar
This is done by unscrewing all screws to remove tray and lid. Only
the cutter disc and the bearings do not have to be unscrewed. Then
push the idle wheels along with the ball bearing away by using two
tire levers. The ball bearing is held in the cogwheel by means of a
retaining ring. The ball bearing can be pressed out of the cogwheel
by applying a pressing force of 5 tonnes. This will only destroy the
retaining ring.
15. After use
If the LIPCO Compact disc mower is to remain unused for a longer
period, it is necessary to carry out the following steps:
•Thoroughly wash and dry the LIPCO Compact disc mower!
•Check the function of all movable parts. Replace damaged or
worn parts!
•Check the tightening of the screws!
•Lubricate free wheel and universal joint shaft!
•Check oil in the angular gear and in the cutter bar!
•Grease all unpainted metal parts to protect them against
corrosion, cover the LIPCO Compact disc mower and store it in a
dry place so that it will be ready for use any time!
•Attention!
When putting the device back into operation, please follow the
instructions in chapter “11. Maintenance”.

Table of contents
Other Lipco Farm Equipment manuals


Popular Farm Equipment manuals by other brands


Maschio
Maschio JUMBO RAPIDO Series Use and maintenance

TMG
TMG TMG-SLP72 product manual

FPM Agromehanika
FPM Agromehanika 627 152 ASSEMBLY / OPERATION/ MAINTENANCE, SPARE PARTS LIST

Kverneland
Kverneland ACPND 65929 Series Technical & service manual

LELY
LELY HIBISCUS 1525 Master Operator's manual

Kemper
Kemper 445 Operator's manual

Poettinger
Poettinger ALPINTOP 300 U Operator's manual

Arrowquip
Arrowquip PORTABLE Q-CATCH 74 Series product manual

Mesko-Rol
Mesko-Rol Z 548 Service manual, Spare Parts

Gaspardo
Gaspardo Primo E2 Use and maintenance

waratah
waratah HTH622B SIII Operator's manual

CrustBuster
CrustBuster Speed King owner's manual