Lister Petter K1 64 Service manual

1
K Series
Operators' Handbook
K1 64, K1 72 Engines
P027-10504, Issue 2

2
Disclaimer
The information, specications, illustrations, instructions and statements contained within this
publication are given with Lister Petter's best intentions and are believed to be correct at the time
of going to press.
Our policy is one of continued development and we reserve the right to amend any technical informa-
tion with or without prior notice. Whilst every effort is made to ensure the accuracy of the particulars
contained within this publication neither the Manufacturer, the Distributor nor the Dealer shall in any
circumstances be held liable for any inaccuracy or the consequences thereof.
The information given is subject to the Company’s current Conditions of Tender and Sale, is for the
assistance of users and is based upon results obtained from tests carried out at the place of manu-
facture. The Company does not guarantee that the same results will be obtained elsewhere under
different conditions.
© Copyright Lister Petter Limited, Dursley
GL11 4HS, England.
All rights reserved.
Associated Publications:
Master Parts Manual ............P027-10506
Workshop Manual.................P027-10505
Technical Handbook .............P027-10507

3
Contents
1. Introduction....................................................................................4
2. Engine Features.............................................................................5
3. Safety Information .........................................................................6
4. General Information ................................................................... 10
5. Operating Instructions................................................................ 11
6. Engine Fluids............................................................................... 14
7. Engine Servicing.......................................................................... 15
8. Troubleshooting .......................................................................... 22
9. Maintenance Record .................................................................. 25
10. Warranty.................................................................................... 36
11. Index.......................................................................................... 38

4
1.1 Introduction
The purpose of this handbook is to lay
down operating guidelines for the K Series
engine ranges.
The specication details given apply
to a range of engines and not to any one
particularengine,incasesofdifcultythe
user should consult the local Lister Petter
Distributor or Dealer for further advice and
technical assistance.
The information, specifications, il-
lustrations, instructions and statements
contained within this publication are given
with our best intentions and are believed
to be correct at the time of going to press.
Our policy is one of continued develop-
ment and we reserve the right to amend
any technical information with or without
prior notice.
Whilst every effort is made to ensure
the accuracy of the particulars contained
within this publication neither the Manu-
facturer, Distributor or Dealer shall in any
circumstances be held liable for any inac-
curacy or the consequences thereof.
The information given is subject to the
Company’s current Conditions of Tender
and Sale, and is for the assistance of users
and is based upon results obtained from
tests carried out at the place of manufac-
ture. This Company does not guarantee that
the same results will be obtained elsewhere
under different conditions.
Using this Operators Handbook
It is recommended the individual steps
contained in the various maintenance or
repair operations are followed in the se-
quence in which they appear.
When a diesel engine is operating or
being overhauled there are a number of
associated practices which may lead to
personal injury or product damage.
Your attention is drawn to the symbols
shown and described below which are ap-
plied throughout this publication
CAUTION
This caution symbol draws attention to
special instructions or procedures which,
if not correctly followed, may result in
damage to or destruction of equipment
WARNING
This warning symbol draws attention to
special instructions or procedures which,
if not strictly observed, may result in
personal injury
WARNING
A WARNING SYMBOL WITH THIS TYPE
OF TEXT DRAWS ATTENTION TO SPECIAL
INSTRUCTIONS OR PROCEDURES WHICH,
IF NOT STRICTLY OBSERVED, MAY RESULT
IN SEVERE PERSONAL INJURY, OR LOSS
OF LIFE.
Running-in
A gradual running-in of a new engine
is necessary. Extended light load running
early in the life of the engine may cause
detrimental damage to the cylinder bore
allowing lubricating oil to enter the exhaust
system.
Associated Publications
Workshop Manual
Master Parts Manual
Technical Handbook
1. Introduction
1. Introduction

5
2. Engine Features
K1 72
2. Engine Features
Air cleaner
Exhaust silencer
Decompressor lever
Fueltankller
Fuel tank
Recoil start
Oil drain plug
Fuel injection
pump
Speed control
assembly
Oilller/dipstick
Fuel tap

6
3.1 Safety Information,
Precautions and Safe Working
Practices
Follow All Safety Instructions
a. Carefully read all safety messages in this
manual and the safety and informative
symbols on your engine and plant.
b. Starting any diesel engine can be dan-
gerous in the hands of inexperienced
people. Engine operators must be in-
structed in the correct procedures before
attempting to start any engine.
c.Donotmakeanyunauthorisedmodica-
tions as these may affect the safe opera-
tion of the engine and put the operator
at risk.
d. Ensure all starting devices are removed,
or isolated, before commencing any work
on the engine or plant.
Emergency Considerations
a. Be prepared with suitable equipment,
andknowledge,incasearestarts.
b. Know where to make calls to the emer-
gency services from.
c. Ensure a third party knows where you are
working and when you leave the working
area.
Handling Fluids Safely
a. When working with fuel or batteries do
not smoke or work near to heaters or
otherrehazards.
b.Store ammable liquids away from re
hazards.
c. Do not expose pressurised containers to
heat and do not incinerate or puncture
them.
d. Handle fuel with care and always stop
the engine before refuelling. Do not
overllthefueltank.
e. Thoroughly clean any lubricating or fuel
oil from the skin as soon as possible.
f. Rectify all fuel, coolant and oil leaks as
soon as practicable and clean any spills
when they occur.
g. Remove any build-up of grease, oil or
debris.
h. Batteries contain sulphuric acid - if the
acid has been splashed on the skin,
eyesorclothesushitawaywithcopious
amounts of fresh water and seek medi-
cal aid.
Personal Safety
a. Tie long hair close to your head.
b. Do not wear a necktie, scarf, loose cloth-
ing or necklace when working close to a
running engine.
c. It is advisable to remove rings and other
jewellery to prevent possible entangle-
ment in moving parts. These items could
also cause an electric short circuit if any
part of the electrical system is being
worked on.
d. Do not work under any plant that is only
held by overhead lifting equipment.
Personal Protective Clothing and
Equipment
a.Wearclosettingclothingandpersonal
protective clothing and safety equipment
appropriate to the work being done.
b. Wear suitable ear protection to protect
against objectionable or uncomfortable
loud noise.
Prolonged exposure to loud noise can
cause impairment, or loss of hearing.
c. The use of music or radio headphones
could cause a loss of concentration.
Handling Chemical Products Safely
a.Directexposuretohazardouschemicals
can cause serious injury.
b.Potentiallyhazardouschemicalsinclude
such items as lubricants, fuel, coolant
concentrate, battery acid, paint and
adhesives.
c. Manufacturers Safety Data Sheets will
provide specic details of the physical
and health hazards, safety and emer-
3. Safety Information and Precautions

7
Safe Maintenance Considerations
a. Understand the service procedures be-
fore commencing any work.
b. Ensure the work area is clean, dry, well
ventilated and has adequate lighting.
c. Isolate the engine starting system before
commencing any work on the plant.
d. All persons using equipment or process-
es in connection with the maintenance of
plant and machinery must have received
adequate and suitable training.
High Pressure Fluids
a. Never allow any part of the body to
come into contact with high pressure
hydraulic oil, compressed air or fuel oil,
for example when testing fuel injection
equipment.
b.Both digested and injested uids can
lead to serious injury, possibly with fatal
results in a very short period of time.
Electrical System Considerations
a.Ensure that the battery is of sufcient
capacity to start the engine down to its
minimum operating temperature tak-
ing into account any drag that may be
imposed on the engine by the type of
transmission that is attached to it.
b. Ensure the battery and all engine wiring
cablesareofsufcientsizetocarrythe
currents required.
c. Check that the engine mounted alterna-
tor is of sufcient output to cope with
the total electrical load required by the
machinetowhichitistted.
d. Ensure engine wiring cables are:
Bound together in a loom and adequately
supported.
Routed to avoid any hot surfaces, par-
ticularly the exhaust system.
Not in contact with any rough surfaces
or sharp corners so as to avoid any pos-
sibilityofchafngtakingplace
Charge Winding Precautions
The following points must be strictly
observedwhenchargewindingsaretted
otherwise serious damage can be done.
a.Never remove any electrical cable while
the battery is connected in the circuit.
b.Only disconnect the battery with the
engine stopped and all switches in the
OFF position.
c.
Always ensure that cables are tted to
their correct terminals.
A short circuit or reversal of polarity will
ruin diodes and transistors.
d.Never connect a battery into the system
without checking that the voltage and
polarity are correct.
e.
Neverashanyconnectiontocheckthe
currentow.
f.Never experiment with any adjustments
or repairs to the system.
g.The battery and charge windings must
be disconnected before commencing
any electric welding when a pole strap
is directly or indirectly connected to the
engine.
WARNING
Starting engines that are fitted with
charge windings which have been dis-
connected from the battery will cause
irreparable damage unless the stator
leads from the rectier/regulator have
been removed.
gency procedures and any necessary
personal protection equipment required
while working with hazardous materi-
als.
Rotating Machinery
a. Entanglement with any rotating equip-
ment can cause serious injury or death.
b. If unprotected skin comes into contact
with rotating equipment severe burns
can result.
c. Some accessories may require guards
whichmustbesuppliedandttedbythe
purchaser.
3. Safety Information and Precautions

8
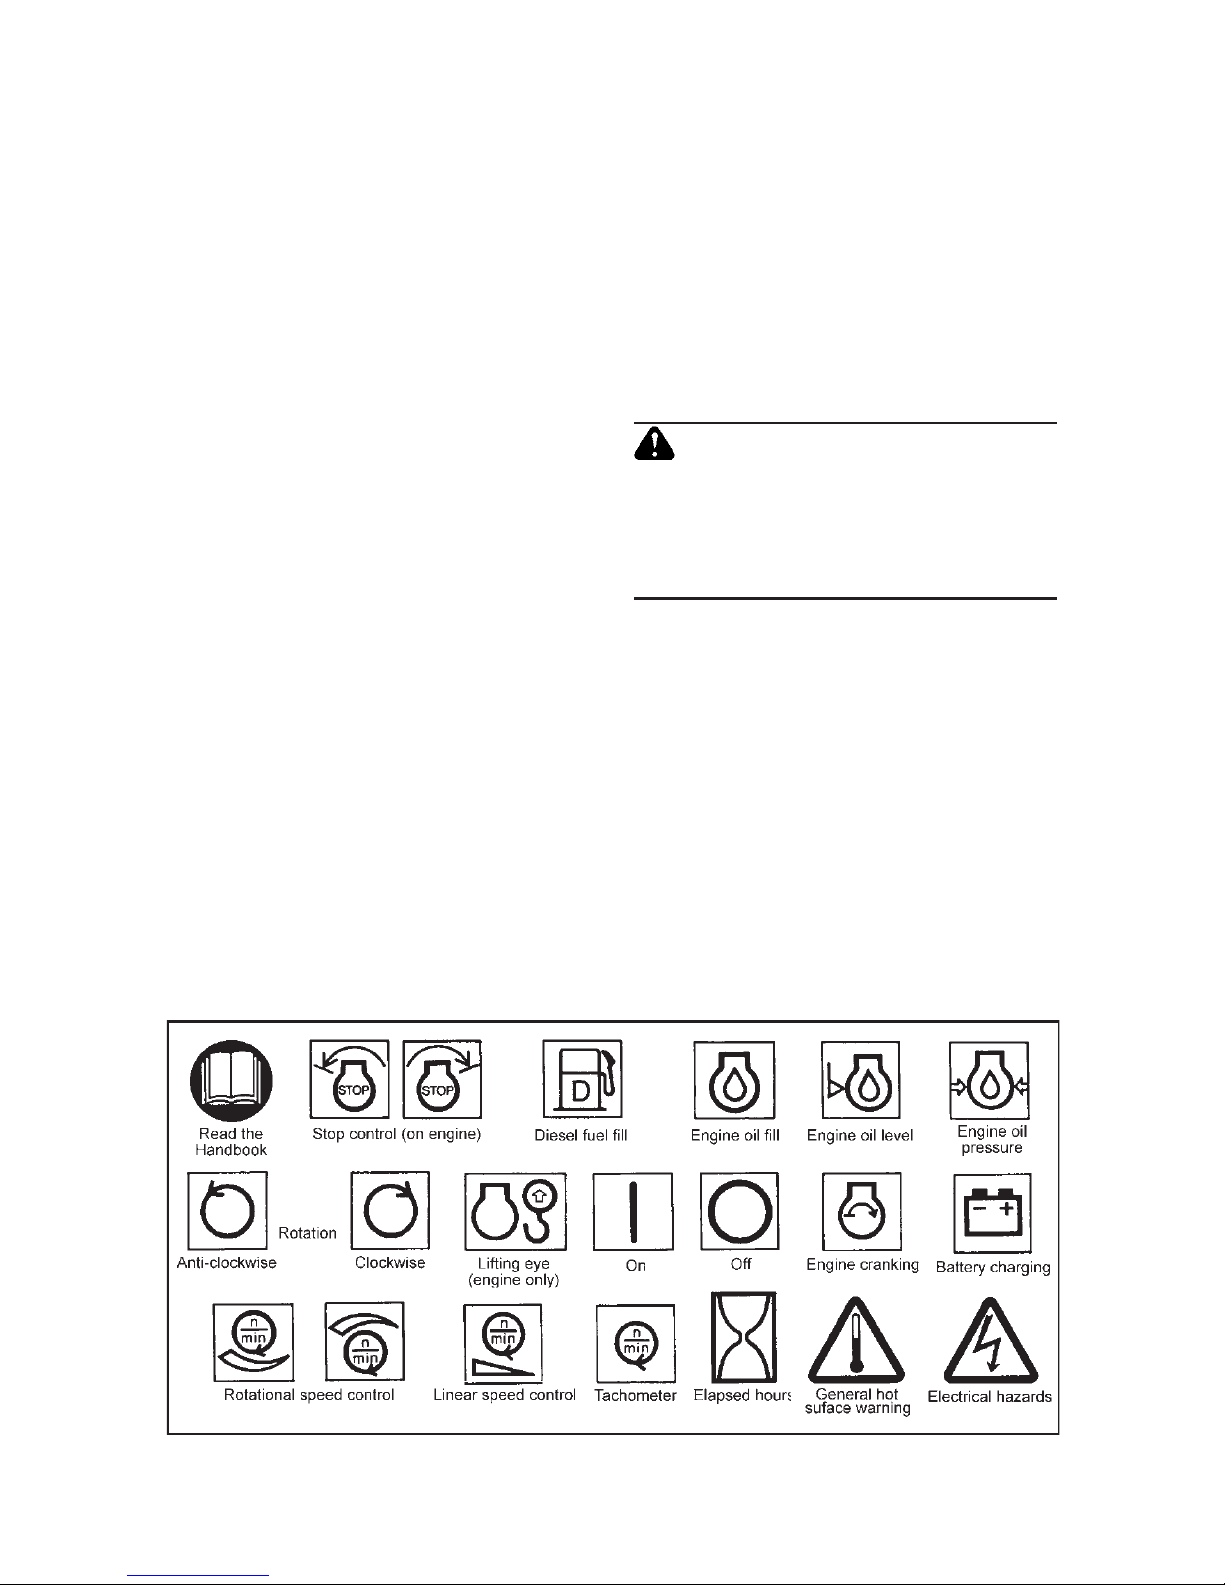
• Ensuretheliftingequipmenttobeused
has the correct capacity to lift the engine
and is designed to give a vertical lift from
directly above the lifting eyes.
• Checktoensuretheengineliftingeyes
are not damaged and they are secure.
• Ensurethereisclearancebetweenthe
lifting equipment hooks and the engine.
• Theliftingeyesttedtotheengineare
suitable for lifting the engine and acces-
sory assemblies originally tted by Lister
Petter.
Waste Disposal Precautions
WARNING
Extreme care must be taken to ensure
that waste oil, fuel, lter elements, cool-
ant concentrate, battery electrolyte, sol-
vents or other toxic wastes are disposed
of in accordance with local regulations to
prevent contamination.
Fuel System Precautions
a. When priming or checking the fuel injec-
tion pump timing, care must be taken to
wipe spilled fuel from the outside of the
engine.
b.Alwaystanewjointwhenaunionhas
been disturbed.
c. Special care must be taken to see that
there is no leakage from the joints of the
fuel pipe connection to the pump.
d. When tightening or loosening the fuel
injection pump delivery connections, use
two spanners to prevent the unsealing of
the fuel pump delivery valve holders.
e. When refitting the fuel pipe from the
pump to injector, the connection to the
injector must be tightened before the
connection to the fuel pump.
This procedure will ensure that there is
no leakage from these joints.
f. It is most important that all fuel joints are
tight and leak proof.
g.Always ll the fuel tank through a ne
strainer, preferably at the end of the
engine work period.
Starter Battery Precautions
WARNING
Sulphuric acid in battery electrolyte is
poisonous, is strong enough to burn skin,
eat holes in clothing and cause blindness
if splashed into the eyes.
a. Do not smoke near the batteries and
keep sparks and flames away from
them.
b. Batteries contain sulphuric acid - if the
acid has been splashed on the skin,
eyes orclothesush it awaywithcopi-
ous amounts of fresh water and seek
immediate medical aid.
c. Keep the top of the battery well venti-
lated during charging. Switch off the
battery charger before connecting or
disconnecting the charger leads.
d. Disconnect the battery negative (earth)
leadrstandreconnectlast.
e.Never 'ash' connections to check cur-
rentow.
f. A damaged or unserviceable battery
must never be used.
g.Donotattempttochargeafrozenbat-
tery; it may explode; warm the battery to
16°C (60°F).
Oil Seals Containing Viton
Someenginesmaybettedwithseals
or 'O' rings manufactured from 'Viton' or a
similar material.
When exposed to abnormally high tem-
peratures, in excess of 400°C (752°F), an
extremely corrosive acid is produced which
cannot be removed from the skin.
If signs of decomposition are evident, or
if in doubt, always wear disposable heavy
duty gloves.
Lifting Precautions
The following points must be consid-
ered before attempting to lift the engine.
WARNING
Engine lifting eyes must not be used to lift
the complete plant.
3. Safety Information and Precautions

9
If any sediment is stirred up during the
process this has time to settle before the
engine is used again, this will minimise the
risk of condensation contaminating the
fuel.
If cans are used, avoid tipping out the last
few drops.
h.Funnelsareverydifculttokeepcleanin
dusty conditions.
Wash them before and after use and
wrapthemupwhennotrequired,orll
the tank direct from a small mouthed
screw capped fuel can.
i. The fuel injection equipment is manu-
factured to very accurate limits and the
smallest particle of dirt will destroy its
efciency.
Fuel, free from water and contaminants
is of the utmost importance.
General Precautions
a.Ensure the engine is securely mounted.
b. Ensure that there is a generous supply of
cooling and combustion air available.
c. Keep the engine and surrounding area
clean.
d. Keep all safety guards in position.
e.Keep the body and clothing clear of all
moving or hot parts.
f.Never allow any part of the body to come
into contact with high pressure fuel oil,
for example when testing fuel injection
equipment.
g.Thoroughly clean any lubricating or fuel
oil from the skin as soon as possible.
h.Rectify all fuel and oil leaks as soon as
practicable and clean any spillages when
they occur.
Before Starting Precautions
WARNING
Starting any diesel engine can be danger-
ous in the hands of inexperienced people.
Engine operators must be instructed in
the correct procedures before attempting
to start any engine.
a.Ensure the engine is free to turn without
obstruction.
b.Check that the lubricating oil level is cor-
rect.
c.Theoilsumpmustbelledtothe‘full’
markonthedipstick;donotoverll.
d.Check that the fuel is in the 'ON' posi-
tion.
e.Ensure that the battery is connected,
fully charged and serviceable.
f.Where possible, disengage the driven
equipment while starting.
Safety Symbols
This section identies the ISO 8999 symbols currently used by Lister Petter.
3. Safety Information and Precautions

10
4.1 Technical Data
4.2 Nomenclature
K1 64 - Single cylinder, direct injection,
naturallyaspirated,ywheelfanaircooled
diesel engine.
K1 72 - Single cylinder, direct injection,
naturallyaspirated,ywheelfanaircooled
diesel engine.
4.3 Engine Serial Number
The engine serial number is stamped on
a plate attached to the engine. It is neces-
sary to identify the type and build of each
engine to enable the correct maintenance
procedures, as described later in this pub-
4. General Information
Type K1 64 K1 72
Design Air-cooled four-stroke diesel engine
Rotation¹ Anticlockwise Anticlockwise
Type of injection Direct Direct
Number of cylinders 1 1
Bore x stroke mm 78 x 64 86 x 72
Displacement cm³ 305 418
Electrical system² 12v negative earth 12v negative earth
Battery charging system² Charge windings Charge windings
Lubricating oil consumption
(after running in period) 0.75% of fuel consumption at full load
Minimum lubricating oil pressure at 3000r/min bar (lbf in²) 1.5 (21)
Oil sump capacity
litre 1.1 1.65
pints 1.95 2.9
USquarts 1.2 1.75
Capacity between dipstick marks
litre 0.4 0.55
pints 0.73 1.0
USquarts 0.45 0.6
Fuel tank capacity
litre 3.5 5.5
pints 6.1 9.6
USquarts 3.6 5.7
Net weight kg 33 47
Notes:
1. Viewed from output shaft end; 2. Fitted as standard on some models.
lication, to be carried out.
Typical Serial Number
11300123K164C36V
Serial Number Code
11................Year code (11=2011)
3..................Factory code
00123..........Consecutive number of engine
K164...........Model
C.................Camshaft drive PTO (Power Take
Off)
36................Maximum rated speed of 3600rev/
min (30 = 3000rev/min)
V.................Variable speed governor
4. General information

11
5. Operating Instructions
5.1 Preliminary Instructions
The following operating instructions
are of a general nature and should be read
in conjunction with, or substituted by, the
equipment manufacturers instructions.
WARNING
Starting any diesel engine can be dan-
gerous in the hands of inexperienced
people.
Before attempting to start any engine the
operator should read the "3. Safety Informa-
tion and Precautions" and be conversant
with the use of the engine controls and the
correct starting procedures.
CAUTION
ETHER BASED COLD START AIDS IN AERO-
SOL CANS MUST NOT BE USED UNDER
ANY CIRCUMSTANCES.
WARNING
EXHAUST GASES CONTAIN CARBON
MONOXIDE WHICH IS A COLOURLESS,
ODOURLESS AND POISONOUS GAS THAT
CAN CAUSE UNCONSCIOUSNESS AND
DEATH.
The engines are able to run satisfacto-
rily at ambient temperatures up to 25°C
(77°F) without derating. Above this tem-
perature the rated power must be reduced
in accordance with the relevant ISO, BS or
DIN Standards.
The maximum ambient operating tem-
perature is 40°C (104°F) and if it is desired
to run at higher temperatures the local
Lister Petter Distributor or Dealer should
be consulted.
WARNING
All engines are dispatched dry, i.e. not
containing fuel or oil.
5.2 Starting Procedure
WARNING
When using a rope start, do not wind the
rope around the hand or wrist and ensure
the rope is not tangled, frayed or contami-
nated with fuel or oil.
1. Fill the engine with the correct grade of
lubricating oil and fuel as specied in
Engine Fluids - Section 6.
2.Open the fuel tap.
Figure 5.2.1 Fuel Tap (on position)
3. Move the engine control (A) to the 'RUN'
position.
Figure 5.2.2 Engine Control - Fixed Speed
5. Operating Instructions
A

12
Figure 5.2.3 Engine Control - Variable Speed
4.Pull the rope handle until you feel ten-
sion. Let the rope rewind back into the
recoil start; in this way the entire length
of the starting rope can be used to start
the engine.
5. Push the decompressor lever down and
it will stay in the down position.
Figure 5.2.4 Decompressor Lever
6. Grip the handle with both hands.
7. Commence pulling the starting cable
vigorously (the decompressor lever will
return automatically to the run position)
and at increasing speed until the engine
starts.
8. If the engine does not start repeat proc-
ess from 3 - 6 again.
5. Operating Instructions
5.3 Electric Key Start
1.Ensure the decompressor lever is in the
running position.
Figure 5.3.1 Decompressor Lever - Run posi-
tion
2.Move the engine control lever (A) to the
'RUN' position.
Figure 5.3.2 Engine Control
3.Ifavariablespeedcontrolisttedselect
the fast position.
4.Turn the starter key clockwise to the ON
position.Anypilotlamps(iftted)must
now light up.
5.Ifaheaterplugisttedturnthestarter
key clockwise to the HEAT position and
hold it there for 20 seconds.
6. Turn starter key clockwise to the START
position and release it immediately after
theengineres.
Do not operate the starter key for more
than 15 seconds at a time.
A

13
Figure 5.3.3 Start Key
7.Ifavariablespeedcontrolisttedreduce
the speed as required.
5.4 Stopping the Engine
CAUTION
Turning the starter key to the 'STOP' po-
sition will not stop the engine unless an
optional fuel control solenoid is tted.
CAUTION
Never stop the engine by using the decom-
pressor lever.
1.On xed speed engines not tted with
a fuel control solenoid press the lever
marked B downwards to release the
speed control lever.
Figure 5.4.1 Engine Control
After the engine has stopped turn the
startkey,iftted,tothe'STOP'position.
2.Ifafuelcontrolsolenoidisttedturnthe
start key to the 'STOP' position.
3. On variable speed engines, release the
screw C and move it back to the stop
position and hold it there until the en-
gine stops.
5. Operating Instructions
B
C

14
6. Engine Fluids
6.1 Oil Specication
All subsequent oil changes must be as
speciedin"7.14Maintenance-Schedule
hours".
1.Theoilspecicationisshownintheat-
tached table.
Temperature Lube oil
specication Lube oil type
10°C - 40°CAPI CD Grade
or above
SAE 10w-30
or SAE 15w-40
Below 10°C SAE 10w-30
2.The oil must be suitable for 100 hour oil
change periods without undue degrada-
tion.
3. Monograde SAE40 oils are not recom-
mended.
6.2 Fuel Specication
The engine must only be used with
diesel fuel oil which conforms to one of the
following:
a. BS 2869:1988 Class A2.
b. BS EN590:1995 Class A1.
c. USA Specification ASTM D-975-77
Grades No.1-D and 2-D.
6. Engine Fluids
d. BSMA 100 Class M1 for marine use.
The fuel must be a distillate, and not a
residual oil or blend. Vaporising oils are not
suitable as fuels for these diesel engines.
The user is cautioned that although the
engines may operate on fuels outside the
abovespecications,suchoperationmay
well result in excessive wear and damage.
CAUTION
The fuel injection equipment is manu-
factured to very accurate limits and the
smallest particle of dirt will destroy its
efciency.
Fuel, free from water and contaminants is
of the utmost importance.
6.3 Fuel in Low Temperatures
Special winter fuels are often available
for use at ambient temperatures below 0°C
(32°F).
These fuels have a lower viscosity and
limit the formation of wax at low ambient
temperature.
CAUTION
Wax formation can rapidly reduce the ow
of fuel through the fuel lter element.

15
7.1 Preliminary Instructions
These recommendations and instruc-
tions cover K Series engines therefore they
are of a general nature and may include
optionalequipmentnotspecicallycovered
in this book.
More detailed information can be found
in the Workshop Manual or any Lister Petter
Distributor can be consulted.
•Theengineshouldreceiveregularatten-
tionduringtherst20hoursofitslife
from new and after a major overhaul.
•Longperiodsoflightor‘noload’running
early in the engine’s life may lead to cyl-
inderboreglazingandhighoilconsump-
tion.
•The instructions given in "7.14 Mainte-
nance - Schedule hours" are based on
average operating conditions and cover
the minimum requirements to keep an
engine running at peak performance
with trouble free operation.
•Under very dusty conditions, air clean-
ers, lubricating oil and fuel lters will
require more frequent attention.
•Decarbonising may be required more
often if the engine has been running on
light loads for long periods.
•Before carrying out any maintenance
work on an engine it is advisable to re-
move the battery.
The battery and charge windings must
be disconnected before commencing
any electric welding when a pole strap
is directly or indirectly connected to the
engine.
•It is essential to ensure that nuts and
bolts are tightened to the torques speci-
edintheWorkshopManual.
•Whenre-assemblinganenginelubricate
all moving parts with engine oil.
•Renew nuts and bolts that have been
taken from high stress locations.
Inparticularnutsand/orboltsfromthe
connecting rods should be renewed.
•The fuel injector can only be checked
and set off the engine using suitable
specialist test equipment.
WARNING
ON NO ACCOUNT ALLOW ANY UNPRO-
TECTED SKIN TO COME INTO CONTACT
WITH THE INJECTOR SPRAY AS THE FUEL
MAY ENTER THE BLOOD STREAM WITH
FATAL RESULTS.
WARNING
SOME ENGINES MAY BE FITTED WITH
SEALS OR ‘O’ RINGS MANUFACTURED
FROM ‘VITON’ OR A SIMILAR MATERIAL.
WHEN EXPOSED TO ABNORMALLY HIGH
TEMPERATURES, IN EXCESS OF 400°C
(752°F), AN EXTREMELY CORROSIVE
ACID IS PRODUCED WHICH CANNOT BE
REMOVED FROM THE SKIN.
IF SIGNS OF DECOMPOSITION ARE
EVIDENT, OR IF IN DOUBT, ALWAYS WEAR
DISPOSABLE HEAVY DUTY GLOVES.
Before Starting Work
Before starting any dismantling proce-
dure the following should be considered:
• Doyouhave,oraccessto,theneces-
sary Lister Petter spare parts before you
commence dismantling.
• Doyouknowandunderstandtheen-
gine and all the related systems?
• Do you have sufcient electrical and
mechanical knowledge and skills to under-
stand the symptoms?
• Doyouhavesuitableelectricaldiagnos-
tic equipment available?
7. Engine Servicing
7.2 Precautions for Oil, Filters
and Elements
•Particular attention is drawn to the in-
structions given later in this section for
replacinglters.
•Usedliquidltersandelementscontain
someofthelteredliquidandshouldbe
handled and disposed of with care.
7. Engine Servicing

16
•After handling new or used elements
the users hands should be thoroughly
washed, particularly before eating.
WARNING
Fuel and new or used lubricating oil may
cause skin irritation.
WARNING
The materials used in the manufacture
and treatment of some lters and ele-
ments may cause irritation or discomfort
if they come into contact with the eyes or
mouth and they may give off toxic gases
if they are burnt.
WARNING
Care must be taken to ensure that waste
fuel, oil and lter elements are disposed
of in accordance with local regulations to
prevent contamination.
7.3 Initial Attention
All engines are dispatched dry, i.e. not
containing fuel or oil.
All subsequent oil changes must be as
speciedin"7.14Maintenance-schedule
hours".
7.4 Priming the Fuel System
Theengineisttedwithaselfpriming
fuel system it should not be necessary to
prime the system.
7.5 Valve Clearance Adjustment
The valve clearance for both inlet and
exhaust valves, set with the engine cold, is
0.15mm (0.006in).
Figure 7.5.1 Valve Clearance
1.Remove the valve rocker box cover.
2.With the piston at TDC on the firing
stroke, slacken the locknut (A) on the
adjusting screw (B) and turn the screw
until the correct clearance has been
obtained.
3.Hold the adjusting screw and tighten the
locknut.
4.Re-check the clearance.
5.Repeat the procedure for the second
valve.
7.6 Changing the Air Cleaner
Element
1.Remove the centre wing nut and remove
thelterhousing.
Figure 7.6.1 Air lter housing
2. Remove the anti vibration washer and
lterretainingnut.
Figure 7.6.2 Air lter element
7. Engine Servicing

17
7.7 Draining and Filling the Oil
Sump
Before draining the oil, read "7.2 Pre-
cautions for Oil, Filters and Elements"
CAUTION
Do not overll with lubricating oil as this
may have a detrimental effect on engine
performance.
1.If possible, run the engine immediately
before draining the oil.
2.Place a suitable container under the
drain plug.
3.Remove the plug and drain the sump
Figure 7.7.1 Oil drain plug
4.Replace the plug taking care not to over
tightenit.Cleantheoillter,refertosec-
tion 7.8.
5.Fillthesumpthroughtheoilllertothe
top mark on the dipstick. The oil level on
the dipstick must be measured without
the dipstick being screwed in.
Figure 7.7.2 Oil dipstick
6.Start the engine, run it for a few minutes
and check that the drain plug does not
leak.
7. Stop the engine, allow the oil to settle
and check the level on the dipstick.
8.Add more oil if necessary.
3. Withdraw the element.
Figure 7.6.3 Element removal
4.Cleantheareaaroundthelterensuring
that no dirt falls into the inlet port.
Figure 7.6.4 Air cleaner back plate
5. For re-assembly, reverse the above
process.
WARNING
The engine must not be run without an air
cleaner element.
7. Engine Servicing

18
7.8 Cleaning the Oil Filter
1.Beforechangingthelter,read"7.2Pre-
cautions for Oil, Filters and Elements".
2. Remove drain plug and drain oil into a
suitable container.
3.Unscrew the retaining screw (A) and pull
outtheoillterfromthecrankcase.
Figure 7.8.1 OIl lter securing bolt
Figure 7.8.2 Oil Filter
4.Cleantheoillterindieselfuel.
5.Clean the crankcase ‘O’ ring housing
face.
6.Fitanew‘O’ringifdamaged.
7.Retthelterandtightenretainingscrew
'A' to 10Nm (7.5lb ft).
CAUTION
The retaining screw must not be over
tightened.
8.Run the engine and check for any oil
leaks.
7.11 Changing the Fuel Filter
Before changing the lter, read "7.2
Precautions for Oil, Filters and Elements".
1.Drain the fuel tank.
2. Remove the two 6mm nuts which secure
the fuel tap assembly.
7. Engine Servicing
A
9.Stop the engine, allow the oil to settle
and check the level on the dipstick.
10.Add more oil if necessary.
7.9 Sump Capacity
Type litres pints US qts
K1 72 1.65 2.9 1.75
K1 64 1.1 1.95 1.2
7.10 Capacity Between Dipstick
Marks
Type litres pints US qts
K1 72 0.55 1.0 0.6
K1 64 0.4 0.73 0.45
Figure 7.11.1
Fuel Filter Element

19
7. Engine Servicing
3. Remove the filter through the tank
ller.
4.Insertnewlterwithsealinggasketinto
tank.
5. Fit fuel tap assembly and tighten retain-
ing screws.
6. Turn the fuel tap ON.
7.Rellthefueltank.Bleedingofthefuel
injection system takes place automati-
cally.
7.12 Removing the injector
1. Slacken and remove the pump to injec-
tor fuel pipe (A) and hold the fuel pump
delivery valve holder with a spanner to
prevent it turning.
2. Disconnect the leak-off pipe (B) from
the injector.
3. Remove the two injector holding down
nuts (C).
4. Lift off the injector clamp (D).
5. Lift out the injector and the sealing
washer.
7.12.1 Injector Setting
The injector must only be set on a test rig to
203 bar (200atmos; 2950lbf in²).
7.12.2 Replacing the injector
1. Ensure the seatings in the cylinder head
are clean and smooth.
2. Fit the heat insulating washer onto the
Injector.
3. Replace the Injector into the cylinder
head, ensure dowel pin locates into the
slot.
4. Fit injector clamp over the two studs.
5. Replace the two clamp nuts leaving them
ngertight.
6. Replace the fuel pump to injector pipe
andtightentheunionsngertight.
7. Tighten the unions a further half turn
with a spanner.
8. Torque load the injector nuts to 10-
12Nm (7.5-9lbf ft).
9. Replace the leak-off pipe.
10. After the initial run following an injector
replacement, re-torque the two clamp
nuts.
7.13 Checking the Battery
1.Wear protective gloves and goggles.
2.Clean the top of the battery ller plug
area.
3.Removethellerplugsandcheckthat
the electrolyte level is 6.0-9.0mm (0.25-
0.37in) above the tops of the separa-
tors.
4.If necessary top up with distilled water.
In cold weather distilled water should
only be added immediately before run-
ning the engine.
5.Replaceandtightenthellerplugs.
6.Check that the terminal connections are
tight; petroleum jelly will help to protect
them from corrosion.
WARNING
BATTERIES CONTAIN SULPHURIC ACID
WHICH CAN CAUSE SEVERE BURNS AND
PRODUCE EXPLOSIVE GASES.
IF THE ACID HAS BEEN SPLASHED ON THE
SKIN, EYES OR CLOTHES FLUSH WITH CO-
PIOUS AMOUNTS OF FRESH WATER AND
SEEK IMMEDIATE MEDICAL AID.
A
C
B
D

20
7.14 Maintenance Schedule
At all times continiously monitor engine performance.
Observe the correct oil and lter change periods as specied below.
Regular service
period
Item
Daily First month
or 20 hours
Third
month or
100 hours
200 hours
Sixth
month or
500 hours
Yearly
or 1000
hours
Check and replenish fuel ○
Drain out fuel ○
Check and replenish
lub oil ○
Check for oil leakage ○
Check and tighten all
engine nuts and bolts ○
●Tighten
cylinder
head nuts
Change lub oil ○Initial ○
Cleanoillter ○ ○ ○(Changeif
necessary)
Replaceairlterelement ○
Changefuellter ○Replace
Check fuel injection pump ● ●Change
Checkfuelinjectionnozzle ●
Check fuel pipes ○(Changeif
necessary)
Check and adjust inlet and
exhaust valve clearance ●Initial ●
Check inlet and exhaust
valve and seat condition ●
Replace piston rings ●
Check battery electrolyte Monthly (replenish with distilled water as necessary)
Note: ● means if you need special tools, please contact your nearest Lister-Petter Distributor
Changethelubricatingoilandcleantheoillterforthersttimeat20hoursandthenas
speciedin7.14MaintenanceSchedule.
CAUTION
Continuous operation under heavy loads in ambient temperatures above 35°C (95°F)
causes the oil to deteriorate more quickly.
7. Engine Servicing
This manual suits for next models
1
Table of contents
Other Lister Petter Engine manuals

Lister Petter
Lister Petter GW3 Service manual

Lister Petter
Lister Petter alpha Series Service manual

Lister Petter
Lister Petter TS1 Instruction manual

Lister Petter
Lister Petter ALPHA Series User manual

Lister Petter
Lister Petter T Series Service manual

Lister Petter
Lister Petter alpha Series Service manual

Lister Petter
Lister Petter T Series Service manual

Lister Petter
Lister Petter ALPHA LPW2 Service manual

Lister Petter
Lister Petter L Series Service manual

Lister Petter
Lister Petter TS1 Instruction manual