Lister Star User manual


CONTENTS
Page
Setting for horse and cattle clipping 2
Care of the blades, Failure to cut 3
Maintenance, Reset button 4
Parts list. Warranty, repair and regrind service 4
Clipper unit 5
Service equipment 22-23
Fig 1 - 3 24
TABLES DES MATIERES
Comment tondre les cheveaux et bovines 6
Entretien des peignes. Si les peignes ne coupant pas 7
Entretien. Bouton de sécurité 8
Liste de pieces detaches 8
Unité de tondeuse 9
Equipment de service 22-23
Fig 1 - 3 24
INDICE DE MATERIAS
La posicion para esquilar caballos y Ganado 10
Cuidado de las cuchillas, Fallo en el corte 11
Mantenimiento, Pulsador de reposicion 12
Lista des piezas de repuesto 12
Grupo para esquilar 13
Equipo de mantenemiento 22-23
Fig 1 - 3 24
CONTENUTO
Aggiustamento per tosatura eqine e bovini 14
Cura della lame. Se le lame non tagliano 15
Mantutenzione. Bottone di resistemazione 16
Lista di pezzi 16
Pezzi di ricambo della tosatrice 17
L’apparecchiature per l’assistenza 22-23
Fig 1 - 3 24
INHALTSÜBERSICHT
Einstellen für Pferde – und Rinderscheren 18
Pflege der Schemesser, Versagen der Schneidefunktion 1 9
Wartung, Rückstellknopf 20
Ersatszteileste 20
Clipper – Gerät 21
Service – Ausrüstung 22-23
Abb 1 - 3 24

2
SETTING FOR HORSE AND CATTLE CLIPPING
PREPARING THE ANIMAL
The clipper cannot be expected to cut properly if the animal is wet and dirty.
THE ANIMAL MUST BE CLEAN AND DRY.
Ideally, shampoo and rinse the coat a few days before clipping. The building floor should
also be clean and dry.
Clip horses before the coat grows thick and clip frequently to maintain an even length. If
the legs are clipped use standard blades, whereas the body may be clipped with standard
or fine blades.
Cattle require coarse toothed blades.
Stretch the skin flat with the hand and as far as possible cut against the direction the coat
grows. Glide over the skin with the blade.
Stop clipping at intervals to brush off the coat and oil the blades.
TENSIONING THE CLIPPER BLADES (Fig. 1)
1. Wipe the head and blades (including between the teeth) absolutely clean.
2. Fit the blades on the clipper head and screw the tension nut down tight.
3. Turn the tension nut back 1½ turns. This is the correct setting. The tension nut
marker line (A) will ensure accuracy.
4. Oil the blades and head, switch the clipper on and run briefly.
5. Switch off and wipe off any excess oil.
LUBRICATION (Fig. 1)
Oil the moving parts before starting the motor. It is necessary to point the head up to
allow oil to penetrate between cutter points, and sideways for effective lubrication of the
blade rear surfaces.
1. Oil between cutter points
2. Oil clipper head front pads
3. Oil cutter blade guide channel
4. Oil cutter blade heel
5. Oil crank shaft and roller
Unlike other clippers, this model does not slow down appreciably when lubrication is re-
quired. Therefore, regular oiling of the blades is essential to keep them cool. If the blades
get hot you are not oiling often enough or in the right places.
OIL EVERY 10 MINUTES RUNNING – Wipe off excess oil.
WARNING:- The use of spray lubricants is not recommended. Use Lister R15 oil, which is
specially formulated for clipping.

3
CARE OF BLADES
Blades should be kept together as MATCHED SETS.
The teeth could break if the blades are knocked. The steel blades, specially hardened for
good cutting qualities, are more brittle than unhardened teeth.
BLADE PROTECTION
WIPE BLADES ABSOLUTELY CLEAN. This is essential if the clipper is to work properly.
The blades are ground and then lapped to a very fine precision finish.
CLIPPING WITH NEW BLADES
New or reground blades must be cleaned, then tensioned correctly and oiled before use.
If the new blades fail to cut when first used, stop work immediately. DO NOT INCREASE
THE TENSION - THIS CAN ONLY BE HARMFUL. Remove and clean the blades, as even
a small amount of dirt or a single hair may be the cause of the trouble. Brush between the
teeth and wipe the blades and head clean. Fit the blades back on to the clipper, then set
the tension correctly and oil.
Should the clipper fail to cut again, repeat the cleaning procedure.
USE LISTER R15 OIL OR VERY LIGTH MACHINE OIL.
FAILURE TO CUT
IF THE BLADES FAIL TO CUT – DO NOT INCREASE THE TENSION.
EXCESSIVE TENSION WILL ONLY CAUSE OVERHEATING AND WILL BLUNT THE
BLADES.
THE CLIPPER WILL NOT CUT IF HAIR OR DIRT GETS BETWEEN THE BLADES
Remove the blades from the clipper. Wipe the clipper head clean to prevent stray hairs
getting between the blades. Brush between the blade teeth and wipe the blades clean. Fit
the blades back on the clipper. Finally set the tension correctly and oil.
THE SLIGHTEST BRUISE ON THE FACE OF EITHER BLADE IS SUFFICIENT TO STOP
THEM CUTTING ALTOGETHER.
BLADES SHOULD BE KEPT TOGETHER AS MATCHED SETS.
WHEN THE BLADES HAVE LOST THEIR CUTTING EDGE RETURN THEM TO A
QUALIFIED FIRM FOR REGRINDING.

4
MAINTENANCE (Figs. 2 & 3)
It is particularly important to keep plug and cable clean and in good order at all times. The
motor and drive gears can be expected to give years of trouble free use if maintained and
serviced regularly. The following should be carried out at the end of each season, or more
regularly if used extensively.
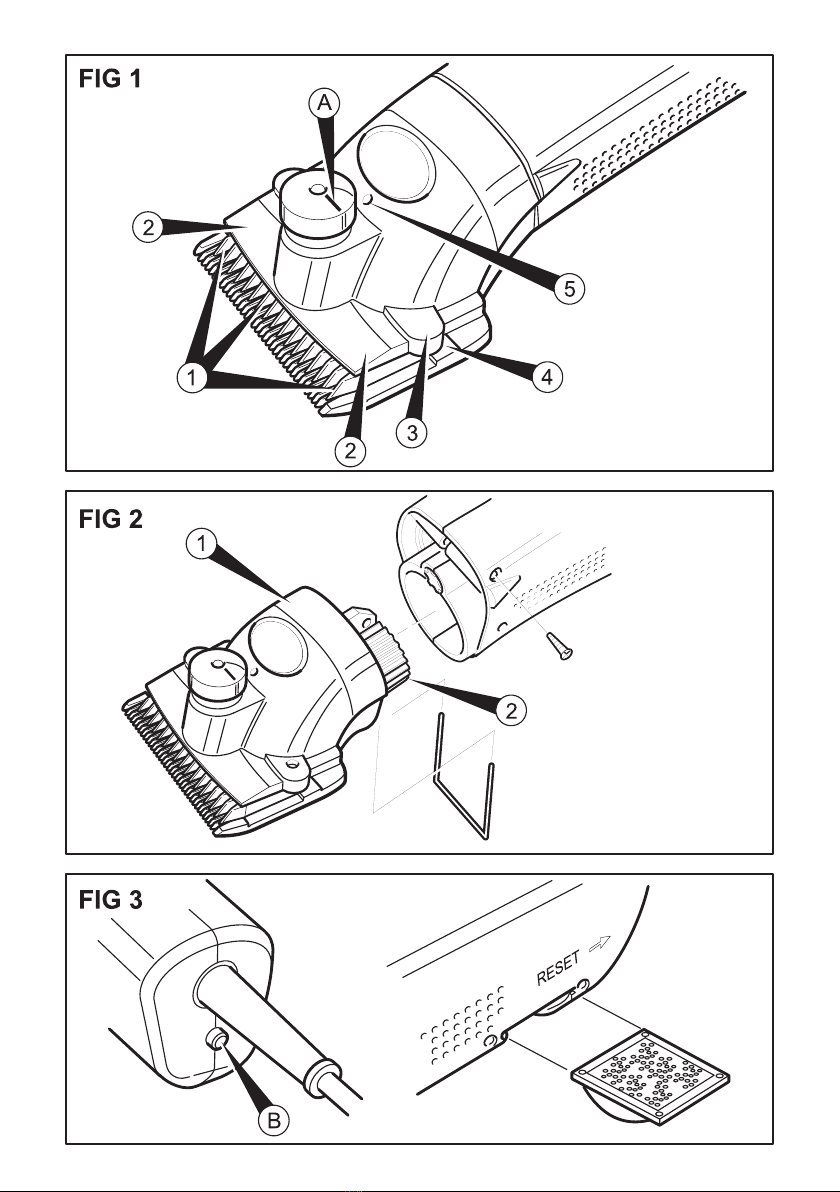
GEARS (Fig. 2)
Every 200 hours running remove the clipper head (1). Wipe the clipper head and gear-
wheel (2) to remove hair and used grease. Coat the gearwheel with clean grease (Lister R2
or Shell Alvania R2 or equivalent). When the clipper head is removed, check the gear-
wheel for wear and broken teeth.
FILTERS (Fig. 3)
The motor air filter shown in Fig. 3 should be frequently removed and meticulously
cleaned (brush supplied) to ensure efficient running of the motor. To clear the gauzes, a
high-pressure air-line is ideal – otherwise wash in detergent solution and dry carefully. If
this maintenance is ignored, overheating of the motor could occur with possible irrevers-
ible damage to the motor, or inefficient clipping at the very least. DO NOT RUN MOTOR
WITH FILTER REMOVED.
WARNING: All maintenance should be carried out with the unit switched off and re-
moved from the mains supply.
RESET BUTTON (Fig. 3)
The clipper is fitted with an overload protection switch, which will trip if the clipper is
overloaded. Should this occur, the unit should be thoroughly checked before fully depress-
ing the button to reset. The button is situated at the backend of the motor body (B).
PARTS LIST (Fig. 4)
When ordering spare parts please specify:
Part number, description and quantity of spare part(s).
Whenever possible, quote the Model and Clipper Serial Number which will be found on
the specification plate.
U.K. USERS ONLY
WARRANTY, REPAIR & REGRIND
Items requiring attention under warranty, repair or regrind should be returned to your
dealer or the Lister factory.
A qualified repairer using genuine Lister parts must carry out repairs.
Do not dispose of this product in household waste. At the end of its useful life please
return this product for recycling to:
LISTER SHEARING EQUIPMENT LTD. DURSLEY, GLOS. GL11 4HR. ENGLAND

5
Fig. 4 CLIPPER UNIT
Item No.
No. Part No. Description per set
1. 258-33560 Motor 240V 1
258-33920 Motor 110V
2. 258-33573 Clipper Casing R.H. 1
3. 258-33583 Clipper Casing L.H. 1
4. 258-33750 Gearshaft, Fan & Bearing Assembly 1
(comprising items 5 – 10)
5. 258-33680 Gearshaft Detail 1
6. 258-33690 Gearshaft Insert 1
7. 258-33700 Fan 1
8. 249-12250 Ball Bearing 1
9. 258-32430 Circlip 1
10. 258-31120 O-ring 1
11. 258-33630 Switch Lever 1
12. 258-37070 Grommet 1
13. 258-33590 Cable Clamp Bridge 1
14. 258-33670 Screw 2
15. 258-33070 Mains Lead UK 1
258-33910 Mains Lead USA
258-33970 Mains Lead AUS
16. 258-33650 Printed Circuit Board 220-240V 1
258-33890 Printed Circuit Board 110-115V
17. 258-33740 Wrist Cord 1
18. 258-33730 Wrist Cord End 1
19. 258-33660 Upper Casing Screw 2
20 258-33670 Lower Casing Screw 3
22. 258-33961 Filter 1
23. 258-33760 Clipper Head Assy Complete 1
(comprising items 24-30)
24. 258-33610 Clipper Head 1
25. 258-30820 Gear & Shaft Assembly 1
26. 258-00061 Crank Head 1
27. 258-00057 Crank Roller 1
28. 258-00062 Crank Roller Spring 1
29. 258-30850 Comb Peg 2
30. 258-30850P Comb Peg Pin 2
31. 252-00009 Tension Bolt 1
32. 258-10061 Tension Spring 1
33. 258-33710 Tension Nut 1
34. 258-34330 Spring Clip 1

22
FIG. 5 SERVICE EQUIPMENT AVAILABLE
Item No. Part No. Description
1. 258-35040 Brush
2. 258-30930 Screwdriver
3. 258-34870 Grease sachet
4. 258-30940 Oil Bottle – with oil (60ml)
FIG. 5 EQUIPEMENT DE SERVICE A DISPOSITION
Position No. de Piece Description
1. 258-35040 Brosse
2. 258-30930 Tournevis
3. 258-34870 Graisse
4. 258-30940 Bouteille d’huile (60ml)
FIG.5 EQUIPO DE ENTRETENIMENTO DISPONIBLE
Item No. Nūmero de la Descripcion
Pieza
1. 258-35040 Cepillo
2. 258-30930 Juego de destornilladores
3. 258-34870 Envase de Grasa
4. 258-30940 Envase de aceite – con aceite (60ml)
FIG.5 APPARECCHIATURA PER L’ASSISTENZA DISPONIBLE
Voce Nr. del Pezzo Descrizione
1. 258-35040 Spazzola
2. 258-30930 Serie di cacciaviti
3. 258-34870 Contenitore di grasso – con grasso
4. 258-30940 Bottiglia d’olio – con olio (60ml)
FIG.5 SERVICE - AUSRÜSTUNG ZUR VERFÜGUNG
Pos. Nr. Bestellnr. Gegestand
1. 258-35040 Bürste
2. 258-30930 Satz Schraubenzieher
3. 258-34870 Schmierstoffbehalter
4. 258-30940 Öfflasche mit Öl (60ml)

23

24


Lister Shearing Equipment Ltd
Dursley, Gloucestershire, GL11 4HR
Tel: +44 (0) 1453 544 832
www.lister-shearing.com
A Subsidiary of Clipper Corporation
LS-08-1012-A-A
Table of contents
Other Lister Power Tools manuals