LiteGear LiteDimmer User manual

About LiteDimmer Micro Single
LiteDimmer Micro Single is our entry-level, handheld LED dimmer. As the most
basic of LiteGear’s LiteDimmers, it is lightweight and travel-friendly, making it
perfect for situations requiring small amounts of single-color LiteRibbon® or simply
for those on a budget. Its simple yet powerful approach to controlling brightness
maintains LiteGear’s standard of performance and quality while allowing the
kind of exibility demanded from lighting professionals. For best results, use with
LiteGear LEDs which incorporate current limiting. LiteDimmer Micro Single is not
designed to limit current. Additional devices may be required.
Power Supply Options
LiteDimmer Micro Single is capable of operating with DC voltages between 9VDC
to 24VDC only. It will not increase or decrease input voltage. You must provide
voltage that is compatible with the power requirements of LiteRibbon. For best
results, use LiteDimmer Micro Single with LiteGear LED products.
Controls
The dimmer is equipped with a fader and a slightly recessed“Power” button.
Connections
LiteDimmer Micro Single is equipped with two 2.1 mm x 5.5 mm Barrel connectors;
one is used for input power (male) while the other is for output to the LEDs (female).
Barrel polarity is positive (+) in the center, surrounded by a negative (-) shroud.
Safety and Maintenance
Before operation, inspect the cables and enclosure for any damage. Also, inspect
the installation for short circuits, damage, water, or similar.
How to Install
To install LiteDimmer Micro Single, bring the fader down to 0. Provide DC power
between 9V and 24V* to the Barrel input connector. If the“Power”button is red and
fading on and o, the dimmer is on standby. If the“Power”button is steady red, the
dimmer output is active; tap it once to put it on standby. (Note: LiteDimmer Micro
Single will remember the last saved settings on power-up; settings are saved by
waiting for 5 seconds after making a change. For instance, if you put the dimmer on
standby, you must wait at least 5 seconds before disconnecting the dimmer from
power, or the dimmer will not remember that you put it on standby, resulting in an
active output on the next power-up.) Now, connect the load to the Barrel output
connector. Be sure you observe current capacities of all components such as cable,
connectors, and power supplies and that your load is under 4 amps. You are now
ready to operate your LiteDimmer Micro Single.
*Note: Power supply voltage must match the rating of the LiteRibbon, or damage
may occur.
How to Set Levels
With the dimmer on standby, tap the “Power” button once to activate the output.
Use the fader to control brightness. Your single-color LiteRibbon should now be
operating and will be dim or bright depending on the level chosen. The enclosure
shows output level in percentage to the left of the fader.
Software Modes
LiteDimmer Micro Single is programmed with the ability to set an adjustable fade
time when turning your LiteRibbon on and o. To edit the fade time, ensure your
dimmer is on standby (red indicator light will be pulsing), and bring the fader down
to 0. Press and hold the “Power”button. Continue to press and hold while adjusting
the fader accordingly: bringing the fader up to 100 sets the fade time to be 2
seconds while bringing the fader down to 0 sets the fade time to be instantaneous.
The red indicator light under the “Power”button will ash with a frequency relative
LITE
DIMMER
MICRO
SINGLE
TM
DIMMER
TM
DIMMER
continue-->
219-90

to the fade time. Release the“Power” button to lock in the fade time.
“Aaaaand Action!” Cueing: After setting the fade time, this dimmer function
allows for the LiteRibbon to be brought up on cue.
From STANDBY: Set the fader to the desired brightness. Press and hold the
“Power” button until the cue is given. When the cue is given, release the“Power”
button, and the LiteRibbon will fade on (with the set fade time) to the desired
brightness.
From ON: With the fader set to the desired brightness, press and hold the“Power”
button until the cue is given. When the cue is given, release the“Power” button,
and the LiteRibbon will fade o (with the set fade time).
Troubleshooting
If LiteDimmer Micro Single stops operating, remove it from the circuit to conrm
that the dimmer is the problem. Connect the LiteRibbon directly to power. If it does
not operate, the problem may not be the dimmer. Check leads and connectors. If
the LiteRibbon does operate, LiteDimmer Micro Single could be overheated due to
over-current conditions or is damaged. If damaged, contact the LiteGear Service
department for service.
If LiteDimmer Micro Single seems to be experiencing irregular operation, a factory
reset may be needed. Resetting the operating system can restore normal operation
in many cases. To perform a factory reset, disconnect your dimmer from power,
and bring the fader down to 0. Next, press and hold the “Power” button, and then
power the dimmer.
After powering the dimmer, release the“Power”button. (The“Power”button should
now be ashing on and o.) With your fader still at 0, tap the “Power” button once
to confirm that you wish to reset the dimmer. At this time, cycle the power. Note
that your preferences and settings may now have to be reset. (The “Power” button
should now be flashing the software version of your dimmer.)
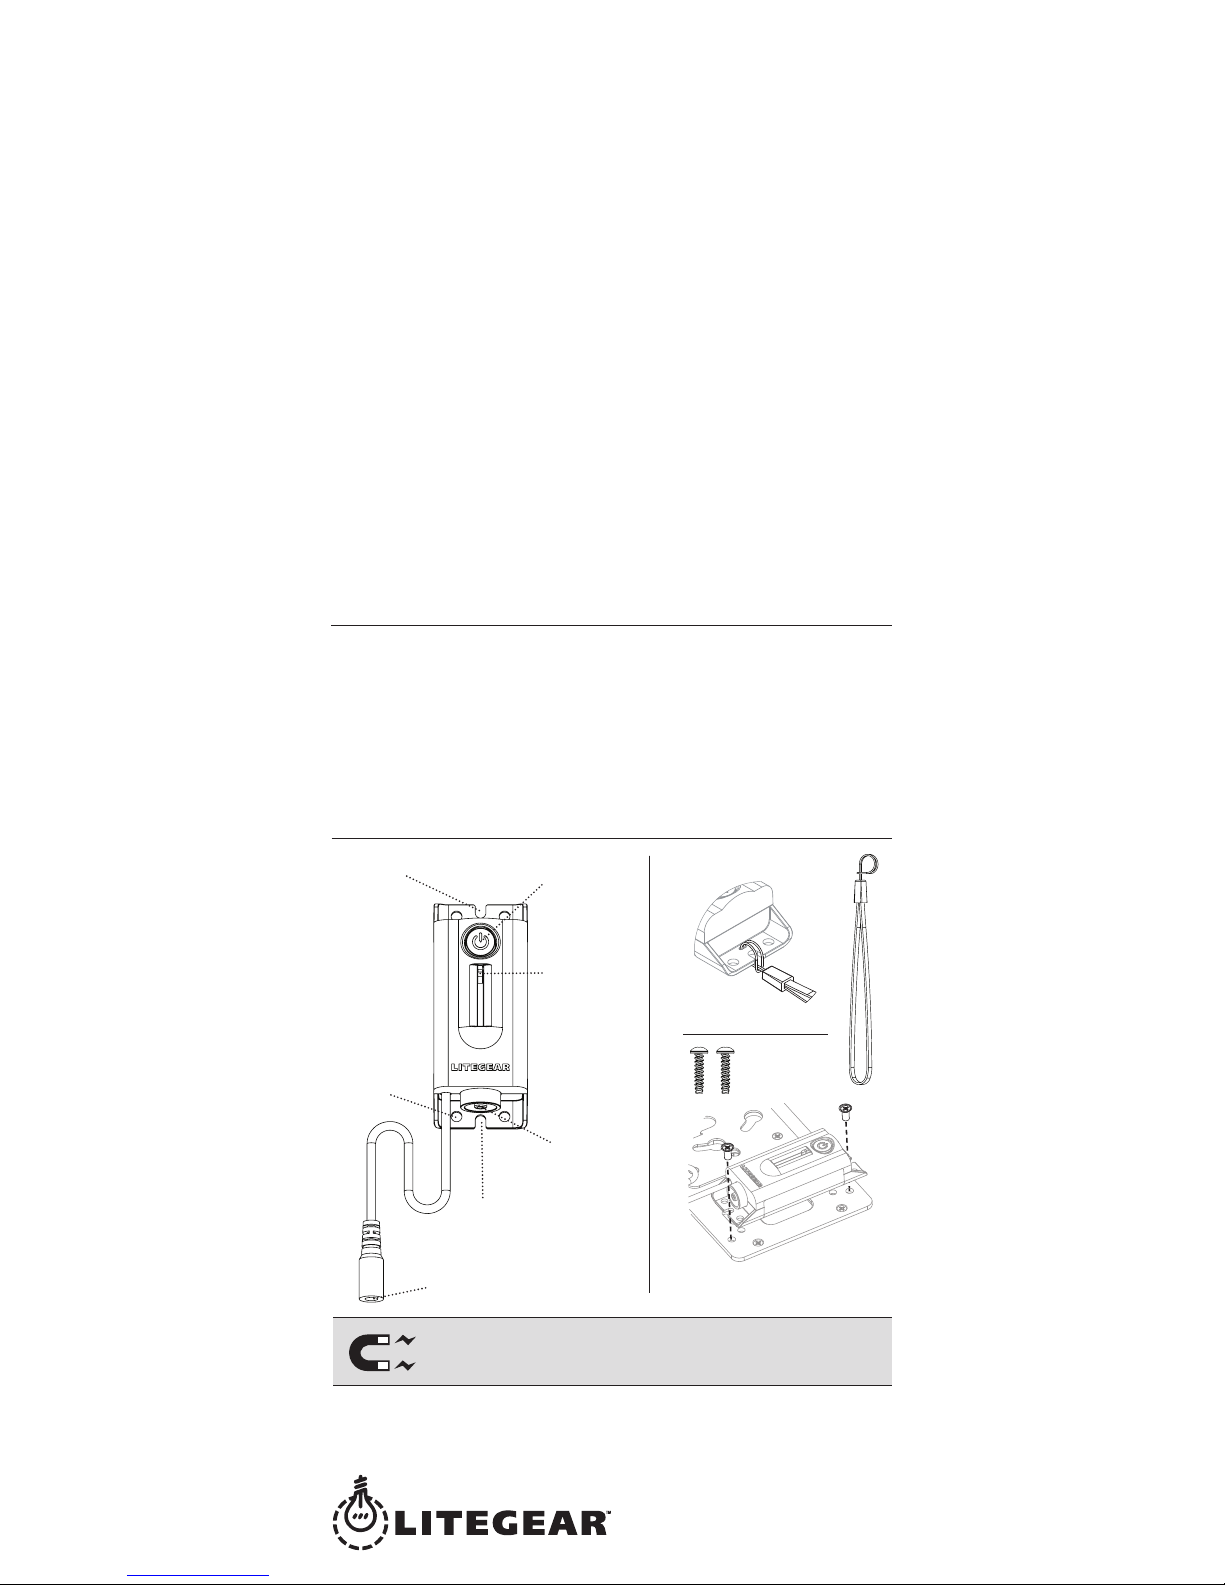
As an added convenience for mounting, the
LiteDimmer Micro Single
EFX Paparazzi
features a magnetic base. An adhesive-backed metal
plate accessory is included.
Warnings
Stage and Studio Use Only • Dry Location Only • Hazardous Voltage
Risk of Electrical Shock • Disconnect Power Before Servicing • Not For Residential Use
Any questions? Comments? Concerns?
Contact us at +1 818.358.8542 or info@litegear.com.
+1 (818) 358-8542 • info@litegear.com • www.litegear.com
Technical Specifications
SIZE: 4 in. x 1.625 in. x 1.125 in.
WEIGHT: 0.146 lb, 2.336 oz, 66 g
INPUT: 12/24V DC, (9-24V DC); input voltage must match load voltage requirements!
RATING: 4 amps max. total
WATTAGE: 96 watts max. total at 12VDC; 192 watts max. total at 24VDC.
CONNECTOR: Barrel, 2.1 mm x 5.5 mm
OUTPUT: DynaRythmic PWM; does not provide“current limiting.”
For use with LiteGear products only.
Male Barrel Connector
POWER INPUT
Wrist Strap
Mounting
Screws for
LiteMat 1
Lighted
Power
Button
Rigging
Points
Wrist Strap/
LiteMat 1
Mounting
Notch
LiteMat 1 Mount
Notch
Attach
Wrist Strap
as shown.
ACCESSORIES
Can be
attached to
LiteMat 1 using
provided screws.
© 2017 LITEGEAR, INC. All rights reserved.
LiteRibbon® is a registered trademarks of LiteGear, Inc.
© 2017 LITEGEAR, INC. All rights reserved.
LiteGear™, LiteMat™, LiteStix™, LitePower™, LiteDimmer™, LiteEFX™,
and E-Control™ are trademarks of LiteGear, Inc.
Female Barrel
Connector
LED OUTPUT
Fader
Brightness
Control
Table of contents
Other LiteGear Dimmer manuals