LiteHawk ZOOM 2 User manual

PLEASE DO NOT RETURN THIS PRODUCT TO ANY RETAIL STORE.
For any questions or problems with this product please call us at 1-800-268-5797
or visit our website www.litehawk.ca
Made for and distributed by Borgfeldt (Canada) Limited 50 Konrad Cres., Markham, ON L3R 8T4
CAUTION: Charging time is Approx 1 to 1.5 hours. Do Not Charge for more than 2 hours
WARNING: CHOKING HAZARD - Small parts. Not For Children under 3 years
Made
for
and
distributed
by
Borgfeldt
(Canada)
Limited
50
Konrad
Cres
.,
Markham
,
ON
L3R
8T4
www.litehawk.ca R
LiteHawk ZOOM 2 Instruction Manual
14+

CAUTION: Do not touch the running model! Adult supervision is required!
www.litehawk.ca R
LiteHawk ZOOM 2 Instruction Manual 2
LiteHawk ZOOM 2 Precautions - The LiteHawk ZOOM 2 is not intended for children under the age of
14 unless closely supervised by an adult. Improper use may cause serious injury. Please read Li-Po
Battery section before use. Do not fly in areas close to high voltage lines or crowds. Do not fly when
windy. Do not use when raining or snowing or if there is lightning and/or thunder. Do not touch ANY
moving parts while the model is powered. Do not fly when wind speed is above 15 km/h (10 mph).
CAUTION: Never insert any sharp objects, pins or screws into the model as this may puncture the internal
battery!
SAFETY PRECAUTIONS
- Keep hands, hair and loose clothing away from moving parts when the model is powered ON.
- Turn off controller and ZOOM 2 when not in use.
- Remove batteries from controller when not in use.
- Parental guidance is recommended for the flight.
- Keep your ZOOM 2 in your sight so that you can supervise it at all times.
- New alkaline batteries are recommended for use in controller to obtain maximum performance.
- Your charger is tailor made for the Li-Po battery used in your LiteHawk ZOOM 2. Do not use it to charge any
battery other than that in the LiteHawk ZOOM 2.
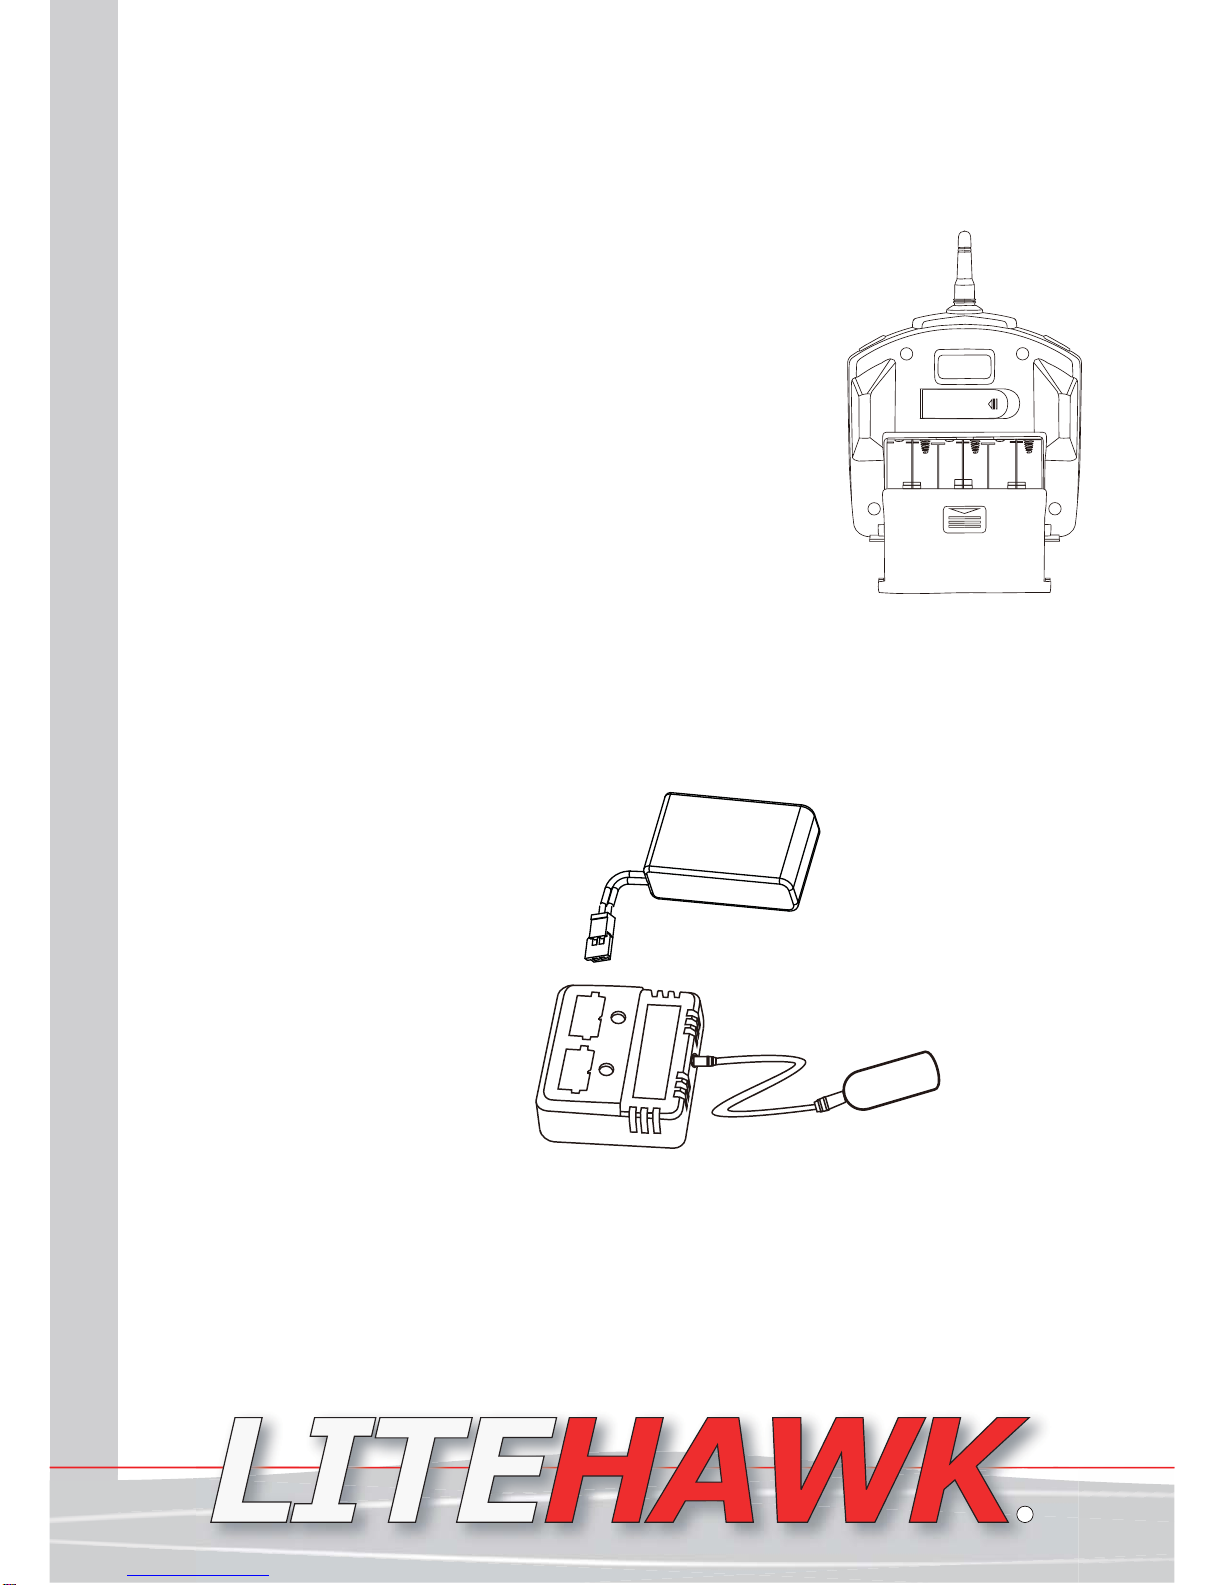
BATTERY SAFETY INFORMATION
- Requires 6 x 1.5V AA batteries (not included)
- Batteries are small objects.
- Replacement of batteries must be done by adults.
- Follow the polarity (+/-) diagram.
- Promptly remove dead batteries from the toy.
- Dispose of used batteries properly.
- Keep batteries dry.
- Remove batteries for prolonged storage.
- DO NOT incinerate used batteries
- DO NOT dispose of batteries in fire, as batteries may
explode or leak.
- DO NOT mix old and new batteries or different types of
batteries (i.e. alkaline/standard)
- Always replace the whole set of batteries at one time.
- DO NOT short-circuit the supply terminals
CARE AND MAINTENANCE - Controller
- Always remove batteries from the controller when it is not being used for a long period of time and disconnect
battery from model.
- Keep the toy away from direct heat or extreme cold.
- Do not expose the toy’s interior to water or moisture. This can damage the electronic assemblies.
Before charging the LiteHawk ZOOM 2 please read the following!
- DO NOT leave the battery unattended during charging.
- DO NOT leave the battery plugged into the charger any longer than 2 hours. If the charging light does not go
out in this time, the charger or battery could be faulty - unplug immediately!
- DO NOT drain the battery to the point at which you can no longer lift off. Stop using the ZOOM 2 when you
begin to lose significant power.
- DO NOT install another battery without letting the motor cool first! 5-10 minutes is sufficient.
- DO NOT recharge the battery until it is cool to the touch! 10 minutes is sufficient.
- DO NOT store battery for longer than 24 hours without recharging to at least 65% capacity.
- Do not charge if battery or connector is wet.
Your LiteHawk ZOOM 2 is equipped with a Li-Po
battery.
Special Li-Po Battery Instructions:
- Never charge battery unattended.
- Charge battery in isolated area. Keep away from
flammable materials.
- Do not expose to direct sunlight. There is a risk of the
batteries exploding, overheating or igniting.
- Do not disassemble, modify, heat or short circuit the
batteries. Do not place them in fires or leave them in hot
places.
- Only charge the batteries with the specified battery
charger.
- Only use the batteries in the device specified by
LiteHawk.
- In the unlikely event of leakage or explosion use sand
or a chemical fire extinguisher for the battery.
- Batteries must be recycled or disposed of properly.
- Keep battery dry.
- Do not leave plugged into model when not in use.
- Do not charge if battery or connector is wet.
Do Not Fully Discharge the battery! Stop and recharge when your ZOOM 2 begins to lose power! Failing
to do so will result in irreparable damage to the battery!

www.litehawk.ca R
LiteHawk ZOOM 2 Instruction Manual 3
Welcome to the World of LiteHawk!
Welcome aboard, this is your new LiteHawk ZOOM 2! Before we get ready for your
first aerial adventure, let’s cover the basics together!
Attempting to fly your LiteHawk ZOOM 2 without completely reading the manual may
cause injury to yourself and people in the vicinity, as well as damage to the RC model.
Please read the Instruction Manual thoroughly before taking your first flight.
How to charge the Litehawk ZOOM 2:
- Make sure that battery and connectors are dry.
You will notice that there is a white plug coming out of the battery. This is the plug you
use with the supplied charger. This is a keyed plug and will only go in one way.
1. Plug your USB power supply into any powered USB port and connect the charger into
the opposite end.
2. Connect the battery’s white plug connector into the corresponding port on the
charger. A red light will come on, this indicates that the battery is being charged.
Charging time is Approx 45 min to 1 hour.
3. Charging is completed
once red light goes out.
4. Once charging is
complete, unplug battery
from the charger and unplug
USB from the port.
During charging:
- It is normal for the battery to
get warm during the charging
process.
- NEVER charge when the
battery, charger or connectors are wet.
- Do not leave the battery and charger unattended while charging.
- After charging, unplug charger from the USB power source
- Do not store the battery plugged into the charger.
- It is best to charge your battery fully before using it for the first time.
- DO NOT leave the battery charging unattended under ANY circumstances!
- Do not charge on a flamable surface. For example, do not charge on your sofa, on a
carpet, in bed..... Please use common sense when charging your product.
LiteHawk ZOOM 2 - Transmitter Set Up
Battery Installation:
1. Open the Battery Cover.
2. If used batteries are present, remove these batteries from the
unit by pulling up on one end of each battery.
3. Install new batteries as shown in the battery compartment
(+/-).
4. Replace battery door securely.
5. Check your local laws and regulations for correct recycling
and/or battery disposal.
6. Never expose the transmitter or batteries to moisture.
Battery
Battery Plug
Charger
USB

www.litehawk.ca R
LiteHawk ZOOM 2 Instruction Manual 4
LiteHawk ZOOM 2 - Controller Functions
*Familiarize yourself with the Remote and the Model - everything should be turned off.*
Throttle
Throttle Trim
Power Switch
LED Power Indicator
Low Stick Response/
High Stick Response Elevator
Elevator Trim
Rudder
Rudder Trim
Function Screen
Rudder Stick Position
Rudder Trim Position
Elevator Stick Position
L H
Throttle Trim
High/Low
Stick Input
Selection
Controller Battery Level
Signal
Throttle Stick Position
Elevator Trim Position

Rudder control: Right
joystick control. Left
and the rudder will
turn left, Right and the
rudder will turn right.
Elevator control:
To go up: Move the
right joystick down-
wards.
To go down: Move the
right joystick upwards
www.litehawk.ca R
LiteHawk ZOOM 2 Instruction Manual 5
Throttle control: Hold
the plane, so that it
wont be damaged by
moving during the test.
Move the left joystick
up. This controls the
speed of the motor
that spins the propel-
ler. The higher you
move the throttle stick
up, the faster the
propeller will spin.
LiteHawk ZOOM 2 Controls
LiteHawk ZOOM 2 Install Landing Gear
Landing wheels fit into fuselage slots and are placed as shown. Gently bend inward to
install.

www.litehawk.ca R
LiteHawk ZOOM 2 Instruction Manual 6
Low / High Response:
Press the button to show “L”
on the function screen. This
gives the plane less servo
throw.
Press the button to show “H”
on the function screen. This
gives the plane maximum
servo throw.
L HL H
LiteHawk ZOOM 2 Battery Placement and “sync”
1 Unlock the hatch on the bottom of the fuselage by turning the tab.
2 The battery plugs into the white power lead
3 Once plugged in a red LED within the fuselage will blink.
4 Turn on the controller, make sure the throttle stick is all the way down.
5 You will hear an audible beeping, once the beeping stops (about 3 seconds) the LED in
the plane will turn solid red. The plane and the controller are now bound.
Pre Fight Check
Before you head out for a fun day of flying, make sure to check the following:
1. Performing a good range check
2. Performing a control surface check
3. Landing Gear Secure
4. Prop Secured to shaft and spins freely
5. Check rudder Control full deflection
6. Check Elevator Control full deflection
7. Is elevator trimmed neutral (or on a slight angle up).
8. Is rudder trimmed neutral

www.litehawk.ca R
LiteHawk ZOOM 2 Instruction Manual 7
Learn To Fly
Hand Launching Your LiteHawk ZOOM 2.
- Stand in the middle of the wide area, facing the wind.
(Remember under 15 km/h (10 mph) wind). Hold the plane in
your right hand.
- Move the left joystick (throttle stick) to max power.
- Toss the plane into the wind slightly upwards angle. This is the
easiest and best way for beginners first flights.
- Once you have let go of the plane, move your right hand onto
the radio to operate the right control stick. Pull down on the
right side control stick to help the plane climb into the sky.
- Once you are comfortable with the height of the plane reduce
the throttle speed.
- Visit www.litehawk.ca for more flying tips!
Mechanical Elevator and Rudder adjustments
Trimming your ZOOM 2 is a very important procedure, and when properly trimmed your
plane will be a real pleasure to fly. The goal of trimming the plane correctly is to get it
flying straight and level at 'cruising speed', with no input from you on the transmitter
sticks (the elevator, and rudder sticks in their neutral positions) the plane should fly in a
straight line. The throttles stick in the halfway to two-thirds full power. On your ZOOM 2
you can make mechanical adjustments to the control surfaces (Rudder/ Elevator) along
with the trim adjustments on the radio. It is best to make the adjustments to the control
surface rod ends before adjusting the radio.
LiteHawk ZOOM 2 - Post Flight
- When you have finished using your LiteHawk ZOOM 2 you should first disconnect the
Li-Po battery, then switch OFF the transmitter.
- If you do not plan on using the model for more than 24 hours, it is recommended that
you recharge the battery fully before putting it away.
- Remember to allow the battery to cool 10-15 minutes before recharging.
When heading out to fly your model, it’s important to always use common sense.
Do not fly in the following places: Near crowds or high voltage, near any obstacles,
wind speeds over 15 km/h (10 mph), thunder, rain or snow or between high buildings.
- Ensure nothing prevents the smooth running of the moving parts.
- Do not dismantle or tamper with this R/C product or its transmitter. The manufacturer
and distributor will accept no responsibility, expressed or implied, for accidents or
injuries caused as a result of dis-assembly, modification and/or usage against the
instructions for this product.
- Ensure that all batteries are correctly installed and that the Li-Po battery is fully
charged and in good condition.
- Do not touch ANY moving parts during operation.

www.litehawk.ca R
LiteHawk ZOOM 2 Instruction Manual 8
LiteHawk Parts & Tech
There’s nothing worse than buying a new toy, having a question, or needing a replace-
ment part, and then being left out in the cold. No worries! We pride ourselves on the
very best customer service!
We have all the parts you’ll ever need to keep your new LiteHawk in tip top shape! Like
we always say, “accidents happen, even to the best of us”....with that in mind www.lite-
hawk.ca is available 24 hours a day, 7 days a week! Our technical personnel are just a
phone call away! Monday to Friday 8:30am to 4:00pm EST. 1-800-268-5797 toll free in
North America!
We ship your parts Same Day! Except weekends of course - that’s when we are out
playing too!
LiteHawk Guarantee
All LiteHawk products have been tested and designed to perform as claimed out of the
box. If you have an issue with a product or part of a product please contact us directly.
We cover claims towards manufacturing defects. We know that there is nothing worse
than having a question or needing a replacement part and having nowhere to go.
LiteHawk is not responsible for covering the costs of replacement parts or repair on
products that have been damaged due to product use.
LiteHawk Forum
Trust us, this is no ordinary forum! Staffed by a full team of
LiteHawk Moderators whose backgrounds range from
Engineering, Component Design, Forum Management, R/C
Build and Developement....professionally, you are in good
hands. We cover everything under the LiteHawk sun!
Do-It-Yourself Guides, common questions, Tips and Tricks,
User Custom Mods...that’s just the beginning, really!
It all has to do with community and we want you to see for
yourself! With over one million views to date, we’re doing
something right!
Oh, Contests. We love to give away stuff, everything that we
make is up for grabs. Contests are run at least once per
month, so it’s a great way to meet everyone and have some
fun too!
See all of our Litehawk products in action! Everything from
videos that show LiteHawks in their natural environments -
flying, sailing, power boating....to helpful In-Depth product
information too! It’s all just a mouse click away!
Get the inside scoop - by joining LiteHawk
INSIDER e-bulletin!
Keep up to speed with our newest product releases
- we have some great stuff just around the corner!
Ever missed a Forum contest, simply because it
happened so fast? Heck, it was over before you even
got to the party! LiteHawk will never, ever share
your email address - it’s private and we respect that.
Table of contents
Other LiteHawk Toy manuals

LiteHawk
LiteHawk CHARGER User manual

LiteHawk
LiteHawk Whisper 30180 User manual

LiteHawk
LiteHawk 285-31335 User manual

LiteHawk
LiteHawk CHASE User manual

LiteHawk
LiteHawk RANGER User manual

LiteHawk
LiteHawk INTIMIDATOR User manual

LiteHawk
LiteHawk CHARGER 2 User manual

LiteHawk
LiteHawk CHAMP User manual

LiteHawk
LiteHawk XXL II User manual

LiteHawk
LiteHawk CIRCUIT BROOKLANDS User manual
Popular Toy manuals by other brands

Mattel
Mattel Barbie R4300 instructions

Fisher-Price
Fisher-Price Creative Effects Fun PhotoMaker manual

Hasbro
Hasbro Disney Frozen Play-A-Melody Gown manual

Horizon Hobby
Horizon Hobby EC-1500 instruction manual

Modellbau Laffont
Modellbau Laffont Z6101 Assembly instructions

6mmFlyRC
6mmFlyRC F-14 Tomcat instruction manual