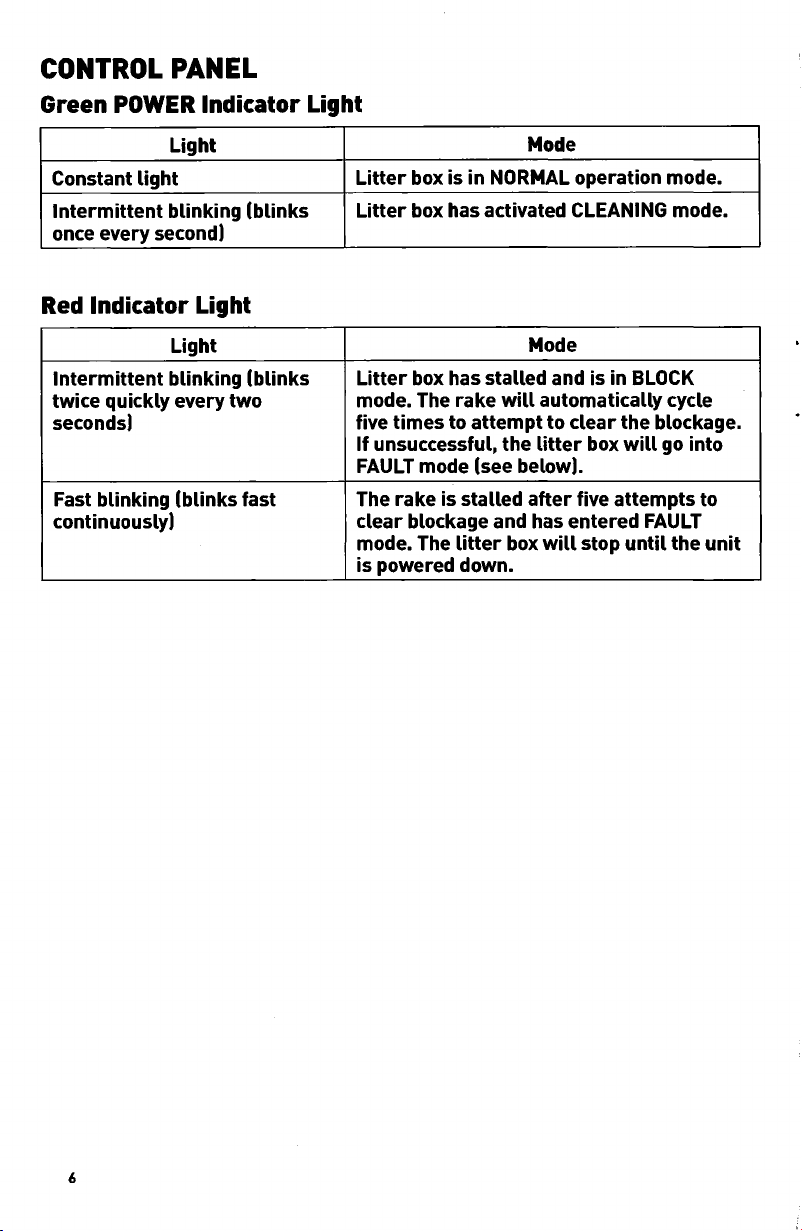
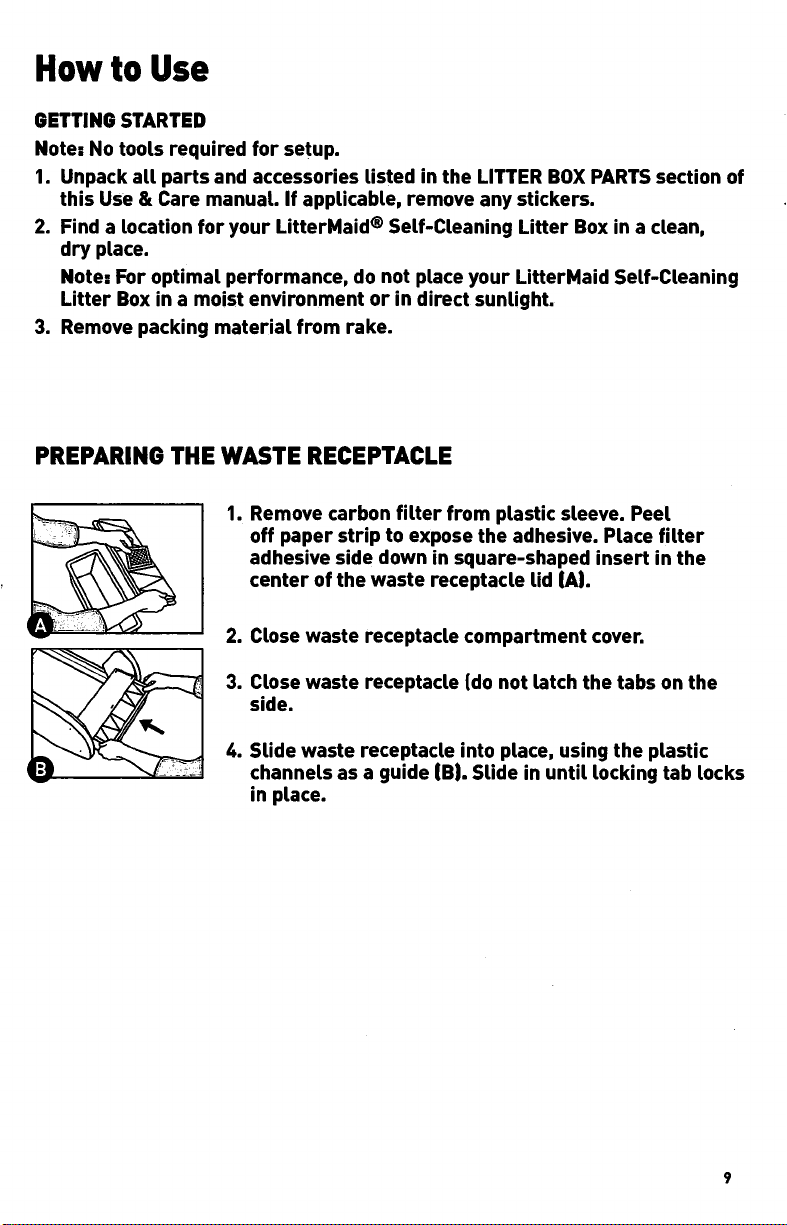
LitterMaid LM2680 User manual

PLEASE
READ
AND
SAVE
THIS
USE
AND
CARE
MANUAL.
IMPORTANT
SAFEGUARDS
Caution
:
Clumping
litter
is
not
intended
for
use
with
kittens
under
six
months.
If
your
kitten
is
under
six
months,
always
use
litter
formulated
for
kittens
and
leave
your
LitterMaid®
Self-Cleaning
Utter
Box
OFF
until
the
kitten
is
the
appropriate
age
of
over
six
months.
•
Please
read
all
directions
in
this
manual
carefully
prior
to
operating
this
product.
•
Not
intended
for
use
by
incapacitated
or
older
cats
that
may
experience
difficulty
in
entering
or
leaving
the
litter
box.
•
Pregnant
women
and
immune-deficient
people
should
avoid
contact
with
cat
waste
at
all
times.
•
Caution
:
This
is
not
a
toy!
Never
allow
small
children
to
play
in
or
around
this
device.
•
Your
LitterMaid®
Self-Cleaning
Litter
Box
is
a
precision-operated
appliance.
Should
the
rake
become
jammed
during
cleaning,
the
unit
contains
a
mechanism
that
will
automatically
stop,
reverse
and
restart
the
cleaning
operation
(see
TROUBLESHOOTING
for
more
information).
•
For
cat
use
only
and
intended
solely
for
the
safe
elimination
of
cat
waste.
Do
not
attempt
to
use
this
product
for
any
other
purpose.
SAVE
THESE
INSTRUCTIONS.

WELCOME
TO
THE
FAMILY!
Thank
you
for
purchasing
a
LitterMaid®
Self-Cleaning
Litter
Box!
This
Use
&
Care
manual
will
provide
useful
information
on
operating
and
maintaining
your
litter
box,
finding
accessories
and
troubleshooting
for
common
issues.
In
addition to
this
Use
&
Care
manual,
our
website
also
provides
expanded
information
on
a
number
of
topics.
As
you
’
re
reading
this
manual,
you
will
see
this
쳔
t
icon
with
an
article
title
when
the
website
provides
additional
information
on
that
topic.
Simply
visit
our
website
at
www.littermaid.com
and
look
for
the
title
provided.
If
you
have
any
additional
questions
or
concerns,
or
cannot
find
the
information
you
need
either
here
or
on
our
site,
please
call
our
customer
care
line
at
1-800-645-5154.

TABLE
OF
CONTENTS
Section
Page
Gelling
to
Know
Your
LilterMaid®
Litter
Box
:
•
Litter
Box
Parts
5
•
Control
Panel
6
•
Accessories
7
Selecting
Litter
8
Acclimating
Your
Cat
8
How
to
Use
9
•
Getting
Started
9
•
Preparing the
Waste
Receptacle
9
•
Filling
the
Litter
Tray
10
•
Attaching
Paw
Cleaning
Ramp
10
•
Daily
Use
10
Care
&
Cleaning
11
•
Removing
the
Waste
Receptacle
11
•
Weekly
Cleaning
12
•
Paw
Cleaning
Ramp
12
•
Motion
Sensors
&
Top
Housing
12
•
Thorough
Cleaning
12
•
Rake
Removal &
Cleaning
13
•
Litter
Tray
Cleaning
14
Troubleshooting
15
•
Need
Help?
17

GETTING
TO
KNOW
YOUR
LITTERMAID®
LITTER
BOX
Product
may
vary
slightly
from
what
is
illustrated.
UTTER
BOX
PARTS
1.
LED
Indicator
Light
Indicates
the
current
mode
of
litter
box
(see
MODE
INDICATOR
니
GHT
for
details).
2.
On/Off/Clean
Switch
Turns
the
litter
box
on
and
off.
You
can
also
use
this
switch
to
activate
the
cleaning
cycle
mode.
3.
AC
Adapter
Outlet
Plug
in
for
regular
power
and
daily
usage.
t
4.
Removable
Rake
Removes
for
easy
cleaning.
t
5.
Litter
Tray
Fill
only
with
premium,
hard-clumping
litter
to
ensure
proper
operation.
6.
Motion
Sensors
(both
sides)
Activate
the
cleaning
cycle.
t
7.
Waste
Receptacle
Compartment
Cove
厂
Waste
receptacle
lid
attaches
to
bottom
of
waste
receptacle
cover
during
insertion
of
the
waste
receptacle
into
position.
8.
Paw
Cleaning
Ramp
Attachment
Posts
(both
sides)
Use
to
attach
the
paw
cleaning
ramp
accessory.
9.
Litter
Tray
Latches
(both
sides)
Unlock
the
litter
tray
cover
for
cleaning.
Note
:
t
indicates
consumer
replaceable/
removable
parts
5

CONTROL
PANEL
Green
POWER
Indicator
Light
Light
Mode
Constant
light
Litter
box
is
in
NORMAL
operation
mode.
Intermittent
blinking
(blinks
once
every
second)
Litter
box
has
activated
CLEANING
mode.
Red
Indicator
Light
Light
Mode
Intermittent
banking
(blinks
twice quickly
every
two
seconds)
Litter
box
has
stalled
and
is
in
BLOCK
mode.
The
rake
will
automatically
cycle
five
times
to
attempt
to
clear
the
blockage.
If
unsuccessful,
the
Utter
box
will
go
into
FAULT
mode
(see
below).
Fast
blinking
(blinks
fast
continuously)
The
rake
is
stalled
after
five
attempts
to
clear
blockage
and
has
entered
FAULT
mode.
The
litter
box
will
stop
until
the
unit
is
powered
down.

ACCESSORIES
1.
AC
Adapter
Plug
AC
adapter
into
household
outlet
and
connect
DC
jack
to
connection
in
back
of
litter
box.
2.
Scoop
&
Rake
Cleaner
Use
to
clean
the
automatic
rake,
assist
in
measuring
the
litter
level
and
for
daily
spot
maintenance.
3.
Paw
Cleaning
Ramp
Provides
easy
entrance
and
exit
to
the
litter
box
for
your
cat
as
it
cleans
loose
litter
from
paws.
1
4.
Carbon
Filters
Helps
reduce
odors
around
the
receptacle,
t
5.
Waste
Receptacle
&
Receptacle
Lid
Heavy-gauge
plastic
contains
waste
with
a
sealable
lid
to
help
contain
odors.
Note
:
t
indicates
consumer
replaceable/removable
parts
7

SELECTING
LITTER
Your
니
tterMaid®
Self-Cleaning
Litter
Box
is
designed
to
work
with
any
premium,
hard-clumping
cat
litter,
so
you
can
choose
the
litter
that
best
suits
your
cat.
We
recommend
the
following
:
•
LitterMaid®
Premium
Corn
Cob
Utter
•
Nature's
Miracle®
Intense
Defense™
Clumping
Litter
Tip
:
For
optimal
performance,
use
with
LitterMaid
Premium
Corn
Cob
Litter.
Important
:
Do
not
use
non-clumping
litter,
crystal
or
pearl-like
litters.
ACCLIMATING
YOUR
CAT
Some
cats
are
finicky
when
it
comes
to
their
litter
box
area.
In
some
cases,
your
cat
may
need
to
get
used
to
its
LitterMaid®
Self-Cleaning
Litter
Box,
which
means
you
will
need
to
acclimate
your
cat
before
removing
your
old
box.
상
See
Acclimating
Your
Cat
on
littermaid.com
1.
Place
your
LitterMaid
Self-Cleaning
Litter
Box
next
to
your
old
litter
box.
Set
it
to
run
automatically
by
turning
it
on
p
using
the
ON/OFF/CLEAN
switch.
2.
Do
not
clean
previous
litter
box.
Cats
prefer
to
use
a
clean
box.
The
LitterMaid
Self-Cleaning
Litter
Box
will
always
be
clean,
so
they
will
transition
to
the
new
box
on
their
own.
3.
If
your
cat
seems
timid
around
the
LitterMaid
Self-Cleaning
Litter
Box,
turn
it
off
so
it
will
not
run
automatically
for
two
to
three
days.
4.
Each
day,
manually
activate
the
box
two
to
three
times
to
allow
your
cat
to
get
used
to
it
before
setting
it
to
clean
automatically.
5.
As
soon
as
your
cat
is
acclimated,
set
your
LitterMaid
Self-Cleaning
Litter
Box
to
clean
automatically.
6.
Remove
previous
litter
box.

How
to
Use
GETTING
STARTED
Notes
No
tools
required
for
setup.
1.
Unpack
all
parts
and
accessories
listed
in
the
LITTER
BOX
PARTS
section
of
this
Use
&
Care
manual.
If
applicable,
remove
any
stickers.
2.
Find
a
location
for
your
LitterMaid®
Self-Cleaning
Litter
Box
in
a
clean,
dry
place.
Notes
For
optimal
performance,
do
not
place
your
LitterMaid
Self-Cleaning
Litter
Box
in
a
moist
environment
or
in
direct
sunlight.
3.
Remove
packing
material
from
rake.
PREPARING
THE
WASTE
RECEPTACLE
1.
Remove
carbon
filter
from
plastic
sleeve.
Peel
off
paper
strip
to
expose
the
adhesive.
Place
filter
adhesive
side
down
in
square-shaped
insert
in
the
center
of
the
waste
receptacle
lid
(A).
2.
Close
waste
receptacle
compartment
cover.
3.
Close
waste
receptacle
(do
not
latch
the
tabs
on
the
side.
4.
Slide
waste
receptacle
into
place,
using
the
plastic
channels
as
a
guide
(B).
Slide
in
until
locking
tab
locks
in
place.

FILLING
LITTER
TRAY
1.
Fill
your
box
so
the
litter
level
is
between
the
MIN
and
MAX
fill
lines
on
either
side
of
the
litter
box
(C).
2.
Use
the
scoop
&
rake
cleaner
to
evenly
distribute
litter
in
the
litter
tray.
Tip
:
To
measure
litter
at
the
center of
the
box,
insert
the
scoop
&
rake
cleaner,
scoop
down,
into
the
center
of
the
litter
tray.
The
fill
line
on
the
scoop
is
even
with
the
MAX
fill
line
on
the
tray
(D).
Important
:
Do
not
overfill
unit
or
it
will
not
operate
properly.
ATTACHING
PAW
CLEANING
RAMP
1.
The
paw
cleaning
ramp
has
two
notches
that
snap
onto
the
paw
cleaning
ramp
attachment
posts
on
the
top
housing,
directly
in
front
of
the
waste
receptacle
compartment
cover.
2.
Position
the
paw
cleaning
ramp
with
the
mat
side
facing
up.
3.
Place
the
notches
over
the
paw
cleaning
ramp
attachment
posts
on
either
side
of
the
unit
(E).
4.
Tug
slightly
on
ramp
to
ensure
that
it
is
firmly
in
place.
DAILY
USE
1.
Remove
AC
adapter
from
packaging
and
plug
into
the
DC
jack
connector
outlet
at
the
back
of
the
top
housing.
Plug
AC
adapter
into
a
standard
electrical
outlet.
2.
Turn
the
ON/OFF/CLEAN
switch
to
ON
;
the
green
indicator
light
will
turn
on.
Note
:
The
rake
will
automatically
run
through
a
cleaning
cycle
to
smooth
out
litter.
3.
When
your
cat
enters
and
leaves
the
litter
box,
the
motion
sensors
will
activate
the
CLEANING
cycle.
(Sensors
must
be
blocked
for
at
least
10
seconds
to
activate
CLEANING
cycle.)
Important
:
Unit
will
not
start
CLEANING
cycle
while
cat
is
in
the
box.
4.
After
20
minutes,
the
CLEANING
cycle
will
start
and
the
automatic
rake
will
move
forward
and
back
to
scoop
waste
clumps
into the waste
receptacle.
Note
:
If
the
cat
re-enters
and
leaves
the
litter
box
before
the
initial
20
minutes
have
passed,
the
timer
will
automatically
reset
and
delay
the
rake
action
for
an
additional
20
minutes.
10

Note
:
Rake
will
stop
and
reverse
direction
if
the
safety
bar
touches
any
object
behind
the
rake
as
it
cycles.
Important
:
If
the
rake
encounters
a
blockage,
it
will
attempt
to
complete
its
cleaning
cycle
five
times.
If
unsuccessful,
the
rake
will
return
to
the
home
position
and
the
LED
light
will
blink
quickly
to
indicate
FAULT
mode
(see
TROUBLESHOOTING
for
more
details).
5.
If
small
litter
particles
remain
in
the
litter
tray
after
the
rake
has
completed
a
cycle,
you
can
use
the
scoop
&
rake
cleaner
to
move
these
particles
to
the
waste
receptacle.
6.
If
clumps
of
litter
become
stuck
to
the
rake,
use
the
teeth
on
the
scoop
&
rake
cleaner
to
clean
between
the
teeth
on
the
rake.
7.
The
disposable
waste
receptacle
will
keep
odors
and
waste
trapped
until
you
are
ready
to
replace
the
receptacle.
Once
the
receptacle
is
full,
remove
and
replace
as
instructed
in
REMOVING
THE
WASTE
RECEPTACLE.
Care
&
Cleaning
Note
:
Your
니
tterMaid®
Self-Cleaning
Litter
Box
is
designed
to
minimize
daily
maintenance.
Simply
replace
the
waste
receptacle
and
follow
the
instructions
for
weekly
cleaning.
REMOVING
THE
WASTE
RECEPTACLE
Caution
:
We
recommend
avoiding
contact
with
waste
material.
Wear
rubber
or
latex
gloves
when
handling
used
waste
receptacle,
particularly
if
you
are
pregnant
or
have
an
immunodeficiency.
1.
Remove
paw
cleaning
ramp.
Grip
the
pull
tab
centrally
located
on
the
waste
receptacle
and
push
down
on
the
locking
tab
with
thumb
to
release.
Slide
out
waste
receptacle
(lid
will
be
attached)
(F).
2.
Pull
up
lock
tabs
on
each
side
of
the
waste
receptacle
and
lock
into
lid
(G).
3.
Place
a
new
receptacle,
following
the
instructions
in
PREPARING
THE
WASTE
RECEPTACLE.
11

WEEKLY
CLEANING
Paw
Cleaning
Ramp
Note
:
The
paw
cleaning
ramp
is
designed
to
remove
litter
from your
cat's
paws
as
it
exits
the
litter
box.
1.
Grasp
the
ramp
on
either
side
near
the
attachment
points
and
lift
up
gently.
2.
Grasp
the
rubber
mat
on
one
side
and
lift
up
to
remove
(H).
3.
Remove
the
rubber
mat
to
remove
loose
litter
particles.
4.
Tip
over
and
empty
the
mat
holder
to
ensure
no
litter
remains
trapped
under
the
mat.
5.
Replace
the
mat
by
sliding
the
four
corners
of
the
mat
under
the
four
holder
points
on
the
comers
of
the
ramp.
Note
:
The
mat
and
ramp
are
both
cut
in
on
the
back
side
near
the
attachment
points.
Always
make
sure
you
are
putting
the
mat
into
position
correctly
by
matching
the
shape
of
the
two
pieces.
Motion
Sensors
&
Top
Housing
Notes
The
motion
sensors
on
the
inside
walls
of
the
litter
box
are
what
activate
the
CLEANING
cycle.
Keep
sensors
free
of
dust
to
ensure
proper
operation.
1.
Use
a
soft,
dry
cloth
or
towel
to
gently
wipe
the
sensors
and
remove
any
dust
⑴.
2.
Use
the
cloth
to
wipe
the
exterior
surfaces
of
the
top
housing
to
maintain
its
appearance.
THOROUGH
CLEANING
Note
:
Clean
thoroughly
once
a
month
to
ensure
optimal
operation.
Important
:
We
recommend
wearing
rubber
or
Latex
gloves
when
handling
the
soiled
rake
or
litter
tray.
12

Rake
Removal
&
Cleaning
Note
:
The
rake
is
removable
for
thorough
cleaning.
For
quick
cleaning,
you
can
simply
use
the
teeth
on
the
scoop
&
rake
cleaner
to
clean
between
the
teeth
of
the
rake.
1.
To
remove
the
rake
for
cleaning,
move
the
ON/OFF/CLEAN
switch
to
CLEAN
position.
The
green
indicator
light
will
blink
slowly.
2.
Rake
will
move
forward
and
stop
at
the
front
of
the
litter
box.
3.
With
both
thumbs,
press
the
two
buttons
on
top
of
the
rake
housing
assembly
to
release
rake
(J).
4.
Pull
rake
out
(K).
Important
:
Do
not
operate
without
the
rake.
5.
Wash
the
rake
with
a
soft
cloth
using
warm
water
and
mild
detergent.
Dry
thoroughly.
Note
:
Do
not
use
scouring
pads
or
harsh
or
abrasive
chemicals.
6.
Hold
rake
with
both
hands
and
align
the
two
indentations
on
the
rake
with
the
two
buttons
on
the
rake
housing
assembly.
7.
Push
rake
into
the
rake
housing
assembly
until
it
snaps
into
place
both
on
top
and
on
the
bottom
of
the
rake
(L).
8.
Move
ON/OFF/CLEAN
switch
to
OFF,
then
back
to
CLEAN
to
return
the
rake
to
home
position.
Note
:
The
rake
will
automatically
return
to
the
home
position
five
minutes
after
activating
the
cleaning
cycle.
13

Litter
Tray
Cleaning
Note
:
It
is
not
necessary
to
clean
the
tray
each
time
you
refill.
Litter
tray
cleaning
is
recommended
once
a
month.
1.
To
remove
the
litter
tray
for
cleaning,
check
to
make
sure
the
rake
is
in
home
position.
2.
Turn
the
ON/OFF/CLEAN
switch
to
OFF.
3.
Unplug
the
unit
to
prevent
accidental
activation.
4.
Lift
the
latches
on
both
sides
of
the
unit
(M).
This
will
separate
the
litter
tray
from
the
top
housing.
5.
Lifting
by
the
sides,
move
the
top
housing
off
and
away
from
the
litter
tray
(N).
6.
Dispose
of
any
used
litter
in
the
litter
tray.
To
ensure
proper
disposal
of
litter,
follow
manufacturer
’
s
instructions
on
litter
package.
7.
Wipe
the
litter
tray
with
a
damp
cloth.
If
further
cleaning
is
necessary,
the
litter
tray
can
be
fully
immersed
in
water
and
washed
with
a
mild
detergent.
8.
Wipe
the
top
housing
with
a
clean
cloth,
paying
close
attention
to
the
rake
track
rails
on
either
side
of
the
top
housing.
If
the
rails
have
any
litter
caked
on,
use
a
soft,
damp
cloth
to
clean.
Note
:
Keeping
these
tracks
clean
will
ensure
the
rake
functions
properly.
Important
:
Do
not
soak
or
immerse
top
housing
in
water.
9.
Dry
litter
tray
thoroughly
before
reassembling.
Tip
:
Before
reassembling,
you
can
spray
the
inside
of
the
litter
tray
surface
with
nonstick
cooking
spray
or
silicone
spray
and
wipe
with
a
soft,
dry
cloth.
This
will
help
to
prevent
clumps
from
adhering
to
surface
of
the
tray,
10.
Place
the
litter
tray
on
a
flat
surface.
Carefully
lower
top
housing
onto
the
litter
tray.
11.
Lock
the
two
latches
by
pressing
lower
part
of
each
latch
firmly
against
tabs
on
the
litter
tray
until
each
latch
clicks
and
locks
into
place.
14

TROUBLESHOOTING
상
See
FAQ
on
littermaid.com
Problem
Red
indicator
light
blinks
twice
quickly
every
two
seconds
;
rake
moves
continuously.
Possible
Cause
Litter
box
is
in
FAULT
mode.
The
rake
has
enco
니
ntered
a
blockage
-
either
in
front
of
or
behind
the
rake.
There
may
also
be
loose
litter
piled
behind
the
rake
that
’
s
preventing
it
from
returning
to
the
home
position.
As
a
res
니
Lt,
the
rake cannot
complete
its
normal
cycle.
(Note
:
The
rake
will
automatically
cycle
five
times
to
attempt
to
clear
the
blockage
;
if
uns
니
ccessf
니
l,
the
red
light
will
blink
quickly
repeatedly
and
the
litter
box
will
stop
until
the
unit
is
powered
down.)
Solution
Turn
the
ON/OFF/CLEAN
switch
to
OFF
and
unpl니
g
the
니
nit.
Use
the
scoop
&
rake
cleaner
to
clear
any
clumps
or
blockages
that
are
preventing
the
rake
from
completing
its
cycle,
as
well
as
to
level
off
the
litter
Level,
so
the
level
is
below
the
MAX
line
throughout
the
tray.
Once
blockages
a
「
e
removed,
plug
in
and
turn
the
unit
on.
Check
that
side
rails
are
dear
of
debris
and
buildup.
Rake
does
not
move
after
the
cat
exits
the
litter
box
and
20
minutes
have
Sensors
may
be
ckisty.
Wipe
the
sensor
with
a
soft
dry
cloth
to
remove
any
dust.
passed.
Rake
does
not
Low-q
니
ality
Litter
may
completely
clean
have
been
니sed.
Always
니
se
premium,
ha
「
d-cLumping
cat
Litter.
litter
box.
See
SELECTING
니
TTERfor
more
details.
15

Problem
Possible
Cause
Solution
Waste
clumps
stick
to
the
litter
tray.
Litter
tray
surface
may
need
cleaning.
Clean
litter
tray
as
instructed
in
THOROUGH
CLEANING.
Mode
indicator
light
does
not
turn
on
when
ON/
OFF/CLEAN
switch
is
turned
on.
Litter
box
is
not
receiving
power.
Check
to
be
sure
that
the
unit
is
plugged
into
a
working
outlet.
16

NEED
HELP?
For
service,
repair
or
any
questions
regarding
your
appliance,
call
1-800-645-5154
〇
「
visit
www.littermaid.com
.
Do
not
return
the
product
to
the
place
of
purchase.
Do
not
mail
the
product
back
to
the
manufacturer
or
bring
it
to
a
service
center.
■E-YEAR
LIMITED
WARRANTY
(Applies
only
in
the
United
States
and
Canada)
What
does
it
cover?
Any
defect
in
material
or
workmanship
;
provided,
however,
Spectrum
Brands
Pet
LLC's
liability
will
not
exceed
the
purchase
price
of
the
product.
For
how
long?
One
year
after
the
date
of
original
purchase.
What
will
we
do
to
help
you?
Provide
you
with
a
reasonably
similar
replacement
product
that
is
either
new
or
factory
refurbished.
How
do
you
get
service?
•
Save
your
receipt
as
proof
of
the
date
of
sale.
•
Call
our
toll-free
number,
1
-800-645-5154,
for
general
warranty
service.
What
does
your
warranty
not
cover?
•
Damage
from
commercial
use.
•
Damage
from
misuse,
abuse
or
neglect.
•
Products
that
have
been
modified
in
any
way.
•
Products
used
or
serviced
outside
the
country
of
purchase.
•
Accessory
items
that
are
packed
with
the
unit.
•
Shipping
and
handling
costs
associated
with the
replacement
of
the
unit.
•
Consequential
or
incidental
damages.
(Please
note,
however,
that
some
states
do
not
allow
the
exclusion
or
limitation
of
consequential
or incidental
damages,
so
this
limitation
may
not
apply
to
you.)
How
does
state
law
relate
to
this
warranty?
This
warranty
gives
you
specific
legal
rights,
and
you
may
also
have
other
rights
that
vary
from
state
to
state
or
province
to
province.
17

Spectrum
Brands
Pet
LLC
3001
Commerce
St.,
Blacksburg,
VA
24060
Made
in
China
17-30860
®/TM/©
2018
Spectrum
Brands,
Inc.
or
one
of
its
affiliates
This manual suits for next models
1
Table of contents
Other LitterMaid Pet Care Product manuals

LitterMaid
LitterMaid LitterMaid Self-Cleaning Litter Box User manual

LitterMaid
LitterMaid LM580 User manual

LitterMaid
LitterMaid LM980 Installation instructions

LitterMaid
LitterMaid LitterMaid LME9000MB Owner's manual

LitterMaid
LitterMaid LITTER BOX CARPET User manual

LitterMaid
LitterMaid LM950 User manual

LitterMaid
LitterMaid Kitty Kabana LME9000MW User manual

LitterMaid
LitterMaid LM500 User manual

LitterMaid
LitterMaid Kitty Kabana LME9000MW User manual

LitterMaid
LitterMaid LitterMaid LM680 Owner's manual