manuals.online logo
Brands
  1. Home
  2. •
  3. Brands
  4. •
  5. Little Tikes
  6. •
  7. Motorized Toy Car
  8. •
  9. Little Tikes RC WHEELZ Tire Twister User manual

Little Tikes RC WHEELZ Tire Twister User manual

1
4
638541
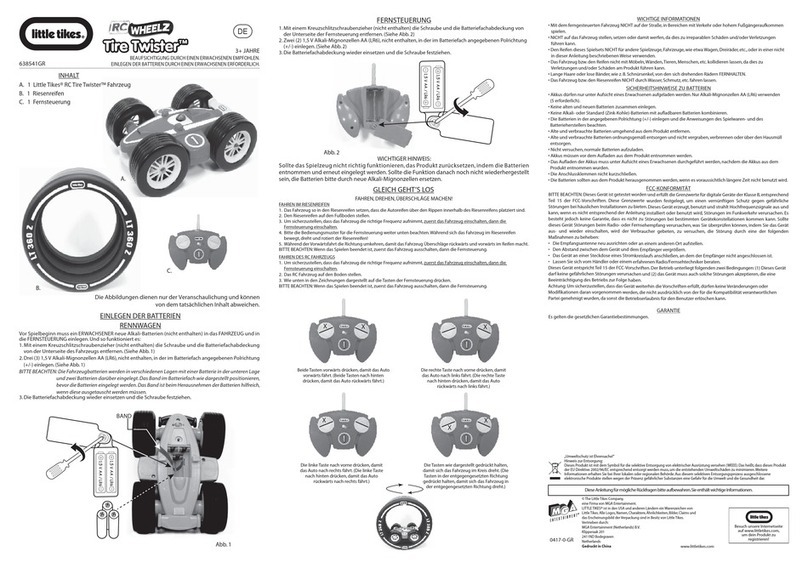
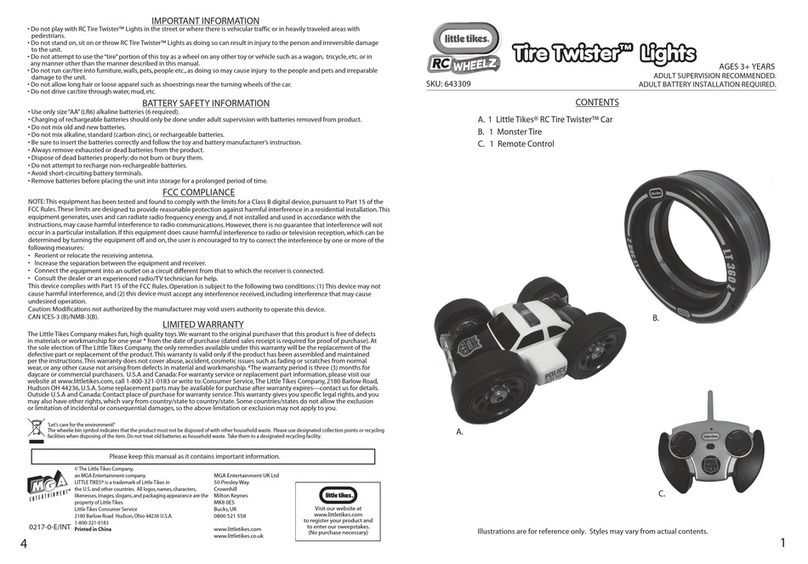
CONTENTS
Illustrations are for reference only. Styles may vary from actual contents.
Tire Twister™Tire Twister™
AGES 3+ YEARS
A. 1 Little Tikes® RC Tire Twister™ Car
B. 1 Monster Tire
C. 1 Remote Control
ADULT SUPERVISION RECOMMENDED
IMPORTANT INFORMATION
• DO NOT play with RC Tire Twister™ in the street or where there is vehicular traffic or in heavily traveled areas with pedestrians.
• DO NOT stand on,sit on or throw RC Tire Twister™ as doing so can result in injury to the person and irreversible damage to
the unit.
• DO NOT attempt to use the“tire”portion of this toy as a wheel on any other toy or vehicle such as a wagon, tricycle,etc. or in
any manner other than the manner described in this manual.
• DO NOT run car/tire into furniture, walls, pets, people etc., as doing so may cause injury to the people and pets and
irreparable damage to the unit.
• DO NOT allow long hair or loose apparel such as shoestrings near the turning wheels of the car.
• DO NOT drive car/tire through water, mud, etc.
A.
B.
The Little Tikes Company makes fun, high quality toys.We warrant to the original purchaser that this product is free of defects in
materials or workmanship for one year * from the date of purchase (dated sales receipt is required for proof of purchase). At the sole
election of The Little Tikes Company, the only remedies available under this warranty will be the replacement of the defective part or
replacement of the product.This warranty is valid only if the product has been assembled and maintained per the instructions.This
warranty does not cover abuse,accident, cosmetic issues such as fading or scratches from normal wear, or any other cause not arising
from defects in material and workmanship.*The warranty period is three (3) months for daycare or commercial purchasers. U.S.A and
Canada: For warranty service or replacement part information, please visit our website at www.littletikes.com, call 1-800-321-0183 or
write to: Consumer Service,The Little Tikes Company, 2180 Barlow Road, Hudson OH 44236,U.S.A. Some replacement parts may be
available for purchase after warranty expires—contact us for details. Outside U.S.A and Canada: Contact place of purchase for warranty
service.This warranty gives you specific legal rights, and you may also have other rights, which vary from country/state to country/state.
Some countries/states do not allow the exclusion or limitation of incidental or consequential damages, so the above limitation or
exclusion may not apply to you.
‘Let’s care for the environment!’
The wheelie bin symbol indicates that the product must not be disposed of with
other household waste. Please use designated collection points or recycling
facilities when disposing of the item.
Do not treat old batteries as household waste. Take them to a designated
recycling facility.
FCC COMPLIANCE
NOTE:This equipment has been tested and found to comply with the limits for a Class B digital device,pursuant to Part 15 of
the FCC Rules.These limits are designed to provide reasonable protection against harmful interference in a residential
installation.This equipment generates, uses and can radiate radio frequency energy and,if not installed and used in
accordance with the instructions,may cause harmful interference to radio communications.However, there is no guarantee
that interference will not occur in a particular installation. If this equipment does cause harmful interference to radio or
television reception, which can be determined by turning the equipment off and on,the user is encouraged to try to correct
the interference by one or more of the following measures:
• Reorient or relocate the receiving antenna.
• Increase the separation between the equipment and receiver.
• Connect the equipment into an outlet on a circuit different from that to which the receiver is connected.
• Consult the dealer or an experienced radio/TV technician for help.
This device complies with Part 15 of the FCC Rules. Operation is subject to the following two conditions: (1) This device may not
cause harmful interference,and (2) this device must accept any interference received,including interference that may cause
undesired operation.
Warning: Changes or modifications to this unit not expressly approved by the party responsible for compliance could void the
user’s authority to operate the equipment.
This device complies with Industry Canada Licence-exempt RSS-210. Operation is subject to the following two conditions: (1)
this device may not cause interference,and (2) this device must accept any interference,including interference that may cause
undesired operation of the device.
LIMITED WARRANTY
BATTERY SAFETY INFORMATION
• Charging of rechargeable batteries should only be done under adult supervision. Use only size“AA”(LR6) alkaline batteries
(5 required).
• Never mix old batteries with new batteries,rechargeable (nickel-cadmium) or carbon zinc with alkaline batteries.
• Be sure to insert the batteries correctly and follow the toy and battery manufacturer’s instruction.
• Always remove exhausted or dead batteries from the product.
• Dispose of dead batteries properly: do not burn or bury them.
• Do not attempt to recharge non-rechargeable batteries.
• Remove rechargeable batteries from the product before recharging.
• Charging of rechargeable batteries should only be done under adult supervision with batteries removed from product.
• Avoid short-circuiting battery terminals.
• Remove batteries before placing the unit into storage for a prolonged period of time.
Please keep this manual as it contains important information.
MGA Entertainment UK Ltd
50 Presley Way
Crownhill
Milton Keynes
MK8 0ES
Bucks, UK
0800 521 558
www.littletikes.com
www.littletikes.co.uk
© The Little Tikes Company,
an MGA Entertainment company.
LITTLE TIKES® is a trademark of Little Tikes in
the U.S. and other countries. All logos, names,characters,
likenesses, images,slogans, and packaging appearance are the
property of
Little Tikes.
Little Tikes Consumer Service
2180 Barlow Road Hudson, Ohio 44236 U.S.A.
1-800-321-0183
Printed in China
0415-0-E/INT
Visit our website at
www.littletikes.com
to register your product and
to enter our sweepstakes.
(No purchase necessary)
[Hereby, MGA Entertainment (H.K.) Ltd,
declares that this Little Tikes® RC Tire
Twister™ is in compliance with essential
requirements and other provisions of
Directive 1999/5/EC.]
0359
C.
3
2
Before playing, an ADULT must install fresh alkaline batteries in the CAR and REMOTE. Here’s how:
1. Using a Phillips screwdriver (not included) remove the screw and battery compartment cover from the
underside of the car. (Fig. 1)
2. Install three (3) fresh 1.5V AA alkaline batteries (not included) in the car making sure the (+)and (-) ends
face the proper direction as indicated inside the battery compartment. (Fig. 1)
NOTE: Car batteries are layered with one battery inserted on the bottom layer and the two
remaining batteries above it.Position ribbon inside the battery compartment as shown before installing
batteries.Ribbon will aid in battery removal when batteries need to be replaced.
3. Replace the compartment cover and tighten the screw.
BATTERY INSTALLATION
RACE CAR
REMOTE CONTROL Fig. 1
1. Using a Phillips screwdriver (not included) remove the screw and battery compartment cover from the
underside of the remote.(Fig. 2)
2. Install two (2) fresh 1.5V AA alkaline batteries (not included) making sure the (+) and (-) ends face the proper
direction as indicated inside the battery compartment. (Fig.2)
3. Replace the compartment cover and tighten the screw.
Fig. 2
QUICK START
X
X
XX
Press both buttons forward,
car will move forward.(Press both
buttons back, car will move backward.)
Press right button forward,
car will turn left. (Press right
button backward,car will back left.)
Press left button forward,car will turn
right. (Press left button backward, car will
back right.)
X
X
Press and hold buttons as shown,
car will spin in a circle. (Press and hold
opposite buttons, car will spin in the
opposite direction.)
DRIVE IT, SPIN IT,FLIP IT !
DRIVING THE TIRE TWISTER
1. Set the car inside the monster tire making sure the car tires straddle the ribs inside the monster tire.
2. Place the monster tire on the floor.
3. To assure your car will pick up the correct frequency, switch the car ON first, then switch the remote control ON.
4. Follow the remote control patterns below. As the car inside the monster tire moves, the monster tire will turn, twist and spin!
5. While going forward,reverse the direction and the car will flip backward and forward inside the monster tire.
NOTE: When finished playing, first move the ( I/ O) switch on the car to O,then move the ( I/ O) switch on the
remote control to O.
DRIVING THE RC CAR
1. To assure your car will pick up the correct frequency, switch the car ON first, then switch the remote control ON.
2. Place the car on the floor.
3. Press the buttons on the remote control as shown in the diagrams below.
NOTE: When finished playing, first move the ( I/ O) switch on the car to O,then move the ( I/ O) switch on the
remote control to O.
1.5V AA / LR6
1.5V AA / LR6
1.5V AA / LR6
1.5V AA / LR6
IMPORTANT NOTE:
In the event of a malfunction, reset the item by removing and replacing the batteries. If function is
still not restored, replace the batteries with fresh alkaline batteries.
RIBBON
1
4
638541
CONTENTS
Illustrations are for reference only. Styles may vary from actual contents.
Tire Twister™Tire Twister™
AGES 3+ YEARS
A. 1 Little Tikes® RC Tire Twister™ Car
B. 1 Monster Tire
C. 1 Remote Control
ADULT SUPERVISION RECOMMENDED
IMPORTANT INFORMATION
• DO NOT play with RC Tire Twister™ in the street or where there is vehicular traffic or in heavily traveled areas with pedestrians.
• DO NOT stand on,sit on or throw RC Tire Twister™ as doing so can result in injury to the person and irreversible damage to
the unit.
• DO NOT attempt to use the“tire”portion of this toy as a wheel on any other toy or vehicle such as a wagon, tricycle,etc. or in
any manner other than the manner described in this manual.
• DO NOT run car/tire into furniture, walls, pets, people etc., as doing so may cause injury to the people and pets and
irreparable damage to the unit.
• DO NOT allow long hair or loose apparel such as shoestrings near the turning wheels of the car.
• DO NOT drive car/tire through water, mud, etc.
A.
B.
The Little Tikes Company makes fun, high quality toys.We warrant to the original purchaser that this product is free of defects in
materials or workmanship for one year * from the date of purchase (dated sales receipt is required for proof of purchase). At the sole
election of The Little Tikes Company, the only remedies available under this warranty will be the replacement of the defective part or
replacement of the product.This warranty is valid only if the product has been assembled and maintained per the instructions.This
warranty does not cover abuse,accident, cosmetic issues such as fading or scratches from normal wear, or any other cause not arising
from defects in material and workmanship.*The warranty period is three (3) months for daycare or commercial purchasers. U.S.A and
Canada: For warranty service or replacement part information, please visit our website at www.littletikes.com, call 1-800-321-0183 or
write to: Consumer Service,The Little Tikes Company, 2180 Barlow Road, Hudson OH 44236,U.S.A. Some replacement parts may be
available for purchase after warranty expires—contact us for details. Outside U.S.A and Canada: Contact place of purchase for warranty
service.This warranty gives you specific legal rights, and you may also have other rights, which vary from country/state to country/state.
Some countries/states do not allow the exclusion or limitation of incidental or consequential damages, so the above limitation or
exclusion may not apply to you.
‘Let’s care for the environment!’
The wheelie bin symbol indicates that the product must not be disposed of with
other household waste. Please use designated collection points or recycling
facilities when disposing of the item.
Do not treat old batteries as household waste. Take them to a designated
recycling facility.
FCC COMPLIANCE
NOTE:This equipment has been tested and found to comply with the limits for a Class B digital device,pursuant to Part 15 of
the FCC Rules.These limits are designed to provide reasonable protection against harmful interference in a residential
installation.This equipment generates, uses and can radiate radio frequency energy and,if not installed and used in
accordance with the instructions,may cause harmful interference to radio communications.However, there is no guarantee
that interference will not occur in a particular installation. If this equipment does cause harmful interference to radio or
television reception, which can be determined by turning the equipment off and on,the user is encouraged to try to correct
the interference by one or more of the following measures:
• Reorient or relocate the receiving antenna.
• Increase the separation between the equipment and receiver.
• Connect the equipment into an outlet on a circuit different from that to which the receiver is connected.
• Consult the dealer or an experienced radio/TV technician for help.
This device complies with Part 15 of the FCC Rules. Operation is subject to the following two conditions: (1) This device may not
cause harmful interference,and (2) this device must accept any interference received,including interference that may cause
undesired operation.
Warning: Changes or modifications to this unit not expressly approved by the party responsible for compliance could void the
user’s authority to operate the equipment.
This device complies with Industry Canada Licence-exempt RSS-210. Operation is subject to the following two conditions: (1)
this device may not cause interference,and (2) this device must accept any interference,including interference that may cause
undesired operation of the device.
LIMITED WARRANTY
BATTERY SAFETY INFORMATION
• Charging of rechargeable batteries should only be done under adult supervision. Use only size“AA”(LR6) alkaline batteries
(5 required).
• Never mix old batteries with new batteries,rechargeable (nickel-cadmium) or carbon zinc with alkaline batteries.
• Be sure to insert the batteries correctly and follow the toy and battery manufacturer’s instruction.
• Always remove exhausted or dead batteries from the product.
• Dispose of dead batteries properly: do not burn or bury them.
• Do not attempt to recharge non-rechargeable batteries.
• Remove rechargeable batteries from the product before recharging.
• Charging of rechargeable batteries should only be done under adult supervision with batteries removed from product.
• Avoid short-circuiting battery terminals.
• Remove batteries before placing the unit into storage for a prolonged period of time.
Please keep this manual as it contains important information.
MGA Entertainment UK Ltd
50 Presley Way
Crownhill
Milton Keynes
MK8 0ES
Bucks, UK
0800 521 558
www.littletikes.com
www.littletikes.co.uk
© The Little Tikes Company,
an MGA Entertainment company.
LITTLE TIKES® is a trademark of Little Tikes in
the U.S. and other countries. All logos, names,characters,
likenesses, images,slogans, and packaging appearance are the
property of
Little Tikes.
Little Tikes Consumer Service
2180 Barlow Road Hudson, Ohio 44236 U.S.A.
1-800-321-0183
Printed in China
0415-0-E/INT
Visit our website at
www.littletikes.com
to register your product and
to enter our sweepstakes.
(No purchase necessary)
[Hereby, MGA Entertainment (H.K.) Ltd,
declares that this Little Tikes® RC Tire
Twister™ is in compliance with essential
requirements and other provisions of
Directive 1999/5/EC.]
0359
C.
3
2
Before playing, an ADULT must install fresh alkaline batteries in the CAR and REMOTE. Here’s how:
1. Using a Phillips screwdriver (not included) remove the screw and battery compartment cover from the
underside of the car. (Fig. 1)
2. Install three (3) fresh 1.5V AA alkaline batteries (not included) in the car making sure the (+)and (-) ends
face the proper direction as indicated inside the battery compartment. (Fig. 1)
NOTE: Car batteries are layered with one battery inserted on the bottom layer and the two
remaining batteries above it.Position ribbon inside the battery compartment as shown before installing
batteries.Ribbon will aid in battery removal when batteries need to be replaced.
3. Replace the compartment cover and tighten the screw.
BATTERY INSTALLATION
RACE CAR
REMOTE CONTROL Fig. 1
1. Using a Phillips screwdriver (not included) remove the screw and battery compartment cover from the
underside of the remote.(Fig. 2)
2. Install two (2) fresh 1.5V AA alkaline batteries (not included) making sure the (+) and (-) ends face the proper
direction as indicated inside the battery compartment. (Fig.2)
3. Replace the compartment cover and tighten the screw.
Fig. 2
QUICK START
X
X
XX
Press both buttons forward,
car will move forward.(Press both
buttons back, car will move backward.)
Press right button forward,
car will turn left. (Press right
button backward,car will back left.)
Press left button forward,car will turn
right. (Press left button backward, car will
back right.)
X
X
Press and hold buttons as shown,
car will spin in a circle. (Press and hold
opposite buttons, car will spin in the
opposite direction.)
DRIVE IT, SPIN IT,FLIP IT !
DRIVING THE TIRE TWISTER
1. Set the car inside the monster tire making sure the car tires straddle the ribs inside the monster tire.
2. Place the monster tire on the floor.
3. To assure your car will pick up the correct frequency, switch the car ON first, then switch the remote control ON.
4. Follow the remote control patterns below. As the car inside the monster tire moves, the monster tire will turn, twist and spin!
5. While going forward,reverse the direction and the car will flip backward and forward inside the monster tire.
NOTE: When finished playing, first turn off the car, then turn off the remote control.
DRIVING THE RC CAR
1. To assure your car will pick up the correct frequency, switch the car ON first, then switch the remote control ON.
2. Place the car on the floor.
3. Press the buttons on the remote control as shown in the diagrams below.
NOTE: When finished playing, first turn off the car, then turn off the remote control.
1.5V AA / LR6
1.5V AA / LR6
1.5V AA / LR6
1.5V AA / LR6
IMPORTANT NOTE:
In the event of a malfunction, reset the item by removing and replacing the batteries. If function is
still not restored, replace the batteries with fresh alkaline batteries.
RIBBON

Other Little Tikes Motorized Toy Car manuals

Little Tikes COZY TRUCK 642319M User manual

Little Tikes

Little Tikes COZY TRUCK 642319M User manual

Little Tikes SLAMMIN' RACERS Police Car User manual

Little Tikes

Little Tikes SLAMMIN' RACERS Police Car User manual

Little Tikes T-Rex Truck User manual

Little Tikes

Little Tikes T-Rex Truck User manual

Little Tikes RC WHEELZ Tire Twister Lights User manual

Little Tikes

Little Tikes RC WHEELZ Tire Twister Lights User manual

Little Tikes 651083 Use and care manual

Little Tikes

Little Tikes 651083 Use and care manual

Little Tikes Adventure Rover User manual

Little Tikes

Little Tikes Adventure Rover User manual

Little Tikes RC WHEELZ Bumper Cars User manual

Little Tikes

Little Tikes RC WHEELZ Bumper Cars User manual

Little Tikes Tire Twister User manual

Little Tikes

Little Tikes Tire Twister User manual

Little Tikes Dino Dune Buggy User manual

Little Tikes

Little Tikes Dino Dune Buggy User manual

Little Tikes 173059E3 User manual

Little Tikes

Little Tikes 173059E3 User manual

Little Tikes LTXtreme AIR CHARGERS 3-IN-1 STUNT LOOP TRACK... Datasheet

Little Tikes

Little Tikes LTXtreme AIR CHARGERS 3-IN-1 STUNT LOOP TRACK... Datasheet

Little Tikes Bumper Car User manual

Little Tikes

Little Tikes Bumper Car User manual

Little Tikes 627426090-R2-3/04 User manual

Little Tikes

Little Tikes 627426090-R2-3/04 User manual

Popular Motorized Toy Car manuals by other brands

Carson Stunt warrior X10EB instruction manual

Carson

Carson Stunt warrior X10EB instruction manual

Mugen Seiki MTX4 instruction manual

Mugen Seiki

Mugen Seiki MTX4 instruction manual

Coolster 250CC Series user manual

Coolster

Coolster 250CC Series user manual

Kyosho MINI-Z Racer MR-02 RM Type instruction sheet

Kyosho

Kyosho MINI-Z Racer MR-02 RM Type instruction sheet

Jamara Strong Bull instructions

Jamara

Jamara Strong Bull instructions

HOLLICY SX1968 Assembly manual

HOLLICY

HOLLICY SX1968 Assembly manual

Robitronic ETC V2 instruction manual

Robitronic

Robitronic ETC V2 instruction manual

Helion Animus 18SC owner's manual

Helion

Helion Animus 18SC owner's manual

Atomic MRZ Assembly manual

Atomic

Atomic MRZ Assembly manual

Jamara Ride on Traktor Big Wheel 12V instruction manual

Jamara

Jamara Ride on Traktor Big Wheel 12V instruction manual

Tonka ATV user guide

Tonka

Tonka ATV user guide

Jamara Lamborghini Aventador SVJ instructions

Jamara

Jamara Lamborghini Aventador SVJ instructions

Eduard M-985 HEMTT Armament quick start guide

Eduard

Eduard M-985 HEMTT Armament quick start guide

Supertrax Ghost Installation and operation instructions

Supertrax

Supertrax Ghost Installation and operation instructions

Traxxas 1/16 E ERVO VXL 71074 owner's manual

Traxxas

Traxxas 1/16 E ERVO VXL 71074 owner's manual

REVELL Ferrari Testarossa Assembly manual

REVELL

REVELL Ferrari Testarossa Assembly manual

Kyosho Mini Inferno ST 09 instruction manual

Kyosho

Kyosho Mini Inferno ST 09 instruction manual

Tamiya PORSCHE CARRERA GT manual

Tamiya

Tamiya PORSCHE CARRERA GT manual

manuals.online logo
manuals.online logoBrands
  • About & Mission
  • Contact us
  • Privacy Policy
  • Terms and Conditions

Copyright 2025 Manuals.Online. All Rights Reserved.