manuals.online logo
Brands
  1. Home
  2. •
  3. Brands
  4. •
  5. Little Tikes
  6. •
  7. Toy
  8. •
  9. Little Tikes YouDrive Flex Tracks User manual

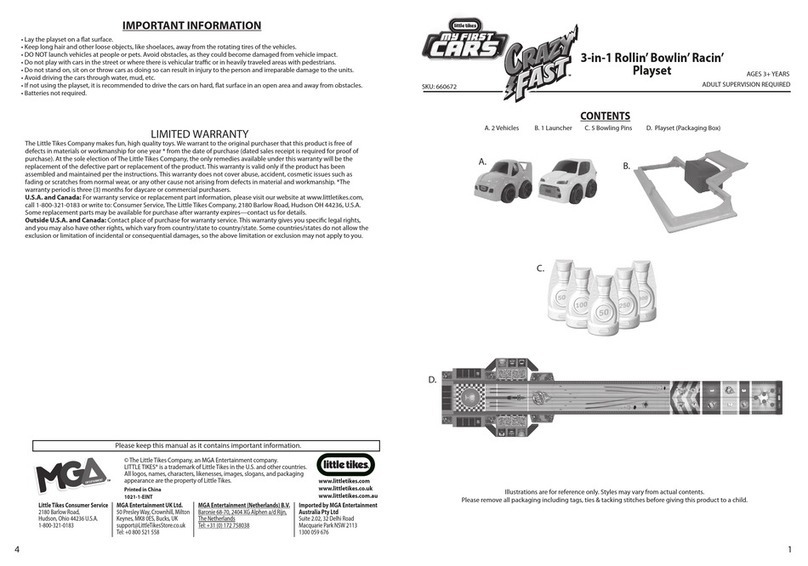
Little Tikes YouDrive Flex Tracks User manual

SKUs: 649301, 649318
AGES 3+ YEARS
ADULT BATTERY INSTALLATION REQUIRED
A. 1 Vehicle
B. 1 Remote Control
C. 50 Track Pieces
CONTENTS
TM
EACH SOLD SEPARATELY
A. A.
B. B.
1
Before beginning, an adult must install fresh alkaline batteries in the vehicle and remote control. Here’s how:
1. Using a Phillips screwdriver (not included), remove the screws and battery compartment covers located
under the vehicle and on the back of the remote control.
2. Install two (2) fresh 1.5V AAA (LR03) alkaline batteries (not included) in the vehicle and remote control,
making sure the (+) and (-) ends face the proper direction as indicated inside the battery compartment.
3. Replace the compartment covers and tighten the screws.
BATTERY INSTALLATION
VEHICLE REMOTE CONTROL
1.5V AAA/LR03
1.5V AAA/LR03
2 x AAA Batteries
Illustrations are for reference only. Styles may vary from actual contents.
649301 649318
C. C.
4
‘Let’s care for the environment!’
The wheelie bin symbol indicates that the product must not be disposed of with other household waste. Please use designated
collection points or recycling facilities when disposing of the item. Do not treat old batteries as household waste. Take them to a
designated recycling facility.
• Use only size“AAA”(LR03) alkaline batteries (4 required).
• Charging of rechargeable batteries should only be done under adult supervision.
• Remove rechargeable batteries from the product before recharging.
• Do not mix old and new batteries.
• Do not mix alkaline, standard (carbon-zinc), or rechargeable batteries.
• Be sure to insert the batteries correctly and follow the toy and battery manufacturer’s instruction.
• Always remove exhausted or dead batteries from the product.
• Dispose of dead batteries properly: do not burn or bury them.
• Do not attempt to recharge non-rechargeable batteries.
• Avoid short-circuiting battery terminals.
• Remove batteries before placing the unit into storage for a prolonged period of time.
BATTERY SAFETY INFORMATION
FCC COMPLIANCE
NOTE: This equipment has been tested and found to comply with the limits for a Class B digital device, pursuant to Part 15 of the
FCC Rules. These limits are designed to provide reasonable protection against harmful interference in a residential installation. This
equipment generates, uses and can radiate radio frequency energy and, if not installed and used in accordance with the
instructions, may cause harmful interference to radio communications. However, there is no guarantee that interference will not
occur in a particular installation. If this equipment does cause harmful interference to radio or television reception, which can be
determined by turning the equipment o and on, the user is encouraged to try to correct the interference by one or more of the
following measures:
• Reorient or relocate the receiving antenna.
• Increase the separation between the equipment and receiver.
• Connect the equipment into an outlet on a circuit dierent from that to which the receiver is connected.
• Consult the dealer or an experienced radio/TV technician for help.
This device complies with Part 15 of the FCC Rules. Operation is subject to the following two conditions: (1) This device may not
cause harmful interference, and (2) this device must accept any interference received, including interference that may cause
undesired operation.
Caution: Modications not authorized by the manufacturer may void users authority to operate this device.
This device contains licence-exempt transmitter(s)/receiver(s) that comply with Innovation, Science and Economic
Development Canada’s licence-exempt RSS(s). Operation is subject to the following two conditions: (1) This device may not cause
interference. (2) This device must accept any interference, including interference that may cause undesired operation of the device.
CAN ICES-3 (B)/NMB-3(B).
Please keep this manual as it contains important information.
MGA Entertainment (Netherlands) B.V.
Klipperaak 201, 2411 ND Bodergraven, NL
Tel: +31 (0) 172-758 038
E-mail: [email protected]
© The Little Tikes Company, an MGA Entertainment company.
LITTLE TIKES® is a trademark of Little Tikes in the U.S. and
other countries. All logos, names, characters, likenesses,
images, slogan, and packaging appearance are the property
of Little Tikes.
MGA Entertainment UK Ltd
50 Presley Way
Crownhill
Milton Keynes
MK8 0ES
Bucks, UK
0800 521 558
Printed in China
1118-1-E/INT
Little Tikes Consumer Service
2180 Barlow Road
Hudson, Ohio 44236 U.S.A.
1-800-321-0183
www.littletikes.com
www.littletikes.co.uk
Visit our website at
www.littletikes.com
to register your product and
to enter our sweepstakes.
(No purchase necessary)
OI
1.5V AAA/LR03
1.5V AAA/LR03
2 x AAA Batteries
O
I
2
BUILD IT YOUR WAY
1
Attach the track pieces
together by inserting the
peg into the opening.
Pieces will snap in place.
2
Continue adding the
pieces until you have
built your desired track.
Alternate colors for a
real track look.
For best results, build your track and place the vehicle on a hard, at surface in a large open area.
3
To disassemble track pieces, rmly hold both
pieces, push in on the peg with your thumb
and pull pieces apart.
3
TEST YOUR SKILLS
BEGINNER
EXPERT
Practice and strengthen your skills by building your track following the diagrams below.
INTERMEDIATE
123
12 3
1 2 3
FIG. 1
DRIVING LESSONS
PAIRING VEHICLE AND REMOTE CONTROL
Before beginning, the vehicle and remote control will need to be paired. Here’s how:
1. Move the switch under the vehicle from the “OFF” (O) position to the “ON” ( I) position. (Fig. 1)
2. The lights on the front of the vehicle will begin to blink.
3. Move the switch on top of the remote control from the “OFF” (O) position to the “ON” ( I) position. (Fig. 2)
4. The vehicle and remote control are paired when the lights on the vehicle stop blinking.
Press and hold the left
button to make the
vehicle go in reverse.
Press and hold the
right button to make
the vehicle go forward.
Tilt the wheel to the left.
While keeping the wheel in
position, press and hold the
left or right button. The
vehicle will go forward or
reverse to the left.
Place your vehicle inside the track and follow the steps below to move the vehicle.
FIG. 2
Tilt the wheel to the right.
While keeping the wheel in
position, press and hold the
left or right button. The
vehicle will go forward or
reverse to the right.
ADJUSTING THE ALIGNMENT
If the vehicle is moving to one side, adjust the alignment by moving the switch under the vehicle to the left or right.
IMPORTANT INFORMATION
• Do not play with vehicle in the street, where there is vehicular traffic, or in heavily traveled ares with pedestrians.
• Do not stand on, sit on, or throw the vehicle, remote control and track pieces, as doing so can result in injury to the person
and irreparable damage to the units.
• Do not run the vehicle into furniture, walls, pets, people, etc., as doing so may cause injury to the person and irreparable
damage to the unit.
• Avoid driving the vehicle through water, mud, etc.
• Keep long hair and loose apparel, such as shoestrings, away from the rotating wheels.
• It is recommended to drive the vehicle on hardwood ooring.
• Keep the remote control in range to operate vehicle correctly.
• When not playing, turn the vehicle and remote control o to conserve battery power.
• The light on some vehicles may continue to ash while playing even after it has been paired.
• If the vehicle stops working or doesn’t work as it should, turn o remote and vehicle and pair again. If there is still a
problem, replace the batteries.
• This toy produces ashes that may trigger epilepsy in sensitised individuals.
• Wipe the unit with a damp cloth to clean. Keep moisture away from the battery compartment.
• Frequency band range is 2420 - 2465MHz.
• Maximum radio-frequency power is -3.4dBm.
The Little Tikes Company makes fun, high quality toys. We warrant to the original purchaser that this product is free of
defects in materials or workmanship for one year * from the date of purchase (dated sales receipt is required for proof of
purchase). At the sole election of The Little Tikes Company, the only remedies available under this warranty will be the
replacement of the defective part or replacement of the product. This warranty is valid only if the product has been
assembled and maintained per the instructions. This warranty does not cover abuse, accident, cosmetic issues such as
fading or scratches from normal wear, or any other cause not arising from defects in material and workmanship. *The
warranty period is three (3) months for daycare or commercial purchasers. U.S.A and Canada: For warranty service or
replacement part information, please visit our website at www.littletikes.com, call 1-800-321-0183 or write to: Consumer
Service, The Little Tikes Company, 2180 Barlow Road, Hudson OH 44236, U.S.A. Some replacement parts may be available for
purchase after warranty expires—contact us for details. Outside U.S.A and Canada: Contact place of purchase for warranty
service. This warranty gives you specic legal rights, and you may also have other rights, which vary from country/state to
country/state. Some countries/states do not allow the exclusion or limitation of incidental or consequential damages, so the
above limitation or exclusion may not apply to you.
LIMITED WARRANTY
1234
(OFF)(ON)
OI
(ON)(OFF)
IO
OI
TIP: For hard to remove track pieces, push in on
the peg, turn one piece inward and pull apart.
TIP

This manual suits for next models

2

Other Little Tikes Toy manuals

Little Tikes 172182E3 User manual

Little Tikes

Little Tikes 172182E3 User manual

Little Tikes Jett Car Racer 660443M8 User manual

Little Tikes

Little Tikes Jett Car Racer 660443M8 User manual

Little Tikes MyFirst Helicopter User manual

Little Tikes

Little Tikes MyFirst Helicopter User manual

Little Tikes Wheelz Slammin' Racers Scrapyard Derby User manual

Little Tikes

Little Tikes Wheelz Slammin' Racers Scrapyard Derby User manual

Little Tikes COOK'N STORE 638701M User manual

Little Tikes

Little Tikes COOK'N STORE 638701M User manual

Little Tikes 640278M User manual

Little Tikes

Little Tikes 640278M User manual

Little Tikes MY FIRST MIGHTY BLASTERS 656255 User manual

Little Tikes

Little Tikes MY FIRST MIGHTY BLASTERS 656255 User manual

Little Tikes CAPE COTTAGE PLAYHOUSE 637902M User manual

Little Tikes

Little Tikes CAPE COTTAGE PLAYHOUSE 637902M User manual

Little Tikes 651328MX1 User manual

Little Tikes

Little Tikes 651328MX1 User manual

Little Tikes Cute Lil' Pups Swim to me puppy User manual

Little Tikes

Little Tikes Cute Lil' Pups Swim to me puppy User manual

Little Tikes 3-in-1 Sports Zone User manual

Little Tikes

Little Tikes 3-in-1 Sports Zone User manual

Little Tikes MY REAL JAM 654800EUC User manual

Little Tikes

Little Tikes MY REAL JAM 654800EUC User manual

Little Tikes First Sink & Stove User manual

Little Tikes

Little Tikes First Sink & Stove User manual

Little Tikes Fold 'n Go Folding Wagon User manual

Little Tikes

Little Tikes Fold 'n Go Folding Wagon User manual

Little Tikes My Real Jam 654817 User manual

Little Tikes

Little Tikes My Real Jam 654817 User manual

Little Tikes MY FIRSST MIGHTY BLASTERS 656712 User manual

Little Tikes

Little Tikes MY FIRSST MIGHTY BLASTERS 656712 User manual

Little Tikes Little Baby Bum Singing Storybook User manual

Little Tikes

Little Tikes Little Baby Bum Singing Storybook User manual

Little Tikes 653568M User manual

Little Tikes

Little Tikes 653568M User manual

Little Tikes Light ‘n Go Movin’ Lights Monkey User manual

Little Tikes

Little Tikes Light ‘n Go Movin’ Lights Monkey User manual

Little Tikes Handle Haulers Big Top Charlie User manual

Little Tikes

Little Tikes Handle Haulers Big Top Charlie User manual

Little Tikes 618031 User manual

Little Tikes

Little Tikes 618031 User manual

Little Tikes TREASURE TROVE WATER TABLE User manual

Little Tikes

Little Tikes TREASURE TROVE WATER TABLE User manual

Little Tikes 4372 User manual

Little Tikes

Little Tikes 4372 User manual

Little Tikes LEARN & PLAY 659621 User manual

Little Tikes

Little Tikes LEARN & PLAY 659621 User manual

Popular Toy manuals by other brands

Lionel 6-19868 owner's manual

Lionel

Lionel 6-19868 owner's manual

AeroWorks 60cc Freestyle 260 ARF QB-L Assembly manual

AeroWorks

AeroWorks 60cc Freestyle 260 ARF QB-L Assembly manual

Canon CREATIVE PARK 3D Decoupage Assembly instructions

Canon

Canon CREATIVE PARK 3D Decoupage Assembly instructions

SL Model SL-30 instruction manual

SL Model

SL Model SL-30 instruction manual

Hachette ALIEN spectacular Assembly

Hachette

Hachette ALIEN spectacular Assembly

Southern Dia 1386 20T Assembly instructions

Southern

Southern Dia 1386 20T Assembly instructions

Eduard Zoom Hurricane Mk.I quick start guide

Eduard

Eduard Zoom Hurricane Mk.I quick start guide

LEGO Duplo 10606 Building instructions

LEGO

LEGO Duplo 10606 Building instructions

Faller 120217 manual

Faller

Faller 120217 manual

Enabling Devices Rock N Roll Stuart user guide

Enabling Devices

Enabling Devices Rock N Roll Stuart user guide

Faller GANTRY CRANE manual

Faller

Faller GANTRY CRANE manual

TILLIG TT BAHN 08414 manual

TILLIG TT BAHN

TILLIG TT BAHN 08414 manual

Solarbotics brutusbot 60125 user manual

Solarbotics

Solarbotics brutusbot 60125 user manual

Viessmann VOLLMER 45147 Mounting instruction

Viessmann

Viessmann VOLLMER 45147 Mounting instruction

REVELL Sd.Kfz. 173 Jagdpanther Assembly manual

REVELL

REVELL Sd.Kfz. 173 Jagdpanther Assembly manual

Giroo OFF-ROAD GD30805 user manual

Giroo

Giroo OFF-ROAD GD30805 user manual

MD Helicopters MD 500E Technical description

MD Helicopters

MD Helicopters MD 500E Technical description

Faller 2187 quick start guide

Faller

Faller 2187 quick start guide

manuals.online logo
manuals.online logoBrands
  • About & Mission
  • Contact us
  • Privacy Policy
  • Terms and Conditions

Copyright 2025 Manuals.Online. All Rights Reserved.