manuals.online logo
Brands
  1. Home
  2. •
  3. Brands
  4. •
  5. Locinox
  6. •
  7. Lock
  8. •
  9. Locinox VINCI-LMKQ V2 User manual

Locinox VINCI-LMKQ V2 User manual

Other Locinox Lock manuals

Locinox LOKQ4040Y2L9005VCAC User manual

Locinox

Locinox LOKQ4040Y2L9005VCAC User manual

Locinox FORTYLOCK Service manual

Locinox

Locinox FORTYLOCK Service manual

Locinox Valentino Instruction sheet

Locinox

Locinox Valentino Instruction sheet

Locinox GUARDIMA-FM User manual

Locinox

Locinox GUARDIMA-FM User manual

Locinox Valentino Instruction sheet

Locinox

Locinox Valentino Instruction sheet

Popular Lock manuals by other brands

Magic 105 manual

Magic

Magic 105 manual

Gantner GAT NET.Lock 7020 System Installation, configuration & operation

Gantner

Gantner GAT NET.Lock 7020 System Installation, configuration & operation

Dorma Studio Classic Installation instruction

Dorma

Dorma Studio Classic Installation instruction

Securam ECSL-601 quick start guide

Securam

Securam ECSL-601 quick start guide

Sudhaus 3003 operating manual

Sudhaus

Sudhaus 3003 operating manual

Safety 1st 48517 user guide

Safety 1st

Safety 1st 48517 user guide

Pado FDS-10 user manual

Pado

Pado FDS-10 user manual

Esco systeQ Series installation instructions

Esco

Esco systeQ Series installation instructions

COMPX National D8951 instruction sheet

COMPX

COMPX National D8951 instruction sheet

secureo Key Box instruction manual

secureo

secureo Key Box instruction manual

Stock Loks C8713 instruction sheet

Stock Loks

Stock Loks C8713 instruction sheet

COMPX 1T-058 Information

COMPX

COMPX 1T-058 Information

Auslock T11 user manual

Auslock

Auslock T11 user manual

Stealth SAFES ShadowVault Instructions & Troubleshooting

Stealth SAFES

Stealth SAFES ShadowVault Instructions & Troubleshooting

Knox KeySecure 5 Admin & user guide

Knox

Knox KeySecure 5 Admin & user guide

Kwikset 48334/01 Quick installation guide

Kwikset

Kwikset 48334/01 Quick installation guide

Metra Electronics Door Access Terminal Combo Technical manual

Metra Electronics

Metra Electronics Door Access Terminal Combo Technical manual

Kilitronik miniK10m operating manual

Kilitronik

Kilitronik miniK10m operating manual

manuals.online logo
manuals.online logoBrands
  • About & Mission
  • Contact us
  • Privacy Policy
  • Terms and Conditions

Copyright 2025 Manuals.Online. All Rights Reserved.

2010-01-19 - rev 1
CODE: VINCI - LMKQ V2
2010-01-19 - rev 1
Test the reset function - Testez la fonction reset
M8
M8
20 mm
60 mm
140 mm
2 x Ø24
90
120
2 x Ø18
2 x Ø15
2 x Ø9
MIN. 110
210
140
60 60 20
30
Blocked
Bloqué
Geblokkeerd
Blockiert
Code entry
Entrer le code
Code invoeren
Code-Eingabe
Open
Ouvert
Open
Geöffnet
Preparation of the prole - Préparation du prol
1
Voorbereiding van het poortkader - Vorbereitung des Prols
3
Test de resetfunctie - Testen Sie die Rücksetz-Funktion
• Enter a false code and check if the handle remains blocked. Reset the code panel, enter the
correct code and test the handle again.
• Entrez un code erroné et vériez si la poigneé reste bloquée. Recomposez le code et
retestez le poignée.
• Voer een foutieve code in en verieer of de kruk geblokkeerd blijft. Reset het codepaneel,
voer de juiste code in en test opnieuw de kruk.
• Geben Sie einen falschen Code ein und überprüfen Sie ob der Drücker blockiert bleibt.
Geben Sie nach Rücksetzung des Codepultes den richtigen Code ein und überprüfen Sie den
Drücker aufs neue.
180°
• Left / Right changing of the self-latching bolt
• Réversibilité du pêne à gauche / à droite
• Links / Rechts omstelling
• Links / Rechts- Riegelumstellung
25 mm
15 mm
B
A
A
B
• Key operated & throw
• Ouverture du pêne & verrouillage
• Sleutelbediening en vergrendeling
• Mit Schlüssel und Wurf
20 mm
20 mm
• Continuous adjustability of the bolts
• Réglage continu du pêne de jour et de nuit
• Continue regelbaarheid van dag- & nachtpen
• Ständige Umstellung des Tages- und Nachriegels
* M A N U - 0 0 0 0 0 3 *
Locinox nv • Mannebeekstraat 21 • B-8790 Waregem • Belgium - Europe
Tel. +32 (0)56 77 27 66 • Fax. +32 (0)56 77 69 26 • E-mail: [email protected]
Doc. Nr.: MANU-000003
2010-01-19 - rev 1 2010-01-19 - rev 1
Code setting - Fixation du code
Code: 2 - 6 - 8 - 0
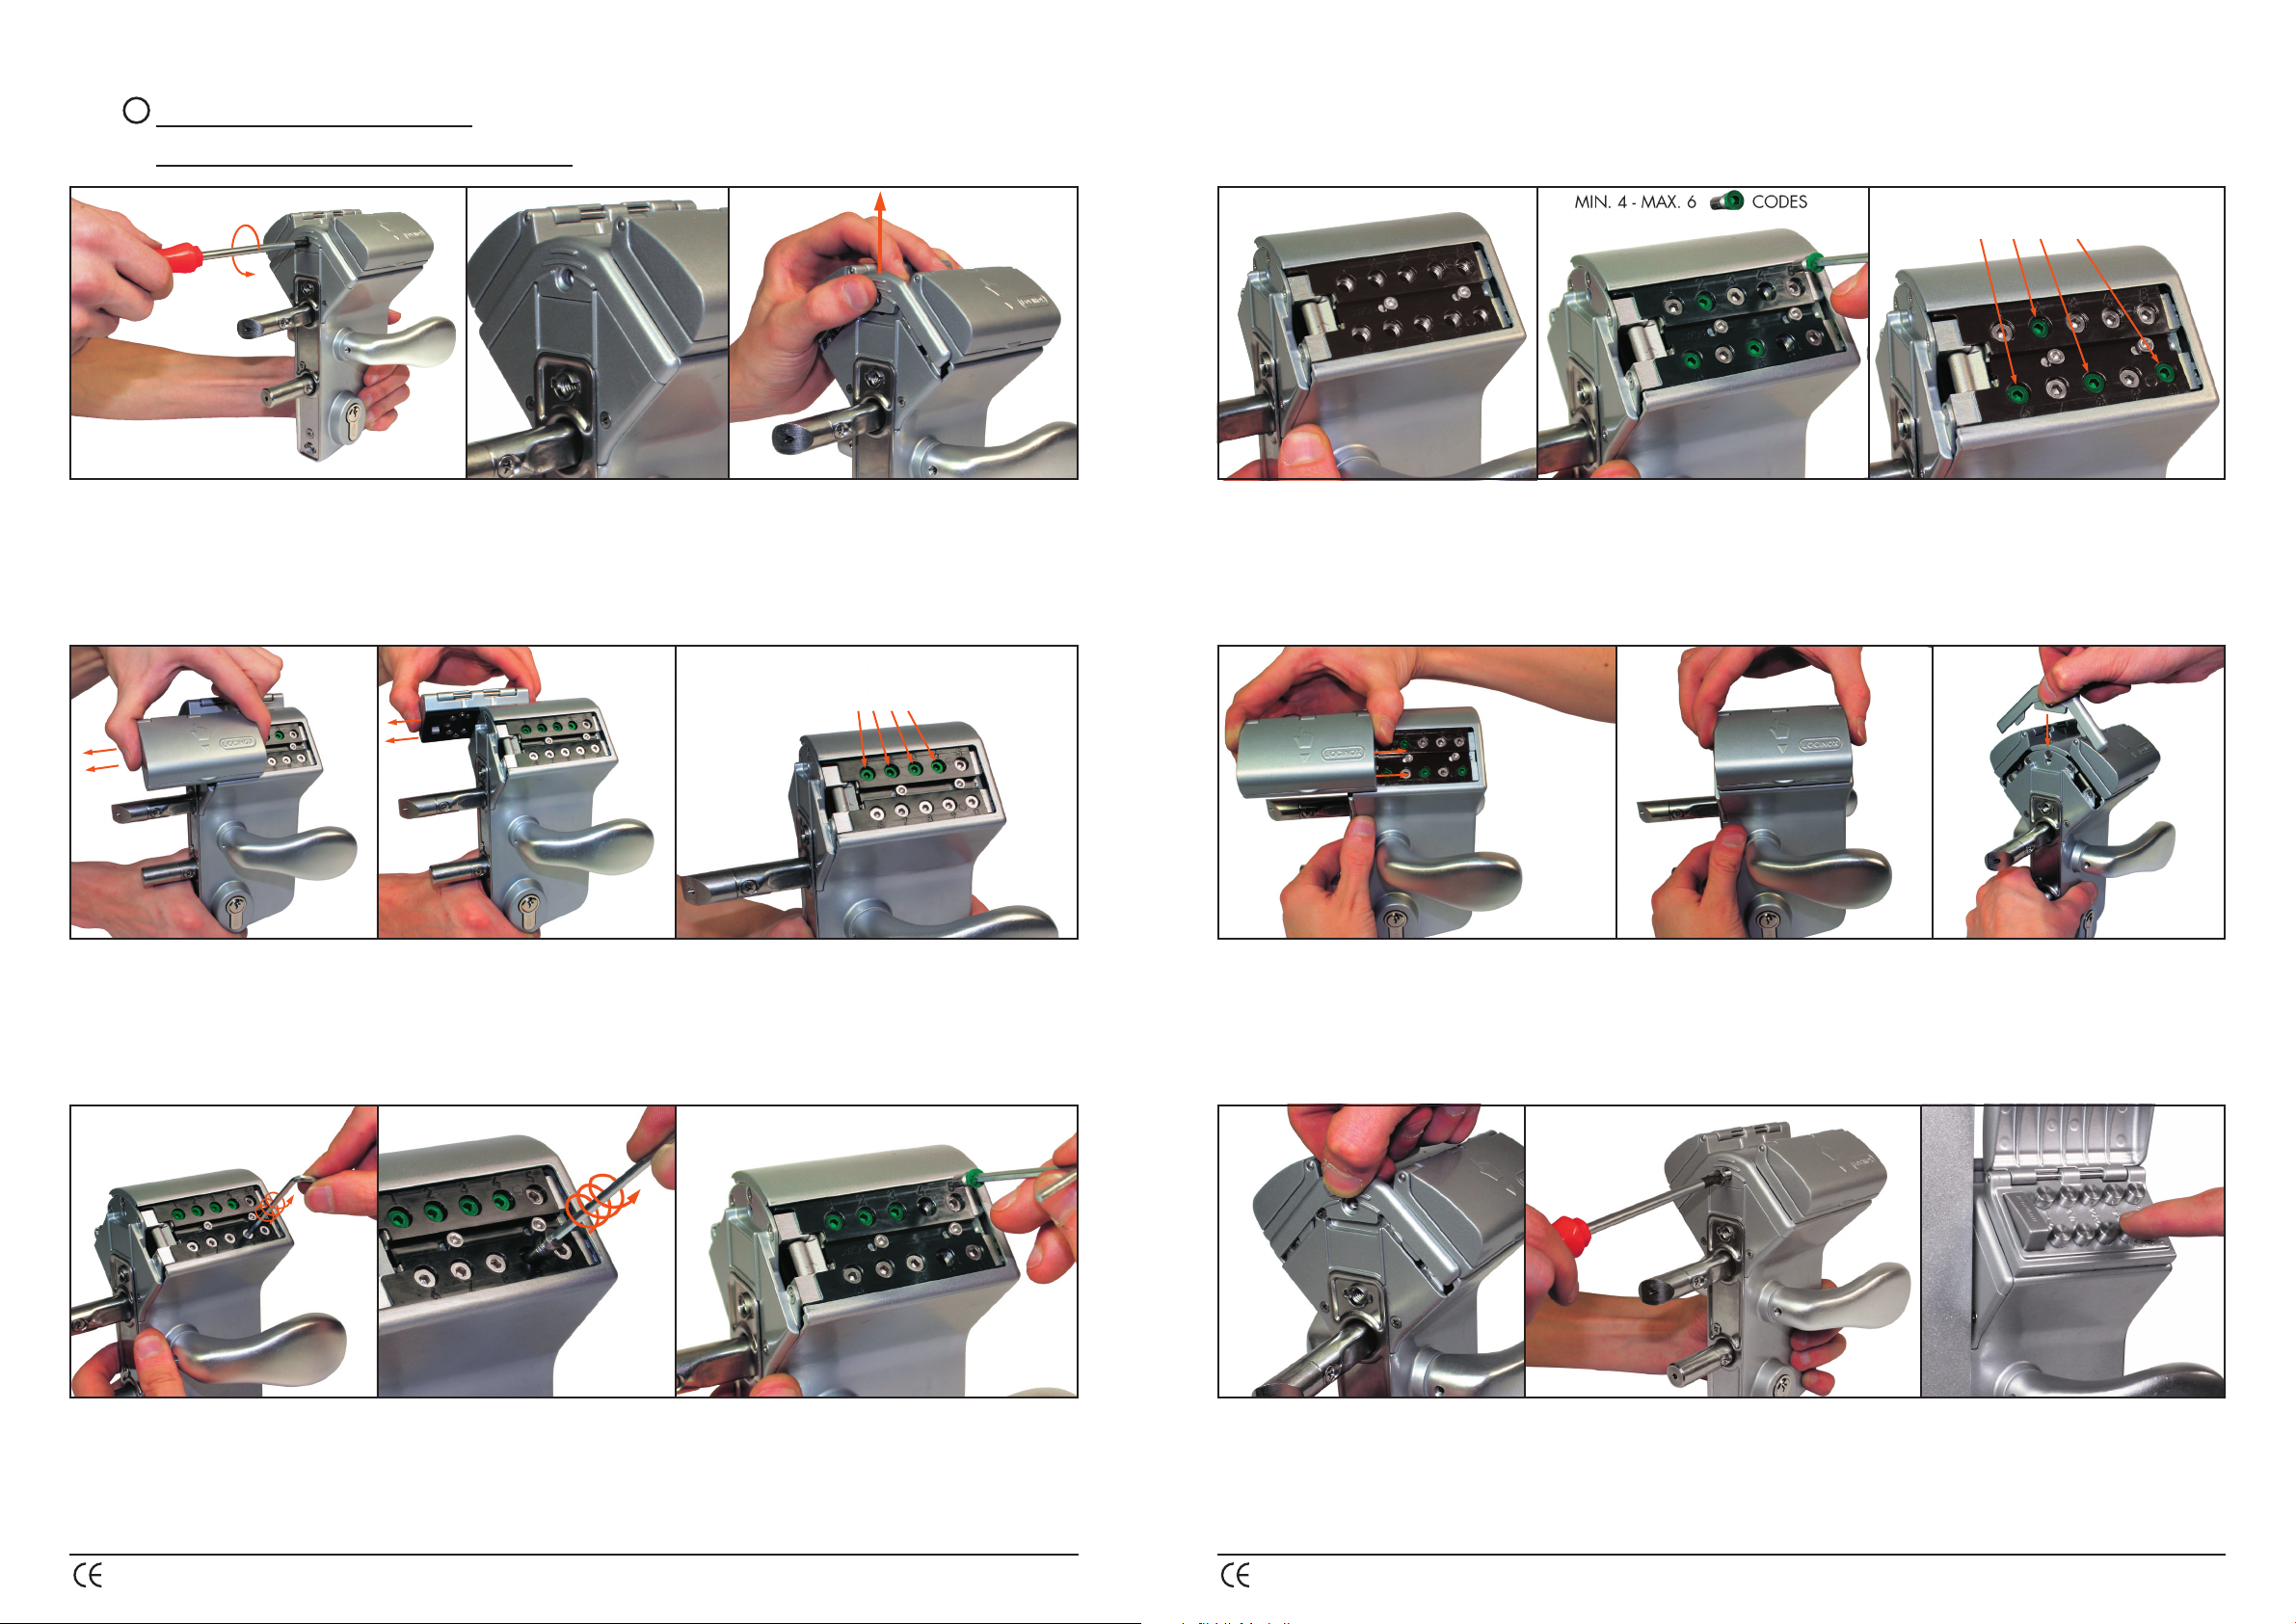
• Remove the cover screw and slide the cover plate upwards.
• Enlevez la vis du couvercle et coulissez la plaque du couvercle en haut.
• Verwijder de dekselschroef en schuif de dekselplaat naar boven.
• Entfernen Sie die Befestigungsschraube der Abdeckungsplatte und schieben Sie diese nach oben.
2
Code: 1 - 2 - 3 - 4
• Slide both control panels out of the lock casing.
• Enlevez en coulissant les deux claviers de contrôle du coffre de la serrure.
• Schuif beide bedieningspanelen uit de slotbehuizing.
• Schieben Sie beide Betriebscodepulte aus dem Schlossgehäuse.
• Remove all machine screws from the code mechanism.
• Enlevez toutes les vis BTR du mécanisme de code.
• Verwijder alle inbuscodeschroefjes uit het codemechanisme.
• Entfernen Sie alle Sechskantschrauben aus dem Codemechanismus.
Instelling van de code - Codespeicherung
• Place the CODE screws (green) on the chosen code locations and use the NO CODE screws (blanc) to ll up the remaining locations.
• Placez les vis CODE (vert) sur les positions souhaitées et utilisez les vis NO-CODE (sans couleur) pour les positions restantes.
• Positioneer de CODE-schroefjes (groen) op de gewenste codelocaties, gebruik NO-CODE schroefjes (blank) voor de resterende locaties.
• Positionieren Sie die CODE-Schrauben (grün) auf die erwünschten Codelöcher und benutzen Sie die NO-CODE-Schrauben (ohne Farbe)
für die übrigen Löcher.
• Slide both control panels and the covering plate back onto the lock casing.
• Coulissez les deux claviers de contrôle et la plaque de couverture à nouveau sur le coffre.
• Schuif beide bedieningspanelen en coverplaat terug op de slotbehuizing.
• Schieben Sie beide Betriebscodepulte und die Abdeckungsplatte zurück auf das Schlossgehäuse.
• Re-attach the cover by means of the cover screw and test the pre-set code.
• Rattachez la plaque de couverture avec la vis et testez le code xé.
• Zet de cover terug vast met de coverschroef en test de ingestelde code.
• Befestigen Sie die Abdeckungplatte mit der Abdeckungsschraube und testen Sie den
vorgespeicherten Code.