■CHARACTERISTICS
uPedometer
• Range:0-999999steps
• Distancedisplay:0-9999.99km/0-9999.99
miles
• Calorimeter:0-99999.9kcal
• Duration:0-1440minutes(23hours59
minutes59seconds)
• Targetstepcount:Beepsuponcompletion
• Personalcalibration:Bodyweight,stride
length
• Pedometerinstrument:Accelerometer
uAutomatic calendar adjustmentbetween
2011and2099(year,month,day,hour,minute,
second)
u12/24-hour indication format
uHourly chime
uDaylight saving time setting
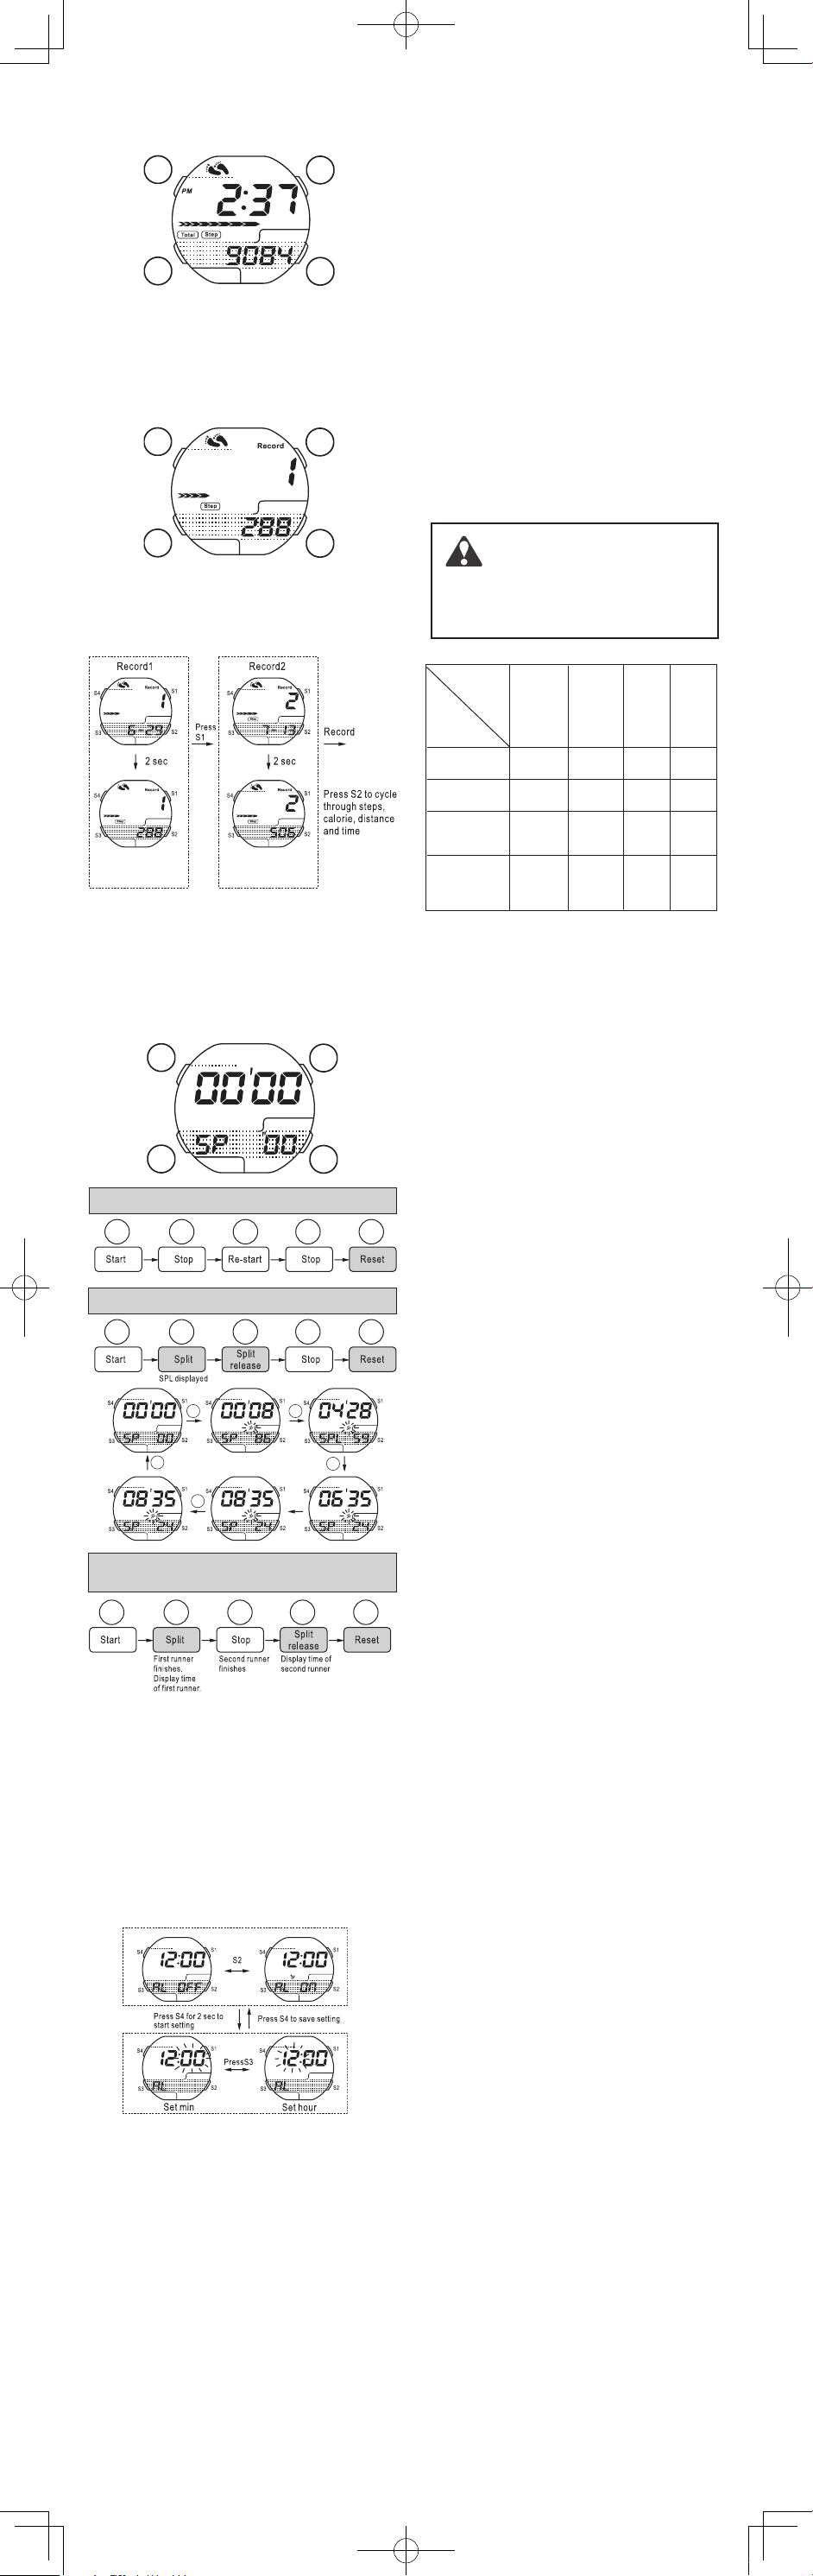
uStopwatch
Maximumrange:23hours59minutes59
seconds
Splitintervalfunction(SPL)
uRecord archive functionwhichallowsusersto
storeupto30entrieswhereeachindividual
entrycanberecalledforevaluation.Users
mayalsochoosetodeleteindividualentries
orerasetheentirearchive.
uDaily and one-time alarm settings
uLow battery detection
uKey tone settings:Usersmaychooseto
deactivatethekeytonefunctionwhen
operatinginsituationsthatrequirelownoise
levels
• EL Backlight:3secduration
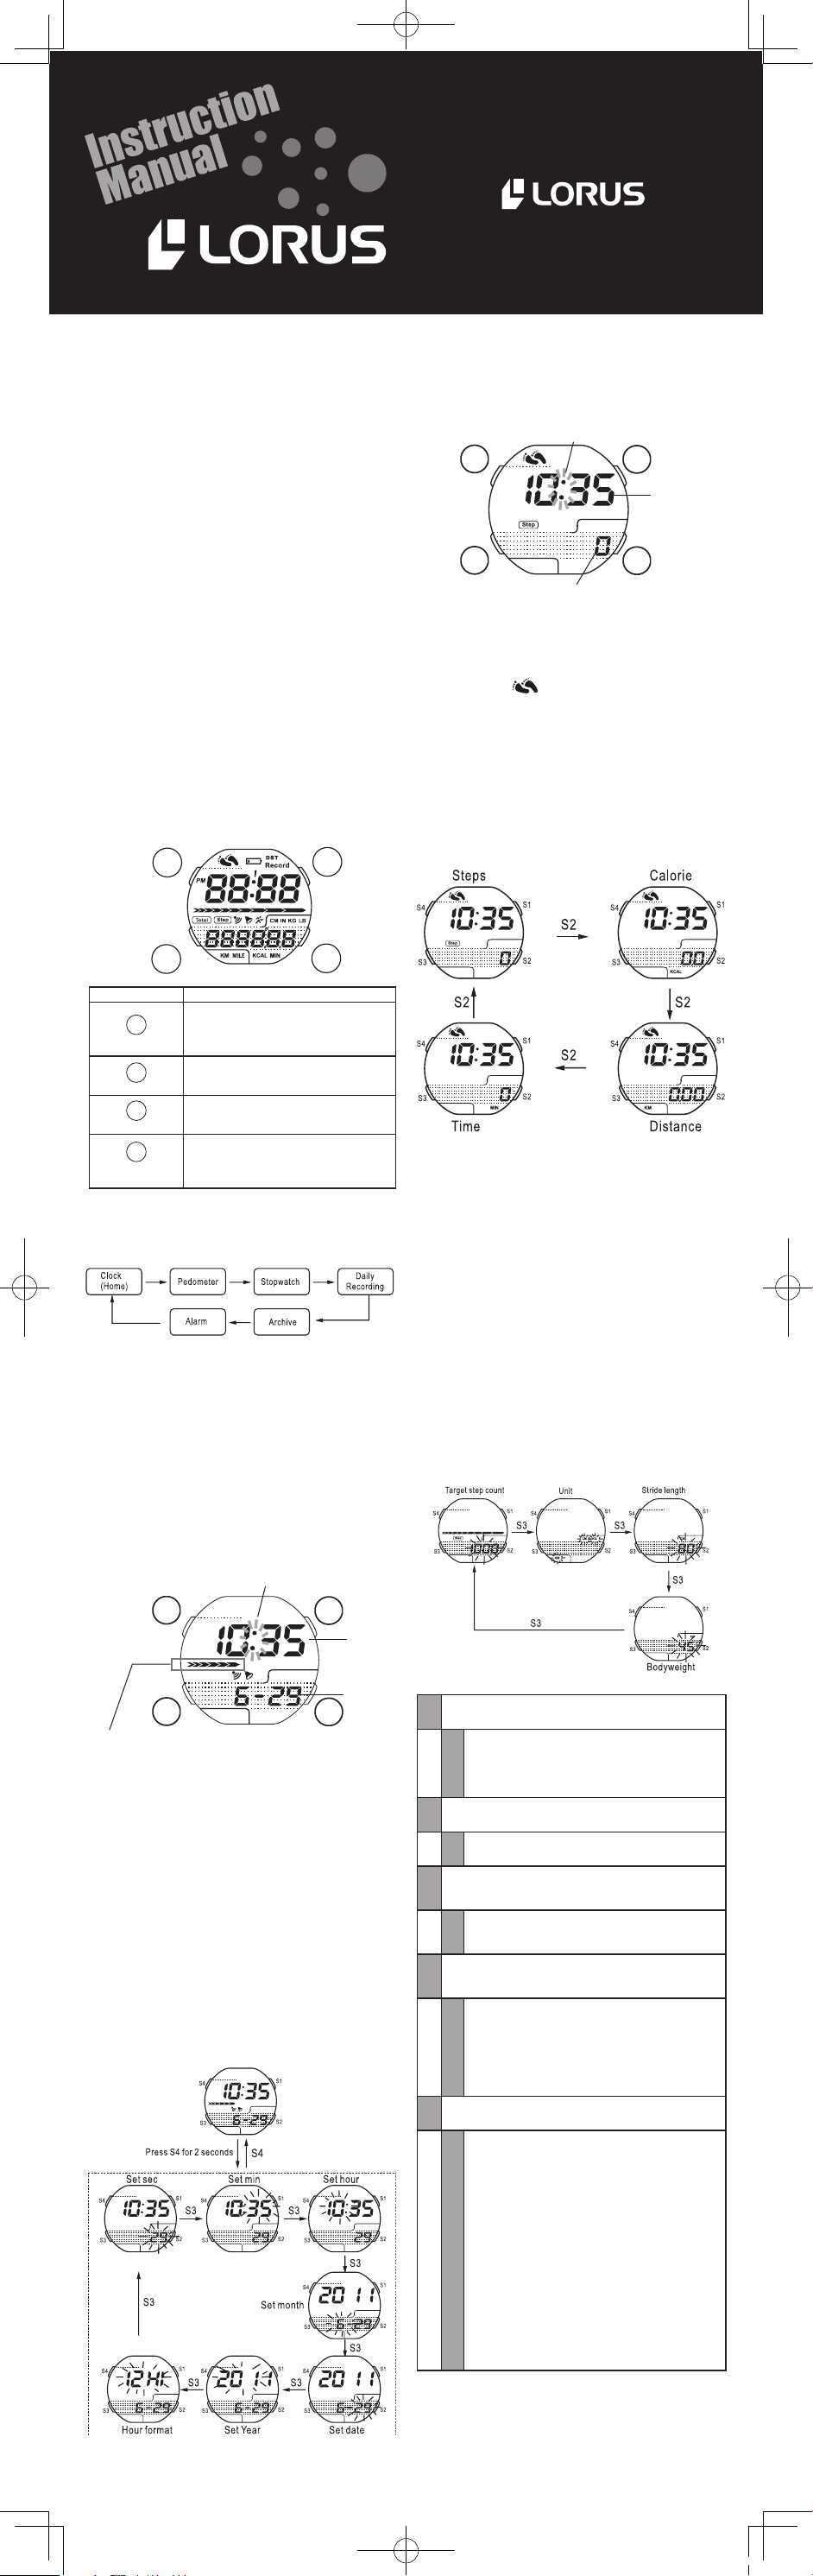
■CLOCK
■
PEDOMETER
GENERAL OPERATIONS
1) AUTO-RETURN
• Whileinarchiveandalarmmode,ifnooperation
within2minutes,thewatchwillautomatically
returntohomescreen.
• Whileinsettingmenu(digitsflashing),ifno
operationwithin2minutes,thewatchwill
automaticallyexitthesettingmenu.
2) DEFAULT SCREEN
Wheneverenteringdaily recording andarchive
mode, the last recordingswhen existed will show
first.
S1
S2
S4
S3
SECONDS DISPLAY*
NOTE:
• Ifthewatchissettothe12-hourindication
format,the‘PM’symbolwillappearonlyinthe
S1
S2
S4
S3
SECONDS DISPLAY*
REAL TIME
[HH:MM]
STEP COUNT/CALORIES/
DISTANCE TRAVELLED/
ELAPSED TIME
ACTIVATING PEDOMETER
1. PressS1tobeginrecordingyourmovement,and
pressagaintostoprecording.
Theflashing indicatesthatthepedometer
isactive.
NOTE:
If no movement is registered on the pedometer
for5minutes,thepedometerwillbeautomatically
deactivatedtoreducebatteryconsumption.
KEEPING TRACK OF STEP COUNT, CALORIES BURNED,
DISTANCE AND ELAPSED TIME.
1. Press S2 to cycle through the following
measurements:Stepcount,calories,distance
andelapsedtime.
2. Whenthepedometerisinactive,holdS2for2
secondstoresetallcounters.
TROUBLESHOOTING
Q1 Why can’t I set a target step count, unit, stride
length and/or weight?
A1
It is not allowed to set personal information
after step count activated.Please set up
correct personal information first before
step count, as it affects distance and
calories counting.
Q2 Why does the alarm cause my pedometer
to malfunction during operation?
A2 Step counting will stop when alarm or
countdown alarm rings.
Q3
The distance recorded on my pedometer
doesn’t match at all. Is my pedometer
broken?
A3
The distance is calculated upon your
steps and stride length. Please check if
the correct stride length is set.
Q4
I noticed that the pedometer has the
tendency to register sudden increases in
step count, why is this?
A4
The pedometer may not be able to
register movement with complete
precision at all times, but it has a built in
function that allows it to try and account
for any discrepancies in its measurements
which is why you will notice certain spikes
in your recording.
Q5 The number of steps recorded doesn’t seem
to be accurate at all.
A5
There are two possible causes for this
problem:
The pedometer is only intended for
measuring basic movements such as
walking and/or jogging. Therefore, it is
unlikely to produce reliable data when
measuring activities which involve
sprinting.
The pedometer’s operation is based on
principles of biomechanics, specifically
on how people’s arms behave during
movement. If your arms are moving
excessively during exercise then there
is a possibility that it may affect the
pedometer’s measurements.
afternoon.Ifthe‘PM’symbolisn’tvisible,itmeans
thewatchissettoAMtime/24hourtimeformat.
• Thewatchhasabuilt-incalendarwhichisfully
automatedwhichiscapableofadjustingto
leapyears.
NREZ019 10-2012
CAL. Z019 (R 23 SERIES)
NOTE:
• Thevaluesthatappearonthesecondroware
actuallythecumulativesumfromallprevious
recordingsessionsandwillremainuntilthe
pedometerisreset.
• Ifyouhavealreadysetadesignatedsumasyour
dailyobjective,thepedometerwillnotifyyouof
yourprogressinincrementsof10%andyouwill
hearabeepingsound.
• Thewatchwillproduceacontinuousbeeping
soundfor20secondsandtheprogressbar
willbegintoflashuponcompletionofyour
designatedobjective.Toproceed,simplypress
anybuttontostopthebeeping.
SETTING UP YOUR PEDOMETER
1. Inpedometermode,holdS4untilthenumber
displaystartsflashing.
2. PressS3tocyclethroughthefollowingvariables:
Targetstepcount⇨ Unit(metric/imperial)⇨
Stridelength⇨ Bodyweight
3. AdjustthevaluesofeachvariableusingS1&S2.
4. PressS4tosaveandexistsettingmenu.
■DISPLAY OVERVIEW
DATE
TIME
Button Primary Function
S1
Start/Stop
Stopwatch:Start/Pause
Pedometer:Start/Stoprecording
Menusetting:+value(Holdforrapid
increase)
S2
Reset
Stopwatch:Reset
Menusetting:-value(Holdforrapid
decrease)
S3
Mode
Modeselection
Menunavigation
S4
Enter/
ELbacklight
ELbacklight
Holdfor2seconds:Settingsmenu
Menuscreen:Saveandreturntothe
previousmenu
S1
S2
S4
S3
MODE SELECTION
Thepedometerwatchprovides6modes of
function.They arelistedinthefollowingorder.
PressS3tocyclethrougheachmode.
Hold button S3 down for 2 seconds to return to
thehomescreen.
DAILY TARGET PROGRESS BAR**
* SECONDS DISPLAY:When the“:”symbol
isflashing,itisanindicationoftheseconds
passing.
** DAILY TARGET PROGRESS BAR:eachsegmentof
thebarrepresents10%progress.
BUTTON FUNCTIONS
S1 Alternatesbetweenstandardtimeanddaylight
savingtime
S2 Turnon/offhourlychime
S3 Modeselection
S4ELBlacklight,clocksettings
SETTING THE TIME AND DATE
1. Whileinclockmode,holdS4for2secondsor
untilnumbersstarttoflash.
2. PressS3tohighlighttheunityouwishtoadjust.
3. SetthevalueoftheselectedunitusingS1and
S2.
4. Onceyou’vesetyourwatchtothecorrecttime,
pressS4tosaveyoursettings.
NREV019.indd 1 12/07/25 15:48