manuals.online logo
Brands
  1. Home
  2. •
  3. Brands
  4. •
  5. LORUS
  6. •
  7. Watch
  8. •
  9. LORUS Y704B User manual

LORUS Y704B User manual

INSTRUCTION MANUAL FOR
WATCH CALIBRE
Y704B
THIS PRODUCT CONTAINS A BUTTON BATTERY
If swallowed or placed inside any part of the body, the battery can
cause severe or fatal injuries within 2 hours or less.
Button batteries are hazardous. Keep batteries out of reach of children.
If you think the battery may have been swallowed or placed inside any
part of the body, seek immediate medical attention. Contact the
Australian Poisons Information Centre immediately on 13 11 26
(New Zealand 0800 764 766) for 24 / 7 fast, expert advice.
■HOW TO USE THE STOPWATCH
• The stopwatch can measure up to 9 hours,
59 minutes, 59 seconds and 99 in 1/100
seconds.
* Even if the stopwatch display is changed
to another while the measurement is in
progress, it continues counting properly.
After the stopwatch is used, however, be
sure to reset it as the battery energy is
consumed enormously to shorten the battery
life.
■CHARACTERISTICS
1. Stopwatch: Measures up to 9 hours, 59
minutes, 59 seconds and 99 with 1/100
second readout.
•Lap time measurement: Up to 9 lap
times can be measured. The lap time
difference and the fastest lap time are
calculated and displayed during the
measurement.
2. Time/calendar display: Hour, minutes,
seconds, month, date and day of the week.
•Automatic calendar adjustment: Calendar
adjusts automatically for odd and even
months including February of leap years,
but not for February of common years.
•Time indication: Changeover between
12- and 24-hour indications is possible.
3. Daily alarm: The alarm can be set to
ring on a 24-hour basis.
4. Dual time: Time of a different time zone
can be set and displayed.
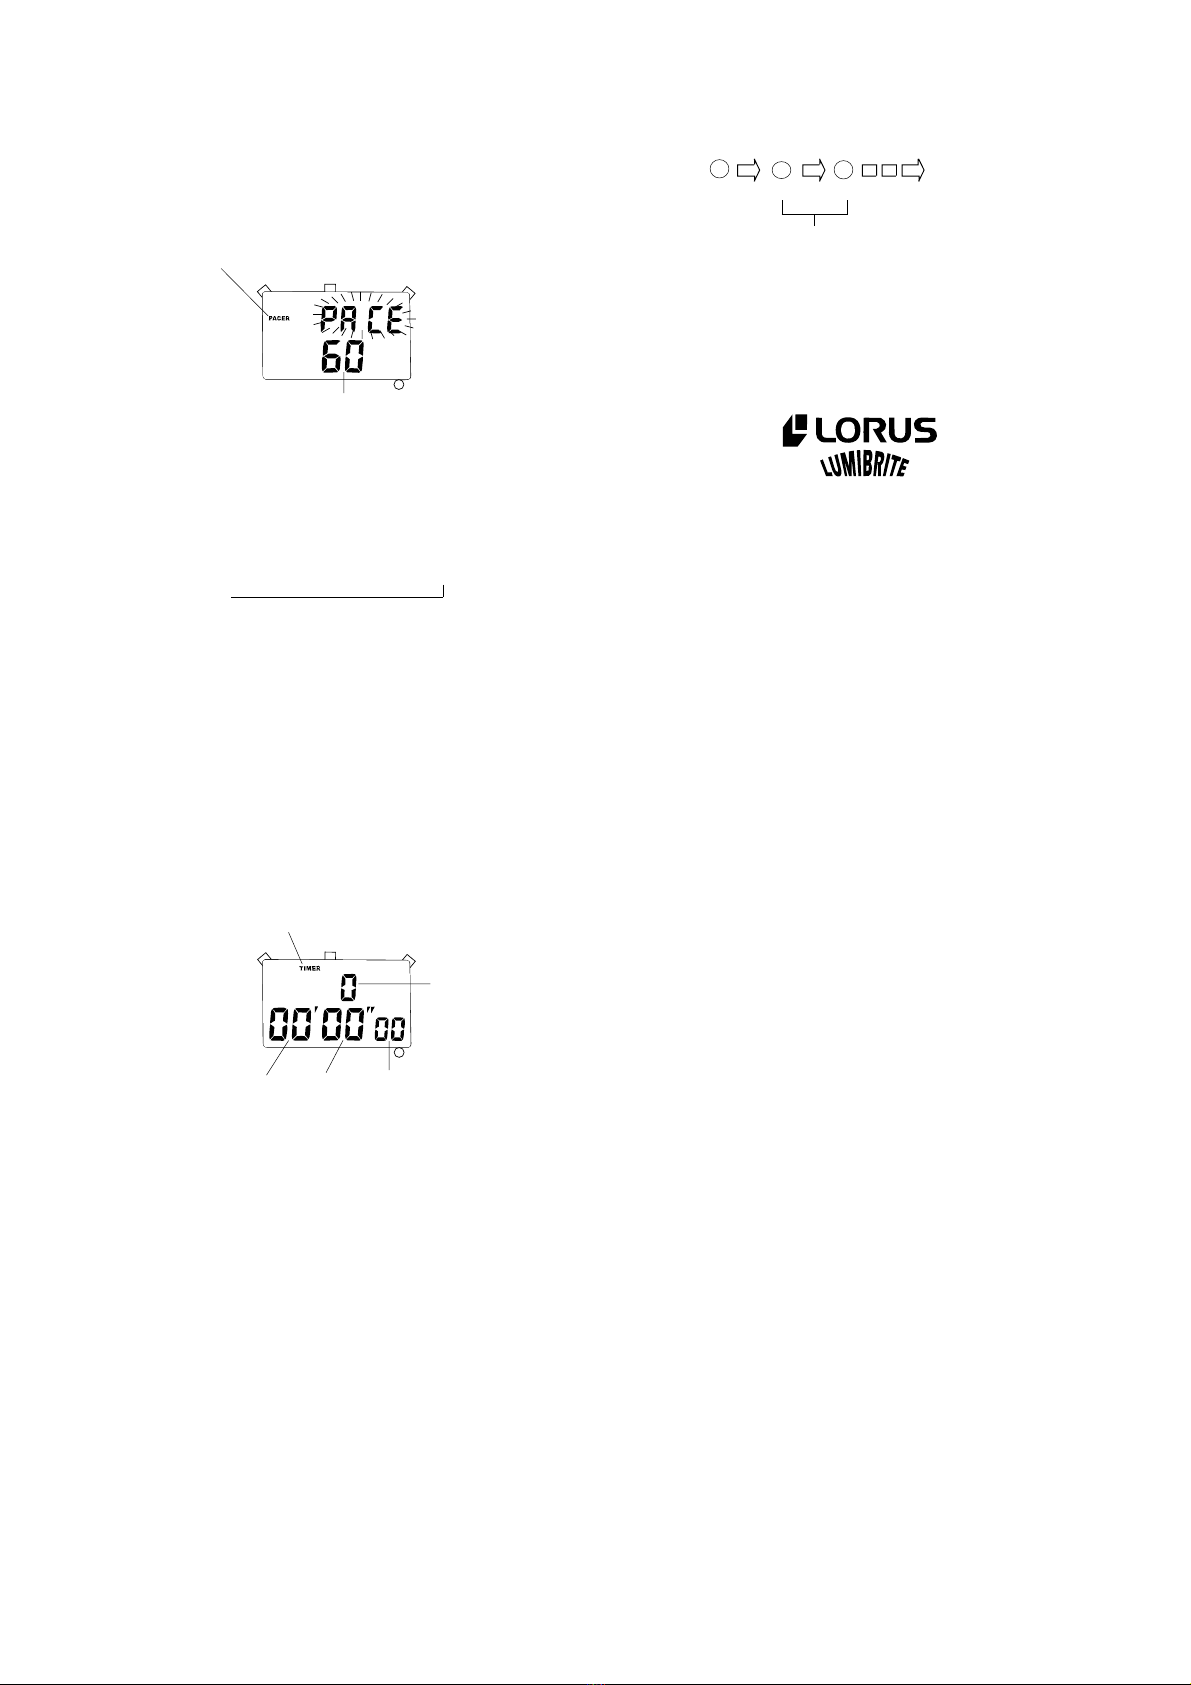
5. Stroke function: The watch can be set
to beep at a selected rate to serve as a
pacemaker in jogging, etc.
6. Countdown timer: Up to 9 hours 59
minutes and 59 seconds can be set in seconds.
Lap time measurement
• “Lap time” refers to an elapsed time required
to cover a given section of the whole distance.
1. At the start of the activity, depress button
“D” to start the stopwatch.
2. At the end of the first lap, depress button
“B”.
The first lap time and lap number are dis-
played, though the second lap time is be-
ing measured internally.
3. Depress button “B” to release the lap time
before the end of the second lap. The first
lap time and lap number disappear, and
the measurement in progress and “0” are
displayed in place of the lap time and lap
number, respectively.
4. At the end of the second lap, depress but-
ton “B”. The second lap time and lap
number are displayed, though the third
lap time is being measured internally.
5. Measurement and release of the lap time
can be repeated by depressing button “B”.
6. At the end of the activity, follow either of
the two methods below.
a. To display the final lap time, depress
button “B”. Then, depress button “B”
to release the lap time, and depress button
“D” to stop the measurement.
*The time displayed when button “D”
is depressed is not the total elapsed
time of the activity, that is, the time
that elapsed from the start until the
end of the activity but the time that
elapsed from the start until the stop of
the measurement.
b. To display the total elapsed time of the
activity, depress button “D” to stop the
measurement.
7. Depress button “C” to reset the stopwatch.
Stopwatch operation
Month (Day) Date
A
*A flashing display mark indicates that the
corresponding function is in use.
Timer
display
A
Dual time
display
AStroke
display
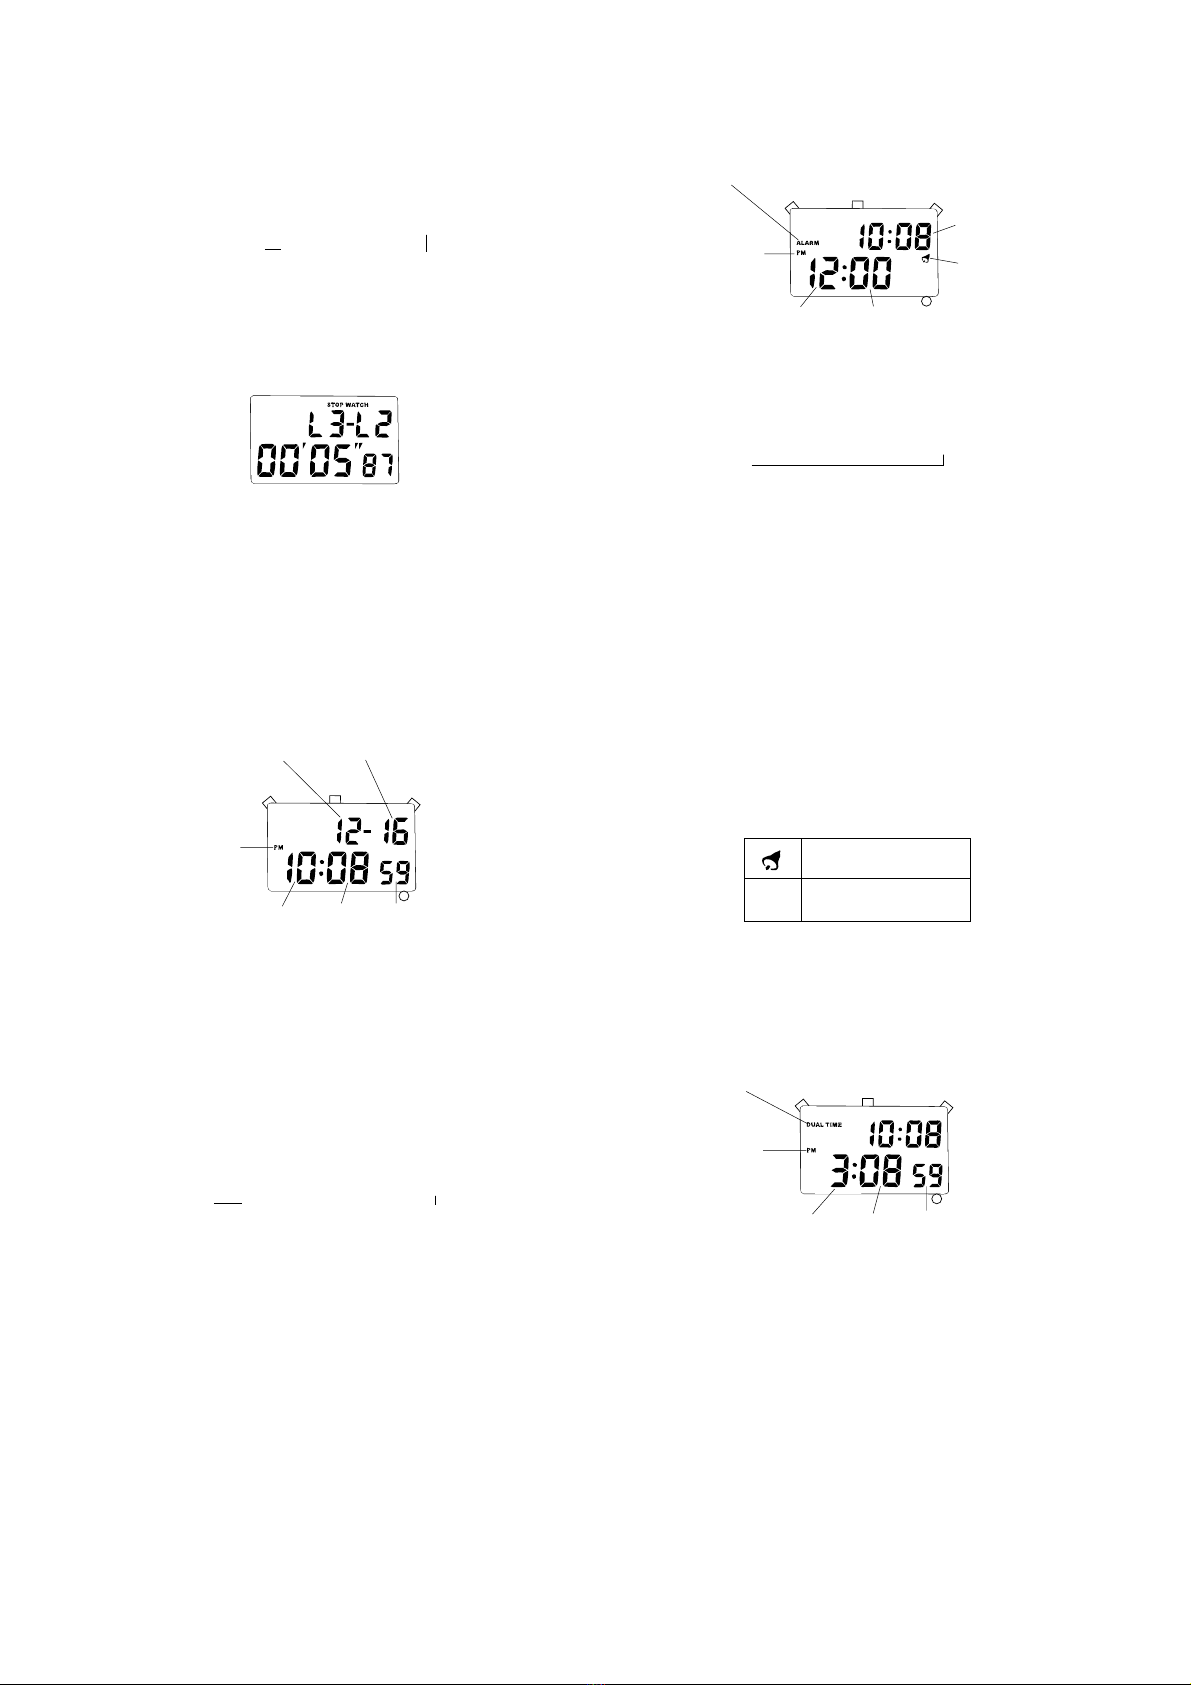
■BUTTONS AND DISPLAYS
C
Reset
Start Stop
Restart
Stop
Accumulate repeatedly by
depressing button “D”.
Accumulated elapsed time measurement
DD DC
Depress button “A” to show the stopwatch
display.
Notes:
1. When a lap time measured is the fastest
among the lap times previously measured,
a short beep rings to signal that the memory
has been updated with the new fastest lap
time.
2. The lap number counts up to “9”. After
“9”, the number returns to “1”.
The selection of the display can be made in
the following order with each depression of
button “A”.
Stopwatch
display Time/calendar
display
AAlarm
display
A
A
D
Stopwatch display
mark
C
INSTRUCTION MANUAL
CAL. Y704 (R23 SERIES)
NREY704B 10-98
Minutes
Hour
PM
mark
BD
A
Seconds
D
B
Seconds
Minutes 1/100 second
A
Hour
Alarm
mark
• While a lap time is being displayed, de-
press button “C”. With each depression of
the button, the difference between the dis-
played lap time and the previous lap time is
displayed in the following order.
Lap time difference and the fastest lap time
Lap time difference
→
↑
Latest lap time ←
Fastest lap time
To return to the measurement in progress,
depress button “B”.
• The lap time difference is displayed without
a plus or minus sign. Instead, the lap number
of the faster lap time is always displayed at
the right of the “–” mark.
Ex.)
The display should be read as “Lap 2 is 5
seconds 87 faster than Lap 3”.
Notes:
1. While the measurement in progress
is shown on the display, the lap time
difference and the fastest lap time
cannotbeshownbydepressingbutton“C”.
2. While the latest lap time, lap time
difference or the fastest lap time is
shown on the display, the display
cannot be changed to another by
depressing button “A”.
■
HOW TO SET THE TIME/CALENDAR
* With each depression of button “B”, month
and day are displayed alternately.
*With each depression of button “D”, the
display changes over between the 12- and
24-hour indications.
DateMonth (Day)
PM mark
1. Depress button “A” to show the time/calendar
display.
2. Depress button “C” to show the time/calendar
setting display. The second digits start
flashing.
3. Selection of the digits to be adjusted (flashing)
is made in the following order by depressing
button “D”.
Seconds
→←
DateDay ←Month
↑
Hour
←
4. Depress button “B” to set the flashing
digits. One digit is advanced with each
depression of button “B”. Digits except
seconds move quickly by keeping button
“B” depressed.
5. After all the adjustments are completed,
depress button “A” to return to the time/
calendar display.
Seconds setting
When the seconds digits are flashing, depress
button “B” in accordance with a time signal.
Thesecondsare reset to“00”andstart immediately.
Note: When setting the hour digits in the
12-hour indication, check that AM/
PM is properly set. Only “PM” is displayed
and there is no indication for the AM
setting. In the 24-hour indication, there
is no indication.
■HOW TO SET THE ALARM
Current
time
Alarm
mark
1. Depress button “A” to show the alarm display.
2. Depress button “C” to show the alarm setting
display. The hour digits start flashing.
3. Depress button “D” to select the digits to
be adjusted (flashing).
→
→
Hour
↑Minutes
(tens digit) Minutes
(units digit)
4. Depress button “B” to set the digits. One
digit is advanced with each depression of
the button. The digits move quickly by
keeping the button depressed.
5. After all the adjustments are completed,
depress button “A” to return to the alarm
display.
Notes:
1. When the time function is displayed in the
24-hour indication, the alarm is also displayed
in the 24-hour indication.
2. When setting the hour digits in the 12-
hour indication, check that AM/PM is properly
set.
Only “PM” is displayed and there is no
indication for the AM setting. In the 24-
hour indication, there is no indication.
Engagement/disengagement of the
alarm
• With each depression of button “D” in the
alarm display, the alarm is engaged and
disengaged alternately.
Alarm disengaged
Alarm engaged
• The alarm rings at the designated time for
18 seconds and stops. To stop it manually,
depress button “A”, “B”, “C” or “D”.
■HOW TO SET THE DUAL TIME
Time of a different time zone can be set and
displayed together with the time you have set
in “HOW TO SET THE TIME/CALENDAR”.
1. Depress button “A” to show the dual time
display.
2. For dual time setting, refer to “HOW TO
SET THE TIME/CALENDAR”.
Dual time display
mark
D
BC
Seconds
MinutesHour A
Minutes
Hour
C
BD
A
PM mark
Alarm display
mark
C
SecondsMinutes
Hour A
D
B
PM mark
→→
Minutes
(units digit)
Minutes
(tens digit)
■HOW TO USE THE STROKE FUNCTION
•4 different stroke rates (60, 80, 120 and
160 strokes per minute) have been preset
for the stroke function, and the watch beeps
at a selected preset stroke rate. Therefore,
it can serve as a pacemaker in such activities
as jogging.
Stroke display
mark
Selection of the preset stroke rate
1. Depress button “A” to show the stroke
display.
2. Depress button “C” to select the desired
stroke rate. Selection of the stroke rate is
made in the following order by depressing
button “C”.
60 →80 →120 →160
Operation of the stroke function
• Depress button “D” in the stroke display.
The watch starts beeping at the selected
rate.
* To turn off the stroke sound, depress button
“D”. With each depression of button “D”,
the stroke sound is turned on and off
alternately.
↑
■HOW TO USE THE COUNTDOWN
TIMER
•The timer can be set up to 9 hours, 59
minutes and 59 seconds in seconds.
• The remaining time is displayed in 1/100
seconds.
Timer setting
→
←
Seconds (tens digit)
Hour Minutes
(tens digit)→Minutes
(units digit)
↑↓
Timer display
mark
Minutes
1. Depress button “A” to show the timer display.
2. Depress button “C” to show the timer setting
display. The hour digit starts flashing.
3. Depress button “D” to select the digits to
be adjusted (flashing).
Seconds (units digit)
4. Depress button “B” to set the digits. One
digit is advanced with each depression of
the button. The digits move quickly by
keeping the button depressed.
5. After all the adjustments are completed,
depress button “A” to return to the timer
display.
Timer operation
Depress the buttons in the following order.
Time-up
Stop
Restart
Warning
beep
sounds
Start
Restart and stop of the
timer can be repeated by
depressing button “D”.
* A warning sound beeps for 18 seconds when
the set time is up. To stop it manually,
depress button “A”, “B”, “C” or “D”.
DDD
■LUMIBRITE WATCH
(dial, hands, buttons, case, bezel,
strap, etc.)
✩If your watch is a LORUS LUMIBRITE watch,
it has following features.
LORUS LUMIBRITE watches absorb and store
light energy from natural and artificial light
sources and emit light in the dark. They are
made of environmentally friendly material,
and therefore, are harmless to human beings
and the environment.
• With a full charge, LORUS LUMIBRITE
watches glow in the dark hours longer than
conventional luminous watches of this type.
If exposed to a light of more than 500 lux
(i.e., the brightness of a typical office) for
approximately 10 minutes, or direct sunlight
for 2 minutes, they will glow for hours.
• Since LORUS LUMIBRITE watches emit
the light they store, the brightness will
decrease gradually over time. The length
of time they will glow may also differ slightly
depending on such factors as the brightness
of and distance from the light source used
to charge the watch.
■BATTERY CHANGE
TheminiaturelithiumbatteryMAXELLSR44W,which
powers your watch should last approximately
2 years. However, because it is inserted at
the factory, the actual life of the battery once
in your possession may be less than 1 year.
Be sure to replace the battery to prevent any
possible malfunction as soon as it runs down.
To replace the battery, we recommend taking
the watch to a local watch repair shop.
C
Seconds 1/100 seconds
Number of strokes
per minute
A
DB
D
C
B
A
Hour
■CARE OF YOUR LORUS WATCH
• BATTERY
• WATER RESISTANT
No
indication
WATER
RESISTANT
WATER
RESISTANT
(50 M/5 BAR)*
WATER
RESISTANT
100 M/
10 BAR or
above
Condition
of use
Accidental
contactwith
water, such
as splashes
and rain
Swimm-
ing and
taking a
shower
Skin
diving Scuba
diving
Indica-
tion on
the dial/
case back
NO NO NO NO
YES YES NO NO
YES NO NO NO
YES YES YES NO
()
*
CAUTION
Do not expose the old battery to
fire or recharge it. Keep it at a
place beyond the reach of chil-
dren. If a child swallows it, consult
a doctor immediately.
* If your watch is 200 M/20 BAR, 100 M/10
BAR or 50 M/5 BAR water resistant, it is so
indicated on the dial/case back.
•Do not operate the buttons when the watch
is wet.
•If the watch is exposed to salt water, rinse
it in fresh water and then wipe it thoroughly
dry.
Caution:
Leather straps are not water resistant except
so indicated, even if the watch head is water
resistant.
• ALLERGIC REACTION
Because the case and band touch the skin
directly,itisimportanttoclean them regularly.
If not, shirt sleeves may be stained and
those with delicate skin may develop a
rash. Please wear the watch with some
play to avoid any possible allergic reaction.
If you develop a rash on your wrist, stop
wearing and consult a physician.
• MAGNETISM
Your watch will not be affected by mag-
netism generated by household electric
appliances.
• SHOCKS AND VIBRATIONS
Your watch may be worn for normal sports
activities, but be careful not to drop it or
hit it on hard surfaces.
• TEMPERATURE
Your watch is preadjusted so that constant
accuracy may be insured at normal tem-
perature.
■SERVICE
When your LORUS watch requires repair or
servicing, please see the enclosed WARRANTY/
GUARANTEE.

Other LORUS Watch manuals

LORUS RX3 Series User manual

LORUS

LORUS RX3 Series User manual

LORUS V072 User manual

LORUS

LORUS V072 User manual

LORUS R23 Series User manual

LORUS

LORUS R23 Series User manual

LORUS W590 User manual

LORUS

LORUS W590 User manual

LORUS R23 Series User manual

LORUS

LORUS R23 Series User manual

LORUS VD75 User manual

LORUS

LORUS VD75 User manual

LORUS PC32 User manual

LORUS

LORUS PC32 User manual

LORUS RCW Series User manual

LORUS

LORUS RCW Series User manual

LORUS R23 Series User manual

LORUS

LORUS R23 Series User manual

LORUS RW23 Series User manual

LORUS

LORUS RW23 Series User manual

LORUS V501 User manual

LORUS

LORUS V501 User manual

LORUS Y736 User manual

LORUS

LORUS Y736 User manual

LORUS RL5 Series User manual

LORUS

LORUS RL5 Series User manual

LORUS V52H User manual

LORUS

LORUS V52H User manual

LORUS V52T User manual

LORUS

LORUS V52T User manual

LORUS W160 User manual

LORUS

LORUS W160 User manual

LORUS NREZ027C User manual

LORUS

LORUS NREZ027C User manual

LORUS RW6 Series User manual

LORUS

LORUS RW6 Series User manual

LORUS W100 User manual

LORUS

LORUS W100 User manual

LORUS VJ33 User manual

LORUS

LORUS VJ33 User manual

LORUS V782 User manual

LORUS

LORUS V782 User manual

LORUS R23 Series User manual

LORUS

LORUS R23 Series User manual

LORUS R23 Series User manual

LORUS

LORUS R23 Series User manual

LORUS Watch User manual

LORUS

LORUS Watch User manual

Popular Watch manuals by other brands

Nokia Steel HR Quick installation guide

Nokia

Nokia Steel HR Quick installation guide

XPLORA X5 Play eSIM Quick user guide

XPLORA

XPLORA X5 Play eSIM Quick user guide

Samsung SMR885 user manual

Samsung

Samsung SMR885 user manual

Seiko 8X22 Series instructions

Seiko

Seiko 8X22 Series instructions

FILA FAT004DG user manual

FILA

FILA FAT004DG user manual

GLOBAL ASSISTIVE DEVICES VibraLITE 3 instruction manual

GLOBAL ASSISTIVE DEVICES

GLOBAL ASSISTIVE DEVICES VibraLITE 3 instruction manual

Casio HS-60W Operation guide

Casio

Casio HS-60W Operation guide

maxtop T6 user manual

maxtop

maxtop T6 user manual

Control Company TRACEABLE instructions

Control Company

Control Company TRACEABLE instructions

Casio 3185 Operation guide

Casio

Casio 3185 Operation guide

Reebok W-113 instructions

Reebok

Reebok W-113 instructions

LG LM-W315 user guide

LG

LG LM-W315 user guide

Suunto G6 user guide

Suunto

Suunto G6 user guide

Freestyle 881 Aggressor instructions

Freestyle

Freestyle 881 Aggressor instructions

Seiko H024A Technical guide

Seiko

Seiko H024A Technical guide

Xlyne X-WATCH IVE XW FIT Series manual

Xlyne

Xlyne X-WATCH IVE XW FIT Series manual

Citizen D710 instruction manual

Citizen

Citizen D710 instruction manual

Casio 5477 Operation guide

Casio

Casio 5477 Operation guide

manuals.online logo
manuals.online logoBrands
  • About & Mission
  • Contact us
  • Privacy Policy
  • Terms and Conditions

Copyright 2025 Manuals.Online. All Rights Reserved.