Louvolite R1912 User manual

POWER SOURCE & CHARGING OPTIONS
Built-in Li-ion battery supply. Recharged using an external charger. On
a full charge can be used up to 6 months. Charging time is 6-8 hours.
REMOTE LAYOUT
DC power supply with energy saving patented design, 7.4V
2600mAh (R1912) 3000mAh (R1918) Lithium battery built-in.
Setting limits by remote control. Up to 6 limits, including
upper/lower limit and 4 intermediate positions.
433.92MHz radio control.
Short/open circuit protection
Patented helical gear design, noise level lowered to 30dB.
Make sure the motor has enough charge to operate the blind.
Attach the solar panel to the charge port on the motor using the
1.5m charge cable.
Place/ x the solar panel so that it is facing direct sunlight.
R1912 & R1918 LITHIUM MOTOR
Operating Instructions
KEY FEATURES
MOTOR ASSEMBLY ATTACHING THE SOLAR PANEL
Fit crown by sliding along the motor body until it meets the
motor head.
Fit the drive using the cir-clip to secure in position.
Attach the motor plate with the screws supplied in either left
hand or right hand orientation as required.
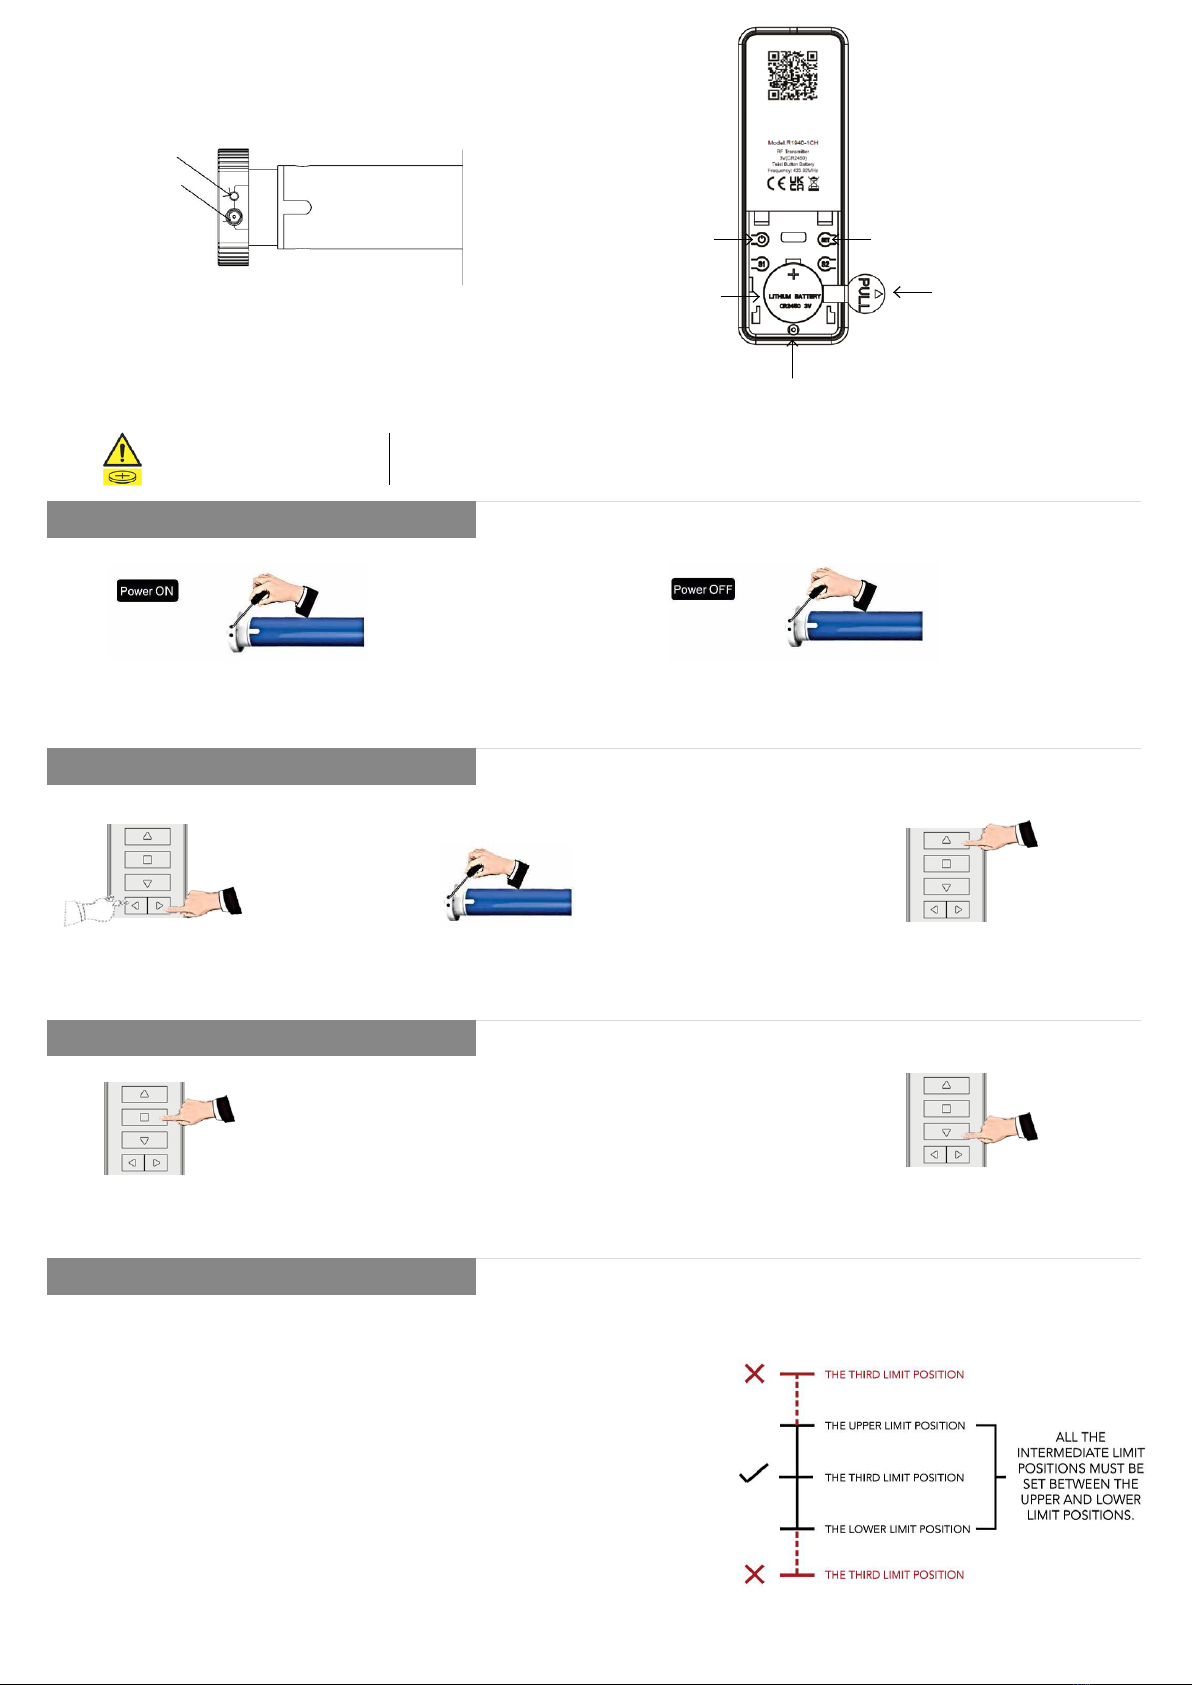
R1940 - 1CH
Push button
LED CHANNEL
INDICATOR
UP
STOP
DOWN
R1942 - 6CH - WH
Push button
Also available in black
CHANNEL
BUTTON
LED CHANNEL
INDICATOR
UP
STOP
DOWN
R1944 - 16CH
Push button
CHANNEL
BUTTON
LED CHANNEL
INDICATOR
UP
STOP
DOWN
MOTOR HEAD REMOTE
POWER ON/OFF
PAIRING REMOTE
CHANGE DIRECTION
LIMIT POSITION
After switching off the power the motor will not be able to receive remote signals.
1. Press the PROG button on the motor head for 1 second
until the motor beeps once.
1. Select a channel for pairing
on your remote control
1. Press and hold STOP on the programmed remote
for 5 seconds, the motor will oscillate once.
2. Press DOWN within 10 seconds and the motor will oscillate again,
the motor direction is now reversed
2. Press the PROG button until the motor beeps and
oscillates once. The motor will now be in setting mode.
3. Press UP within 10 seconds. The motor will oscillate
again, the motor and remote are now paired.
2. Press the PROG button on the motor head for 7 seconds until the
motor beeps once. After a long beep the motor is now OFF
If there is no action in 10 seconds the motor will exit programming automatically.
If there is a need polarity can be reversed.
1. The rst and second positions are Upper/ Lower limit positions. The other
four are intermediate positions.
2. After the Upper/ Lower limit positions are set, all the intermediate positions
must be set between the Upper and Lower limit.
3. The Upper and Lower limit position can only be ne-tuned once set. It can
only be removed by deleting all the motor memory.
4. Press the UP or DOWN button once and the motor will move to the next pre-
set limit position. When the upper position has been reached the UP button
will be unresponsive. When the lower position has been reached the down
button will become unresponsive.
5. For all the way up/down, press up/down pause for 1 second then press
up/down again.
CHARGE
PORT
PROGRAM/ POWER
BUTTON
New or used batteries can cause severe or fatal injuries in 2 hours or less if swallowed or placed inside any part of the body.
Seek medical attention immediately if you suspect the battery has been swallowed or placed inside any part of the body.
WARNING CONTAINS
HAZARDOUS BATTERY KEEP
OUT OF REACH OF CHILDREN
ON/OFF SET BUTTON
BATTERY
PULL TAB MUST BE
REMOVED TO INITIATE
BATTERY CONTACT
SCREW TO
SECURE BATTERY
SETTING LOWER AND UPPER LIMIT
FINE-TUNING LIMIT POSITIONS
SETTING INTERMEDIATE LIMITS
DELETING LIMIT POSITIONS
JOG MODE
Once the limits are set the system will exit the command automatically. Both
limits must be set to exit mode.
Limits can be ne tuned individually. If there is no activity for 30 seconds the
system will exit the command automatically.
The rst limit cannot be deleted separately, to remove this limit all limits must
be deleted.
The default movement of the motor is continuous, it can be changed to jog
movement or back to continuous movement for blind positioning or during ne
tuning mode.
1. Lower Limit - Press SET on the programmed remote for
1 second
Let the motor run to the limit position and press SET for 1
second. The motor will Oscillate once, the motor is now in
setting mode.
1. Move the blind to the desired position and press SET for
1 second.
1. Let the motor run to the limit position which needs to be
deleted and press SET for 7 seconds.
1. Press and hold STOP on the programmed remote
for 5 seconds. The motor oscillates once.
The motor will oscillate once and is now in setting mode. Use the UP/DOWN arrows to
adjust to the exact position. Press SET again, the motor will oscillate once. The ne-tune
setting is now complete.
2. The motor will oscillate once and is now in setting mode. Press SET again, the
motor will oscillate once. The intermediate limit position is now set.
2. The motor will oscillate after 1 second and then go in setting mode. The motor will
oscillate once again after 7 seconds, the pre-set limit position is now deleted.
2. Press STOP again. The motor oscillates again, the movement mode is changed.
1. Upper Limit - Press UP to the desired upper limit
position then press STOP.
2. Press SET for 1 second and then press SET again to conrm. The motor oscillates
once, the upper limit is now set.
2. Use UP/DOWN to adjust to exact position and then press SET again for 1 second.
The motor will oscillate once, the ne-tune setting is now complete.
2. Press DOWN to the desired lower limit position, then press STOP. Press SET again
for 1 second the motor will oscillate once, the lower limit is now set.

TROUBLE SHOOTING
ISSUE CAUSE SOLUTION
1 Motor does not run or runs slowly Over-load protection
Motor has been operated frequently in a short space of
time or is being operated in hot conditions. Allow the
motor to cool before next operation.
2 Motor does not run or runs slowly Motor has reached its limit Motor has reached a pre-set limit. Operate the blind in
the opposite direction and check for movement.
3 Motor does not run or runs slowly Out of battery Recharge the battery.
4 Motor does not run or runs slowly In power off mode Turn power on to the motor.
R19012 & R1918 08/23
ADDING A REMOTE
CHANNEL LOCKING & UNLOCKING
DELETE SINGLE CHANNEL
DELETE ALL MEMORY
BLUETOOTH SETTING MODE
Deleting all memory returns the motor back to factory settings.
1. Press and hold STOP on the programmed remote for 5
seconds. The motor oscillates once.
Channel Locking - Using the LEFT or RIGHT button, select the
desired channel you wish to lock the remote on. Press STOP and
RIGHT buttons together until the selected channel ashes or CC
is displayed.
1. Select channel to delete. Press and hold STOP on the
programmed remote for 5 seconds. The motor oscillates once.
1. Press PROG 4 times, press for a fth time and hold down until the motor oscillates twice. The motor is now in Bluetooth setting
mode. Open “LL OneTouch” APP to add devices.
1. Press and hold STOP on the programmed remote for 5 seconds.
The motor oscillates once.
2. Press and hold SET for 7 seconds within 10 seconds of the motor
oscillating. The motor will oscillate again for 1 second. The motor
will oscillate twice for 7 seconds, all memory is now erased.
2. Press SET for 1 second. The motor oscillates again, the selected channels
memory is now deleted.
Channel Unlocking - Using the LEFT or RIGHT button, select the desired channel
you wish to unlock on the remote. Press STOP and RIGHT buttons together for 2
seconds until all channels ash or CC is displayed. The remote is now unlocked.
2. Press UP on the new remote. The motor oscillates again, the new remote is now
added.
For motors with both white and black antennae:
1. Press the button on the motor 2 times, the motor will bleep for each time
you press.
2. Press a third time, the motor bleeps once, keep the button held down until the
motor bleeps again.
3. Press a fourth time, the motor bleeps once, keep the button held down until the
motor bleeps again, the motor will jog twice.
The motor memory is now deleted.
METHOD ONE METHOD TWO
This manual suits for next models
1
Other Louvolite Engine manuals

Louvolite
Louvolite Vertical Blind User manual

Louvolite
Louvolite R1912 User manual

Louvolite
Louvolite AM24B-06/34-ES-I-EB Operating instructions

Louvolite
Louvolite R1725 Installation manual

Louvolite
Louvolite R1905 User manual

Louvolite
Louvolite R1710 Installation manual

Louvolite
Louvolite R1705-RH User manual


