FINE-TUNING LIMIT POSITIONS
Limits can be fine tuned individualy. If there is no activity for 30 seconds the system
will exit the command automatically.
Let the motor run to
the limit position.
Press SET for 1 second.
The motor oscillates once,
the motor is now in setting mode.
123456
SUN M ON TUE WE D FUR FRI S AT
Use the UP/DOWN arrows to
adjust to the exact position. Press SET for 1 second.
The motor oscillates once,
the fine-tune setting is now complete.
SETTING INTERMEDIATE LIMITS
Press SET for 1 second.
The motor oscillates once,
the motor is now in setting mode.
Press SET again.
The motor oscillates once, the
intermediate limit position is now set.
123456
SUN M ON TUE WE D FUR FRI S AT
Move the blind to the
desired position.
DELETING LIMIT POSITIONS
The first limit set cannot be deleted seperately, to remove this limit all limits must be deleted.
Press SET for 7 seconds.
The motor oscillates once after 1
second and then goes into setting mode. The motor oscillates once again
after 7 second, the preset limit
position is now deleted.
Let the motor run to the limit
position which needs to be deleted.
JOG MODE
The default movement of the motor is continuous, can be changed to jog movement or back to
continuous movement for blind positioning or during fine tuning mode.
The motor oscillates once. The motor oscillates again, movement
mode is changed.
123456
SUN M ON TUE WE D FUR FRI S AT
Press and hold STOP on the programmed
remote for 5 seconds.
123456
SUN M ON TUE WE D FUR FRI S AT
Press STOP again.
ADD REMOTE
Deleting all memory returns the motor back to factory settings.
The motor oscillates once. The motor ascillates again, the
new remote is now added.
123456
SUN M ON TUE WE D FUR FRI S AT
Press and hold STOP on the
programmed remote for 5 seconds.
123456
SUN M ON TUE WE D FUR FRI S AT
Press UP on the new remote.
DELETE ALL MEMORY
Motor memory is now erased.
Press PROG 4 times, press for a
fifth time and hold down until
the motor oscillates twice.
Method 1
123456
SUN M ON TUE WE D FUR FRI S AT
Press and hold STOP on the
programmed remote for 5 seconds.
The motor oscillates once.
Press and hold SET for 7 seconds
within 10 seconds of the motor oscillating.
The motor oscillates
again for 1 second.
The motor oscillates twice
for 7 seconds, all memory
is now erased.
Method 2
1 2 3 4 5 6
Here displays “T”
in Timer Mode
T
1 2 3 4 5 6
T+
Here displays “T+”
in Random Timer Mode
1 2 3 4 5 6
M
Here displays “M”
in Manual Mode
T : Timer mode
Mon-Sun: every day has different UP/DOWN time, you set day by day
Mon-Sun: the same UP/DOWN time applied to every day, you set once for 7days
Mon-Fri /Sat + Sun: Mon-Fri has same UP/DOWN time, you set once for 5 days. Sat + Sun has same UP/DOWN time, you set once for 2 days.
T+:Random Timer Mode
Timer functions with random function—runs automatically based on T mode, the timing points will fluctuate ±15mins from corresponding T mode.
M: Manual mode
No timer function
Working mode selection: In the home page, press SET for 3s, flashes, press RIGHT to switch to T Mode, press DOWN to switch T, T+, M,
save your selection by long pressing SET button 3s. Or only exit the setting by long pressing STOP button 3s. (won't save setting).
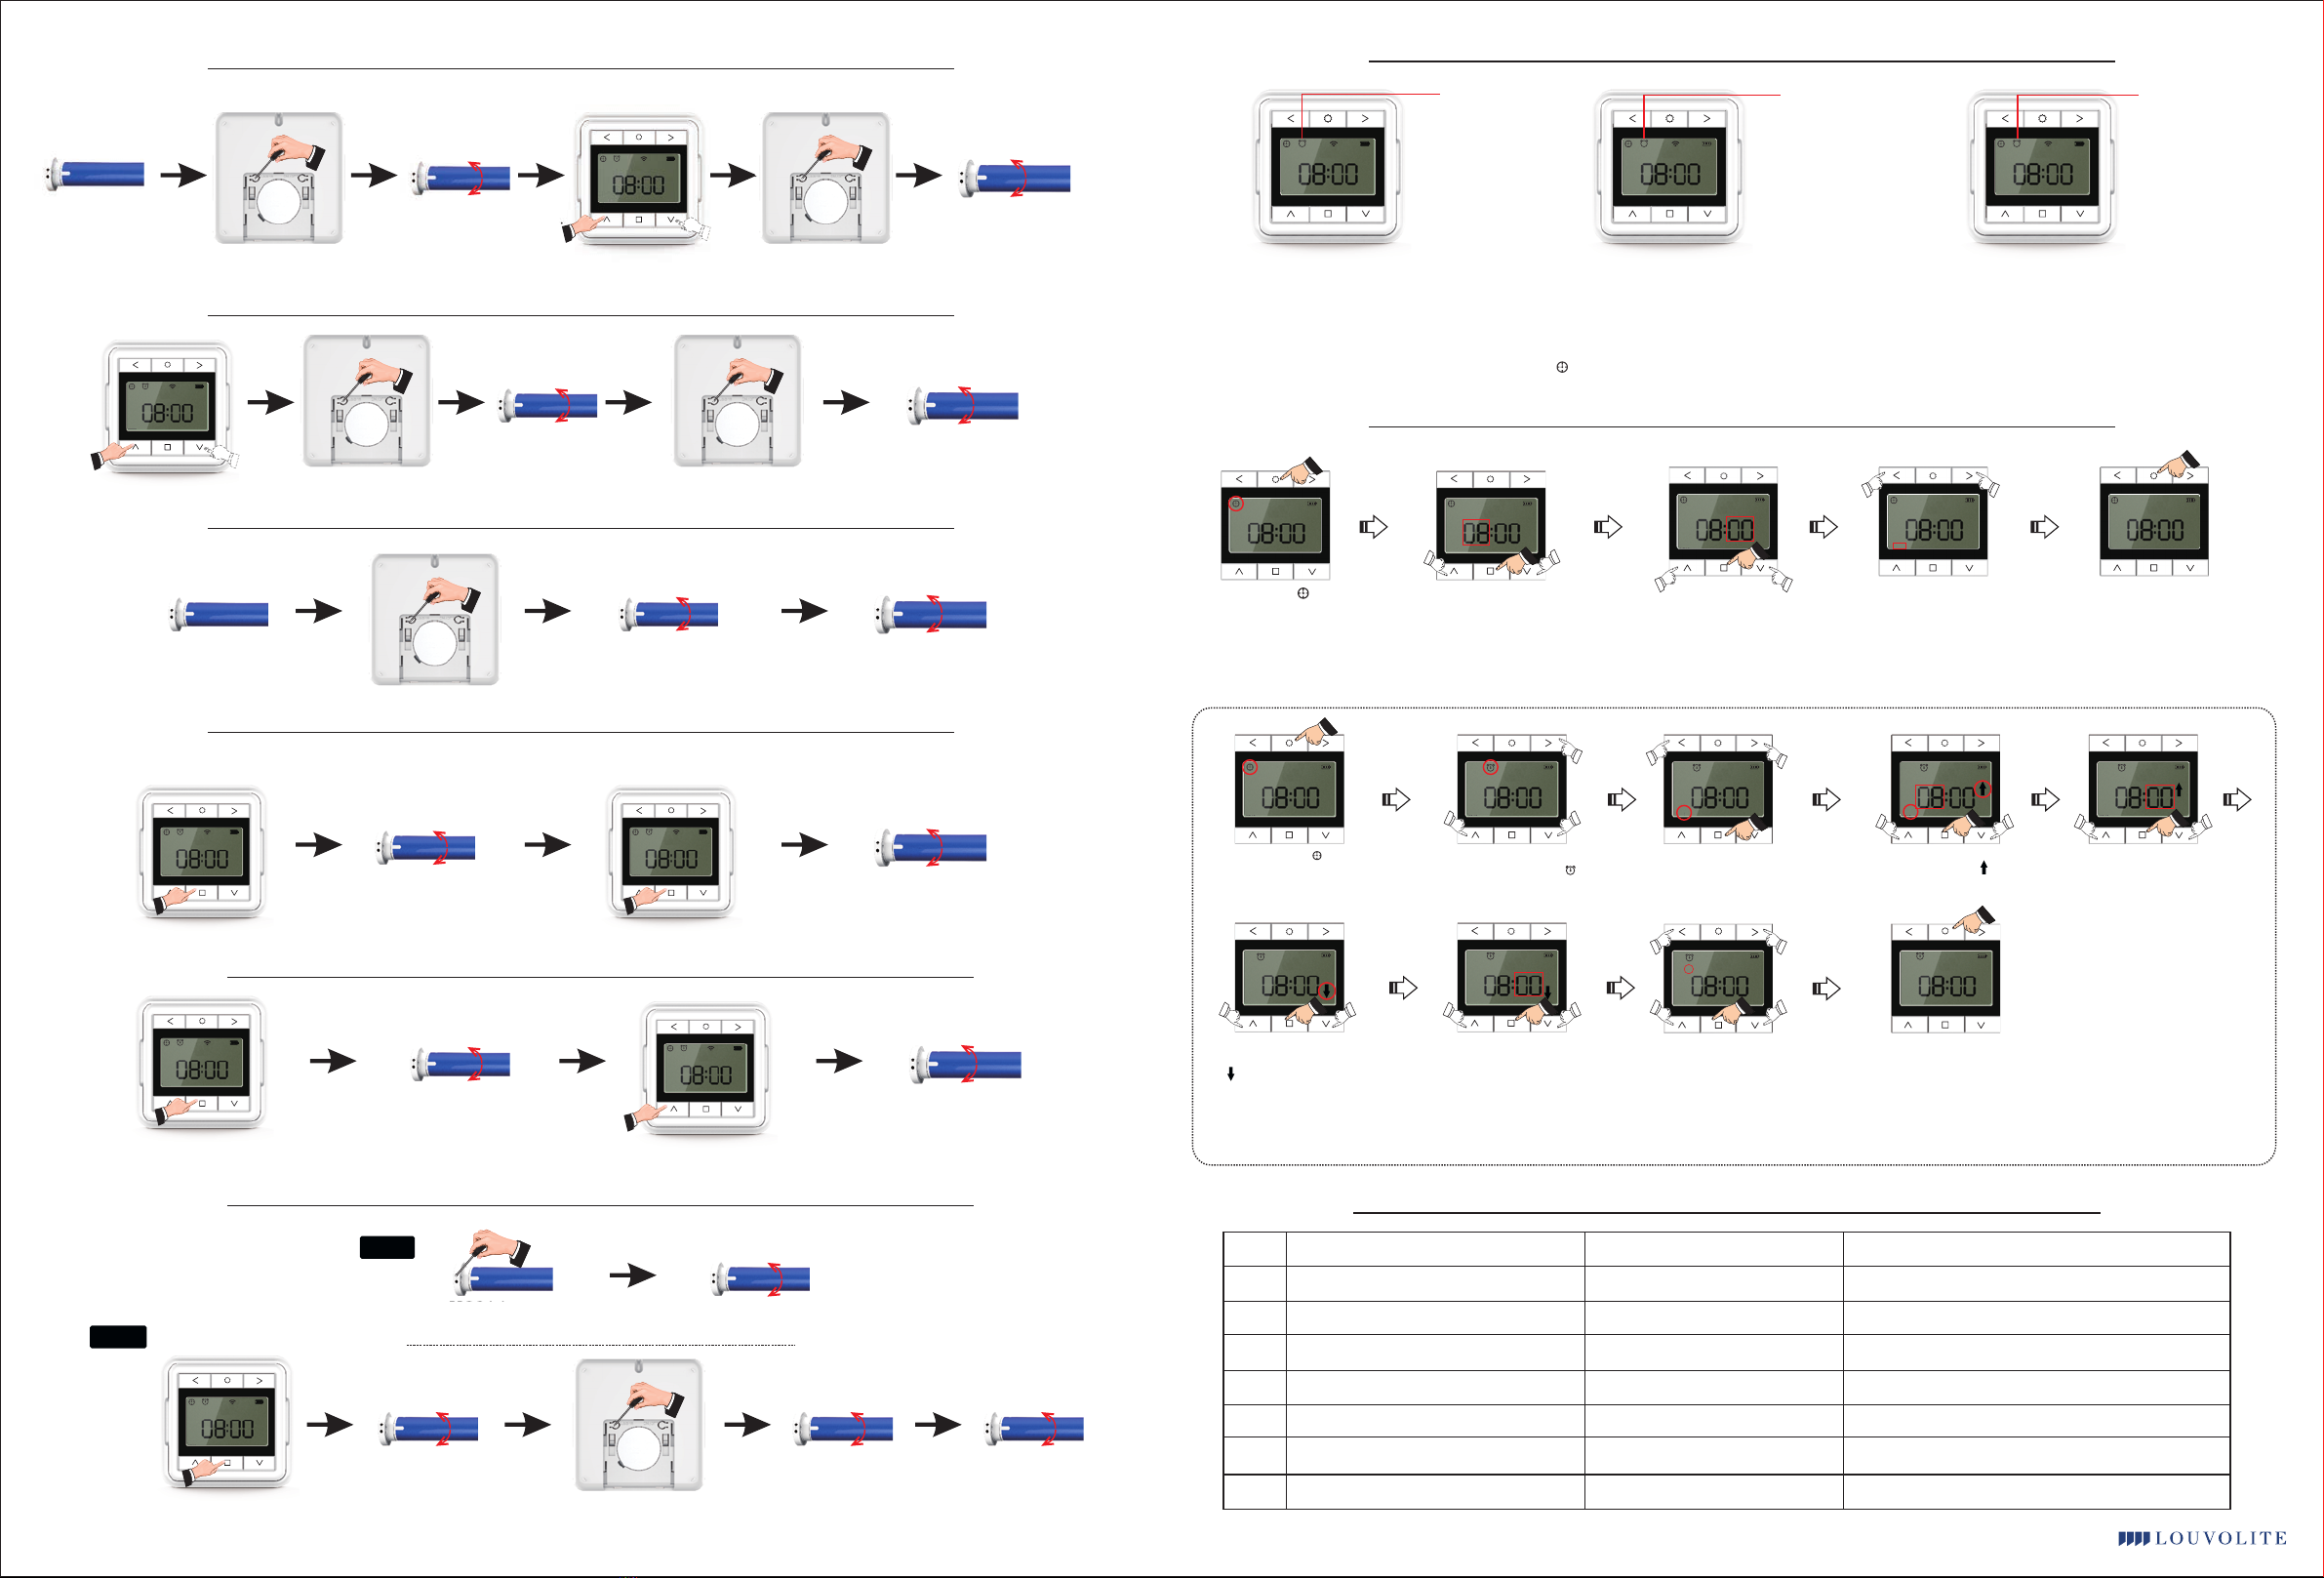
(figure 1-1) (figure 1-2) (figure 1-3)
(figure 1-1)
(figure 1-2)
(figure 1-3)
SUN M ON TUE WE D FUR F RI SAT SUN M ON TUE WE D FUR F RI SAT SUN M ON TUE WE D FUR F RI SAT
Work Mode Switching
Press SET for 3s, flashes Press STOP to switch to minute,
press UP/DOWN to adjust minute.
Press STOP, hour figures flash,
press UP/DOWN to adjust hour.
Press LEFT/RIGHT
to set current day
A. Current/System Time Setting
Press SET for 3s to save the
settings and revert to home page.
B. Timer setting
Note: 1. When setting hours/minutes, press UP/DOWN more than 1.5s, the figures change continuously.
2. During setting, if you want to exit the setting procedure, press STOP for 3s, screen will revert to home page and without saving the settings.
3.The user can’t start to set timing point until the system time of the timer is set.
In the home page, switch mode to timer mode, then follow below steps: (the channel selection is the last thing you do. The sequence is : day,
hr/UP, min/UP, hr/DOWN, min/DOWN, Channel).
SUN SUN
SUN SUN SUN
Note: 1. When SET hours/minutes, press UP/DOWN more than 1.5s, the data changes continuously.
2. During setting, if you want to exit the setting procedure, press STOP button and hold for 3s, screen will revert to home page and without saving the settings.
Operating Instructions
Operating Instructions
ISSUE
Motor does not run or runs slowy
Motor does not run or runs slowy
Motor does not run or runs slowy
Motor does not run or runs slowy
1
2
3
4
CAUSE
Over-Load Protection
Motor Has Reached its Limit
Out of Battery
In Power Off Mode
SOLUTION
Motor has been operated frequently in a short space of time or is
being operated in hot conditions. Allow the motor to cool before
next operation.
Motor has reached a preset limit. Operate the
blind in the opposite direction and check for movement.
Recharge the battery.
Turn power on to the motor.
Timer Remote With Manual Click Buttons Instruction
If screen is incomplete and not clear
Poor remote sensitivity
No response after pressing buttons
Battery level low
Check installation position for
metal obstructions
1) Screen is frozen,
2) press correct button for procedure
Change battery
Re-position unit
1) remove the battery and replace,
2) press correct button for procedure
5
6
7
(In the home page, switch mode to Manual mode, then follow below steps)
Press SET for 3s, flashes Press STOP to set the hour.
Hour figures flash, and appears,
press UP/DOWN to adjust hour.
Press RIGHT to switch
to timer mode, the
appears and flashes,
press UP/DOWN to switch
to Timer mode.
Press STOP to set the day,
press LEFT/RIGHT to adjust to
expected day
Press STOP to switch to minutes,
press UP/DOWN adjust minute.
SUN
SUN
SUN
SUN SUN
Press STOP to set the Down
time. Hour figures flash,
and appears, press UP/DOWN
to adjust hour.
SUN
Press STOP to set the channel,
Channel Number flashes.
Press UP to delete channel,
press DOWN to add channel,
press LEFT/RIGHT to change
and choose channel.
Finish timer setting, press
SET button and hold for
3s, the setting datas will be
saved and screen will revert
to home page.
1
SUN SUN
1
Press STOP to switch to minutes,
press UP/DOWN adjust minute.
SUN
Issue: MAY20


