LOWE'S 2026VB-36-200 User manual

2026VB-36-201 36" White Painted Vanity Base
2026VB-36-200 36" Gray Painted Vanity Base
2026VB-36-202 36" Mahogany Vanity Base
2026VB-36-205 36" Black Oak Vanity Base
2026VB-36-242 36" Light Gray Finish Vanity Base
2500VT-36-900 36" Carrara Marble Top with Backsplash
3500VT-36-901 3500-36" Engineered White Top with Backsplash
3500VT-36-900 3500-36" Carrara Marble Top with Backsplash
2500VT-36-901 36" Engineered White Top with Backsplash
MODEL NUMBER DESCRIPTION
2500VT-36-906 36" Dark Gray Top with Backsplash
2500VT-36-904 36" Black Granite Top with Backsplash
2500VT-36-905 36" Terrazzo Top with Backsplash
PU17-18x14-SQUARE Standard Undermount Sink
SN047B Semi-recessed Sink
ATTACH YOUR RECEIPT HERE
Serial Number__________________ Purchase Date__________________
Questions, problems, missing parts? Before returning to your retailer, call our customer service
department at 1-866-439-9800, 8 a.m. - 8 p.m., EST, Monday - Sunday.
VANITY WITHOUT TOP
MODEL #
2026VB-36-200; 2026VB-36-201; 2026VB-36-202;
2026VB-36-205; 2026VB-36-242
OR
welcoming • sophisticated • inspiring

2
TABLE OF CONTENTS
Package Contents...........................................................................................................................3
Hardware Contents..........................................................................................................................3
Safety Information. .........................................................................................................................3
Preparation ....................................................................................................................................4
Assembly or Installation Instructions .............................................................................................4
Care and Maintenance ...................................................................................................................8
Warranty ........................................................................................................................................8
Replacement Parts List ................................................................................................................. 9

3
PACKAGE CONTENTS
PART DESCRIPTION QUANTITY
BTop 1
AVanity 1
C Backsplash 1
DSink 1
G Shelf 1
E 1
F
Right Door
(preassembled
to Vanity (A))
1
CARTON
box 1 of 3
box 3 of 3
box 2 of 3
box 2 of 3
Left Door
(preassembled
to Vanity (A))
Touch-up Pen
Qty. 1
Shelf Pin
Qty. 4
FF GG
HARDWARE CONTENTS (NOT SHOWN ACTUAL SIZE)
WARNING
CAUTION
Please read and understand this entire manual before attempting to assemble, operate or install
the product.
KEEP THESE INSTRUCTIONS FOR FUTURE REFERENCE.
• Use care when assembling the vanity, take your time and follow the assembly instructions closely.
• Weight capacity for shelf is 10 lb.
SAFETY INFORMATION
• Some steps are more easily handled with two adults.
C
B
A
E
F
G
D
OR
D
OR
C
B

4
INSTALLATION INSTRUCTIONS
2. Clean area where the vanity (A) will be
permanently located prior to beginning
installation, ensuring the vanity (A) will not
interfere with any water supply and drain lines
once mounted.
Locate wall studs and mark locations. With the
help of another adult, place completed Vanity
Cabinet Assembly in its final location. Adjust
the height of the Vanity Cabinet (A) by
twisting the adjustable leveler foot pins on the
bottom of each leg. Twist clockwise to
decrease height or twist counter-clockwise to
increase vanity height.
PREPARATION
Before beginning assembly of product, make sure all parts are present. Compare parts with
package contents list and hardware contents list. If any part is missing or damaged, do not attempt
to assemble the product.
Estimated Installation Time: 45 minutes (24 hours for silicone caulk to dry).
Tools Required for Installation (not included): Phillips screwdriver, utility knife or scissors, silicone
caulk, power drill with drill bit, measuring tape, level
2
A
1
A
12
1. To remove drawers from vanity base (A),
fully extend drawers and locate the plastic
levers on left and right sides of the metal glide
tracks. Push the plastic levers, on both sides,
at the same time, This will disengage the
drawer box from the glides. Gently lift up on
the drawer to remove it from the glide tracks.
Set aside as these will be re-installed.

5
INSTALLATION INSTRUCTIONS
3. Using hardware appropriate for your wall type
(not included), secure Vanity Cabinet (A) to
two wall studs anywhere through the Vanity
Mounting Plates. Be careful not to disturb
any electrical or water lines that may be
concealed in the wall.
3
A
Mounting Plate
WARNING
Vanity (A) MUST be secured to the wall.
A
B
2
2
4
1
4. To install the Top (B) to the vanity (A).
Apply silicone caulk to the top edge of the
wood cabinet. With the help of another adult,
gently lower the stone top with assembled sink
onto the cabinet. Make sure the stone top is flush
with the back side of the wood cabinet and the
stone overhang is equal on both sides over the
wood cabinet left and right side walls. Remove
any excess caulk before allowing to dry.
At this time, if the vanity purchased has a
semi-recessed sink, use the Instruction Manual,
located in the box with the vanity top (B) to install
the sink bowl (D) to the vanity top.
At this time, if the vanity purchased has an
undermount sink, use the Instruction Manual,
located in the box with the vanity top (B) to
install the sink bowl (D) to the vanity top before
moving to Step 4.
If the vanity purchased has a semi-recessed
sink proceed to Step 4. The semi-recessed sink
bowl (D) will be installed after the vanity top (B)
is attached to the vanity base (A).
Helpful tip: it may be easier to install your
choice of faucet (not included) before securing
the vanity top (B) to vanity base (A).

6
INSTALLATION INSTRUCTIONS
6. Insert shelf pins (GG) at desired height,
ensuring they are level. Place shelf (G) on
top of shelf pins (GG).
5. To re-install drawers into vanity (A). Please fully
extend metal glide tracks, gently lower and slide
drawer box into rear glide catch, then, lower
drawer box down to completely rest on
extended glides, push plastic levers to
lock the drawer box in place.
Repeat for remaining drawers.
Note: To Adjust the drawer box height. Please
spin the adjustment wheel to the left to raise the
drawer box or spin the adjustment wheel to
the right to lower the drawer box. You can
adjust the left and right side glide heights
independently in order to find the drawers best
alignment position.
CAUTION
DO NOT force drawer or damage to glide may
occur. If drawer does not slide in with ease,
remove and try again from the start.
Hardware Used
GG Shelf Pin x 4
5
A
B
6
2
A
B
G
1
GG

7
INSTALLATION INSTRUCTIONS
7. If you need to adjust the doors, do so in the following manner.
To adjust door up or down, loosen screws (a) on both hinges, adjust door, and retighten screws.
To adjust door left or right, turn screws (b) on both hinges, in or out.
To adjust door in or out, loosen screws (c) on both hinges, adjust door, and retighten screws.
8. Apply silicone caulk (not included) to unpolished
side and bottom of backsplash (C). Position
backsplash (C) on top (B) and against wall.
Clean any excess caulk before allowing
to dry.
Assembly is now complete. Install desired
faucet and drain assemblies (neither included)
per the manufacturers’ instructions to complete
the installation.
7
a
3
a
1
b
1
1
c
1
c
3
2
2
2
2
22
8
1
A
CB
2
2

8
• Dust the vanity regularly with a soft, non-lint producing cloth or household dusting product.
• You can clean the vanity with a gentle, non-abrasive household cleaner.
• Make sure to dry the wood immediately with a soft cloth or towel.
• The stone top can be cleaned using standard marble cleaning agents available at your local
supplier.
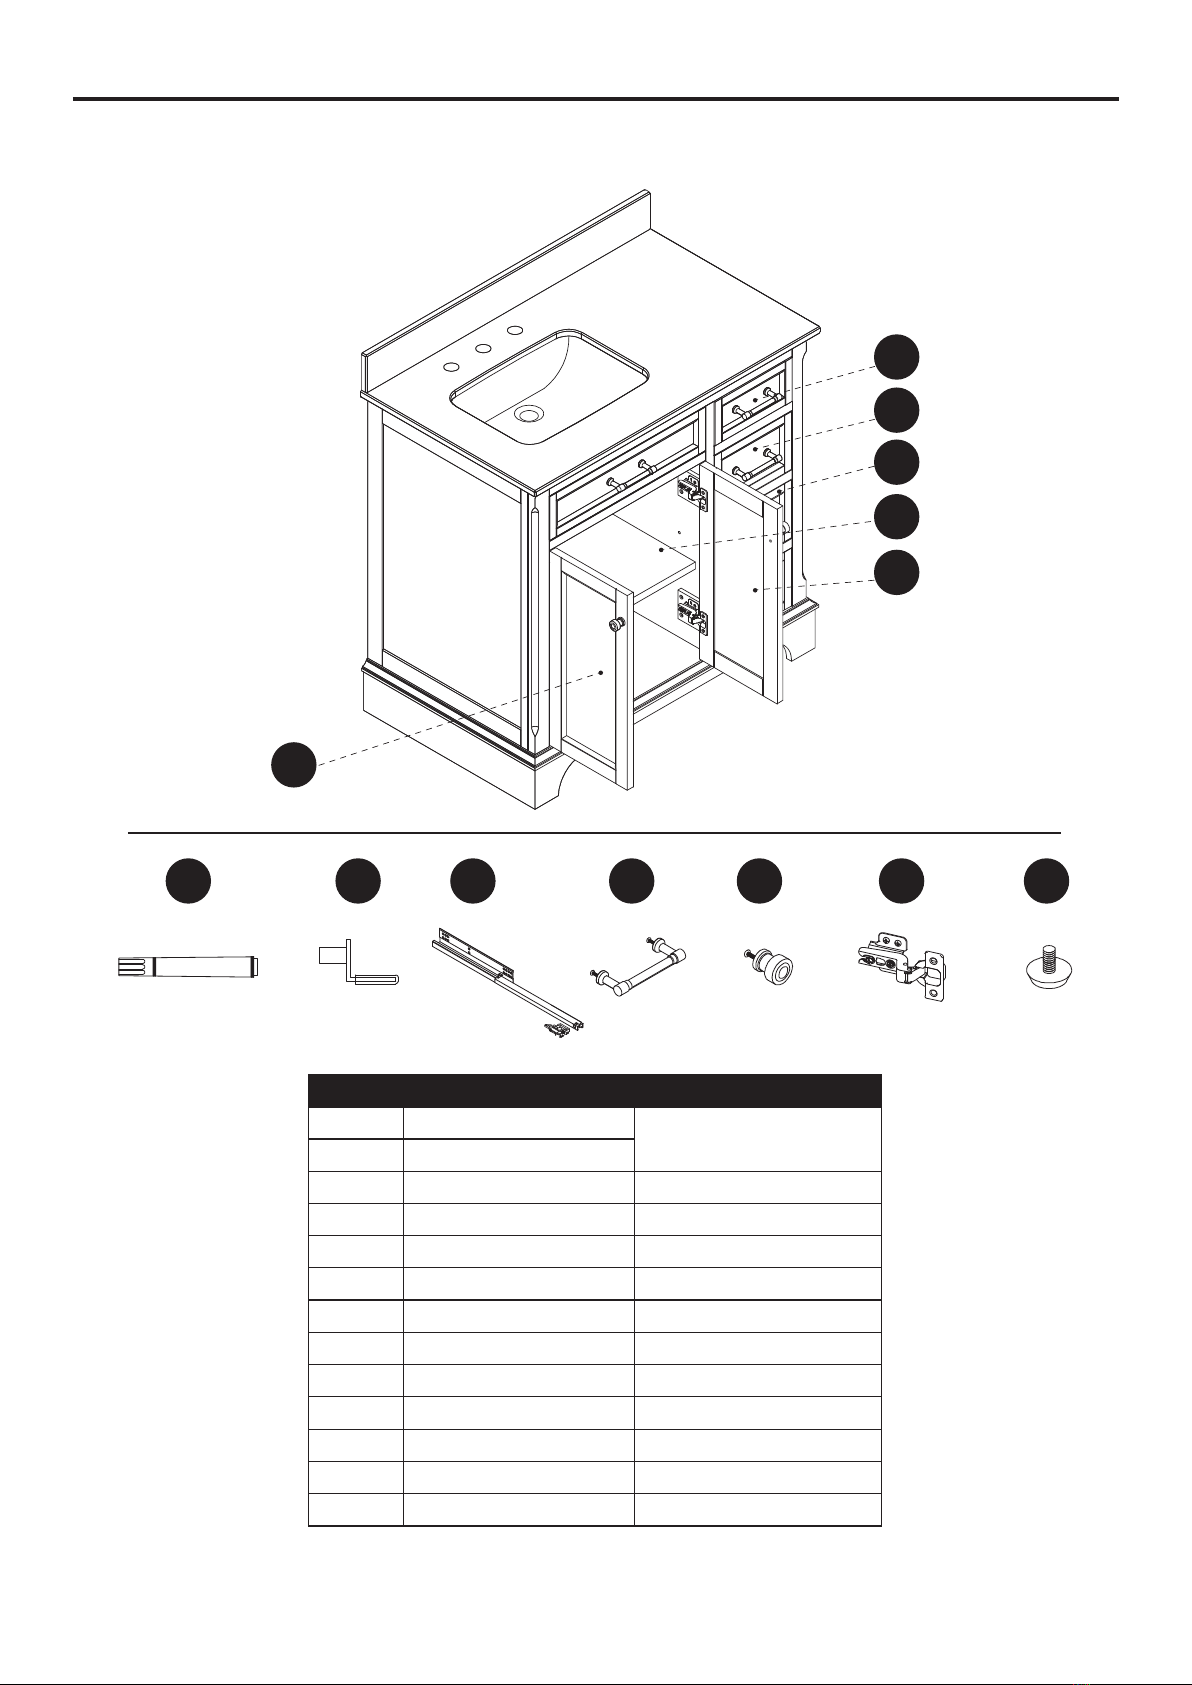
• Tips for using touch-up pen (FF): For scratches, stroke in direction of scratch. Rub off excess
colorant promptly with a soft cloth.
IMPORTANT
• Shade variations and patterns are an inherent characteristic of stone (e.g. granite, marble,
engineered stone). Stone tops will vary from product to product. Use caution placing items
such as soap or any fragranced material on the stone surface. Use a soap dish, coaster or
similar item to protect the surface if placing any soap or fragranced products on the stone.
• If soap or fragranced products come in contact with the stone top, rinse the surface with water
and dry using a soft non-abrasive cloth.
• WARNING: Must use cleaning agents safe for stone. Check your cleaning agents use
restrictions before using on any stone. Damage to the stone may result. Vanity Manufacturer not
responsible for damage caused by improper cleaning agents or soaps used. Warranty will not
cover damage caused by the use of improper soaps or cleaning agents.
• DO NOT use products to clean the stone top that contain acetone, lemon, vinegar or other
acids as these may cause damage to the stone surface.
• Periodically reseal the stone top using an appropriate stone sealer available from your local
home store. Follow the manufacturer’s directions on how to apply.
WARRANTY
The manufacturer warrants this item against defects in materials and workmanship for a period
of one (1) year from the date of original retail purchase. This warranty applies only to the original
purchaser. This warranty does not apply to any damage on the product by accident, misuse, or
modified, improper installation or by affixing accessories not produced by the manufacturer. The
manufacturer is not accountable whatsoever for product installation during the warranty period.
There is no further expressed warranty. The manufacturer shall not be legally responsible for
incidental, consequential or special damages arising at or in connection with product use or
performance except as may otherwise be accorded by law. The manufacturer disclaims any and
all implied warranties.
CARE AND MAINTENANCE

9
REPLACEMENT PARTS FOR 2026VB-36-200
PART DESCRIPTION PART#
H Small Drawer Front 2026VB-36-200-004
I Middle Drawer Front 2026VB-36-200-005
J Large Drawer Front 2026VB-36-200-006
OX-0180Z
FF
Shelf pin
Touch-up Pen
GG B1044
HH Glide Track Set PUDTC-12x3-Handle
II Pull (with screw) CF-96-004-BN
JJ Knob (with screw) CF-D25-005-BN
KK Hinge C-90-107
LL Leveler T-1007
Left Door
E 2026VB-36-200-
001/002
F Right Door
G Shelf 2026VB-36-200-003
For replacement parts, call our customer service department at 1-866-439-9800, 8 a.m. - 8 p.m.,
EST, Monday - Sunday.
H
I
J
F
G
E
FF GG HH II KK LLJJ

10
REPLACEMENT PARTS FOR 2026VB-36-201
PART DESCRIPTION PART#
H Small Drawer Front 2026VB-36-201-004
I Middle Drawer Front 2026VB-36-201-005
J Large Drawer Front 2026VB-36-201-006
OF-0010
FF
Shelf pin
Touch-up Pen
GG B1044
HH Glide Track Set PUDTC-12x3-Handle
II Pull (with screw) CF-96-004-BN
JJ Knob (with screw) CF-D25-005-BN
KK Hinge C-90-107
LL Leveler T-1007
Left Door
E 2026VB-36-201-
001/002
F Right Door
G Shelf 2026VB-36-201-003
For replacement parts, call our customer service department at 1-866-439-9800, 8 a.m. - 8 p.m.,
EST, Monday - Sunday.
H
I
J
F
G
E
FF GG HH II KK LLJJ

11
REPLACEMENT PARTS FOR 2026VB-36-202
PART DESCRIPTION PART#
H Small Drawer Front 2026VB-36-202-004
I Middle Drawer Front 2026VB-36-202-005
J Large Drawer Front 2026VB-36-202-006
W3350A
FF
Shelf pin
Touch-up Pen
GG B1044
HH Glide Track Set PUDTC-12x3-Handle
II Pull (with screw) CF-96-004-BN
JJ Knob (with screw) CF-D25-005-BN
KK Hinge C-90-107
LL Leveler T-1007
Left Door
E 2026VB-36-202-
001/002
F Right Door
G Shelf 2026VB-36-202-003
For replacement parts, call our customer service department at 1-866-439-9800, 8 a.m. - 8 p.m.,
EST, Monday - Sunday.
H
I
J
F
G
E
FF GG HH II KK LLJJ

12
REPLACEMENT PARTS FOR 2026VB-36-205
PART DESCRIPTION PART#
H Small Drawer Front 2026VB-36-205-004
I Middle Drawer Front 2026VB-36-205-005
J Large Drawer Front 2026VB-36-205-006
W3504A
FF
Shelf pin
Touch-up Pen
GG B1044
HH Glide Track Set PUDTC-12x3-Handle
II Pull (with screw) CF-96-004-BN
JJ Knob (with screw) CF-D25-005-BN
KK Hinge C-90-107
LL Leveler T-1007
Left Door
E 2026VB-36-205-
001/002
F Right Door
G Shelf 2026VB-36-205-003
For replacement parts, call our customer service department at 1-866-439-9800, 8 a.m. - 8 p.m.,
EST, Monday - Sunday.
H
I
J
F
G
E
FF GG HH II KK LLJJ

13
REPLACEMENT PARTS FOR 2026VB-36-242
PART DESCRIPTION PART#
H Small Drawer Front 2026VB-36-242-004
I Middle Drawer Front 2026VB-36-242-005
J Large Drawer Front 2026VB-36-242-006
OF-0120R
FF
Shelf pin
Touch-up Pen
GG B1044
HH Glide Track Set PUDTC-12x3-Handle
II Pull (with screw) CF-96-004-BN
JJ Knob (with screw) CF-D25-005-BN
KK Hinge C-90-107
LL Leveler T-1007
Left Door
E 2026VB-36-242-
001/002
F Right Door
G Shelf 2026VB-36-242-003
For replacement parts, call our customer service department at 1-866-439-9800, 8 a.m. - 8 p.m.,
EST, Monday - Sunday.
H
I
J
F
G
E
FF GG HH II KK LLJJ
This manual suits for next models
11
Table of contents
Other LOWE'S Bathroom Fixture manuals
Popular Bathroom Fixture manuals by other brands

PierDeco
PierDeco AQYAMASSAGE PD-892 owner's manual

mr. steam
mr. steam Butler Installation, operation & maintenance manual

Ro-Man
Ro-Man KL Series instruction manual

PotteryBarn
PotteryBarn ELLA TOWEL BAR 18" Assembly instructions

Dreamline
Dreamline ALLIANCE PRO BG SDAB60A700 installation instructions

Dreamline
Dreamline SHCM-3031-00/01 installation guide