Luce Plan CHICHIBIO User manual

01
via E.T. Moneta, 46 - 20161 Milano - Italia
tel. (02) 66242-1 - fax (02) 66203400
www.luceplan.com
CHICHIBIO
ISTRUZIONI
ASSEMBLY INSTRUCTIONS
MONTAGEANLEITUNGEN
INSTRUCTIONS DE MONTAGE
mod. D37
design Amedeo G.Cavalchini / Domenico Perrucci
250W HEG E27
D370I0001
Lampada a stelo in alluminio trafilato e verniciato
con estremità in pressofusione. Diffusore in
policarbonato stampato e riflettore in alluminio
tornito e verniciato. Lo stelo telescopico consente
il posizionamento stabile tra pavimento e soffitto
in ambienti con altezza variabile da 2,2 mt a
3,3mt. La potenza massima consentita è di
250W per lampadina Alogena con attacco E27
Descrizione prodotto
Product description
Produktbeschreibung
Description du produit
Appareil à tige en aluminium tréfilé et peint avec
des extrémités moulées sous pression.Abat-jour
en polycarbonate moulé et réflecteur en aluminium
tourné et peint. La tige télescopique permet un
positionement stable entre le sol et le plafond à
une hauteur variable de 2,2 m à 3,3 m. La
puissance maximum admise est de 250 W pour
ampoule halogène avec culot E27.
Floor lamp in drawn and painted aluminium with
die-cast ends.
Shade in printed polycarbonate and reflector in
turned and painted aluminium.
The telescopic stem and the shock absorbing
base allow the stable positioning of the lamp
between floor and ceiling, with a variety of heights
from 2,2 mt to 3,3 mt.
The maximum allowed power is 250W for halogen
bulbs with E27 coupling.
Stehlampe aus gezogenem und lackiertem
Aluminium mit Endstücken in Druckguß.
Lampenschirm aus gedrucktem Polykarbonat
und Reflektor aus gedrehtem und lackiertem
Aluminium. Der teleskopische Ständer gestattet
das stabile Einspannen zwischen Boden und
Decke mit Höhen von 2,2 m bis 3,3 m. Für
Halogenlampe max 250W E27.

02 03
220 - 330
Dimensioni
Dimensions
Abmessungen
Dimensions
Max 250 W
HEG E27
Montaggio paralume diffusore
Mounting the shade
Montage des Lampenschirms
Montage abat-jour
fig.1
a
b
c
d

04 05
Per agevolare l’operazione di montaggio si
consiglia di appoggiare il diffusore sul pavimento.
Dopo aver infilato il disco colorato prescelto (a),
introdurre lo stelo attraverso il foro superiore (b)
del diffusore. Aver cura di allineare i due dentelli
di centraggio (d) con le due sedi del diffusore.
Spingere in basso lo stelo fino alla posizione in
cui scatta la molla di tenuta (c), come mostrato
in fig.1.
Se fosse successivamente necessario sfilare il
diffusore, agire dall’interno dello stesso
stringendo i due lembi della molla (c) per
sganciarla.
To facilitate the assemly, the shade should be
lain on the floor. After having inserted the
coloured disc (a), introduce the stem through the
upper hole (b) of the diffusor. Pay attention to
insert the two centering teeth (d) in the holes of
the shade. Push the stem downwards until the
holding spring (c) clicks, according to fig. 1.
If it would be then necessary to take the shade
off, operate from the inner part of the diffusor, by
pushing the two spring ends (c) for its release.
Um die Montage zu erleichtern, wird es
empfohlen, den Diffusor auf den Boden zu
stellen. Nach dem Aufstecken der ausgewählten
farbigen Scheibe (a) den Ständer in die Öffnung
(b) des Diffusors einführen. Sicherstellen, dass
die zwei Zentrierungszähne (d) in die beiden
Nuten des Diffusors eingepasst sind. Den
Ständer bis zum Zuschnappen der Haltefeder (c)
nach unten drücken, siehe Bild 1.
Sollte es später einmal nötig sein den
Lampenschirm wieder herauszunehmen, von der
inneren Seite des Diffusors die zwei Enden der
Haltefeder (c) zusammendrücken, so dass die
Feder aushakt.
Pour faciliter le montage, on conseille de poser
l’abat-jour sur le sol. Après avoir enfilé le disque
coloré choisi (a), introduire la tige à travers le
trou supérieur (b) du diffuseur. Veiller à
introduire les deux dents de centrage (d) dans
les rainures placées sur l’abat-jour. Pousser en
bas la tige jusqu’au déclenchement du ressort de
tenue (c), selon l’illustration 1.
Si ceci devait être ensuite nécessaire ôter
l’abat-jour, agir sur la partie intérieure du
diffuseur en serrant les deux extrémités du
ressort (c) pour le décrocher.

06 07
Montaggio riflettore e sostituzione lampadina
Mounting the reflector and replacing the bulb
Montage des Reflektors und Auswechseln des Leuchtmittels
Montage réflecteur et remplacement de l'ampoule
fig.2
Inserire la lampadina (max 250W HEG E27) e
fissare a pressione il disco riflettore (e), che
dovrà avere i piedini in gomma (p) rivolti verso
l’esterno del paralume, fino a far scattare il disco
sotto i dentelli di ritenuta (f). Per sostituire la
lampadina estrarre il riflettore facendo leva con
un cacciavite in corrispondenza delle tacche
poste sul bordo del riflettore.
Introduire l'ampoule (250W HEG E27 maximum)
et fixer ensuite par pression le disque réflecteur
(e), qui devra avoir les pieds (p) orientés vers
l'extérieur de l’abat-jour, jusqu’au déclenchement
des dents de tenue (f). Pour remplacer l'ampoule,
sortir le réflecteur en appuyant, à l'aide d'un
tournevis, au niveau des encoches situées sur le
bord du réflecteur.
Insert the bulb (max 250W HEG E27) and then
press the reflector disc (e), whose rubber feet (p)
should be directed towards the outside of the
shade until the holding teeth (f) click. To replace
the bulb take the reflector out by putting a
screwdriver under the notches on the edge of the
reflector and prizing it open.
Das Leuchtmittel (max. 250W HEG E27)
einsetzen. Die Reflektorscheibe (e), deren Füße
(p) in Richtung Schirmäußeres orientiert sein
müssen, durch Drücken so befestigen, dass die
Haltezähne (f) zuschnappen. Um das
Leuchtmittel auszuwechseln, den Reflektor
entfernen, indem man ihn mit einem
Schraubenzieher in den Kerben am Rand des
Reflektors heraushebelt.
ep
f

08 09
Posizionamento e fissaggio della lampada
Positioning and fixing the lamp
Positionieren und Befestigen der Leuchte
Positionnement et fixation de la lampe
Allentare leggermente la frizione ruotando di
circa mezzo giro il tubo inferiore affinché i due
steli possano scorrere liberamente. Con una
mano spingere in alto lo stelo superiore in modo
da appoggiare al soffitto i piedini di gomma posti
sopra il riflettore. Con l’altra mano spingere in
basso lo stelo inferiore caricando al massimo
la molla. Aver cura di non schiacciare il cavo di
alimentazione ma farlo passare attraverso la
fessura (f) posta nel piede della lampada.
Quando viene raggiunta la posizione di massimo
caricamento, senza mollare la presa, serrare
girando lo stelo inferiore. Verificare poi la stabilità
della lampada, e la sua verticalità
Durante la regolazione della lunghezza dello
stelo accompagnare il cavo di alimentazione in
modo tale da favorirne lo scorrimento.
Non danneggiare il cavo
MAX
f
Slightly loosen the clutch by turning the lower tube
(half a rotation) so that the two stems can slide
easily.
With one hand push the upper stem upwards until
the rubber feet on the reflector touch the ceiling.
With the other hand push the lower stem
downwards, winding the spring to its
maximum. Pay attention not to press the power
cable but let it pass through the slit (f) at the
bottom of the lamp.
When the maximum winding position is
reached, turn the stem, still holding it. Check
the stability of the lamp and its verticality.
While regulating the stem's length, make the
sliding of the power cable easier.
Do not damage the power cable.

10 11
THE SAFETY OF THE APPLIANCE IS GUARANTEED
ONLY IF THESE INSTRUCTIONS ARE FULLY
RESPECTED, BOTH DURING INSTALLATION AND
USE; THEREFORE KEEP THEM IN A SAFE PLACE.
THE MANUFACTURER CANNOT BE HELD
RESPONSIBLE FOR ANY DAMAGE DERIVING FROM
IMPROPER USE OF THE APPLIANCE.
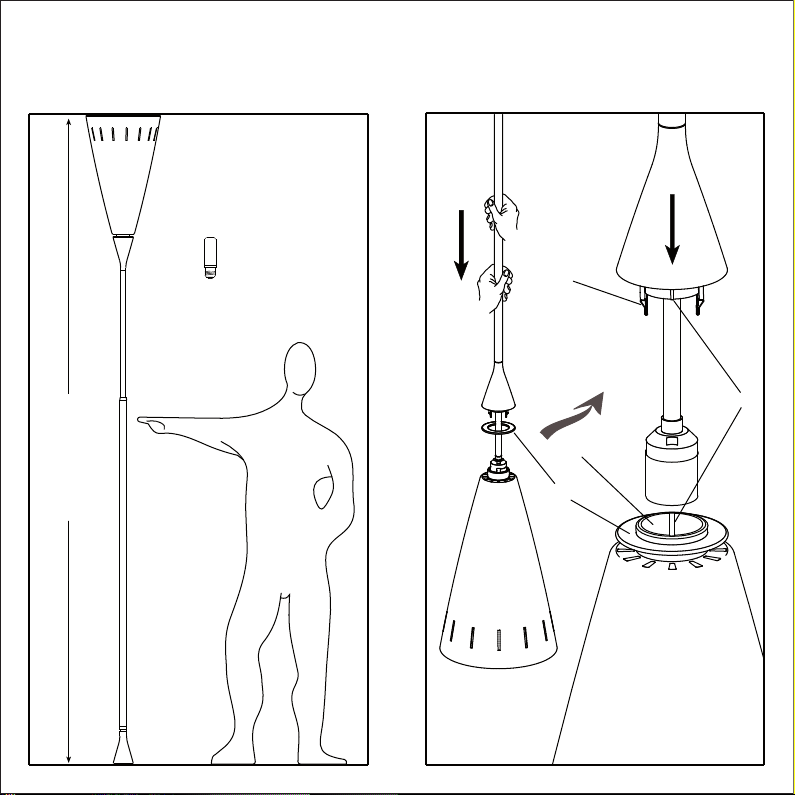
INSTALLATION
For installation and whenever work is to be done on the
appliance, make sure that the voltage has been switched
off!
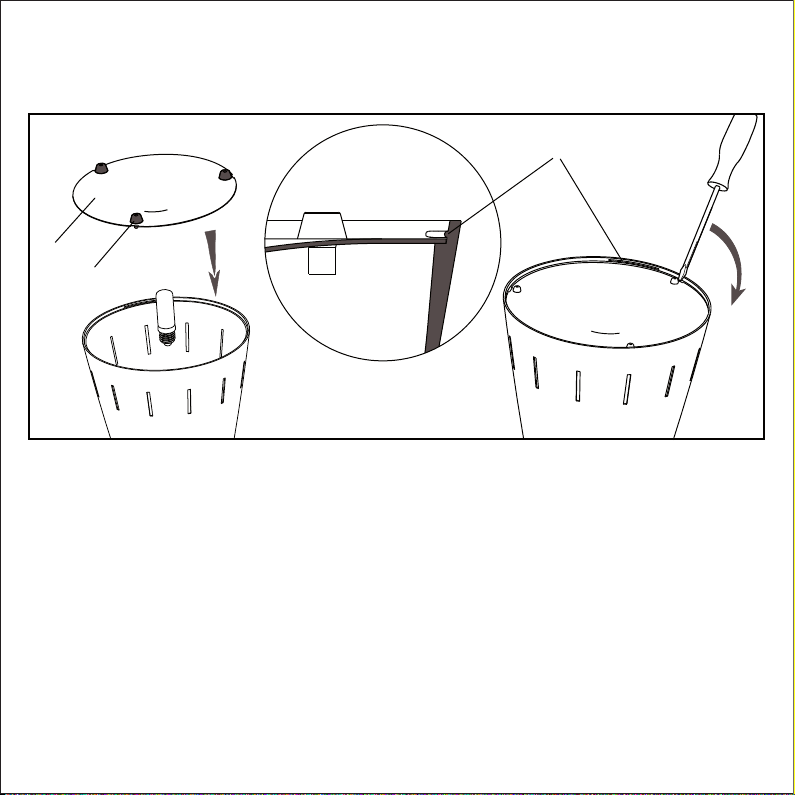
SUPPLY AND REPLACEMENT OF BULBS
Use only the type of bulb shown and never exceed the
maximum power stated.
If the cable is damaged, it should be replaced exclusively
by qualified and authorized personnel, by using original
spare parts.
Only use bulbs that do not need protection
screens.
!
!WARNING
LA SICUREZZA DELL'APPARECCHIO E' GARANTITA
SOLO RISPETTANDO QUESTE ISTRUZIONI, SIA IN
FASE DI INSTALLAZIONE CHE DI IMPIEGO.E'
NECESSARIO CONSERVARLE. IL PRODUTTORE NON
RISPONDE DI DANNI DERIVANTI DA UN USO
SCORRETTO DELL'APPARECCHIO.
INSTALLAZIONE
All'atto dell'installazione ed ogni qual volta si intervenga
sull'apparecchio assicurarsi che sia stata tolta la tensione
di alimentazione!
DOTAZIONE E SOSTITUZIONE LAMPADINE
Utilizzare esclusivamente il tipo di lampadina indicato, non
superare mai la potenza massima stabilita.
Se il cavo di questo apparecchio viene danneggiato deve
essere sostituito esclusivamente da personale qualificato
e autorizzato dal costruttore utilizzando il ricambio originale
Utilizzare esclusivamente lampadine che non
necessitano di schermo di protezione
ATTENZIONE
!
!
Durch eine halbe Drehung des unteren Ständers
die Kupplung leicht lösen, so dass beide Ständer
frei beweglich sind. Mit einer Hand den oberen
Ständer nach oben schieben, bis die Gummifüße
oben am Reflektor an die Decke stoßen. Mit der
anderen Hand den unteren Ständer nach unten
drücken und dabei die Feder maximal
spannen. Dafür sorgen, dass das
Versorgungskabel nicht gequetscht, sondern
durch die Öffnung (f) im Fuß der Lampe geführt
wird. Wenn die maximale Spannung erreicht ist
nicht loslassen, sondern gleich den unteren
Ständer festdrehen. Anschliessend die Stabilität
der Leuchte und ihre senkrechte Ausrichtung
überprüfen.
Während des Einstellens der Ständerlänge das
Versorgungskabel mitführen, um sein korrektes
Gleiten sicherzustellen.
Das Kabel nicht beschädigen.
Relâcher un peu la friction en tournant le tube
inférieur d’environ un demi-tour pour que les deux
tiges puissent glisser facilement.
Avec une main, pousser en haut la tige supérieure
de façon à appuyer contre le plafond les pieds
en caoutchouc situés au-dessus du réflecteur.
Avec l’autre main, pousser en bas la tige
inférieure en comprimant au maximum le
ressort.
Veiller à ne pas écraser le câble d’alimentation
et à le faire passer dans la fente (f) située dans
le pied de la lampe.
Lorsque la position de compression maximum
est atteinte, sans lâcher prise, serrer en
tournant la tige. Vérifier ensuite la stabilité de la
lampe et sa verticalité.
Pendant le réglage de la longueur de la tige,
accompagner le câble d'alimentation de façon à
faciliter son passage.
Ne pas détériorer le câble.

12
LA SECURITE DE L'APPAREIL N'EST GARANTIE
QUE SI CES INSTRUCTIONS SONT RESPECTEES
LORS DE L'INSTALLATION ET DE L'UTILISATION;
IL EST PAR CONSEQUENT NECESSAIRE DE LES
CONSERVER SOIGNEUSEMENT. LE FABRICANT
DEGAGE TOUTE RESPONSABILITE EN CAS DE
DEGATS DUS A UN USAGE INCORRECT DE
L'APPAREIL.
INSTALLATION
Lors de l'installation et pour toute intervention sur l'appareil,
s'assurer que le courant électrique ait été coupé!
FOURNITURE ET REMPLACEMENT DES AMPOULES
N'utiliser que le type d'ampoules indiqué; ne jamais dépasser
la puissance maximale prescrite.
Si le câble de cet appareil est endommagé, il doit être
remplacé exclusivement par des personnes qualifiées et
autorisées par le producteur de l’appareil, en utilisant la
pièce de rechange originale.
ATTENTION
Utiliser exclusivement des ampoules qui ne
nécessitent pas d’écran de protection.
DIE SICHERHEIT DES APPARATES IST NUR DANN
GARANTIERT, WENN VORLIEGENDE ANLEITUNGEN
SOWOHL BEI DER MONTAGE ALS AUCH BEIM
GEBRAUCH BEFOLGT WERDEN; SIE MÜSSEN DAHER
AUFBEWAHRT WERDEN. DER HERSTELLER KOMMT
NICHT FÜR SCHÄDEN AUF, DIE DURCH FALSCHEN
GEBRAUCH DES APPARATES VERURSACHT
WERDEN.
INSTALLATION:
Vergewissern Sie sich, daß bei der Installation und jedes
Mal, wenn Eingriffe am Apparat vorgenommen werden, die
Versorgungsspannung abgeschaltet ist!
LAMPENAUSSTATTUNG UND -AUSTAUSCH
Nur die angegebene Lampenart verwenden, nie die
festgesetzte Höchstleistung überschreiten.
Ist das Stromkabel der Leuchte beschädigt, darf es nur von
autorisierten Fachkräften unter Einsatz von
Originalersatzteilen ausgewechselt werden.
Nur Leuchtmittel verwenden, die keinen
Schutzschirm benötigen.
!
!
ACHTUNG
!
!
Table of contents
Other Luce Plan Lighting Equipment manuals
Popular Lighting Equipment manuals by other brands

Beamz
Beamz PLP PartyPar user manual

Lupo
Lupo DAYLED 650 PRO user manual

Uplus Lighting
Uplus Lighting BL6 user manual

Soundoff Signal
Soundoff Signal NEXUS TECHNOLOGY nFORCE LED Lightbar 24 manual

HUBBELL LIGHTING
HUBBELL LIGHTING Dual Lite EVE4X Series Installation, operation and service instructions

olympia electronics
olympia electronics ZLD-28/EM quick start guide