Lumex AltaDyne 14025 User manual

Alternating Pressure Overlay
Model # 14025
O
Op
pe
er
ra
at
to
or
rs
sM
Ma
an
nu
ua
al
l
14025-INS-LABRevA05

Contents
Important Safeguards . . . . . . . . . . . . . . . . . . . . . . . . . . . . . . . . . . . . . . . . . . . . . . . . . . . . . . .2
Introduction . . . . . . . . . . . . . . . . . . . . . . . . . . . . . . . . . . . . . . . . . . . . . . . . . . . . . . . . . . . . . . .3
Product Description . . . . . . . . . . . . . . . . . . . . . . . . . . . . . . . . . . . . . . . . . . . . . . . . . . . . . . . .4
Installation . . . . . . . . . . . . . . . . . . . . . . . . . . . . . . . . . . . . . . . . . . . . . . . . . . . . . . . . . . . . . . . .6
Operation . . . . . . . . . . . . . . . . . . . . . . . . . . . . . . . . . . . . . . . . . . . . . . . . . . . . . . . . . . . . . . . .8
Cleaning . . . . . . . . . . . . . . . . . . . . . . . . . . . . . . . . . . . . . . . . . . . . . . . . . . . . . . . . . . . . . . . .10
Storage . . . . . . . . . . . . . . . . . . . . . . . . . . . . . . . . . . . . . . . . . . . . . . . . . . . . . . . . . . . . . . . . .11
Maintenance . . . . . . . . . . . . . . . . . . . . . . . . . . . . . . . . . . . . . . . . . . . . . . . . . . . . . . . . . . . . .11
Troubleshooting . . . . . . . . . . . . . . . . . . . . . . . . . . . . . . . . . . . . . . . . . . . . . . . . . . . . . . . . . .12
Technical Description . . . . . . . . . . . . . . . . . . . . . . . . . . . . . . . . . . . . . . . . . . . . . . . . . . . . . .13

2
IMPORTANT SAFEGUARDS
READ ALL INSTRUCTIONS BEFORE USING
DANGER - To reduce the risk of electrocution:
1. Always unplug this product immediately after using.
2. Do not use while bathing.
3. Do not place or store product where it can fall or be pulled into a tub or sink.
4. Do not place in or drop into water or other liquid.
5. Do not reach for a product that has fallen into water. Unplug immediately.
WARNING - To reduce the risk of burns, electrocution, fire, or injury to persons:
1. This product should never be left unattended when plugged in.
2. Close supervision is necessary when this product is used by, on, or near children or
invalids.
3. Use this product only for its intended use as described in this manual. Do not use
attachments not recommended by the manufacturer.
4. Never operate this product if it has a damaged cord or plug, if it is not working properly, if
it has been dropped or damaged, or dropped into water. Return the product to a service
center for examination and repair.
5. Keep the cord away from heated surfaces.
6. Never block the air openings of this product or place it on a soft surface, such as a bed
or couch, where their openings may be blocked. Keep the air opening free of lint, hair,
and other similar particles.
7. Never drop or insert any object into any opening or hose.
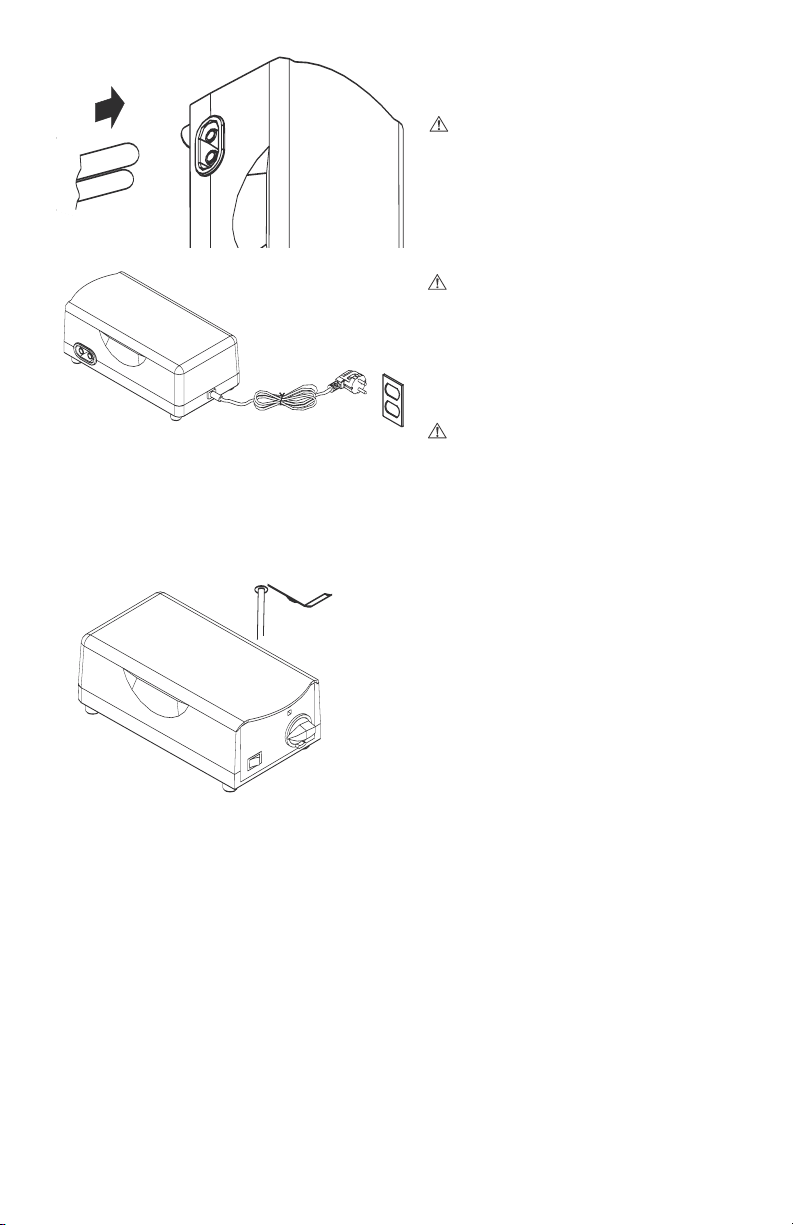
8. Connect this product to a properly grounded outlet only. See Grounding Instructions.
NOTE, CAUTION AND WARNING STATEMENTS:
NOTE- Indicate some tips.
CAUTION - Indicate correct operating or maintenance procedures in order to prevent
damage to or destruction of the equipment or other property.
WARNING - Calls attention to a potential danger that requires correct procedures or
practices in order to prevent personal injury.
SYMBOLS
"BF"symbol, indicate this product is according to the degree of protecting against
electric shock for type BF equipment.
Grounding terminal
Attention, should read the instructions !

3
1. Introduction
This manual should be used for initial set up of the system and for reference purposes.
1.1 General Information
The system is a high quality and affordable mattress system suitable for bed sore treatment
and prevention of pressure ulcers.
The system has been tested and successfully approved with the following standards:
1. For US:
UL 1431
2. For Europe:
EN 60601-1
EN 60601-1-2
EN 55011 Class B
EN 61000-3-2
EN 61000-3-3
IEC 801-2
IEC 801-3
IEC 801-4
IEC 801-5
1.2 Intended Use
This product is intended to help and reduce the incidence of pressure ulcers while optimizing
patient comfort. It is also useful for the following purposes:
• Individual home care setting and long term care of those suffering from pressure ulcers.
• Pain management as prescribed by a physician.
NOTE : Equipment not suitable for use in the presence of a flammable anesthetic
mixture with air or with oxygen or nitrous oxide.

4
2. Product Description
2.1 Pump and Mattress System
1. CPR*
2. Pump unit
3. Mattress System or Bubble Pad System
4. Quick Connectors

5
2.2 Pump Unit
Front
1. Front Panel
2. Mounting Brackets
3. Fuses
4. Air Hose Port
Rear
5. Power Cord
2.3 Front Panel
1. Pressure Adjust Knob
Pressure adjust knob controls the air
pressure output. When turning clockwise,
the output pressure will increase. Vice
versa for decreasing air pressure. Please
consult your physician for a suitable setting.

6
2. Normal Pressure Indicator
When green LED lights up, the pressure inside of air mattress has reached the preset
pressure setting.
3. Low Pressure Indicator
When low pressure LED lights up, the pressure inside of air mattress is below normal.
Please refer to troubleshooting.
4. Main Power Switch
To turn on/off the pump unit.
3. Installation
Unpacking the box to inspect for any damage which may have occurred during shipment. If
there are any damages, please contact your dealer immediately.
3.1 Pump & Mattress Installation
1. Place the mattress or pad on top of the bed
frame. Please note the foot end.
2. Hang the pump onto bed rail (foot-end), and
adjust hangers to best upright position for the
pump, or place the pump on a flat surface.

7
3. Connect air hose from air mattress to
the pump unit.
NOTE:
Check to ensure the air hoses are
not kinked or tucked under mattress.
4. Plug the power cord into electrical
outlet.
NOTE:
1. Make sure the pump unit is
suitable for the local power voltage.
2. The plug also serves to
disconnect the device.
CAUTION:
The pump can only be applied to
the mattress recommended by the
manufacturer. Do not use it for any
other purpose.
5. Turn the main power switch to
ON position.
Grounding:
Before any connection to the output connectors is made, the unit shall be connected to a
protective earth conductor via the three-core main cable: the mains plug shall be inserted
only into a socket outlet provided with a protective earth contact. The protective action shall
not be negated by the user of an extension cord without protective conductor.
Several installation tips are listed below:
After installation, the extra length of the power cord, if any, should be neatly arranged to
avoid any tripping accidents. The equipment should be firmly placed at a position where
users/doctors can access it easily.

8
4. Operation
NOTE: Always read the operating instructions before use.
4.1 General Operation
1. Switch on the main power switch.
2. The pump unit is designed to deliver air into
the mattress.
3. The low pressure indicator (yellow LED) will
light up until the mattress is fully inflated.
4. When the appropriate pressure is reached, the
low pressure indicator (yellow LED) will go off
and normal pressure indicator (green LED) will
light up automatically.
NOTE: When setting mattress up for use, it is recommended that the pressure
knob be set to “Firm” for the quickest inflation. User can then adjust air
mattress to the desired softness afterward.

9
4.2 CPR
When there is an emergency to perform CPR
on the patient, quickly pull the CPR valves to
release air from mattress. The CPR valves are
located at the head-end, right-hand-side of the
mattress. The air hose on the pump unit can be
disconnected for even faster deflation.
4.3 Pressure Set-Up
Users can adjust pressure of air mattress to desired softness by adjusting the pressure
knob. Please consult your physician for a suitable setting.
Patient can lie on the mattress after Normal Pressure indicator lights up, which indicates the
pressure is reached to the desired pressure.
NOTE: Check to see if pressure is suitable by sliding one hand between the
deflated air cells and the patient to feel's patient's buttock. Users should be able to
feel the minimum contact.
4.4 Low Pressure Function
When abnormal low pressure occurs, the Low Pressure indicator (yellow LED) will light up.
Check to ensure all connections are connected properly and that they are correctly installed
as per installation instructions. The Low Pressure indicator will light up until the low-pressure
fault condition is resolved.
NOTE: If the pressure level is consistently low, check for any leakage (tubes or
connecting hoses). If necessary, replace any damaged tubes or hoses. Or contact
local qualified dealer for repair.

10
5. Cleaning
It is important to follow the cleaning procedures before use.
By wiping the pump unit with a damp cloth pre-soaked with a mild detergent. Keep it away
from dust. If other detergent is used, choose one that will have no chemical effects on the
surface of the plastic case of the pump unit.
CAUTION: Do not immerse or soak pump unit.
The cover may also be cleaned using a 10% solution of sodium hypochlorite (bleach) diluted
in water.
All parts should be air dried thoroughly before use.
CAUTION: Do not use phenolic based product for cleaning.
CAUTION: After cleaning, dry the mattress without direct exposure of sunlight.

11
6. Storage
1. To store, lay the mattress out flat and upside down.
2. Roll from the head end towards the foot end.
3. Foot-end strap can then be stretched around the rolled mattress to prevent unrolling.
7. Maintenance
7.1 General
1. Check main power cord and plug for abrasions or excessive wear.
2. Check mattress cover for signs of wear or damage. Ensure mattress cover and
tubes are attached.
3. Check airflow from the air hose. The airflow should alternate between each
connector every half-cycle time.
4. Check the air hoses for kinks or breaks. For replacement, please contact your
local dealer.
7.2 Fuse Replacement
1. Disconnect the plug from main power when a blown
fuse is suspected.
2. Remove the cover of the fuse holder by means of a
small screwdriver.
3. Insert a new fuse of the correct rating, and replace
the cover of the fuse holder.
The fuse should be rated asT1A/250V type.

12
Problem Solution
Power is not ON • Check if the plug is connected to main power.
• Check if there is any blown fuse.
Alarm is on
(audible & visual)
• Check if the connection between air tube connector to
pump unit is tightly secured.
• Check if the CPR is sealed.
• Check if there are any leakage on air cells.
• Check if all tubing connections along mattress are secured.
Patient is bottoming out • Pressure setting might be inadequate for the patient,
adjust pressure to higher level and wait for a few minutes.
Air Mattress is not secured
• Check if all the snap buttons or straps of mattress are
all securely fastened.
• Check if the mattress is fixed to the bed frame by
elastic straps.
No air produced from some air
outlets of the air tube connector
• This is normal during alternating mode. Air outlets take
turn to produce air during preset cycle time.
8. Troubleshooting
If your questions can't be answered with above information, it might require a technician to
take care the problem. Please contact your local agent directly.

13
Item Specification
Power Supply
(Note: See rating label on the product)
120V AC 60Hz, 1A (For 120V system)
230VAC 50Hz, 7W ( For 230V system)
Fuse Rating T1A, 250V
Dimension 25.4 x13 x 9.5 (cm) or 21.6cm 1 0.8cm 9 .2(cm)
Weight 1.6 kg or 3.5 lb
Environment
Temperature
Operation:10 C to 40 C (50 F to 104 F)
Storage: -15 C to 50 C (5 F to 122 F)
Shipping: -15 C to 70 C (5 F to 158 F)
Humidity
Operation: 10% to 90% non-condensing
Storage: 10%to 90% non-condensing
Shipping: 10 % to 90 % non-densing
Classification
• Class I, Type BF, IPX0
• Applied part: Air Mattress
• Not suitable for use in the presence of a flammable
anesthetic mixture(No AP or APG protection)
Mattress Specification
Model Dimension
(LxWxH) Weight Pressure Range
(mmHg)
5" Mattress Overlay 200x 90 x 12.7(cm)
or 78.7" x 35.4" x 5"
5.0 kg
or 11 lb 40 ~ 90
9. Technical Description
Specifications:
NOTE:
1. Consult the distributor or EU representative for further technical documents
2. The specification is also suitable for other areas operating with same power
supply.
3. Mattress dimension and weight is measured without foam; the manufacturer
reserves the right to modify the specification without notice.

14
SAVE THESE INSTRUCTIONS
GROUNDING INSTRUCTIONS
This product should be grounded. In the event of an electrical short circuit, grounding
reduces the risk of electric shock by providing an escape wire for the electric current. This
product is equipped with a cord that has a grounding wire with a grounding plug. The plug
must be plugged into an outlet that is properly installed and grounded.
DANGER-improper use of the grounding plug can result in a risk of electric shock.
If repair or replacement of the cord or plug is necessary, do not connect the grounding wire
to either flat blade terminal. The wire with insulation having an outer surface that is green
with or without yellow stripes is the grounding wire.
Check with a qualified electrician or serviceman if the grounding instructions are not
completely understood, or if in doubt as to whether the product is properly grounded.
Note -The following instruction applies for 120V system only:
This product is for use on a nominal 120 V circuit and has a grounding plug that looks like
the plug illustrated in figure B, in figure A as below. A temporary adapter, which look like the
adapter illustrated in figure B and C, may be used to connect this Plug to a 2-pole receptacle
as shown in figure B if a properly grounded outlet is not available. The temporary adapter
should be used only until properly grounded outlet (figure A) can be installed by a qualified
electrician. The green colored rigid ear, lug, and like extending from the adapter must be
connected to a permanent ground such as properly grounded outlet box cover. Whenever
the adapter is used. It must be held in place by the screw.
If is necessary to use an extension cord, use only a 3-wire extension cord that has a
threeblade grounding plug, and a 3-slot receptacle that will accept the plug on the product.
Replace or repair a damaged cord.

U.S.A., Corporate Headquarters:
Graham-Field Health Products
2935 Northeast Parkway
Atlanta, Georgia 30360
telephone: 800-347-5678, 770-447-1609
fax: 800-726-0601, 678-291-3232
http://www.grahamfield.com
Table of contents
Other Lumex Medical Equipment manuals

Lumex
Lumex 2190A Parts list manual

Lumex
Lumex 7927A Installation guide

Lumex
Lumex LF500 User manual

Lumex
Lumex DSLSA1 User guide

Lumex
Lumex PATRIOT US0458 User manual

Lumex
Lumex LF1090 User manual

Lumex
Lumex 2800A Parts list manual

Lumex
Lumex 2940B Parts list manual

Lumex
Lumex LF1050 User manual

Lumex
Lumex SELECT Series User manual