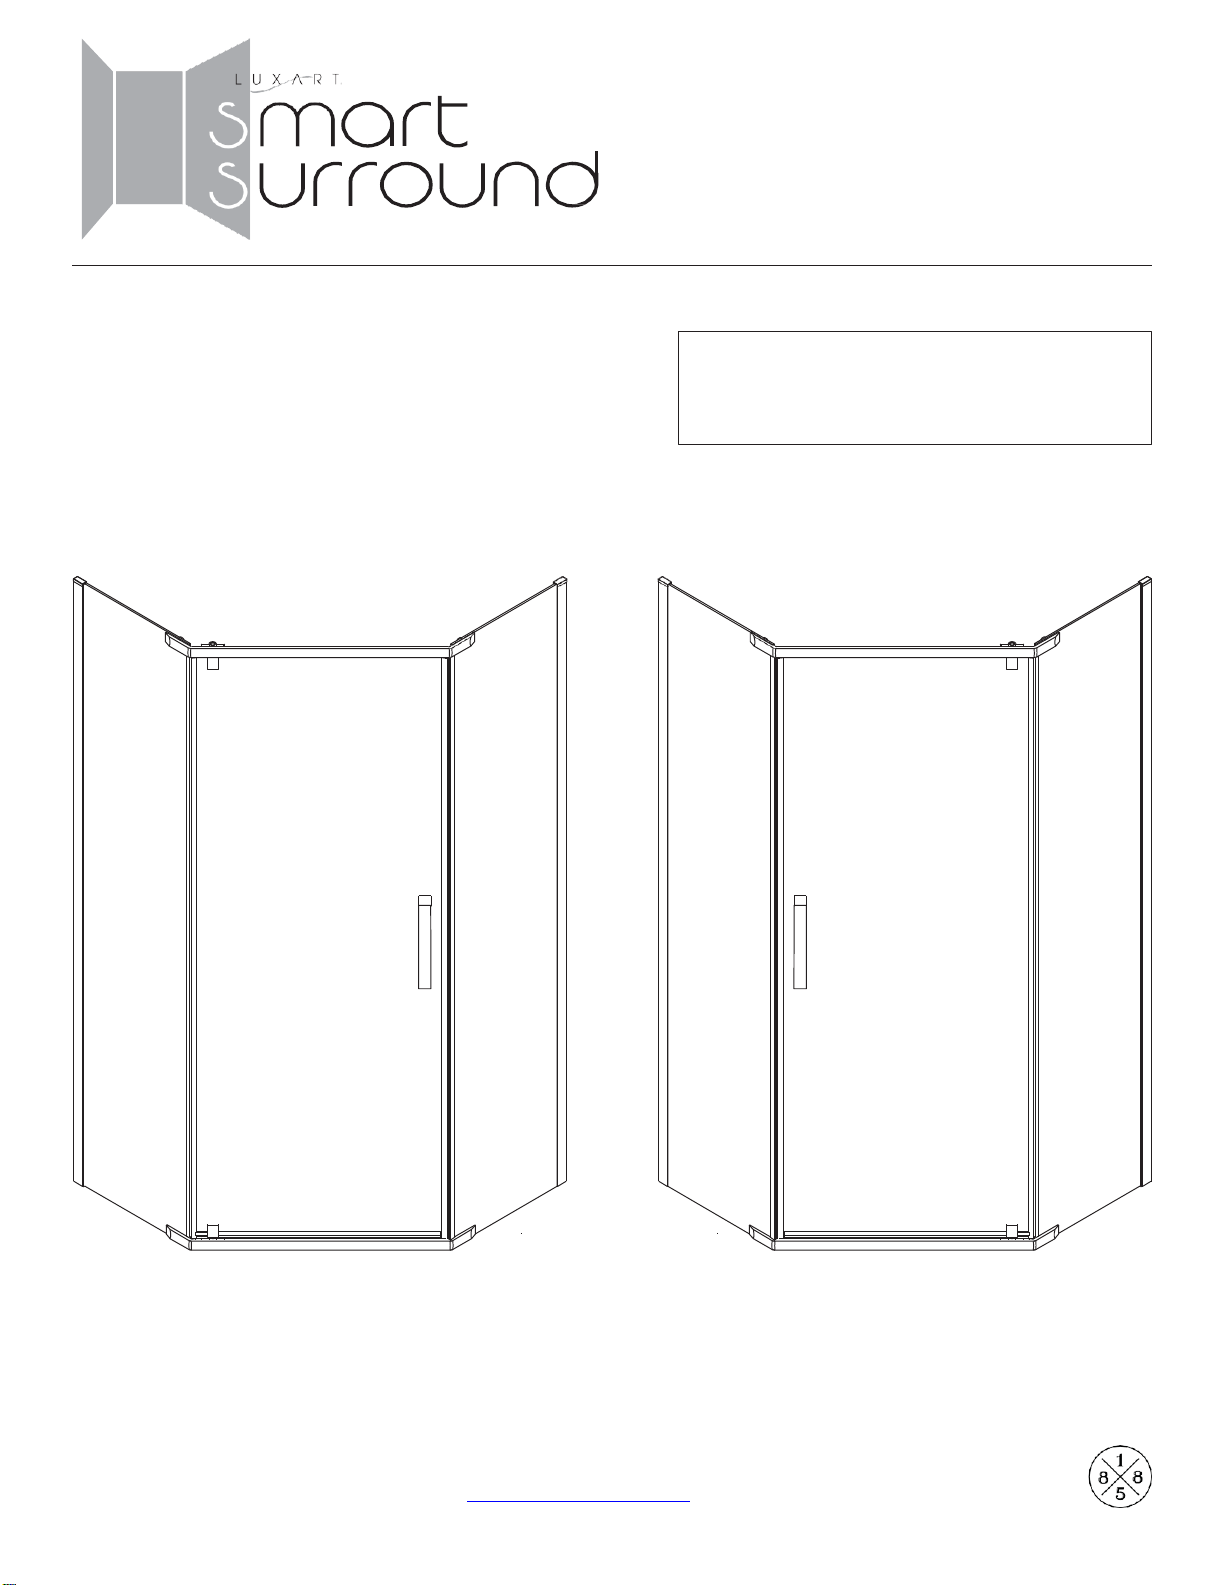
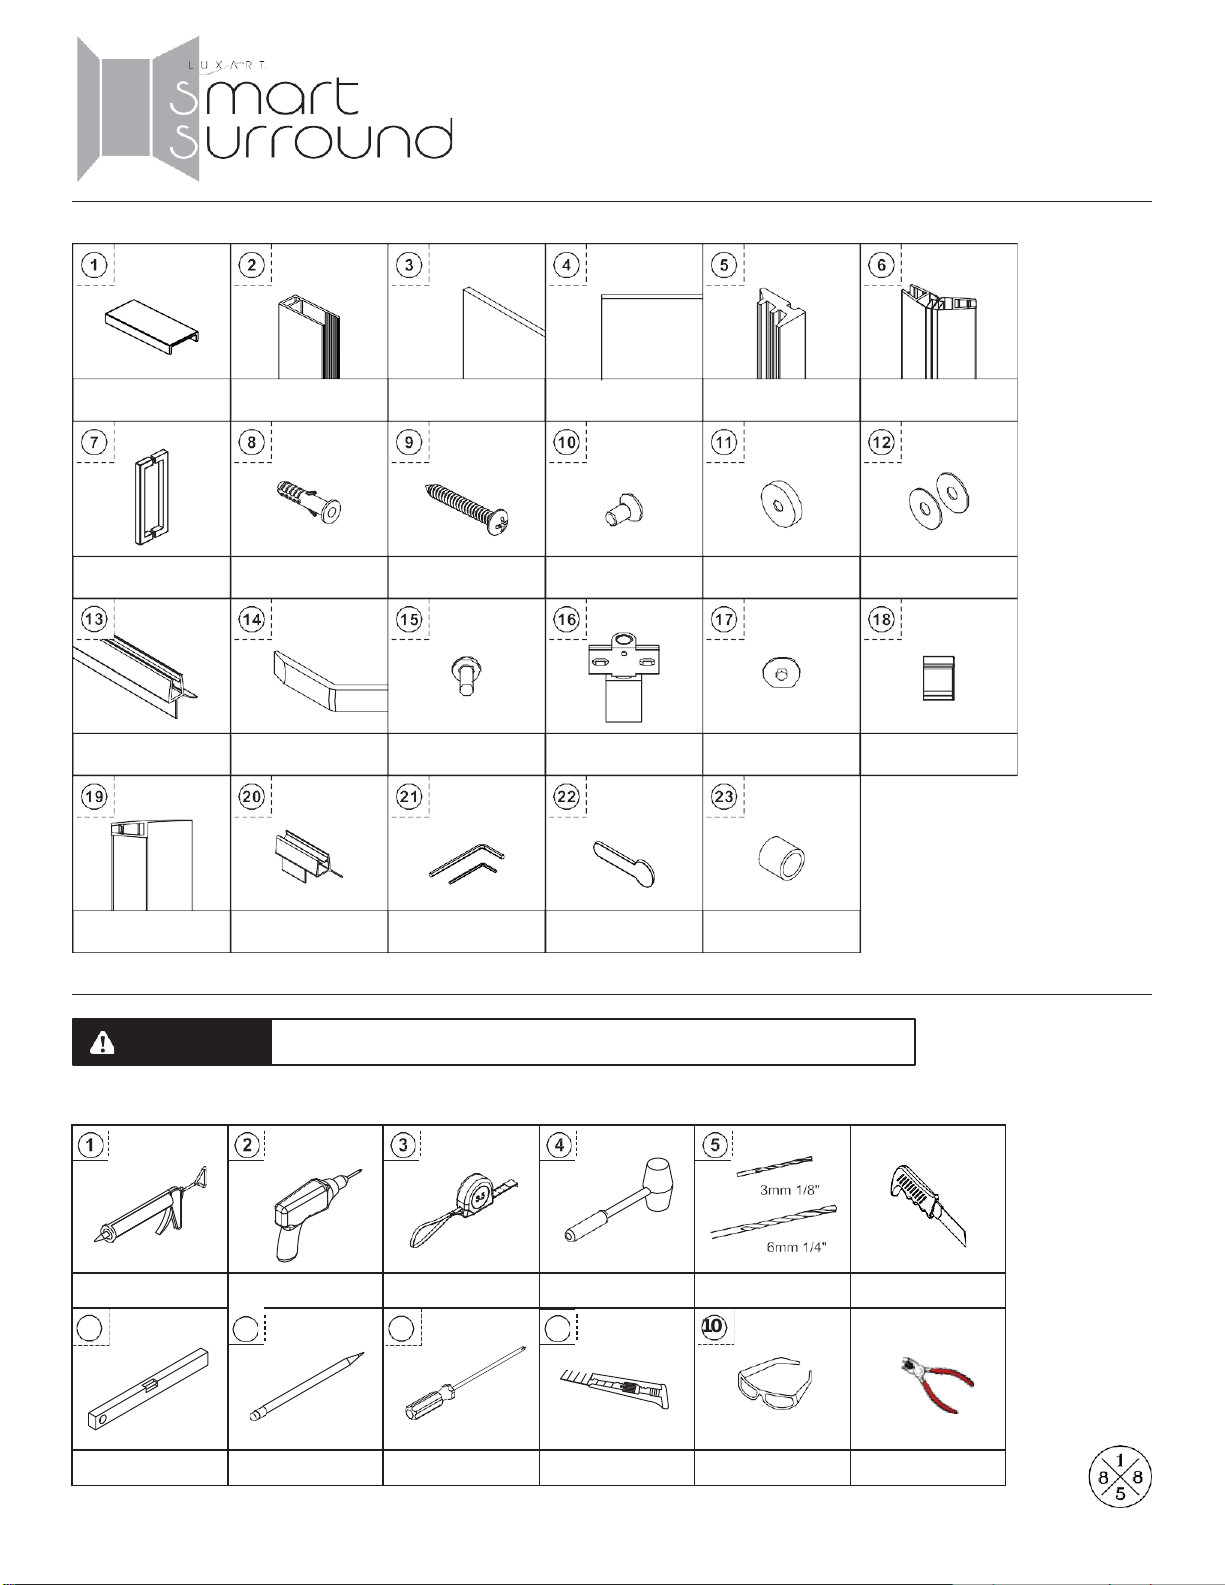
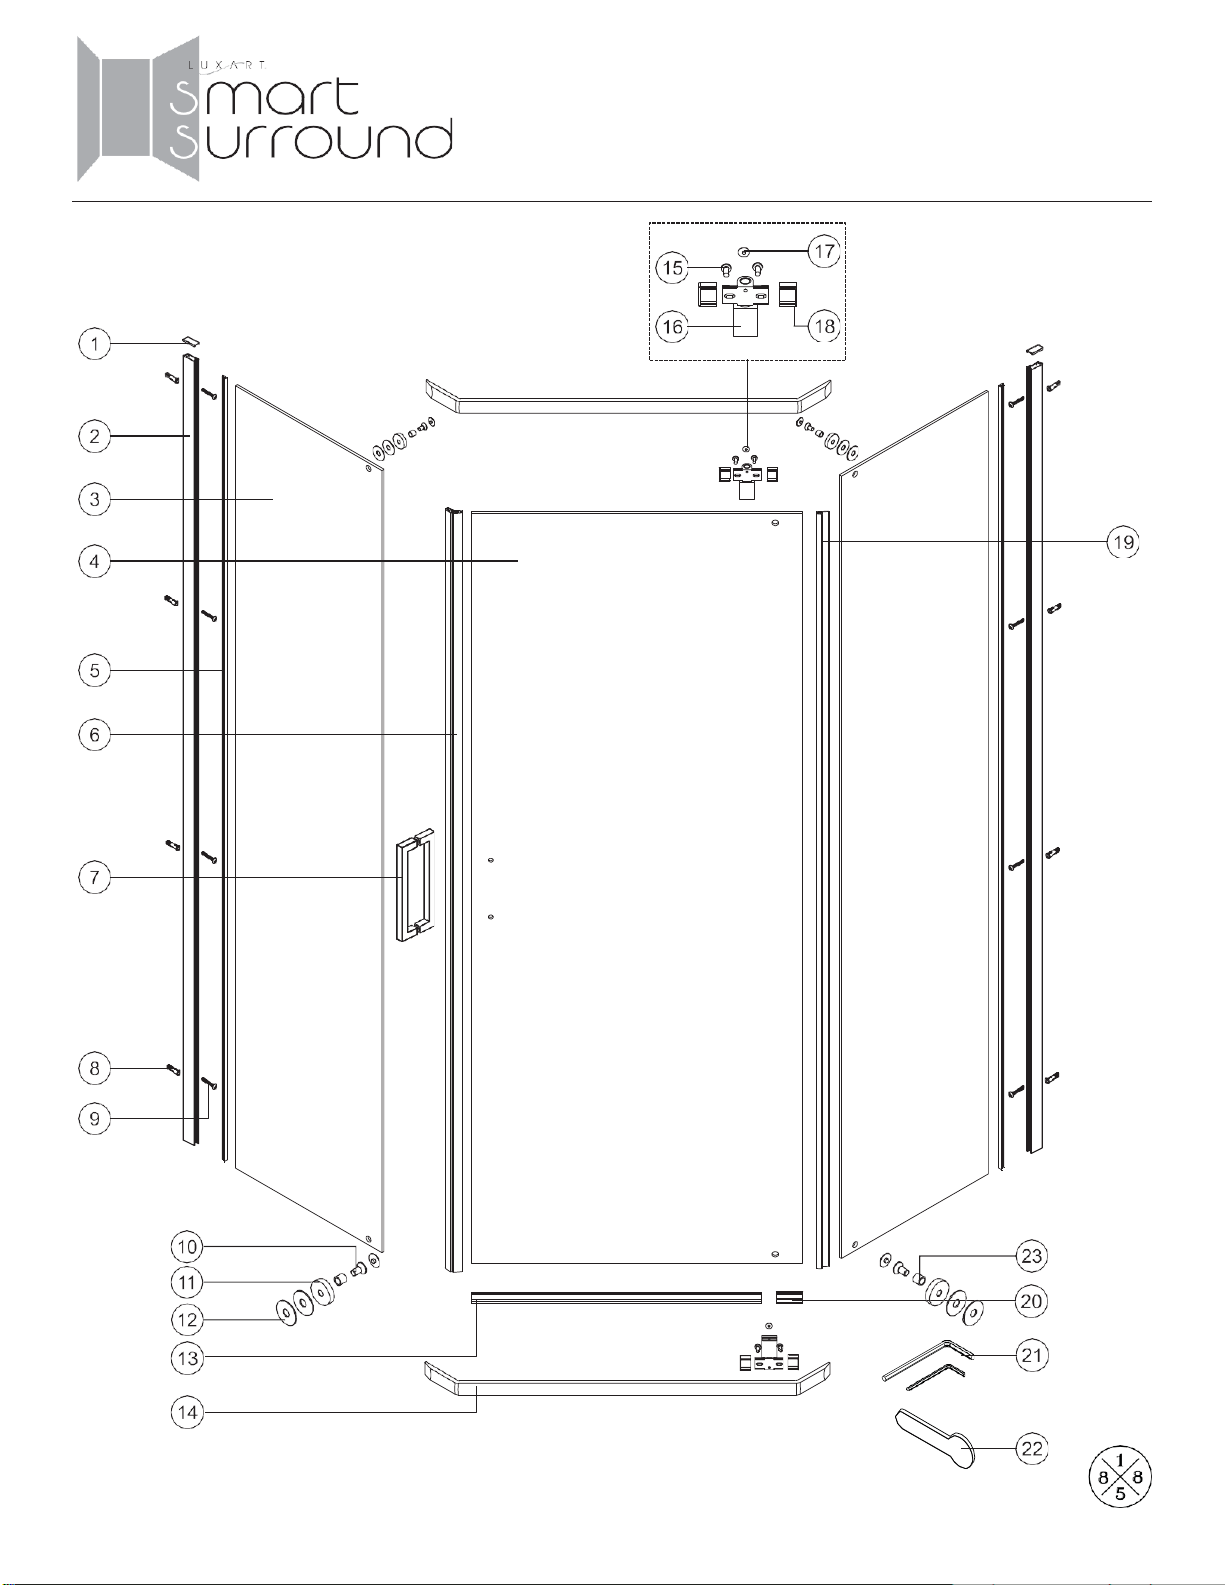
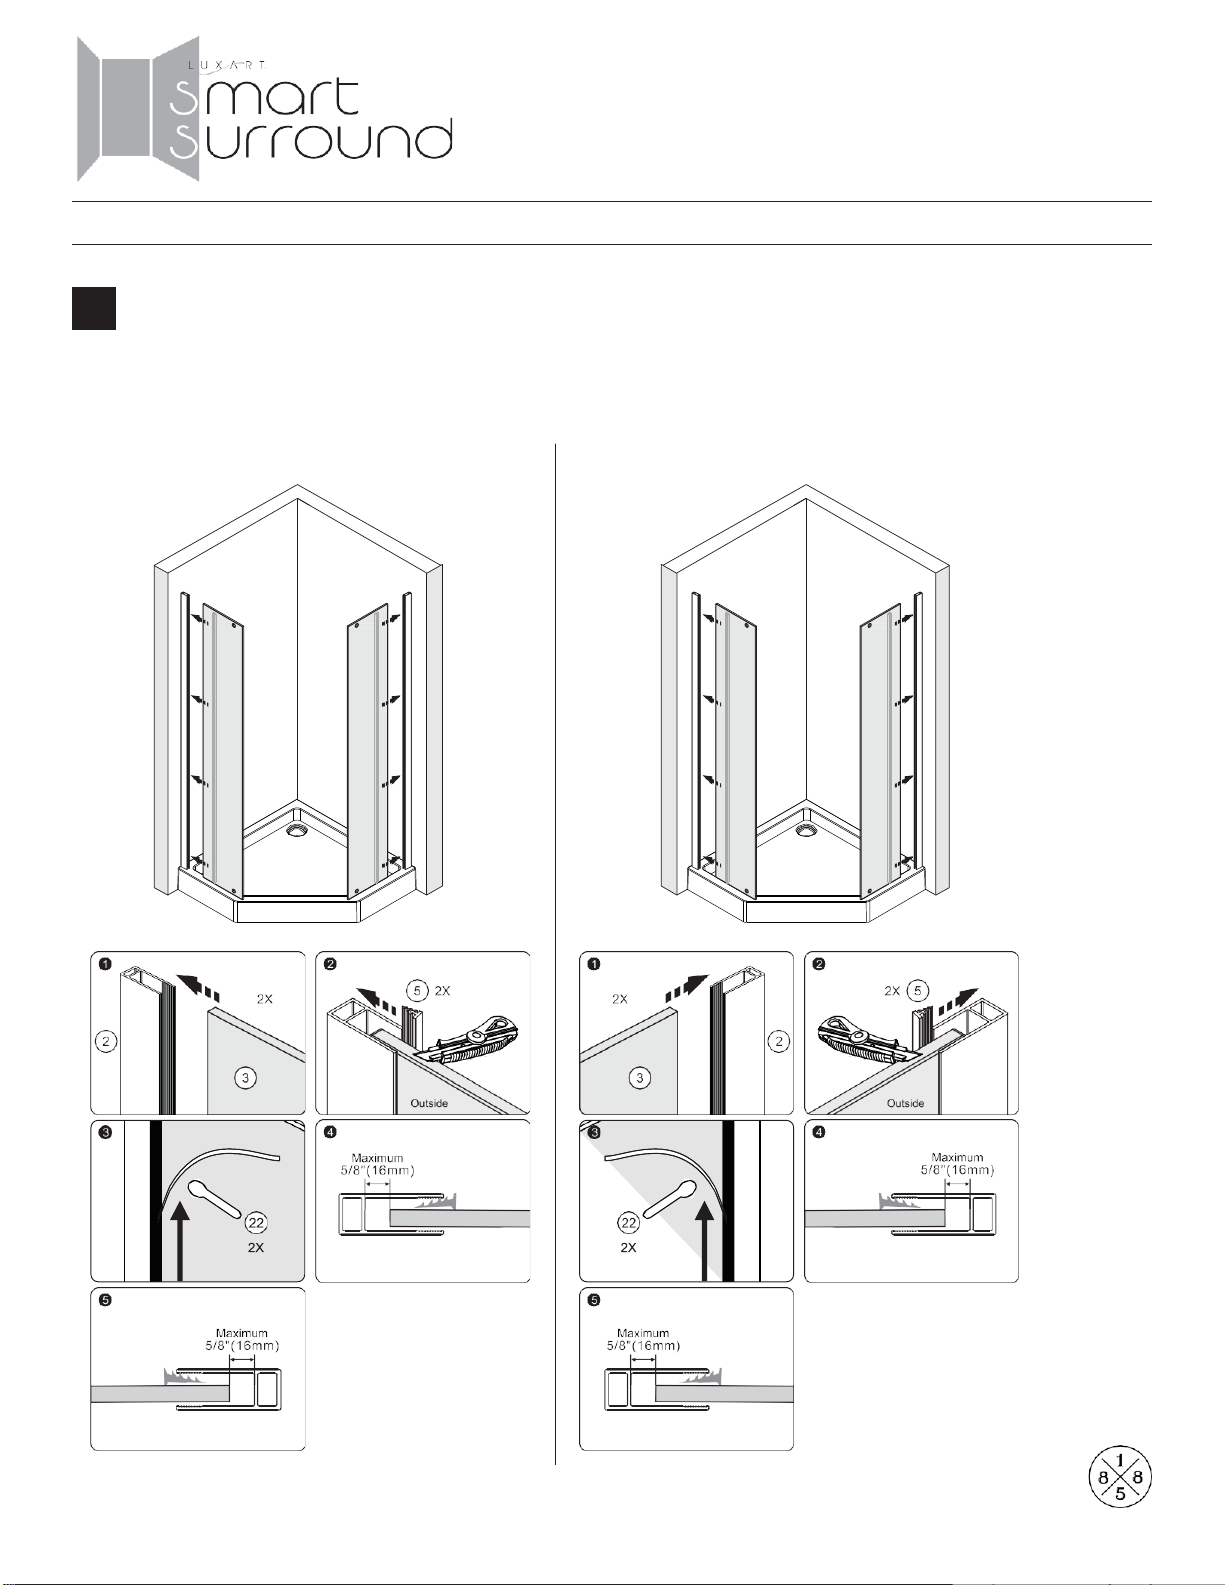
Luxart smart surround User manual

NEO-ANGLE
SHOWER DOOR
READ THE INSTRUCTIONS CAREFULLY:
Familiarize yourself with all the parts as shown in the
exploded view. The exploded view will also provide a
helpful reference when relating to the location of the
various parts and how they are mounted.
COPY THE MODEL NUMBER FOR YOUR RECORDS HERE #
1
LEFT HAND ASSEMBLY RIGHT HAND ASSEMBLY
Need Help? Please call our toll-free customer service line at 1-225-295-4212 for additional assistance or service. If you have any questions or
concerns regarding our warranty plan, please email: customerservice@1858brands.com, Monday-Friday 7:30 AM to 5:00 PM EST
Revised 12/05/2023

NEO-ANGLE
SHOWER DOOR
PARTS LIST
Handle
(1 pcs) Wall Anchor
(8 pcs)
Long Drip Strip
(1 pc) Top and Bottom Track
(2 pcs)
Pivot Side Door Seal
(1 pc) Short Drip Strip
(1 pc) Allen Key Kit
(2 pc) Gasket Insertion Tool
(1 pc) Plastic Washer
(4 pcs)
Pivot Assembly
(2 pcs) Allen Head Screw Cover
(6 pcs) Pivot Back Cover
(4 pcs)
Clamping Washer
(4 pcs) Plastic Washer
(8 pcs)
Wall Channel Gasket
(2 pcs)
Door Glass
(1 pc)
Side Panel Glass
(2 pcs)
Wall Channel
(2 pcs)
Channel Cap
(2 pcs) Magnetic Door Seal
(2 pcs)
Screw ST ⅛" x 1⅝"
(Screw ST 4x40)
(8 pcs)
Screw ¼" x ⅝"
(Screw M6x16)
(4 pcs)
Screw ¼" x ⅜"
(Screw M6x10)
(4 pcs)
TOOLS REQUIRED
SILICONE DRILL TAPE MEASURE RUBBER MALLET DRILL BIT KNIFE
6
7
8
9
10
LEVEL PENCIL SCREW DRIVERS UTILITY KNIFE SAFETY GLASSES CUTTING NIPPERS
Safety glasses should always be worn when working with tempered glass.
WARNING:
2
Revised 12/05/2023

NEO-ANGLE
SHOWER DOOR
3
Revised 12/05/2023

NEO-ANGLE
SHOWER DOOR
1INSTALLATION MEASUREMENT
Measure from the corner base to the outside of channel.
LEFT HAND ASSEMBLY RIGHT HAND ASSEMBLY
CHOOSE WHETHER YOU ARE INSTALLING LEFT OR RIGHT SHOWER DOOR
Determine which assembly configuration you need to follow based on the location of the shower
head as viewed from the outside of the shower. Follow the appropriate diagram below.
INSTALLATION PROCEDURE / STEP 1
4
Revised 12/05/2023

NEO-ANGLE
SHOWER DOOR
21.Put & level wall channel (2) at the installation position, then mark the drilling hole.
2. Drill hole with 1/4" (6mm) drill bit.
3. Glue a little silicone into the hole, then insert wall anchor (8).
4. Glue a little silicone on the back of wall track (2).
5. Fix wall channel (2) with screw 1/8" x 15/8" (9) against the wall.
INSTALLATION PROCEDURE / STEP 2
LEFT HAND ASSEMBLY RIGHT HAND ASSEMBLY
5
Revised 12/05/2023

NEO-ANGLE
SHOWER DOOR
31. Insert fixed panel (3) into wall channel (2) slot.
2-3. Place wall channel gasket (5) between the fixed panel (3) and the channel (2).
Use the squeeze gasket tool (22) to push the gasket snuggly into place.
4-5. NOTE: the maximum adjusting range of both wall channel (2) is 5/8" (16mm).
INSTALLATION PROCEDURE / STEP 3
LEFT HAND ASSEMBLY RIGHT HAND ASSEMBLY
6
Revised 12/05/2023

NEO-ANGLE
SHOWER DOOR
41. Install washers (11,12, 23) on the glass and use the screw 1/4" x 5/8" (10)
to fix the top & bottom track (14).
2. Glue a little silicone at the bottom of bottom track (14).
3. Use the allen key kit (21) to tighten the screw.
4. Install the screw cap (17).
5. Install the wall channel cap (1).
LEFT HAND ASSEMBLY RIGHT HAND ASSEMBLY
INSTALLATION PROCEDURE / STEP 4
7

NEO-ANGLE
SHOWER DOOR
51-4. lnstall the top and bottom pivot kit (15,16) on the door glass (4) and top and bottom track
(14).
5. Put the pivot back cover (18) on the pivot base, install screw cap (17) on the pivot kit.
6. Install the handle (7).
INSTALLATION PROCEDURE / STEP 5
LEFT HAND ASSEMBLY RIGHT HAND ASSEMBLY
8
Revised 12/05/2023

NEO-ANGLE
SHOWER DOOR
61. Install the pivot side door seal (19) on the door panel (4).
2. Install the magnetic door seal (6) on the fixed panel (3) and door panel (4).
INSTALLATION PROCEDURE / STEP 6
LEFT HAND ASSEMBLY RIGHT HAND ASSEMBLY
9
Revised 12/05/2023

NEO-ANGLE
SHOWER DOOR
71. Measuring the “L” width of magnetic gasket (L).
2-3. Per the “L” size, cutting the both extra edge of bottom gasket
(13).
4. Installed long drip strip (13) on the door glass (4), the cutting position of long drip strip
(13) need to be is at the same level with magnetic gasket (L).
5. Installed short drip strip (20) on the door glass (4).
LEFT HAND ASSEMBLY RIGHT HAND ASSEMBLY
INSTALLATION PROCEDURE / STEP 7
10
Revised 12/05/2023

NEO-ANGLE
SHOWER DOOR
8Caulk sides of wall channel and bottom frame. Do not open & close the door for 24 hours.
INSTALLATION PROCEDURE / STEP 8
LEFT HAND ASSEMBLY RIGHT HAND ASSEMBLY
11

IMPORTANT WARRANTY INFORMATION
PLEASE DO NOT DISCARD
Thank you for your purchase.
In order to be eligible for product warranty, please register your door on our
website within two (2) weeks of installation.
Go to:
https://www.luxartcollection.com/pages/register-warranty
Or scan the QR Code below and follow the instructions.
For any questions or comments
about your purchase,
please contact our Customer Service at:
ATTENTION CONSUMER:
Need Help? Please call our toll-free customer service line at 1-225-295-4212 for additional assistance or service. If you have any
questions or concerns regarding our warranty plan, please email: customerservice@1858brands.com, Monday-Friday 7:30 AM
to 5:00 PM EST
Revised 12/05/2023
*Effective July 1, 2023, due to an update in California law, the start date for product warranties will now be aligned with the date of delivery of
the product. This change is for all Luxart products purchased on or after July 1, 2023 by California consumers. (California Legislative Information
AB-2912)

LEE DETENIDAMENTE LAS INSTRUCCIONES:
Familiarízate con todas las piezas tal como se muestran
en la vista ampliada. La vista ampliada sirve también
como útil referencia para conocer la ubicación de varias
piezas y cómo se instalan.
13
PUERTA PARA
DUCHAS
NEO-ANGULAR
COPIE EL NÚMERO DE MODELO PARA SUS REGISTROS AQUÍ #
INSTALACIÓN A LA IZQUIERDA INSTALACIÓN A LA DERECHA
¿Necesita ayuda? Por favor, llame a nuestra línea gratuita de servicio al cliente al 1-225-295-4212 para asistencia o servicio adicional. Si tiene alguna
pregunta o duda sobre nuestro plan de garantía, por favor envíe un correo electrónico: De lunes a viernes, de 7:30 a 17:00 (hora del este),
customerservice@1858brands.com
Revised 12/05/2023

PUERTA PARA DUCHAS
NEO-ANGULAR
LISTA DE PIEZAS
Manija
(1 pieza) Anclaje para pared
(8 piezas)
Tira de goteo larga
(1 pieza) Riel superior e inferior
(2 piezas)
Sello de la puerta lateral
pivotante (1 pieza) Tira de goteo corta
(1 pieza) Kit de llaves Allen
(2 piezas)
Herramienta para
instalación de juntas
(1 pieza)
Arandela plástica
(4 piezas)
Ensamblaje de pivote
(2 piezas)
Cubierta de tornillo
de cabeza Allen
(6 piezas)
Cubierta posterior de
pivote (4 piezas)
Arandela de sujeción
(4 piezas) Arandela plástica
(8 piezas)
Junta de canal de pared
(2 piezas)
Vidrio de puerta
(1 pieza)
Vidrio de panel lateral
(2 piezas)
Canal de pared
(2 piezas)
Tapa de canal
(2 piezas) Sello magnético
de la puerta (2 piezas)
Tornillo ST ⅛" X 1⅝"
(Tornillo ST4X40)
(8 piezas)
Tornillo ¼" x ⅝"
(Tornillo M6X16)
(4 piezas)
Tornillo ¼" x ⅜"
(Tornillo M6X10)
(4 piezas)
HERRAMIENTAS RECOMENDADAS
SILICONA TALADRO CINTA DE MEDIR
MARTILLO
DE GOMA
BROCAS
DE
TALADRO
CUCHILLO
6
7
8
9
10
NIVEL LÁPIZ
DESTORNILLADORES
CUCHILLO MULTIUSO
GAFAS
DE
SEGURIDAD
TIJERAS DE CORTE
Siempre se deben usar gafas de seguridad cuando se trabaja con vidrio templado.
ADVERTENCIA:
14
Revised 12/05/2023

PUERTA PARA DUCHAS
NEO-ANGULAR
15
Revised 12/05/2023

PUERTA PARA DUCHAS
NEO-ANGULAR
1MEDIDA DE INSTALACIÓN
Mide desde la base esquinera hasta el exterior del canal.
ELIGE LA DIRECCIÓN DE APERTURA DE LA PUERTA DE LA DUCHA: IZQUIERDA O DERECHA
Determina qué configuración de ensamblaje debes seguir en función de la ubicación del cabezal de
ducha como se ve desde el exterior de la ducha. Sigue el diagrama apropiado a continuación
PROCEDIMIENTO PARA LA INSTALACIÓN / PASO 1
MONTAJE A MANO IZQUIERDA
16
MONTAJE A MANO DERECHA
Revised 12/05/2023

PUERTA PARA DUCHAS
NEO-ANGULAR
2
PROCEDIMIENTO PARA LA INSTALACIÓN / PASO 2
1.Coloca el canal de pared y nivélalo (2) en la posición de instalación, luego marca el
orificio de taladrar.
2. Taladra un orificio con una broca para taladro de 1/4" (6 mm).
3. Pega un poco de silicona en el orificio, luego inserta el ancla de pared (8).
4. Pega un poco de silicona en la parte posterior del riel de pared (2).
5. Fija el canal de pared (2) con un tornillo 1/8”x1 5/8” (3.1 x 16 mm) (9) contra la pared.
MONTAJE A MANO IZQUIERDA MONTAJE A MANO DERECHA
17
Revised 12/05/2023

PUERTA PARA DUCHAS
NEO-ANGULAR
31. Inserta el panel fijo (3) en la ranura del canal de pared (2).
2.-3. Coloca la junta de canal de pared (5) entre el panel fijo (3) y el canal (2).
Usa la herramienta para el ajuste de juntas (22) para empujar la junta cómodamente en su lugar.
4-5. NOTA: El alcance de ajuste máximo de los canales de pared (2) es de 5/8" (16 mm).
PROCEDIMIENTO PARA LA INSTALACIÓN / PASO 3
MONTAJE A MANO IZQUIERDA
18
MONTAJE A MANO DERECHA
Revised 12/05/2023

PUERTA PARA DUCHAS
NEO-ANGULAR
41. Instala las arandelas (11,12, 23) en el vidrio y usa el tornillo 1/4" x 15/8" (6.3 x 41.2 mm)
(10) para fijar el riel superior e inferior (14).
2.Pega un poco de silicona en la parte en la parte de abajo del riel inferior (14).
3.Usa el kit de llaves allen (21) para ajustar el tornillo.
4.Coloca la tapa del tornillo (17).
5. Instala la tapa del canal de la pared (1).
PROCEDIMIENTO PARA LA INSTALACIÓN / PASO 4
MONTAJE A MANO IZQUIERDA
19
MONTAJE A MANO DERECHA
Revised 12/05/2023

PUERTA PARA DUCHAS
NEO-ANGULAR
51.-4.lnstala el kit de pivote superior e inferior (15,16) en el vidrio de la puerta (4) y el riel superior
e inferior (14).
PROCEDIMIENTO PARA LA INSTALACIÓN / PASO 5
5. Coloca la cubierta posterior del pivote (18) en la base del pivote, instala la tapa del tornillo
(17) en el kit de pivote.
6. Instala la manija (7).
MONTAJE A MANO IZQUIERDA MONTAJE A MANO DERECHA
20
Revised 12/05/2023
Table of contents
Languages:
Other Luxart Bathroom Fixture manuals

Luxart
Luxart smart surround LXSS1010 User manual

Luxart
Luxart Britannia BRL341-LFDV User manual

Luxart
Luxart Aerro A511TO18 User manual

Luxart
Luxart Poydras PO711FMTO User manual

Luxart
Luxart PaStiche PA511TO User manual

Luxart
Luxart Serendipity SE341 User manual

Luxart
Luxart Lumino LUM511TOV User manual

Luxart
Luxart Lumino LUM411TOV User manual
Popular Bathroom Fixture manuals by other brands

Delta
Delta Trinsic T4759 Series manual

HOMEDEPOT
HOMEDEPOT Glacier bay HD873X-6004 Installation and care guide

Delta
Delta MultiChoice T17T251-CZ owner's manual

mr. steam
mr. steam Butler Installation, operation & maintenance manual

LOWE'S
LOWE'S SQ231-DUN3-SS quick start guide

Twin Star Home
Twin Star Home 36BV34018 Assembly instruction