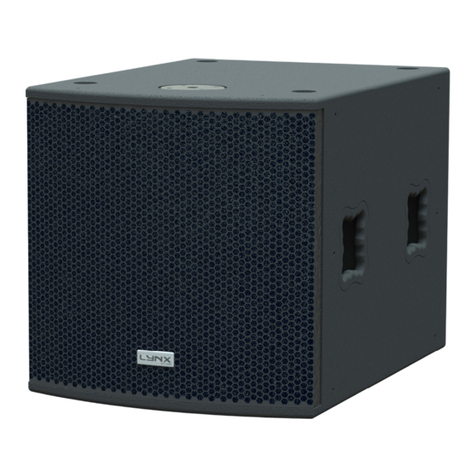
Lynx LX-218S User manual

Lynx Pro Audio S.L.
Valencia, Spain - www.lynxproaudio.com - info@lynxproaudio.com
USER MANUAL
V.10.13
LX-218S
V.13.10

This user manual is property of Lynx Pro Audio S.L. Any reproduction of this manual, by any means is strictly prohibited.
Copyright 2013. All rights reserved.
Manufacturer
CB SCHEME, IEC SYSTEM FOR CONFORMITY TESTING AND CERTIFICATION
OF ELECTRICAL EQUIPMENT
CE CERTIFICACTION, EUROPEAN PRODUCT
LX-218S powered cabinet
LYNX Pro Audio S.L.
Calle 7 - Pol. Ind. Picassent
E-46220 Picassent (Valencia)
RoHSDirective2002/95/EC

CONTENTS
- SAFETY PRECAUTIONS
-CABINETINTRO
SPECIFICATIONS 5
BACK PANEL 6
CONNECTORS AND CONNECTIONS 6
-CONFIGURINGTHE CABINETDSPOPTIONS
CONFIGURATIONPANEL 8
SELECT INPUT DIGITAL / ANALOG 8
SELECT AND RUN PRESETS 9
PRESET LIST 10
CARDIOIDCONFIGURATION 11
ONLINE CONTROL SYSTEM 19
ETHERNETCONFIGURATION 20
-SOFTWARE,RAINBOW 26
- ACCESSORIES 28
- GUARANTEE 29
- DECLARATION OF CONFORMITY CE 30

Before starting to use this device, please read this instruction manual carefully.
Keep these instructions in the place where the equipment will be used and with easy access to them.
-Electricalappliance.
The exclamation mark within a triangle identifies the presence of electricity. Use the system carefullywithout
wethandsor feet.Avoid installing the speaker in wet or excesivellyhumid places.Regularly checkthecondition
of the cables and make sure these are not being walked on or pinched. Connect the speaker to bipolar, earthed
mains. The mains plug must be connected to the appropriate protection (fuse or breaker). Connection to any
othertype ofmainscould result in anelectrical shock andviolatelocal electricalcodes. DO NOT CONNECT OR
DISCONNECTTHEACPOWERCONNECTORSUNDERLOAD.
-Heavyequipment.
Apply back protection when using the system. Avoid loading and unloading at heights.
- Electrical shock risk.
The diagonal mark within a triangle identifies the presenceof dangerous voltage.
Do not open or handle the interior of the box. These parts are not to be adjusted bythe user. For maintenance
and/or repair please go to an authorized service centre.
In order to reduce the risk of electric shock, disconnect from AC before plug in or unplugging Audio signal
cables. Reconnect toAC only if all signal connections are made and secured.
Never manipulate the ground type plug provided.
TheAC mains plugs should always remain accessiblefor operation.
Unplug the loudspeaker during storms or when it’s being usedfor a long time.
-Hearingdamagerisk.
These systems can reproducelarge quantitiesofsound pressure which can damage hearing. Take precautions
if you are going to be near them for extended amounts of time and do not get too close.
- Hanging – Flying.
Do not hang the cabinets from the handles or from any other part other than the designated hanging point.
When flying this system please observe the technical and “Rainbow” software data carefully. Never exceed the
maximumsafeworking loadsor ignore theinstructions included within this manual. UseOnlyflying accessories
providedbyLynx ProAudioS.L.
Rigging must be always carried out by professionals.
-Delicate Material.
Please ensure no foreign object or water enters thespeaker. Donotplacematerial that containsliquid on or near
the unit. Only clean the unit with drycloths. Do not use solvents.
-Overheating – Fire risk.
To reduce the risk ofthe speaker over heating, avoid direct contact with sunlight.Avoid placing the unit close
to heat inducing objects such as radiators. Do not cover the equipment in use and do not block any ventilation
openings. Do not put naked flame, such as lighted candles, close or on top of the unit.
-Electromagneticandinterferenteemissions.
Avoid placing objects which through electromagnetic waves can damage the unit, such as mobilephones, lap
tops, magnetic strip cards etc.
Thissystem complieswithnormatives EN55103-1(1)
EN55103-2(2)
(1) This device maynot cause harmful interferences.
(2) This device may receive interference including interferences that maycause undesired working.
-IMPORTANTNOTE.
This Equipment must be used in accordance with these instructions and by trained professional personnel
only.
This equipment should not be used in places with extreme tropical climates. Don’t expose this apparatus to
extreme humidityand or temperature values.
LX-218S
LYNX Pro Audio S.L. - Valencia, Spain - www.lynxproaudio.com -info@lynxproaudio.com
SPECIFICATIONS:
FREQUENCY RANGE 30Hz -200Hz
FREQUENCY RESPONSE 35Hz- 125Hz ± 3dB
HORIZONTAL COVERAGE 360º single unit
MAX SPL 136 dB/ 139dB peak
TRANSDUCERS LF: 2 x 18" Custom
Nomex Cone and Neodimium magnet
SHAPE Direct radiation
POWER AMPLIFIER 3000W Class D with Switching Power supply
2 x 1500W
DSP Internal LYNX digital processor DSPB-22®
CABINET ADJUSTMENT Back panel LCD screen
INTERNAL CONTROLS Temperature sensor / Fan Speed
SIGNAL CONNECTION NEUTRIK connectors XLR Male Input
XLR Female Loop Thru
CONTROL CONECTIONS USB (DSP programming),
ETHERNET* (Online Monitoring System OMS®)
AC POWER 230v / 115v selectable. 50/60 Hz 3A
AC CONECTIONS 16A NEUTRIK POWERCON with Looping Output
CONSTRUCTION 21 mm Premium birch plywood
FINISH High resistant water-based black paint
FRONT DESIGN Black steel grille
DIMENSIONS (H x W x D) 532 x 1080 x 700 mm
WEIGHT 72 Kg (158 lbs)
INTRODUCTION
Tofacilitate, correct and reliableuseof theLynx LX-218S we havedesigned thisinstructionmanual. Pleaseread the
manual carefully beforeproceedingtoinstall thesystem.
When flying this system please observe the technical and “Rainbow” software data carefully. Never exceed the
maximum safe working loadsor ignoretheinstructions includedwithin this manual.
5
* Ethernet is optional

LYNX Pro Audio S.L. - Valencia, Spain - www.lynxproaudio.com -info@lynxproaudio.com
LX-218S
LX-218S BACK PANEL.-
12 5
6 43
1.- SIGNAL INPUT.
2.- SIGNAL LINK.
3.- INPUT AC.
4.- AC LINK (máx. +1 cabinets).
5.- USB.
6.- DSP CONTROL.
CONNECTORS AND CONNECTIONS
XLRAEREALCONNECTORS
Connecttooutput
Connecttoinput
2 Live(+)
3 Live(-)
1 Earth
3 Live(-)
1 Earth
2 Live(+)
OUTPUTS
1.- EARTH
2.- LIVE (+)
3.- LIVE (-)
1
3
2
INPUTS
1.- EARTH
2.- LIVE (+)
3.- LIVE (-)
2
3
1
XLRSOCKETCONNECTORS
6

LX-218S
LYNX Pro Audio S.L. - Valencia, Spain - www.lynxproaudio.com -info@lynxproaudio.com
ConnecttoACoutput
(max.2 cabinets)
Connectto signal
output
CONNECTION EXAMPLE: 4 LX-218S CABINETS
ConnecttoACoutput
(max.2 cabinets)
SOCKET POWERCON CONNECTORS
CAUTION: Do not connect or
disconnect the AC Power
connectors under load.
L - Line
N - Neutral
- Earth
7

LYNX Pro Audio S.L. - Valencia, Spain - www.lynxproaudio.com -info@lynxproaudio.com
LX-218S
CONFIGURING THECABINETSDSP OPTIONS
From the buttons belowthe display on theLynx cabinet’s backpanel you areable to configurethe Basic
adjustment functionsof the internal DSP.
Note:
Youmust apply the desired configurationin eachcabinet.This isdone via the buttonslocated ontheback
panel of the cabinet andrequireselectrical power towork.
CONFIGURATIONPANEL
Onthebackpanelyouwillsee3buttonsandaninformationscreen,onwhichyoucanreadtheestablished
parametersandinformationsuchasinputmode(analogordigital),amplificationmoduletemperature,inputsignal
level and nameof the current preset (Fig1).If changesarenot made the display will automatically dim to save
energy and avoid unnecessary light in situationswherelight is not wanted. To re-activate the light simply press
theOK button.
8
SELECT THEINPUT:DIGITALORANALOG
There are four input options: Analog / Digital L/ Digital R / Digital L+R
To select the input mode just pressthe OK button (3) and keep pressing down whilst at the same time you press
the up button (1).One of thefour optionswill appear onthe screen.Then you can use the upbutton(1) to search
the option required. To confirm your selection pressOK (3) until the progressbar finishes. The display will showan
invertedD (digital) or aninvertedA(Analog)soyou canalwaysknowif the input is digital or analog.
123
Fig1

LX-218S
LYNX Pro Audio S.L. - Valencia, Spain - www.lynxproaudio.com -info@lynxproaudio.com
Fig3 Fig4
Note:
In case of a power cut, the DSP will save its last configuration when restarted.
9
SELECT AND RUNPRESETS
Tochange thepreset configuration just press theupbutton (1) anddown button (2) until yousee the title
andpreset number required (Fig2). Once found, press OK (3) until the progressbar finishes(Fig3).The display will
indicate“LoadingDSP”(Fig4)
Fig2

LYNX Pro Audio S.L. - Valencia, Spain - www.lynxproaudio.com -info@lynxproaudio.com
LX-218S
PRESET LIST
From the buttons below the display on the cabinet’s back panel you are able to configure the Basic adjustment
functionsof theinternalDSP.Depending on themodel,youcanfindthefollowingconfigurations:
Note:
Youmustapplythedesiredconfigurationineachonecabinet.Thisisdoneviathebuttonslocatedonthebackpanel
of thecabinet and requires electrical power to work.
10

LX-218S
LYNX Pro Audio S.L. - Valencia, Spain - www.lynxproaudio.com -info@lynxproaudio.com
11
CARDIOIDCONFIGURATIONS
Mode 1:
- For Acabinets use preset 10
- For B cabinets use preset 11
-Withthisconfigurationweobtainaround24dBof attenuation between30Hz
and 100Hz, and between 1 and 1.5 dB more SPL up front.
A
A
B
20 30 40 50 60 70 80 90 100 (Hz)
0
-3
-6
-9
-12
-15
-18
-21
+3
+6
+9
(dBr)
Mode 1: Front
Mode 1: Rear
Normal Mode: Front
Normal Mode: Rear
Image1: Polarresponse for Mode 1at 60 Hz Image 2:Polar response at 60Hz(2cabinets)
Graphic 1: Mode 1 vs. Normal Mode

LYNX Pro Audio S.L. - Valencia, Spain - www.lynxproaudio.com -info@lynxproaudio.com
LX-218S
12
CARDIOIDCONFIGURATIONS
Mode 2:
- For Acabinets use preset 10
- For B cabinets use preset 12
-Withthisconfigurationweobtainaround24dBof attenuation between30Hz
and 100Hz, and between 1 and 1.5 dB more SPL up front.
A
B
A
20 30 40 50 60 70 80 90 100
(Hz)
0
-3
-6
-9
-12
-15
-18
-21
+3
+6
+9
(dBr)
Mode 2: Front
Mode 2: Rear
Normal Mode: Front
Normal Mode: Rear
Image3: Polarresponse for Mode 2at 60 Hz Image 4:Polar response at 60Hz(2cabinets)
Graphic 2: Mode 2 vs. Normal Mode

LX-218S
LYNX Pro Audio S.L. - Valencia, Spain - www.lynxproaudio.com -info@lynxproaudio.com
13
CARDIOIDCONFIGURATIONS
Mode 3:
- For Acabinets use preset 10
- For B cabinets use preset 13
-Withthisconfigurationweobtainaround23dBof attenuation between30Hz
and 100Hz, and between 1 and 1.5 dB more SPL up front.
B
A
A
20 30 40 50 60 70 80 90 100 (Hz)
0
-3
-6
-9
-12
-15
-18
-21
+3
+6
+9
(dBr)
Mode 3: Front
Mode 3: Rear
Normal Mode: Front
Normal Mode: Rear
Image5: Polarresponse for Mode 3at 60 Hz Image 6:Polar response at 60Hz(2cabinets)
Graphic 3: Mode 3 vs. Normal Mode

LYNX Pro Audio S.L. - Valencia, Spain - www.lynxproaudio.com -info@lynxproaudio.com
LX-218S
14
CARDIOIDCONFIGURATIONS
Mode 4:
- For Acabinets use preset 10
- For B cabinets use preset 14
-Withthisconfigurationweobtainaround23dBof attenuation between30Hz
and 100Hz, and between 1 and 1.5 dB more SPL up front.
A
B
20 30 40 50 60 70 80 90 100 (Hz)
0
-3
-6
-9
-12
-15
-18
-21
+3
+6
+9
(dBr)
Mode 4: Front
Mode 4: Rear
Normal Mode: Front
Normal Mode: Rear
Image7: Polarresponse for Mode 4at 60 Hz Image 8:Polar response at 60Hz(2cabinets)
Graphic 4: Mode 4 vs. Normal Mode

LX-218S
LYNX Pro Audio S.L. - Valencia, Spain - www.lynxproaudio.com -info@lynxproaudio.com
15
CARDIOIDCONFIGURATIONS
Mode 5:
- For Acabinets use preset 10
- For B cabinets use preset 15
-Withthisconfigurationweobtainaround23dBof attenuation between30Hz
and 100Hz, and between 1 and 1.5 dB more SPL up front.
B
A
20 30 40 50 60 70 80 90 100
(Hz)
0
-3
-6
-9
-12
-15
-18
-21
+3
+6
+9
(dBr)
Mode 5: Front
Mode 5: Rear
Normal Mode: Front
Normal Mode: Rear
Image9: Polarresponse for Mode 5at 60 Hz Image 10:Polar response at 60Hz (1 cabinet)
Graphic 5: Mode 5 vs. Normal Mode

LYNX Pro Audio S.L. - Valencia, Spain - www.lynxproaudio.com -info@lynxproaudio.com
LX-218S
16
CARDIOIDCONFIGURATIONS
Mode 6:
- For Acabinets use preset 10
- For B cabinets use preset 16
-Withthisconfigurationweobtainaround
24 dB of attenuation between 30Hz and
100Hz, and between 1 and 1.5 dB more
SPLupfront.
A B A
20 30 40 50 60 70 80 90 100
(Hz)
0
-3
-6
-9
-12
-15
-18
-21
+3
+6
+9
(dBr)
Mode 6: Front
Mode 6: Rear
Normal Mode: Front
Normal Mode: Rear
Image 11 Polarresponsefor Mode 6at 60 Hz Image 12:Polarresponse at 60Hz (2 cabinets)
Graphic 6: Mode 6 vs. Normal Mode

LX-218S
LYNX Pro Audio S.L. - Valencia, Spain - www.lynxproaudio.com -info@lynxproaudio.com
17
CARDIOIDCONFIGURATIONS
Mode 7:
- For Acabinets use preset 10
- For B cabinets use preset 17
-Withthisconfigurationweobtainbetween
15 and 28 dB of attenuation from 30Hz to
100Hz,andbetween1and2dBmoreSPL
upfront.
B A
20 30 40 50 60 70 80 90 100
(Hz)
0
-3
-6
-9
-12
-15
-18
-21
+3
+6
+9
(dBr)
Mode 7: Front
Mode 7: Rear
Normal Mode: Front
Normal Mode: Rear
Image 13: Polar response for Mode 7 at 60 Hz Image 14:Polarresponse at 60Hz (1 cabinets)
Graphic 7: Mode 7 vs. Normal Mode

LYNX Pro Audio S.L. - Valencia, Spain - www.lynxproaudio.com -info@lynxproaudio.com
LX-218S
18
NOTES:
-All measurementshavebeen taken intheopenair.
- Measurementscarried out in“Half Space”.
- In a closed room the response can vary depending on distance between walls, ceiling etc.
-ThegraphsareshowninrelativedBmeasurements.
- The polar responsesare shown in dB SPL obtainedfrom acoustic prediction.

LX-218S
LYNX Pro Audio S.L. - Valencia, Spain - www.lynxproaudio.com -info@lynxproaudio.com
19
ONLINE CONTROL SYSTEM
Who is it for?
Usersof Self poweredDSPincorporatedLynx ProAudioCabinetswhere theuser hasrequested thecabinetsbe
supplied withthe Ethernet Module kit.
What is it for?
Obtain detailed informationof cabinetbehaviour and monitor thecabinet/sin real time.Youcan changethe
preset, gain, mute, polarity and phase. You canalso activate theair absorption compensationandselect the
«SOLO»mode.
How does it work?
Via Ethernet (cable or wireless). Once installed, the O.C.S. softwareautomatically detects all the cabinets
connected to the network and displays them in the O.C.S. windowon the users PC.
What does it show?
As well as displayingthe cabinetmodel and IP addressthe O.C.S will be monitoring in real time andthe user will
beableto viewRMS levels,Input clip, power module temperature, compression levels, air absorption
compensation andcabinet angulation.

LYNX Pro Audio S.L. - Valencia, Spain - www.lynxproaudio.com -info@lynxproaudio.com
LX-218S
CONFIGURING ETHERNET TO WORK WITH LX-218S
Thereare twopossible waysto connect:
1.-ConnectingthroughanETHERNETSWITCH/HUB::
-You will needanormalCAT5 Cable.
2.- Connectingthrough a Wirless ETHERNET.
Let usnowproceed to configure theEthernet network, setting the IP address of the computer as static.
To do this go to:
START > CONFIGURATION> NETWORK CONFIGURATION
Wewill launch the propertiesof "LocalArea
Connection"byclickingtherightmousebut-
tonandclicking onproperties.
20
Table of contents
Other Lynx Speakers manuals

Lynx
Lynx GR-12 User manual

Lynx
Lynx Ionic Series User manual

Lynx
Lynx pro-audio GR-18S User manual

Lynx
Lynx LX-212S User manual

Lynx
Lynx KR Series User manual

Lynx
Lynx BS Series User manual

Lynx
Lynx ionic-5CX User manual

Lynx
Lynx QB SERIES User manual

Lynx
Lynx Ionic Series User manual

Lynx
Lynx LX-V8 User manual