LYTEQUEST WASH7 User manual

MANUEL D’UTILISATION
FR | EN | NL | DE | ES | IT
Usermanual - Benutzerhandbuch - Gebruikershandleiding - Manual del usuario - Manual do utilizador - Manuale d'uso
Importé par :
SAS Churchill - 20 rue St Gilles - 75003 Paris - France

2 3
FR
!
CONSIGNES DE SÉCURITÉ
Lisez attentivement ce manuel qui contient des informations importantes
sur l’installation et l’utilisation de l’appareil.
• Conservez le manuel pour référence ultérieure. Si l’appareil change un jour de propriétaire, assurez-
vous que le nouvel utilisateur est en possession du manuel.
• Assurez-vous que la tension secteur convient à cet appareil et qu’elle ne dépasse pas la tension d’ali-
mentation indiquée sur la plaque signalétique de l’appareil.
• An d’éviter tout risque d’incendie ou de choc électrique, ne pas exposer cet appareil à la pluie ou à
l’humidité. Assurez-vous qu’aucun objet inammable ne se trouve à proximité de l’appareil pendant son
fonctionnement.
• L’appareil ne doit pas être exposé à des égouttements d’eau ou des éclaboussures. Aucun objet rempli
de liquide tels que des vases ne doit être placé sur l’appareil.
• Ne pas placer sur l’appareil des sources de ammes nues, telles que des bougies allumées.
• An d’assurer une aération susante, installez l’appareil à un endroit bien ventilé à une distance mini-
male autour de l’appareil de 50 cm.
L’aération ne doit pas être gênée par l’obstruction des ouvertures d’aération avec des objets tels que
journaux, nappes, rideaux, etc…
• Débranchez l’appareil du secteur avant toute manipulation ou entretien. Lorsque vous remplacez le
fusible, utilisez
uniquement un fusible qui présente exactement les mêmes caractéristiques que l’ancien.
• L’appareil est destiné à être utilisé sous un climat tempéré. La température ambiante ne doit pas dé-
passer 40°C.
Ne pas faire fonctionner l’appareil à des températures supérieures.
• En cas de dysfonctionnement, arrêtez immédiatement l’appareil. N’essayez jamais de réparer l’appa-
reil par vous-même. Une réparation mal faite peut entraîner des dommages et des dysfonctionnements.
Contactez un service technique agréé. Utilisez uniquement des pièces détachées identiques aux pièces
d’origine.
• Ne pas brancher l’appareil sur un variateur.
• Assurez-vous que le cordon d’alimentation ne soit jamais écrasé ni endommagé.
• Ne jamais débrancher l’appareil en tirant sur le cordon.
• La che de prise de courant doit demeurer aisément accessible.
• Ne pas exposer trop longuement vos yeux en direction de la source lumineuse.
CONSIGNES D’UTILISATION :
Ce produit est un éclairage équipé de lampes LED. Idéal pour un puissant éclairage à faible
consommation avec position fonctionnant au rythme de la musique.
L’appareil n’est prévu que pour une utilisation en intérieur. Avant toute installation, entretien et
réparation, assurez-vous que l’appareil soit éteint, débranché et refroidis.
DÉBALLAGE ET INSPECTION :
Avant son installation et son utilisation, vériez si votre appareil n’est pas endommagé et s’il est
complet. En cas de problème, retournez-le à votre revendeur ou service technique.
Pour éviter tout risque d’accident, mettez tous les emballages hors de la portée
des enfants.
SUSPENSION DE L’ÉCLAIRAGE :
Avant l’installation de l’appareil, assurez-vous de la stabilité et de la solidité du lieu d’installation.
Vérifiez la stabilité et la sûreté de l’installation. Une mauvaise installation peut générer des
risques. Le fabricant ne saurait être tenu responsable en cas de d’accident s’il y a eu une
mauvaise installation.
Vous pouvez installer cet appareil dans n’importe quelle position pourvu qu’il y ait suffisamment
d’espace pour assurer une ventilation suffisante.
Il est impératif de maintenir les orifices de ventilation dégagés.
CARACTÉRISTIQUES TECHNIQUES :
- 7 leds RVB + blanc (4en1) de 4 watts
- Mode automatique / Maitre-Esclave / Rythme de la musique
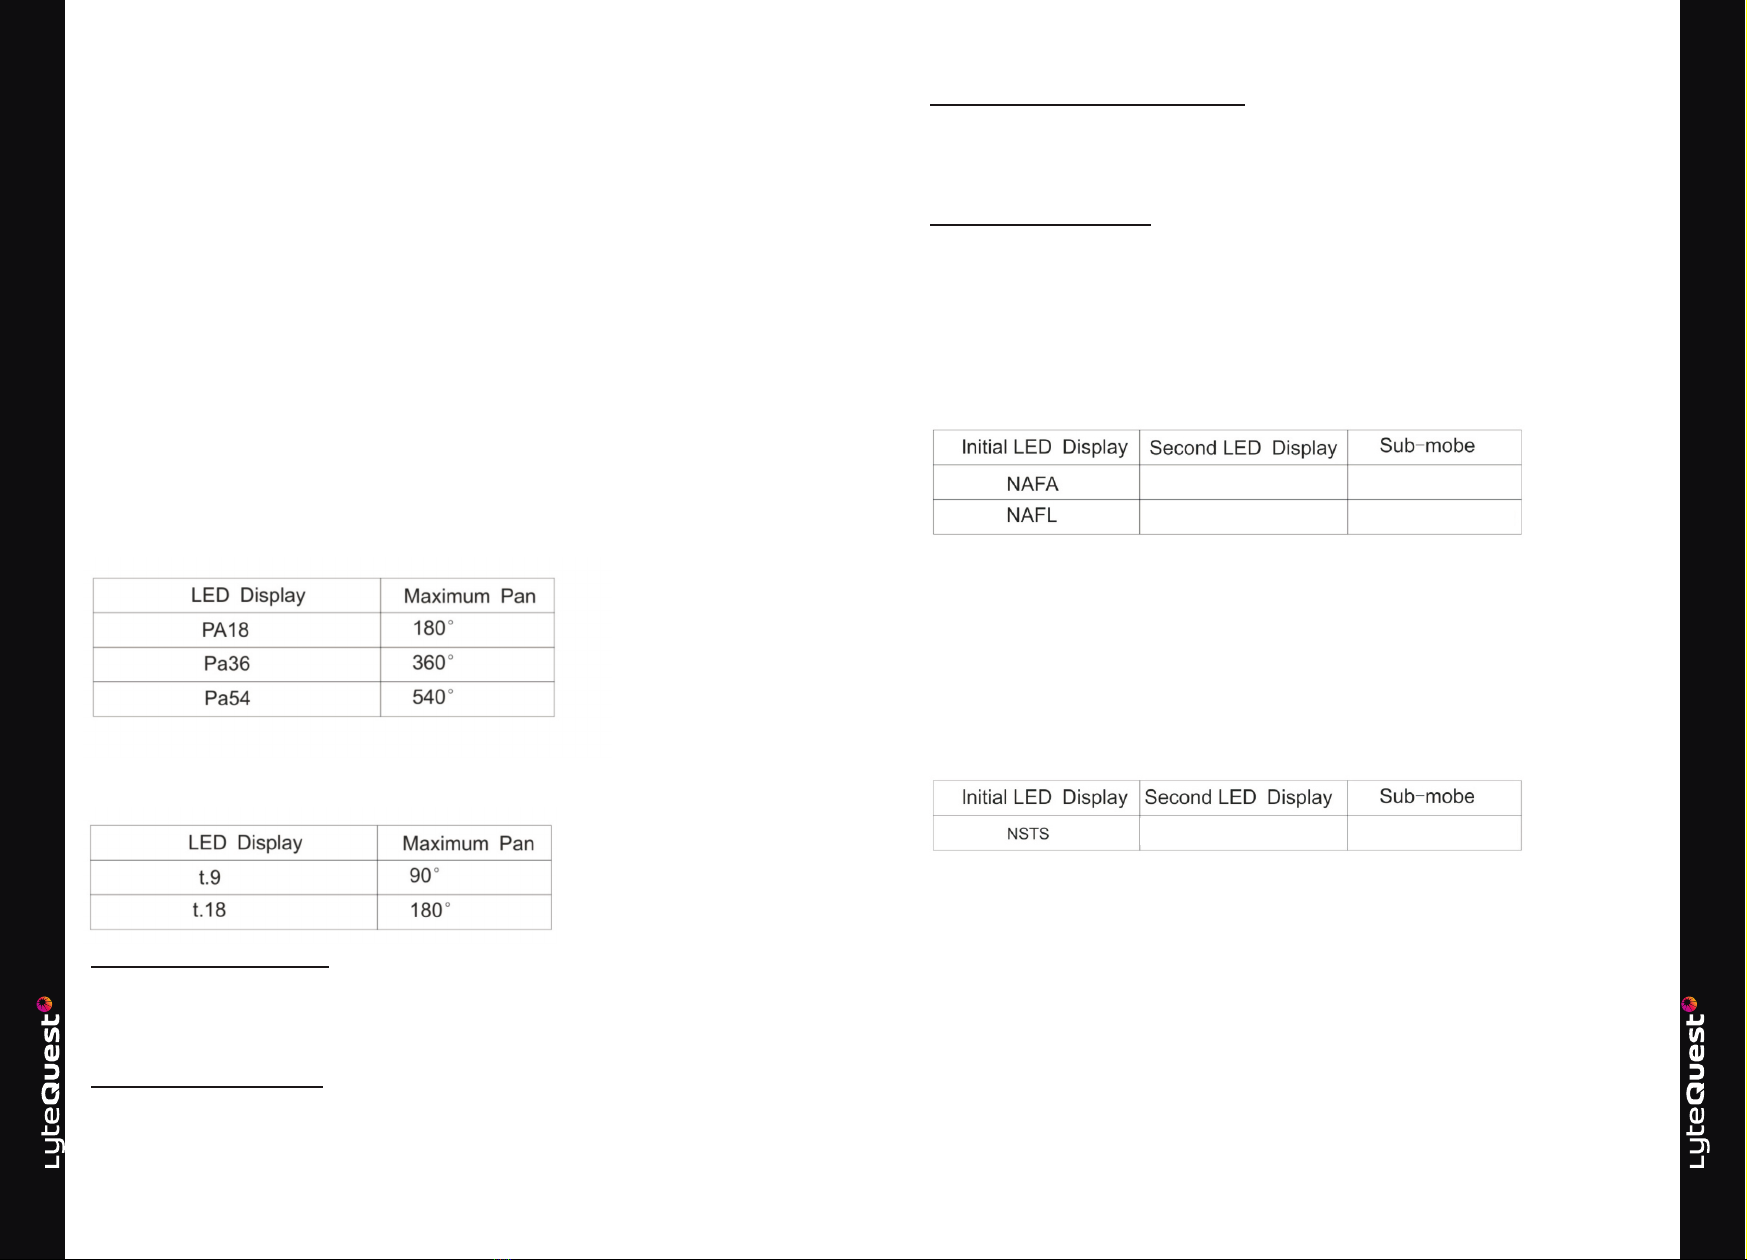
- En DMX-512 (9 ou 14 canaux)
- Fonction Pan (540°) et Tilt (200°)
- Fonction Stroboscope
- Ecran de type LCD
ASSISTANCE
Si vous avez besoin d’assistance pour ce produit, vous pouvez joindre le service technique par e-mail
à cette adresse : assistancelytequest.churchill.world
AVIS DE CHOC ÉLECTRIQUE - NE PAS OUVRIR
Équipement de classe I :
l'appareil possède une isolation principale et une isolation supplémentaire (borne de terre).
Ces équipements possèdent une prise de terre sur laquelle sont connectées les parties métal-
liques.
CONTENU DE L’EMBALLAGE :
1 x Wash7
1 x Câble d’alimentation
1 x Support + vis
1 x Manuel d’utilisation
NOTE IMPORTANTE : Les produits électriques ne doivent pas être mis au rebut avec les ordures ména-
gères. Veuillez les faire recycler là où il existe des centres pour cela. Consultez les autorités locales ou
votre revendeur sur la façon de les recycler.
MISE AU REBUT
Ne jetez pas les appareils portant ce symbole avec les ordures ménagères. Contribuez à la protection de
l’environnement et à votre sécurité, recyclez vos produits électriques et électroniques.
L’appareil et son emballage doivent être déposés à votre point de collecte local pour recyclage.
Contactez les autorités locales pour vous informer sur la mise au rebut et le recyclage. Certains centres de
collecte acceptent des produits gratuitement.
Recyclage : Nos emballages peuvent faire l’objet d’une consigne de tri.
Pour en savoir plus renseignez vous : www.consigneetri.fr
PROTECTION DE L’ENVIRONNEMENT – DIRECTIVE 2012/19/UE
Ces symboles ne sont valides qu’au sein de l’Union Européenne.
Installez l’appareil à une distance minimum de 0,1 mètre de tous autres objets dont ceux
inammables.
AC220-240V / AC50-60Hz / 2A

4 5
TABLEAU DE COMMANDE
MISE EN ROUTE DE LA WASH-7
1. Attention il n’y a pas de bouton Marche/Arrêt (On/O)
2. Connecter la prise de courant à l’arrière de la machine puis raccorder la prise murale.
3. La Wash-7 va se mettre en route et se réinitialiser, cela dure environ 10 sec.
Veuillez orienter la machine an de mettre face à vous le panneau de control « Control Panel ».
Au démarrage l’écran ache le dernier mode sur lequel l’appareil a été utilisé.
Pour faire déler les modes veuillez appuyer sur la touche « MODE/ESC » jusqu’au menu désiré.
Une fois votre choix eectuer appuyer sur « ENTER » pour accéder au sous menu.
MODE SIMPLIFIÉ :
Le clavier est doté de la fonction de réglage «PAN/TILT», il est utilisé pour la mise en veille d’usine
(valeur d’usine). La procédure est suivie lorsque le menu ache «Addr», en appuyant sur la touche
«ENTER» pendant plusieurs secondes, jusqu’à ce que l’achage apparaisse «PAN» ou «TIL», puis
appuyez sur «HAUT» ou «BAS» (UP ou DOWN) pour choisir le panoramique / la fonction (PAN/TILT)
de réglage de l’inclinaison et appuyez sur la touche «ENTER» pour ajuster, quand votre choix est fait, ré
appuyez sur «MENU» pour quitter et enregistrer.
MENU :
Pour sélectionner le menu ou sortir
UP : Augmenter (suivant) le paramètre
DOWN : Diminuer (précédent) le paramètre
ENTER : Conrmer ou entrer le sous-menu
REMARQUE :
1. La machine a une fonction qui reconnaît automatiquement le signal DMX ou SLAVE.
2. Lorsqu’un paramètre est modié et que vous appuyez sur le bouton «ENTER», la nouvelle valeur est
sauvegardée après l’achage «.. ...» sur l’écran numérique.
Mise en place
Débranchez le cordon d’alimentation avant de remplacer un fusible et remplacez-le toujours par le
même type de fusible.
Alimentation: avant de brancher votre appareil, assurez-vous que la tension de source dans votre zone
correspond à la tension requise pour votre appareil. La lumière est disponible dans une version de 110V
à 220V, étant donné que la tension de ligne peut varier d’un lieu à l’autre, vous devriez être sûr que
votre tension d’unité correspond à la tension de prise murale avant d’essayer de faire fonctionner votre
appareil.
Remplacement des fusibles
Avec un tournevis à tête plate, sortir le fusible de son logement.
Retirez le fusible endommagé de son support et remplacez-le par un fusible de même type.
Fixation de liaison
An de commander la lumière d'un ou plusieurs appareils à l'aide d'un contrôleur DMX-512 ou de les
faire fonctionner en mode maître/esclave, vous devrez disposer d'un lien de données en série. Le
nombre total de canaux requis par tous les appareils sur ce lien déterminera le nombre de luminaires
que ce dernier pourra supporter. Il est recommandé de ne pas dépasser une distance maximale de 500
mètres (1640 pieds) pour ce type de liaison et de limiter le nombre d'appareils connectés à 32.
Maîtrise / esclave :
1. Connectez le connecteur (mâle) 3 broches du câble DMX au connecteur 3 broches (femelle) du
premier appareil.
2. Connectez l’extrémité du câble à partir du premier appareil qui aura un connecteur (femelle) à 3 pin
au connecteur d’entrée du dispositif suivant constitué d’un connecteur (mâle) à 3 broches. Ensuite,
procédez à la connexion de la sortie indiquée ci-dessus à l’entrée du luminaire suivant, etc.
DMX/ maître esclave
Mode automatique rapide
Mode son
Mode autonome
Mode maître esclave
Mode automatique lent
PAN sens inverse
Tilt sens inverse
Inversion de l’achage
14 ou 9 canaux
Pan angle
Tilt angle
Réinitialisation
Réglages d’usine

6 7
Orientation :
Cet appareil peut être déplacé dans n’importe quelle position à condition qu’il y ait susamment de
place pour la ventilation
Navigation dans le panneau de commande :
Accédez aux fonctions du panneau de commande en utilisant les quatre boutons du panneau situés
directement sous l’achage.
Carte du menu :
Six modes de fonctionnement distincts, nombreux avec des sous-modes, sont pris en charge par l’unité.
Pour sélectionner, utilisez le bouton «MODE / ESC» pour accéder au menu.
Le bouton «UP» et «DOWN» conrme toute sélection. Au bout de quelques secondes, l’achage LED
va se retourner pendant le fonctionnement jusqu’à ce qu’un autre bouton soit appuyé sur le mode de
programme intégré.
Congurations utilisateur :
Réglage des angles panoramiques maximaux
Pour sélectionner, utilisez le bouton «MODE / ESC» et choisissez «PA18», «PA36» ou «PA54». Les
boutons HAUT et BAS coïncident entre tous les angles PAN disponibles.
Appuyez sur le bouton «ENTER» pour conrmer la sélection choisie.
Pour sélectionner, utilisez le bouton «MODE / ESC» et choisissez «t.9», «t.18» «UP» et «DOWN» cycle
entre tous les angles d’inclinaison disponibles.
Appuyez sur le bouton «ENTER» pour conrmer la sélection choisie
Réglage inversé ou Pan normal
Pour sélectionner, utilisez le bouton «MODE / ESC» et choisissez «Pan» (normal) ou r Pan «(inversé).
Les boutons UP et DOWN cycle entre les deux réglages. Appuyez sur le bouton «ENTER» pour
conrmer la sélection choisie
Réglage inversé ou Tilt normal
Pour sélectionner, utilisez le bouton MODE / ESC et choisissez t. L (normal) ou rt. l (inversé). Les
boutons UP et DOWN coïncident entre les deux réglages. Appuyer sur la touche «ENTER» pour
conrmer la sélection choisie
Réglage inversé ou achage LED normal
Pour sélectionner, utilisez le bouton MODE / ESC et choisissez d.s (normal) ou rd.s (inversé). Les
boutons HAUT et BAS coïncident entre les deux réglages. Appuyer sur la touche «ENTER» pour
conrmer la sélection choisie.
Mode de course automatique
L’un des deux sous-modes Auto Run peut être sélectionné avec une sélection de vitesse préréglée.
Ce mode permet à l’unité d’agir sur un maître vers d’autres unités esclaves
Choix des sous-modes d’exécution automatique
Pour sélectionner, utilisez le bouton MODE / ESC pour acher NAFA ou NASL.
Les boutons UP et DOWN changent entre les deux options initiales. Avec l’option appropriée
sélectionnée, utilisez ENTER pour conrmer et l’achage LED avec changement à «FAST» ou
«SLOW». L’unité fonctionnera alors à la vitesse choisie
Mode activé par le son
L’unité répond au son capté par l’unité dans le microphone pour créer un spectacle lumineux. Chaque
son ramié permet de modier les couleurs et la position des eets. Ce mode permet à l’unité d’agir
sur un maître vers d’autres unités esclaves
Choix du son activé
Pour sélectionner, utilisez le bouton MODE / ESC et choisissez NSTS.
Lorsque le bouton ENTER est enfoncé, l’achage LED passe à SrUn et l’appareil entre en mode
activé par son.
Mode esclave
Jusqu’à 32 unités peuvent être mises en cascade avec une seule unité agissant comme maître et
toute autre unité liée comme esclave.
L’unité esclave fonctionnera tous en synchronisation avec l’unité maître sans avoir besoin d’un
contrôleur supplémen- taire. Les connexions peuvent être eectuées à l’aide de câbles de contrôle
DMX stadard avec l’unité Master en mode activé et placée au début de la chaîne.
Choix du mode esclave
Pour sélectionner, utilisez le bouton MODE / ESC et choisissez NSTS
Lorsque le bouton «ENTER» est pressé, l’achage LED passe à «SON» et l’appareil sera esclave du
signal de com- mande provenant d’une unité maître
Fast / Rapide Course automatique rapide
Slow / Lent Course automatique lente
Son Son activé

8 9
MODE AVANCÉ :
Cannal Valeur Fonction
Pan
Pan n
Tilt
Tilt n
XY Vitesse Éteint
Master Maître
Eet strobe de lent à rapide
Ouverture
Variation de rouge Variation
de vert
Variation de bleu
Variation de rouge
Sélection couleur
Macro couleur Animation de couleur
Vitesse d’animation de couleur
Contrôle personnalisé
Fonctionnement automatique rapide
Fonctionnement automatique lent
Son 1
Son 12
Réinitialiser
NOTICE OF ELECTRIC SHOCK - DO NOT OPEN
PACKAGE CONTENTS :
1 x Wash7
1 x Power cable
1 x Stand + screws
1 x User manual
IMPORTANT NOTE : Electrical products should not be disposed of with household garbage.
Please recycle them where centres exist for this purpose. Consult local authorities or your dealer on how to
recycle them.
Install the appliance at a minimum distance of 0.1 meter from all other objects, including
ammable objects.
EN
!
Class I equipment :
The device has basic insulation and supplementary insulation (earth terminal).
This equipment has an earth socket to which the metal parts are connected.
SAFETY INSTRUCTIONS
Read this manual carefully as it contains important information
on the installation and use of the product.
• Keep the manual for future reference. If the product changes ownership on a day, make sure that the
new user is in possession of the manual.
• Make sure that the mains voltage is suitable for this unit and does not exceed the supply voltage
indicated on the unit’s nameplate.
• To prevent re or electric shock, do not expose this unit to rain or moisture.
• Make sure that no ammable objects are in the vicinity of the unit during operation.
• Do not expose the unit to dripping or splashing water. No objects lled with liquids, such as vases,
should be placed on the apparatus.
• Do not place naked ame sources, such as lighted candles, on the apparatus.
• To ensure adequate ventilation, install the apparatus in a well-ventilated location with a minimum
distance around the apparatus of 50 cm.
Ventilation should not be hindered by obstruction of the ventilation openings by objects such as
newspapers, tablecloths, curtains, etc...
• Unplug the unit from the wall outlet before performing any maintenance or servicing. When replacing
the fuse, use only a fuse with exactly the same characteristics as the old one.
• The unit is intended for use in a temperate climate. The ambient temperature should not exceed 40°C.
Do not operate the unit at higher temperatures.
• In the event of a malfunction, turn o the unit immediately. Never attempt to repair the camera yourself.
Improper repair may result in damage and malfunction. Contact an authorized service center. Only use
spare parts that are identical to the original parts.
• Do not connect the unit to an inverter.
• Make sure that the power cord is never crushed or damaged.
• Never unplug the unit by pulling on the cord.
• The power plug must remain easily accessible.
• Do not expose your eyes too long in the direction of the light source.
AC220-240V / AC50-60Hz / 2A

10 11
INSTRUCTIONS FOR USE :
This product is a lighting equipped with LED lamps. Ideal for powerful, low power consumption lighting
with a position that works to the rhythm of the music.
The device is only intended for indoor use. Before installation, maintenance and repair, make sure that
the device is switched o, unplugged and cooled down.
UNPACKING AND INSPECTION :
Before installation and use, check your appliance for damage and completeness. If there are any
problems, return it to your dealer or technical service.
To avoid the risk of accidents, keep all packaging out of the reach of children.
LIGHTING SUSPENSION :
Before installing the fixture, make sure that the installation site is stable and solid.
Check the stability and safety of the installation. Incorrect installation can generate risks. The
manufacturer cannot be held responsible in case of accident if there has been a bad installation.
You can install this appliance in any position as long as there is enough space for adequate
ventilation.
It is imperative that the ventilation openings are kept clear.
TECHNICAL SPECIFICATIONS :
- 7 leds RGB + white (4in1) of 4 watts
- Automatic mode / Master-Slave / Rhythm of the music
- In DMX-512 (9 or 14 channels)
- Pan (540°) and Tilt (200°) function
- Strobe function
- LCD type screen
ASSISTANCE :
If you need support for this product, you can contact the technical service by email at this address:
assistancelytequest.churchill.world
DISPOSAL
Do not dispose of appliances marked with this symbol in the household waste.
Help protect the environment and your safety, recycle your electrical and electronic products.
The instrument and its packaging must be returned to your local collection point for recycling. Contact your local
authorities
to inform you about disposal and recycling. Some collection centres accept products free of charge.
Recycling : Our packaging may be subject to a sorting deposit.
To nd out more, please contact: www.consigneetri.fr
PROTECTION OF THE ENVIRONMENT – DIRECTIVE 2012/19/UE
These symbols are only valid within the European Union.
CONTROL PANEL
STARTING UP THE WASH-7
1. Please note that there is no On/O button.
2. Connect the power plug to the back of the machine and then connect to the wall socket.
3. The Wash-7 will turn on and reset itself, it takes about 10 sec. Please orient the machine so
that the control panel is facing you.
At startup the screen will display the last mode the machine was used in.
To scroll through the modes, press the "MODE/ESC" key to the desired menu.
Once you have made your choice, press "ENTER" to access the submenu.
SIMPLIFIED MODE :
The keyboard is equipped with the "pan/tilt" setting function, it is used for the factory default setting (suine
value). The procedure is followed when the menu displays "Addr", press "ENTER" key for several
seconds, until the display shows "PAN" or "til", then press "UP" or "DOWN" key to choose the pan/tilt
adjustment function and press "ENTER" key to adjust, when your choice is made, press "MENU" to exit
and save.
DMX/ Maître esclave
Mode automatique rapide
Mode son
Mode autonome
Mode Maître esclave
Mode automatique lent
PAN sens inverse
Tilt sens inverse
Inversion de l’achage
14 ou 9 cannaux
Pan angle
Tilt angle
Réinitialisation
Réglages d’usine

12 13
MENU :
To select menu or exit
UP : Increase (next) setting
DOWN : Decrease (previous) setting
ENTER : Conrm or enter sub-menu
NOTE:
1. The machine has a function that automatically recognizes the DMX or SLAVE signal.
2. When a parameter is changed and the "ENTER" button is pressed, the new value is saved after
"... ..." is displayed on the digital display.
Setting Up
Unplug the power cord before replacing a fuse and always replace it with the same type of fuse.
Power supply: Before plugging in your unit, make sure the voltage source in your area matches the
voltage required for your unit. The light is available in a 110V to 220V version. Since line voltage can
vary from location to location, you should be sure your unit voltage matches the wall outlet voltage
before attempting to operate your unit.
Replacing Fuses
With a athead screwdriver, pry the fuse out of its socket.
Remove the damaged fuse from its holder and replace it with a fuse of the same type. Insert the fuse
holder in its place and reconnect it.
Linkage Attachment
You will need a serial data link to display light from one or more xtures using a DMX-512 controller or
run synchronized to two or more xtures set to master/slave operation. The combined number of
channels required by all xtures on a serial data link determines the number of xtures the data link can
support. Maximum recommended distance of the serial data link: 500 meters (1640 feet).
Maximum recommended number of xtures on a serial data link: 32 xtures
Master/Slave :
1. Connect the 3-pin (male) connector of the DMX cable to the 3-pin (female) connector of the rst
xture.
2. Connect the end of the cable from the rst xture that has a 3-pin (female) connector to the input
connector of the next xture that has a 3-pin (male) connector. Then proceed to connect the output
shown above to the input of the next xture, etc.
Orientation:
This unit can be moved to any position as long as there is enough room for ventilation
Access the control panel functions using the four panel buttons located directly below the display.
Control Panel Navigation:
Access the control panel functions using the four panel buttons located directly below the display.
Menu Map:
Six distinct operating modes, many with sub-modes, are supported by the unit. To select, use the
"MODE / ESC" button to access the menu.
The "UP" and "DOWN" buttons conrm any selection. After a few seconds, the LED display will turn
over during operation until another button is pressed on the built-in program mode.
User Settings :
Setting the maximum pan angles
To select, use the "MODE / ESC" button and choose "PA18", "PA36" or "PA54". The UP and DOWN
buttons coincide between all available PAN angles.
Press the ENTER button to conrm your selection.
To select, use the "MODE / ESC" button and choose "t.9", "t.18" "UP" and "DOWN" cycle between all
available tilt angles.
Press the "ENTER" button to conrm the chosen selection
Reverse or Normal Pan
To select, use the "MODE / ESC" button and choose "Pan" (normal) or "Pan" (reverse).
The UP and DOWN buttons cycle between the two settings. Press the "ENTER" button to conrm the
conrm the chosen selection
Reverse or Normal Tilt Setting
To select, use the MODE / ESC button and choose t. L (normal) or rt. l (reverse). The UP and DOWN
buttons coincide between the two settings. Press the ENTER button to conrm the conrm the chosen
selection

14 15
Reverse setting or normal LED display
To select, use the MODE / ESC button and choose d.s (normal) or rd.s (reverse). The UP and DOWN
buttons coincide between the two settings. Press the ENTER button to conrm the chosen selection.
Automatic stroke mode
One of the two Auto Run sub-modes can be selected with a preset speed selection.
This mode allows the unit to act as a master to other slave units
Selecting Auto Run Submodes
To select, use the MODE / ESC button to display NAFA or NASL.
The UP and DOWN buttons change between the two initial options. With the appropriate option
selected, use ENTER to conrm and the LED display with change to "FAST" or "SLOW". The unit will
then run at the selected speed.
Sound activated mode
The unit responds to the sound picked up by the unit in the microphone to create a light show. Each
branching sound allows the colors and position of the eects to be changed. This mode allows the unit
to act on a master to other slave units.
Choice of activated sound
To select, use the MODE / ESC button and choose NSTS.
When the ENTER button is pressed, the LED display changes to SrUn and the unit enters sound
activated mode.
Mode esclave
Jusqu’à 32 unités peuvent être mises en cascade avec une seule unité agissant comme maître et
toute autre unité liée comme esclave.
L’unité esclave fonctionnera tous en synchronisation avec l’unité maître sans avoir besoin d’un
contrôleur supplémentaire. Les connexions peuvent être eectuées à l’aide de câbles de contrôle
DMX standard avec l’unité Master en mode activé et placée au début de la chaîne.
Choix du mode esclave
Pour sélectionner, utilisez le bouton MODE / ESC et choisissez NSTS
Lorsque le bouton «ENTER» est pressé, l’achage LED passe à «SON» et l’appareil sera esclave du
signal de commande provenant d’une unité maître
Fast / Rapide Course automatique rapide
Slow / Lent Course automatique lente
Son Son activé
ADVANCED MODE:
Channel Value Function
Pan
Pan ne
Tilt
Tilt ne
XY Speed O
Master Master
Slow to fast strobe eect
Opening
Red variation Green
variation
Blue variation
Red variation
Color selection Color
macro Color animation
Color animation speed
Custom control
Fast automatic operation Slow
automatic operation Sound 1
Sound 12
Reset

AFVOEREN
Werp geen apparaten gemarkeerd met de vuilnis.
Help het milieu en uw veiligheid te beschermen, recycle uw elektrische en elektronische producten.
Het apparaat en de verpakking moeten bij uw plaatselijke inzamelingspunt worden ingeleverd voor recycling.
Neem contact op met de lokale autoriteiten
om u te informeren over sloop en recycling. Sommige verzamelcentra accepteren producten gratis.
Recycling : onze verpakkingen kunnen worden onderworpen aan een sorteervolgorde.
Neem voor meer informatie contact op met uw plaatselijke gemeente.
Deze symbolen zijn alleen geldig binnen de Europese Unie.
These symbols are only valid within the European Union.
GEBRUIKSAANWIJZING:
Dit product is uitgerust met LED-verlichting lampen. Ideaal voor een krachtige verlichting met een
laag verbruik.
Het apparaat is bedoeld voor gebruik binnenshuis. Voor de installatie, onderhoud en reparatie, zorg
ervoor dat het apparaat is uitgeschakeld, unplugged en gekoeld.
UITPAKKEN EN INSPECTIE :
Controleer voor installatie en gebruik uw toestel op schade en volledigheid.Als er een probleem is,
stuur het dan terug naar uw dealer of servicecentrum.
Om het risico op ongelukken te vermijden, moet u al het verpakkingsmateriaal buiten het bereik
van kinderen houden.
OPHANGING VAN DE VERLICHTING :
Voordat u het apparaat installeert, moet u ervoor zorgen dat de installatielocatie stabiel en solide
is.
Controleer de stabiliteit en de veiligheid van de installatie. Een verkeerde installatie kan risico's met
zich meebrengen. De fabrikant kan niet aansprakelijk worden gesteld in geval van een ongeluk als
er een verkeerde installatie is geweest.
U kunt dit apparaat in elke positie installeren, zolang er maar voldoende ruimte is voor voldoende
ventilatie.
Het is noodzakelijk dat de ventilatieopeningen vrijgehouden worden.
TECHNISCHE GEGEVENS :
- 7 x 4in1 RGB + witte LED's van 4 watt
- Automatische modus / Master-Slave modus / Muziekritme
- In DMX-512 (9 of 14 kanalen)
- Pan (540°) en Tilt (200°) functie
- Stroboscoop functie
- LCD type display
ASSISTANTIE
Als u ondersteuning nodig heeft voor dit product, kunt u per e-mail contact opnemen met de tech-
nische dienst op dit adres : assistancelytequest.churchill.world
16 17
NL
!
VEILIGHEIDSINSTRUCTIES
Lees deze handleiding zorgvuldig door, die informatie bevat over
de installatie en het gebruik van het apparaat.
• Bewaar de handleiding voor toekomstig gebruik. Als het apparaat verandert op de dag van een eige-
naar, zorg dan dat de nieuwe gebruiker is aangemeld bezit van de handleiding.
• Controleer of de netspanning geschikt is voor dit apparaat en of deze de voedingsspanning over-
schrijdt die wordt aangegeven op het typeplaatje van het apparaat.
• Stel dit apparaat niet bloot aan regen of vocht om brand of elektrische schokken te voorkomen.
Zorg ervoor dat er zich tijdens het gebruik geen brandbare voorwerpen in de buurt van het apparaat
bevinden.
• Het apparaat mag niet worden blootgesteld aan druipend water of opspattend water. Plaats geen voor-
werpen gevuld met vloeistoen zoals vazen op het apparaat.
• Plaats geen open vuur op het apparaat, zoals brandende kaarsen.
• Installeer voor een goede ventilatie de unit in een goed geventileerde ruimte op een minimale afstand
rond de unit van 50 cm. Ventilatie mag niet worden belemmerd door obstructie van ventilatieopeningen
door voorwerpen zoals kranten, tafelkleden, gordijnen, enz.
• Haal de stekker van het apparaat uit het stopcontact voordat u het gebruikt of onderhoudt. Gebruik bij
het vervangen van de zekering alleen een zekering die exact dezelfde kenmerken heeft als de oude.
• Het apparaat is bedoeld voor gebruik in een gematigd klimaat. De omgevingstemperatuur mag niet
hoger zijn dan 40 ° C. Gebruik het apparaat niet bij hogere temperaturen.
• Stop het apparaat in geval van storing onmiddellijk. Probeer het apparaat nooit zelf te repareren. On-
juiste reparatie kan leiden tot schade en storingen. Neem contact op met een geautoriseerde technische
dienst. Gebruik alleen onderdelen die identiek zijn aan de originele onderdelen.
• Sluit het apparaat niet aan op een station.
• Zorg ervoor dat het netsnoer nooit wordt verpletterd of beschadigd.
• Trek nooit de stekker uit het stopcontact door aan het snoer te trekken.
• De stekker moet gemakkelijk toegankelijk zijn.
• Stel uw ogen niet te lang bloot aan de lichtbron.
•Lampen zijn niet vervangbaar
•Het beschermscherm, de lens of het ultraviolette scherm moet worden gewijzigd als ze zichtbaar zoda-
nig zijn beschadigd dat hun eectiviteit wordt aangetast, bijvoorbeeld door diepe scheuren of krassen.
INHOUD VAN DE VERPAKKING :
1 x Wash7
1 x Stroomkabel
1 x Voet + schroeven
1 x Gebruikershandleiding
BELANGRIJKE OPMERKING : Elektrische producten mogen niet worden verwijderd met huisvuil.
Recycle ze waar hiervoor centra bestaan. Raadpleeg de lokale autoriteiten of uw dealer over hoe u ze re-
cyclen.
Apparatuur van klasse I :
Het apparaat heeft basisisolatie en extra isolatie (aardklem).
Deze apparatuur heeft een aardecontactdoos waarop de metalen onderdelen zijn
aangesloten.
Installeer het apparaat op een minimale afstand van 0,1 meter van alle andere objecten,
inclusief brandbare objecten.
AC220-240V / AC50-60Hz / 2A

18 19
BEDIENINGSPANEEL
OPSTARTEN VAN DE WASH-7
1. Let op: er is geen aan/uit-knop.
2. Sluit de stekker aan op de achterkant van de machine en vervolgens op het stopcontact.
3. De Wash-7 zal starten en zichzelf resetten, dit duurt ongeveer 10 sec. Richt de machine zo
dat het bedieningspaneel naar u toe is gericht.
Bij het opstarten toont het display de laatste modus waarin de machine gebruikt werd.
Om door de modes te scrollen drukt u op de "MODE/ESC" toets naar het gewenste menu.
Zodra u uw keuze hebt gemaakt, drukt u op "ENTER" om het submenu te openen.
VEREENVOUDIGDE MODUS :
Het toetsenbord is uitgerust met de "pan/tilt" instelfunctie, deze wordt gebruikt voor de fabrieksinstelling
(suine waarde). De procedure wordt gevolgd wanneer het menu "Addr" toont, door enkele seconden op
de "ENTER" toets te drukken, totdat het display "PAN" of "til" toont, druk dan op "UP" of "DOWN" om de
pan/tilt aanpassingsfunctie te kiezen en druk op de "ENTER" toets om aan te passen, wanneer uw keuze
gemaakt is, druk op "MENU" om af te sluiten en op te slaan.
MENU :
Om het menu te selecteren of te verlaten
UP : Verhogen (volgende) parameter
DOWN : Verlagen (vorige) parameter
ENTER : Bevestigen of submenu openen
OPMERKING:
1. De machine heeft een functie die automatisch het DMX of SLAVE signaal herkent.
2. Wanneer een parameter wordt gewijzigd en de "ENTER" knop wordt ingedrukt, wordt de nieuwe
waarde opgeslagen nadat "... ..." op de digitale display wordt weergegeven.
INSTELLEN
Haal de stekker uit het stopcontact voordat u een zekering vervangt en vervang deze altijd door
hetzelfde type zekering.
Stroomvoorziening: Controleer voordat u de stekker in het stopcontact steekt of de bronspanning in uw
omgeving overeenkomt met de vereiste spanning voor uw. De lamp is verkrijgbaar in een uitvoering van
110V tot 220V. Aangezien de netspanning van locatie tot locatie kan verschillen, moet u er zeker van zijn
dat de spanning van uw apparaat overeenkomt met de spanning van het stopcontact voordat u het
apparaat probeert te gebruiken.
ZEKERINGEN VERVANGEN
Wrik de zekering met een platte schroevendraaier uit de behuizing.
Verwijder de beschadigde zekering uit de houder en vervang deze door een zekering van hetzelfde type.
Plaats de zekeringhouder op zijn plaats en sluit hem weer aan.
BEVESTIGING VAN DE VERBINDING
U hebt een seriële datalink nodig om het licht van de armatuur(en) weer te geven met een DMX-512
controller of gesynchroniseerd te laten lopen met twee of meer armaturen die zijn ingesteld op een
master/slave bedieningsmodus. Het gecombineerde aantal kanalen dat alle armaturen op een seriële
datalink nodig hebben, bepaalt het aantal armaturen dat de datalink kan ondersteunen. Aanbevolen
maximale afstand van de seriële datalink: 500 meter (1640 ft).
Maximaal aanbevolen aantal armaturen op een seriële datalink: 32 armaturen.
Master / Slave
1. Sluit de 3-pins (mannelijke) connector van de DMX-kabel aan op de 3-pins (vrouwelijke) connector
van de eerste armatuur.
2. Sluit het uiteinde van de kabel van de eerste armatuur die een 3-pins (vrouwelijke) connector heeft
aan op de ingangsconnector van de volgende armatuur die een 3-pins (mannelijke) connector heeft.
Sluit vervolgens de hierboven getoonde uitgang aan op de ingang van de volgende armatuur, enz.
DMX/ Master Slave
Snelle automatische modus
Geluidsmodus
Stand-alone modus
Master slave modus
Trage automatische modus
PAN achteruit
Schuine stand achteruit
Display omkering
14 of 9 kanalen
Panhoek
Kantelhoek
Reset
Fabrieksinstellingen

ORIËNTATIE
Dit apparaat kan in elke positie worden geplaatst, mits er voldoende ruimte is voor ventilatie
NAVIGATIE OP HET BEDIENINGSPANEEL
Toegang tot de functies van het bedieningspaneel met behulp van de vier paneelknoppen direct onder
het display.
MENUKAART
Het apparaat ondersteunt zes verschillende bedrijfsmodi, waarvan vele met submodi. Gebruik de toets
"MODE / ESC" om het menu te selecteren.
De "UP" en "DOWN" knoppen bevestigen elke selectie. Na enkele seconden zal het LED-display
tijdens de werking omslaan totdat een andere toets op de ingebouwde programmamodus wordt gedrukt.
GEBRUIKERSINSTELLINGEN
Instellen van de maximale panning hoeken
Om te selecteren gebruikt u de toets "MODE / ESC" en kiest u "PA18","PA36" of "PA54".
De UP en DOWN knoppen vallen samen tussen alle beschikbare PAN hoeken.
Druk op de toets "ENTER" om uw keuze te bevestigen.
Gebruik de toets "MODE / ESC" en kies "t.9", "t.18" "UP" en "DOWN" vallen samen tussen alle
beschikbare kantelhoeken.
Druk op de "ENTER" knop om de gekozen selectie te bevestigen.
INSTELLING OMGEKEERDE OF NORMALE PAN
Om te selecteren gebruikt u de toets "MODE / ESC" en kiest u "Pan" (normaal) of "Pan" (omgekeerd).
De UP en DOWN knoppen wisselen tussen de twee instellingen. Druk op de toets "ENTER" om uw
keuze te bevestigen
OMGEKEERDE OF NORMALE KANTELINSTELLING
Om te selecteren gebruikt u de MODE / ESC toets en kiest u t. L (normaal) of rt. l (omgekeerd). De UP
en DOWN toetsen vallen samen tussen de twee instellingen. Druk op de "ENTER" toets om de gekozen
selectie te bevestigen
20 21
OMGEKEERDE INSTELLING OF NORMALE LED WEERGAVE
Om te selecteren gebruikt u de MODE / ESC toets en kiest u d.s (normaal) of rd.s (omgekeerd). De
UP en DOWN toetsen vallen samen tussen de twee instellingen. Druk op de ENTER toets om de
gekozen keuze te bevestigen.
AUTOMATISCHE SLAGMODUS
Een van de twee Auto Run submodi kan worden geselecteerd met een vooraf ingestelde snelheid.
Met deze modus kan het toestel optreden als master voor andere slave-toestellen.
Selecteren van de Auto Run submodi
Om te selecteren gebruikt u de MODE / ESC toets om NAFA of NASL weer te geven.
De UP en DOWN knoppen wisselen tussen de twee oorspronkelijke opties. Met de juiste optie
geselecteerd, gebruik ENTER om te bevestigen en de LED display verandert in "FAST" of "SLOW".
Het toestel werkt dan op de geselecteerde snelheid.
GELUID GEACTIVEERDE MODUS
Het toestel reageert op het geluid dat door het toestel in de microfoon wordt opgevangen om een
lichtshow te creëren. Met elk vertakkend geluid kunnen de kleuren en de positie van de eecten
worden gewijzigd. Met deze modus kan het toestel als master fungeren voor andere slave-toestellen.
Selecteren van het actieve geluid
Om te selecteren gebruikt u de MODE / ESC toets en kiest u NSTS.
Wanneer de ENTER knop wordt ingedrukt, verandert de LED display in SrUn en komt het apparaat in
de geluidsgeactiveerde modus.
Slavenmodus
Tot 32 toestellen kunnen in cascade worden geschakeld, waarbij één toestel als master fungeert en
elk ander aangesloten toestel als slave.
De slave-eenheden werken allemaal synchroon met de master-eenheid zonder dat er een extra
controller nodig is. Verbindingen kunnen worden gemaakt met DMX-standaard besturingskabels met
de master-eenheid in actieve modus en geplaatst aan het begin van de keten.
Selecteren van de slavemodus
Gebruik om te selecteren de MODE / ESC toets en kies NSTS
Wanneer de "ENTER" knop wordt ingedrukt, verandert de LED display in "SOUND" en zal de
armatuur een slaaf zijn van het stuursignaal van een master unit.
Snel Snelle automatische run
Langzaam Trage automatische slag
Geluid Geluid geactiveerd

22 23
22 23
HINWEIS AUF STROMSCHLAG - NICHT ÖFFNEN
INHALT DES PAKETS :
1 x Wash7
1 x Stromkabel
1 x Halterung + Schrauben
1 x Bedienungsanleitung
WICHTIGER HINWEIS : Elektrische Produkte dürfen nicht mit dem Hausmüll entsorgt werden. Bitte re-
cyceln Sie sie, wenn es dafür Zentren gibt. Erkundigen Sie sich bei den örtlichen Behörden oder Ihrem
Händler, wie sie zu recyceln sind.
Installieren Sie das Gerät in einem Mindestabstand von 0,1 Meter zu allen anderen Objekten,
einschließlich brennbarer Objekte.
DE
!
SICHERHEITSHINWEISE
Lesen Sie dieses Handbuch sorgfältig durch, da es wichtige Informationen
zur Installation und Verwendung des Geräts enthält.
- Bewahren Sie das Handbuch zum späteren Nachschlagen auf. Wenn das Gerät an einem Tag des
Eigentümerwechsels den Besitzer wechselt, stellen Sie sicher, dass der neue Benutzer im Besitz des
Handbuchs ist.
- Stellen Sie sicher, dass die Netzspannung für dieses Gerät geeignet ist und die auf dem Typenschild
des Geräts angegebene Versorgungsspannung nicht übersteigt.
- Um die Gefahr eines Feuers oder Stromschlags zu vermeiden, darf dieses Gerät weder Regen noch
Feuchtigkeit ausgesetzt werden. Stellen Sie sicher, dass sich während des Betriebs keine brennbaren
Gegenstände in der Nähe des Geräts benden.
- Setzen Sie das Gerät nicht Tropf- oder Spritzwasser aus. Es dürfen keine mit Flüssigkeiten gefüllten
Gegenstände, wie z.B. Vasen, auf den Apparat gestellt werden.
- Stellen Sie keine oenen Flammenquellen, wie z.B. brennende Kerzen, auf das Gerät.
- Um eine ausreichende Belüftung zu gewährleisten, installieren Sie das Gerät an einem gut belüfteten
Ort mit einem Mindestabstand von 50 cm um das Gerät herum. Die Belüftung darf nicht dadurch behin-
dert werden, dass die Lüftungsönungen durch Gegenstände wie Zeitungen, Tischtücher, Vorhänge
usw. verstopft werden.
- Ziehen Sie vor der Handhabung oder Wartung den Netzstecker aus der Steckdose. Wenn Sie die
Sicherung ersetzen, verwenden Sie nur eine Sicherung mit genau den gleichen Eigenschaften wie die
alte.
- Das Gerät ist für den Einsatz in einem gemäßigten Klima vorgesehen. Die Umgebungstemperatur
sollte 40°C nicht überschreiten. Betreiben Sie das Gerät nicht bei höheren Temperaturen.
- Schalten Sie das Gerät im Falle einer Fehlfunktion sofort aus. Versuchen Sie niemals, das Gerät selbst
zu reparieren.
Eine unsachgemäße Reparatur kann zu Schäden und Fehlfunktionen führen. Wenden Sie sich an ein
autorisiertes Servicezentrum. Verwenden Sie nur Ersatzteile, die mit den Originalteilen identisch sind.
- Schließen Sie das Gerät nicht an einen Wechselrichter an.
- Stellen Sie sicher, dass das Netzkabel niemals gequetscht oder beschädigt wird.
- Trennen Sie das Gerät niemals durch Ziehen am Kabel vom Netz.
- Der Netzstecker muss leicht zugänglich bleiben.
- Setzen Sie Ihre Augen nicht zu lange der Lichtquelle aus.
Gerät der Klasse I :
Das Gerät hat eine Basisisolierung und eine Zusatzisolierung (Erdungsklemme).
Dieses Gerät hat eine Erdungsbuchse, an der die Metallteile angeschlossen sind.
MODE AVANCÉ :
Cannal Valeur Fonction
Pan
Pan jn
Tilt
Kantelen jn
XY Snelheid Uit
Master Master
Stroboscopisch eect van
langzaam naar snel
Openen
Rode variatie Groene
variatie
Blauwe variatie
Rode variatie
Kleurselectie
Kleurenmacro Kleurenanimatie
Kleur animatie snelheid
Aangepaste regeling
Snelle automatische bediening
Langzame automatische werking
Geluid 1
Toon 12
Reset
AC220-240V / AC50-60Hz / 2A

24 25
GEBRAUCHSANWEISUNG :
Bei diesem Produkt handelt es sich um eine mit LED-Lampen ausgestattete Beleuchtung. Ideal für
leistungsstarke Beleuchtung mit geringem Stromverbrauch und einer Position, die zum Rhythmus der
Musik passt.
Das Gerät ist nur für die Verwendung in Innenräumen vorgesehen. Vergewissern Sie sich vor der
Installation, Wartung und Reparatur, dass das Gerät ausgeschaltet, vom Netz getrennt und abgekühlt
ist.
AUSPACKEN UND KONTROLLE :
Überprüfen Sie Ihr Gerät vor der Installation und Benutzung auf Beschädigung und Vollständigkeit.
Wenn es ein Problem gibt, bringen Sie es zu Ihrem Händler oder Servicezentrum zurück.
Um Unfallrisiken zu vermeiden, bewahren Sie alle Verpackungsmaterialien außerhalb der Reichweite
von Kindern auf.
AUFHÄNGUNG DER BELEUCHTUNG :
Vergewissern Sie sich vor der Installation der Einheit, dass der Installationsort stabil und fest ist.
Überprüfen Sie die Stabilität und Sicherheit der Anlage. Eine fehlerhafte Installation kann Risiken
erzeugen. Der Hersteller kann im Falle eines Unfalls nicht verantwortlich gemacht werden, wenn
eine falsche Installation vorgenommen wurde.
Sie können dieses Gerät in jeder Position installieren, solange genügend Platz für eine
ausreichende Belüftung vorhanden ist.
Die Lüftungsöffnungen müssen unbedingt freigehalten werden.
TECHNISCHE DATEN :
- 7 RGB + weiße Leds (4in1) mit 4 Watt.
- Automatischer Modus / Master-Slave / Rhythmus der Musik.
- In DMX-512 (9 oder 14 Kanäle).
- Funktion Pan (540°) und Tilt (200°).
- Stroboskop-Funktion
- LCD-ähnlicher Bildschirm
UNTERSTÜTZUNG
Wenn Sie Unterstützung für dieses Produkt benötigen, können Sie den technischen Dienst per E-Mail
unter dieser Adresse erreichen: assistancelytequest.churchill.world
ENTSORGUNG VON PRODUKTEN
Geräte, die mit diesem Symbol gekennzeichnet sind, dürfen nicht in den Hausmüll entsorgt werden.
Tragen Sie zum Schutz der Umwelt und Ihrer Sicherheit bei, recyceln Sie Ihre elektrischen und elektronischen
Produkte.
Das Gerät und seine Verpackung müssen zum Recycling zu Ihrer örtlichen Sammelstelle gebracht werden.
Informationen zur Entsorgung und zum
Recycling erhalten Sie bei den örtlichen Behörden. Einige Sammelstellen nehmen Produkte kostenlos an.
Recycling: Unsere Verpackungen können einem Sortierpfand unterliegen.
Für weitere Informationen: www.consigneetri.fr UMWELTSCHUTZ - RICHTLINIE 2012/19/EU Diese Symbole
sind nur innerhalb der Europäischen
Union gültig.
BEDIENFELD
EINSCHALTEN DES WASH-7
1. Achtung es gibt keinen Ein-/Ausschalter (On/O).
2. Stecken Sie den Netzstecker in die Steckdose auf der Rückseite des Geräts und
dann in die Wandsteckdose.
3. Der Wash-7 wird sich einschalten und zurücksetzen, dies dauert etwa 10 Sekunden.
Drehen Sie die Maschine so, dass das Bedienfeld (Control Panel) vor Ihnen liegt.
Beim Einschalten zeigt der Bildschirm den letzten Modus an, in dem das Gerät verwendet wurde.
Um durch die Modi zu blättern, drücken Sie bitte die Taste "MODE/ESC", bis Sie das gewünschte Menü
erreicht haben.
Wenn Sie Ihre Wahl getroen haben, drücken Sie "ENTER", um in das Untermenü zu gelangen.
VEREINFACHTER MODUS
Die Tastatur verfügt über die Einstellungsfunktion "pan/tilt", sie wird für den werkseitigen Standby-Modus
(Suine-Wert) verwendet. Das Verfahren wird durchgeführt, wenn das Menü "Addr" anzeigt, indem Sie die
Taste "ENTER" mehrere Sekunden lang gedrückt halten, bis die Anzeige "PAN" oder "til" erscheint, dann
drücken Sie "UP" oder "DOWN" (AUF oder AB), um die Schwenk-/Neigungsfunktion (pan/tilt)
auszuwählen und drücken Sie die Taste "ENTER", um die Einstellung vorzunehmen, wenn Ihre Wahl
getroen ist, d drücken Sie "MENU", um zu beenden und zu speichern.
DMX/ Maître esclave
Mode automatique rapide
Mode son
Mode autonome
Mode Maître esclave
Mode automatique lent
PAN sens inverse
Tilt sens inverse
Inversion de l’achage
14 ou 9 cannaux
Pan angle
Tilt angle
Réinitialisation
Réglages d’usine

AUSRICHTUNG
Dieses Gerät kann in jede beliebige Position gebracht werden, solange genügend Platz für die Belüftung
vorhanden ist.
NAVIGATION IM BEDIENFELD
Greifen Sie auf die Funktionen des Bedienfelds zu, indem Sie die vier Tasten des Bedienfelds direkt
unter dem Display verwenden.
MENÜKARTE :
Sechs verschiedene Betriebsmodi, viele davon mit Untermodi, werden von der Einheit unterstützt. Zur
Auswahl verwenden Sie die Taste "MODE / ESC", um das Menü aufzurufen.
Die Tasten "UP" und "DOWN" bestätigen jede Auswahl. Nach einigen Sekunden wird sich die LED-
Anzeige während des Betriebs umdrehen, bis eine andere Taste im integrierten Programmmodus
gedrückt wird.
BENUTZERKONFIGURATIONEN
Einstellen der maximalen Panoramawinkel
Zur Auswahl verwenden Sie die Taste "MODE / ESC" und wählen Sie "PA18", "PA36" oder "PA54".
Die Tasten AUF und AB stimmen zwischen allen verfügbaren PAN-Winkeln überein.
Drücken Sie die "ENTER"-Taste, um die gewählte Auswahl zu bestätigen.
Verwenden Sie zur Auswahl die Taste "MODE / ESC" und wählen Sie "t.9", "t.18", "UP" und "DOWN"
zwischen allen verfügbaren Neigungswinkeln.
Drücken Sie die "ENTER"-Taste, um die gewählte Auswahl zu bestätigen.
UMGEKEHRTE EINSTELLUNG ODER NORMALE PAN
Zur Auswahl verwenden Sie die Taste "MODE / ESC" und wählen Sie "Pan" (normal) oder r Pan
(invertiert). Mit den Tasten UP und DOWN können Sie zwischen den beiden Einstellungen wechseln.
Drücken Sie die Taste "ENTER", um die gewählte Auswahl zu bestätigen.
UMGEKEHRTE EINSTELLUNG ODER NORMALE NEIGUNG
Verwenden Sie zur Auswahl die Taste MODE / ESC und wählen Sie t. L (normal) oder rt. l (invertiert).
Die Tasten UP und DOWN stimmen zwischen den beiden Einstellungen überein. Drücken Sie die Taste
"ENTER", um die gewählte Auswahl zu bestätigen.
26 27
MENU :
Zur Auswahl des Menüs oder zum Verlassen.
UP : Erhöhen (nächste) Einstellung
DOWN : Verringern (vorherige) Einstellung
ENTER : Bestätigen oder Untermenü aufrufen.
HINWEIS
1. Das Gerät verfügt über eine Funktion, die automatisch das DMX- oder SLAVE-Signal erkennt.
2. Wenn eine Einstellung geändert wird und Sie die Taste "ENTER" drücken, wird der neue Wert nach
der Anzeige ". . ." auf der Digitalanzeige gespeichert.
EINRICHTEN
Ziehen Sie das Netzkabel aus der Steckdose, bevor Sie eine Sicherung austauschen, und ersetzen Sie
sie immer durch denselben Sicherungstyp.
Stromversorgung: Bevor Sie Ihr Gerät anschließen, vergewissern Sie sich, dass die Spannung der
Stromquelle in Ihrem Gebiet mit der für Ihr Gerät erforderlichen Spannung übereinstimmt. Das Licht ist
in einer Version von 110 V bis 220 V erhältlich. Da die Netzspannung von Ort zu Ort variieren kann,
sollten Sie die Spannung Ihres Geräts mit der Spannung der Steckdose abgleichen, bevor Sie
versuchen, Ihr Gerät in Betrieb zu nehmen.
AUSWECHSELN DER SICHERUNGEN
Halten Sie mit einem Flachkopfschraubendreher die Sicherung aus ihrem Gehäuse heraus.
Ziehen Sie die beschädigte Sicherung aus dem Sicherungshalter und ersetzen Sie sie durch eine
Sicherung desselben Typs. Setzen Sie den Sicherungshalter an seinem Platz ein und schließen Sie ihn
wieder an.
BEFESTIGUNG DER VERBINDUNG
Sie benötigen eine serielle Datenverbindung, um das Licht von einem oder mehreren Geräten mithilfe
eines DMX-512-Controllers anzeigen zu lassen oder synchronisiert auf zwei oder mehreren Geräten
laufen zu lassen, die auf eine Master/Slave-Betriebsart eingestellt sind. Die kombinierte Anzahl der
Kanäle, die von allen Geräten in einer seriellen Datenverbindung benötigt werden, bestimmt die Anzahl
der Leuchten, die die Datenverbindung unterstützen kann. Empfohlene maximale Entfernung der
seriellen Datenverbindung: 500 Meter (1640 Fuß).
Empfohlene maximale Anzahl von Geräten auf einem seriellen Datenlink: 32 Geräte.
MASTER/SLAVE
1. Verbinden Sie den 3-poligen Stecker (männlich) des DMX-Kabels mit dem 3-poligen Stecker
(weiblich) des ersten Geräts.
2. Verbinden Sie das Ende des Kabels vom ersten Gerät, das einen 3-poligen (weiblichen) Stecker hat,
mit dem Eingangsanschluss des nächsten Geräts, das einen 3-poligen (männlichen) Stecker hat.
Verbinden Sie dann den oben angegebenen Ausgang mit dem Eingang der nächsten Leuchte usw.

28 29
INVERTIERTE EINSTELLUNG ODER NORMALE LED-ANZEIGE.
Verwenden Sie zur Auswahl die Taste MODE / ESC und wählen Sie d.s (normal) oder rd.s (invertiert).
Die Tasten AUF und AB stimmen zwischen den beiden Einstellungen überein. Drücken Sie die Taste
"ENTER", um die gewählte Auswahl zu bestätigen.
AUTOMATISCHER LAUFMODUS
Einer der beiden Untermodi Auto Run kann mit einer voreingestellten Geschwindigkeitsauswahl
ausgewählt werden.
Dieser Modus ermöglicht es der Einheit, von einem Master zu anderen Slave-Einheiten zu agieren.
Auswahl der Untermodi für Auto Run.
Zur Auswahl verwenden Sie die MODE / ESC-Taste, um NAFA oder NASL anzuzeigen.
Die Tasten UP und DOWN wechseln zwischen den beiden anfänglichen Optionen. Wenn Sie die
entsprechende Option ausgewählt haben, verwenden Sie ENTER zur Bestätigung und die LED-
Anzeige wechselt auf "FAST" oder "SLOW". Das Gerät arbeitet dann mit der gewählten
Geschwindigkeit.
DURCH TON AKTIVIERTER MODUS
Das Gerät reagiert auf den Ton, der vom Gerät über das Mikrofon aufgenommen wird, um eine
Lichtshow zu erzeugen. Mit jedem verzweigten Ton können die Farben und die Position der Eekte
verändert werden. Dieser Modus ermöglicht es der Einheit, von einem Master auf andere Slave-
Einheiten zu wirken.
Auswahl des aktivierten Sounds
Zur Auswahl verwenden Sie die Taste MODE / ESC und wählen Sie NSTS.
Wenn die Taste ENTER gedrückt wird, wechselt die LED-Anzeige zu SrUn und das Gerät geht in den
klangaktivierten Modus über.
SLAVE-MODUS
Bis zu 32 Einheiten können kaskadiert werden, wobei eine Einheit als Master fungiert und alle
anderen verbundenen Einheiten als Slave.
Die Slave-Einheit arbeitet alle synchron mit der Master-Einheit, ohne dass ein zusätzlicher Controller
benötigt wird. Die Verbindungen können mithilfe von DMX-Stadard-Steuerkabeln hergestellt werden,
wobei sich die Master-Einheit im aktivierten Modus bendet und am Anfang der Kette platziert wird.
Auswahl des Slave-Modus
Zur Auswahl verwenden Sie die Taste MODE / ESC und wählen Sie NSTS.
Wenn die Taste "ENTER" gedrückt wird, wechselt die LED-Anzeige auf "SON" und das Gerät wird
zum Slave des Steuersignals von einer Mastereinheit.
Fast / Schnell Schneller automatischer Lauf
Slow / Langsam Langsamer automatischer Lauf
Ton Ton aktiviert
ERWEITERTER MODUS
Cannal Wert Funktion
Pan
Pan Ende
Tilt
Tilt Ende
XY Geschwindigkeit Aus
Master Master
Strobe-Eekt von langsam
bis schnell
Önung
Variation von Rot
Variation von Grün
Variation von Blau
Variation von Rot
Farbauswahl
Makro Farbe
Animation von Farbe
Geschwindigkeit der Farbanimation
Benutzerdenierte Steuerung
Schneller automatischer Betrieb
Langsamer automatischer Betrieb
Ton 1
Ton 12
Zurücksetzen

30 31
ELIMINACIÓN DE PRODUCTOS
No tirar los aparatos marcados con la basura.
Ayude a proteger el medio ambiente y su seguridad, recicle sus productos eléctricos y electrónicos.
El dispositivo y su embalaje deben dejarse en su punto de recogida local para su reciclaje. Póngase en
contacto con las autoridades locales. Para informarle sobre el desguace y el reciclaje.
Algunos centros de recogida aceptan productos de forma gratuita.
Reciclaje: Nuestro embalaje puede estar sujeto a un orden de clasicación.
Para obtener más información, consulte a su municipio local.
PROTECCIÓN DEL MEDIOAMBIENTE – DIRECTIVE 2012/19/UE
Estos símbolos sólo son válidos dentro de la Unión Europea.
INSTRUCCIONES DE USO:
Este producto es una iluminación equipada con lámparas LED. Ideal para una iluminación potente y de
bajo consumo.
El dispositivo está diseñado para su uso en interiores. Antes de la instalación, el mantenimiento y la
reparación, asegúrese de que la unidad esté apagada, desenchufada y enfriada.
DESEMBALAJE E INSPECCIÓN:
Antes de la instalación y el uso, compruebe si la unidad está dañada y completa. Si hay algún
problema, devuélvalo a su distribuidor o centro de servicio.
Para evitar el riesgo de accidentes, mantenga todos los materiales de embalaje fuera del alcance
de los niños.
SUSPENSIÓN DE LA ILUMINACIÓN :
Antes de instalar la unidad, asegúrese de que el lugar de instalación es estable y sólido.
Compruebe la estabilidad y seguridad de la instalación. Una instalación incorrecta puede generar
riesgos. El fabricante no puede ser considerado responsable en caso de accidente si ha habido
una instalación errónea.
Puede instalar esta unidad en cualquier posición siempre que haya suficiente espacio para una
ventilación adecuada.
Es imperativo que las aberturas de ventilación se mantengan despejadas.
ESPECIFICACIONES TÉCNICAS :
- 7 x 4en1 RGB + LEDs blancos de 4 vatios
- Modo automático / Modo maestro-esclavo / Ritmo de música
- En DMX-512 (9 o 14 canales)
- Función Pan (540°) y Tilt (200°)
- Función estroboscópica
- Pantalla tipo LCD
ASISTENCIA :
Si necesita soporte para este producto, puede contactar con el servicio técnico por correo electrónico
en esta dirección: assistancelytequest.churchill.world
ES
!
NOTA IMPORTANTE: Los productos eléctricos no deben desecharse con la basura doméstica. Por favor,
recíclalos. donde hay centros para eso. Consulte a las autoridades locales o a su distribuidor sobre cómo
reciclarlas.
INSTRUCCIONES DE SEGURIDAD
Lea atentamente este manual, que contiene información.
En la instalación y uso del dispositivo.
• Guarde el manual para futuras referencias. Si el dispositivo cambia en el día del propietario, asegúrese
de que el nuevo usuario esté en posesión del manual.
• Asegúrese de que la tensión de red sea adecuada para esta unidad y que no exceda la tensión de ali-
mentación indicada en la placa de características de la unidad.
• Solo para uso en interiores!
• Para evitar incendios o descargas eléctricas, no exponga este aparato a la lluvia ni a la humedad.
Asegúrese de que no haya objetos inamables cerca de la unidad durante la operación.
• El aparato no debe exponerse a goteos o salpicaduras de agua. No se deben colocar objetos llenos de
líquidos, como jarrones, sobre el aparato.
• No coloque en el dispositivo fuentes de llamas, como velas encendidas.
• Para garantizar una ventilación adecuada, instale la unidad en un área bien ventilada a una distancia
mínima alrededor de la unidad de 50 cm.
La ventilación no debe ser obstruida por la obstrucción de las aberturas de ventilación por objetos tales
como periódicos, manteles, cortinas, etc.
• Desconecte el aparato de la red eléctrica antes de su manipulación o mantenimiento. Cuando reemplace
el fusible, use solo un fusible que tenga exactamente las mismas características que el anterior.
• El dispositivo está diseñado para su uso en un clima templado. La temperatura ambiente no debe superar
los 40° C. No opere la unidad a temperaturas más altas.
• En caso de mal funcionamiento, detenga el dispositivo inmediatamente. Nunca intente reparar la unidad
usted mismo. La reparación inadecuada puede provocar daños y mal funcionamiento. Póngase en contac-
to con un servicio técnico autorizado. Utilice únicamente piezas que sean idénticas a las originales.
• No conecte el dispositivo a una unidad.
• Asegúrese de que el cable de alimentación nunca esté aplastado o dañado.
• Nunca desenchufe el aparato tirando del cable.
• El enchufe debe ser fácilmente accesible.
• No exponga sus ojos demasiado tiempo a la fuente de luz.
CONTENIDO DEL PAQUETE
1 x Wash7
1 x Cable de alimentación
1 x Soporte + tornillos
1 x Manual de usuario
Equipo clase I:
El equipo tiene aislamiento básico y aislamiento suplementario (terminal de tierra).
Este equipo dispone de toma de tierra a la que se conectan las partes metálicas.
Instale la unidad a una distancia mínima de 0,1 metros de todos los demás objetos,
incluidos los objetos inamables.
AC220-240V / AC50-60Hz / 2A

32 33
PANEL DE CONTROL
PUESTA EN MARCHA DEL WASH-7
1. Tenga en cuenta que no hay botón de encendido/apagado.
2. Conecte el enchufe de alimentación a la parte posterior de la máquina y, a
continuación, conéctelo a la toma de corriente.
3. La lavadora Wash-7 se pondrá en marcha y se reiniciará automáticamente, lo que
tardará unos 10 segundos.
Oriente la máquina de forma que el panel de control esté orientado hacia usted.
Al arrancar, la pantalla mostrará el último modo en el que se utilizó la lavadora.
Para desplazarse por los modos, pulse la tecla "MODE/ESC" hasta el menú deseado.
Una vez hecha la elección, pulse "ENTER" para acceder al submenú.
MODO SIMPLIFICADO
El teclado está equipado con la función de ajuste "PAN/TILT", se utiliza para el ajuste por defecto de
fábrica (valor suino). El procedimiento se sigue cuando el menú muestra "Addr", pulsando la tecla
"ENTER" durante varios segundos, hasta que la pantalla muestre "PAN" o"til", entonces pulse
"UP" o"DOWN" para elegir la función de ajuste pan/tilt y pulse la tecla "ENTER" para ajustar,
cuando su elección esté hecha, pulse "MENU" para salir y guardar.
MENÚ
Para seleccionar el menú o salir
ARRIBA: Aumentar (siguiente) ajuste
ABAJO: Disminuir (anterior) ajuste
ENTER: Conrmar o entrar en submenú
NOTA
1. La máquina tiene una función que reconoce automáticamente la señal DMX o ESCLAVO.
2. Cuando se cambia un parámetro y se pulsa el botón "ENTER", el nuevo valor se guarda después de
que aparezca "... ..." en la pantalla digital.
CONFIGURACIÓN
Desenchufe el cable de alimentación antes de sustituir un fusible y sustitúyalo siempre por otro del
mismo tipo.
Fuente de alimentación: Antes de enchufar el aparato, asegúrese de que la tensión de la fuente de su
zona se corresponde con la tensión necesaria para su. La luz está disponible en una versión de 110V a
220V. Dado que la tensión de la red puede variar de un lugar a otro, debe asegurarse de que la tensión
de su aparato coincide con la de la toma de corriente antes de intentar utilizarlo.
SUSTITUCIÓN DE FUSIBLES
Con un destornillador plano, saque el fusible de su alojamiento.
Retire el fusible dañado de su soporte y sustitúyalo por otro del mismo tipo. Inserte el portafusibles en
su lugar y vuelva a conectarlo.
FIJACIÓN DEL ENLACE
Necesitará un enlace de datos en serie para visualizar la luz de la(s) luminaria(s) mediante un
controlador DMX-512 o funcionar de forma sincronizada con dos o más luminarias conguradas en un
modo de funcionamiento maestro/esclavo. El número combinado de canales requeridos por todas las
luminarias en un enlace de datos serie determina el número de luminarias que el enlace de datos puede
soportar. Distancia máxima recomendada del enlace de datos serie: 500 metros (1640 ft).
Número máximo recomendado de dispositivos en un enlace de datos serie: 32 dispositivos.
MAESTRO / ESCLAVO
1. Conecte el conector de 3 clavijas (macho) del cable DMX al conector de 3 clavijas (hembra) de la
primera luminaria.
2. Conectar el extremo del cable de la primera luminaria que tiene un conector de 3 pines (hembra) al
conector de entrada de la siguiente luminaria que tiene un conector de 3 pines (macho). A continuación,
proceda a conectar la salida indicada anteriormente a la entrada de la siguiente luminaria, etc.
DMX/ Maestro Esclavo
Modo automático rápido
Modo de sonido
Modo autónomo
Modo maestro esclavo
Modo automático lento
Inversión PAN
Inversión de inclinación
Inversión de pantalla
14 o 9 canales
Ángulo panorámico
Ángulo de inclinación
Restablecer
Ajustes de fábrica

ORIENTACIÓN:
Este aparato puede moverse a cualquier posición siempre que haya espacio suciente para la ventilación
NAVEGACIÓN POR EL PANEL DE CONTROL
Acceda a las funciones del panel de control mediante los cuatro botones del panel situados justo debajo de
la pantalla.
MAPA DE MENÚS
La unidad admite seis modos de funcionamiento distintos, muchos de ellos con submodos. Para
seleccionarlos, utilice el botón "MODE / ESC" para acceder al menú.
Las teclas "UP" y"DOWN" conrman la selección. Después de unos segundos, la pantalla LED se
apagará durante el funcionamiento hasta que se pulse otro botón en el modo de programa incorporado.
AJUSTES DE USUARIO
Ajuste de los ángulos máximos de barrido
Para seleccionar, utilice el botón "MODE / ESC" y elija "PA18", "PA36" o "PA54". Los botones ARRIBA y
ABAJO coinciden entre todos los ángulos de PAN disponibles.
Pulse el botón "ENTER" para conrmar la selección.
Para seleccionar, utilice el botón "MODE / ESC" y elija "t.9", "t.18" Los botones "UP" y "DOWN" coinciden
entre todos los ángulos de inclinación disponibles. Pulse el botón "ENTER" para conrmar la selección
elegida
AJUSTE DE PANEO INVERSO O NORMAL
Para seleccionar, utilice el botón "MODE / ESC" y elija "Pan" (normal) o "Pan" (inverso).
Los botones ARRIBA yABAJO alternan entre los dos ajustes. Pulse el botón "ENTER" para conrmar la
selección.
AJUSTE DE INCLINACIÓN NORMAL O INVERSA
Para seleccionar, utilice el botón MODE / ESC y elija t. L (normal) o rt. l (inversa). Los botones ARRIBA y
ABAJO coinciden entre los dos ajustes. Pulse el botón "ENTER" para conrmar la selección elegida
34 35
AJUSTE INVERSO O VISUALIZACIÓN NORMAL DEL LED
Para seleccionar, utilice el botón MODE / ESC y elija d.s (normal) o rd.s (inversa). Los botones
ARRIBA y ABAJO coinciden entre los dos ajustes. Pulse el botón ENTER para conrmar la selección
elegida.
MODO DE CARRERA AUTOMÁTICA
Se puede seleccionar uno de los dos submodos de carrera automática con una selección de
velocidad preestablecida.
Este modo permite a la unidad actuar como maestro de otras unidades esclavas.
Selección de los submodos de Marcha Automática
Para seleccionar, utilice el botón MODE / ESC para mostrar NAFA o NASL.
Los botones UP y DOWN cambian entre las dos opciones iniciales. Una vez seleccionada la opción
adecuada, pulse ENTER para conrmar y la pantalla LED cambiará a "RÁPIDO" o "LENTO". La
unidad funcionará entonces a la velocidad seleccionada
MODO ACTIVADO POR SONIDO
La unidad responde al sonido captado por la unidad en el micrófono para crear un espectáculo de
luces. Cada sonido ramicado permite cambiar los colores y la posición de los efectos. Este modo
permite a la unidad actuar como maestro de otras unidades esclavas
Selección del sonido activo
Para seleccionar, utilice el botón MODE / ESC y elija NSTS.
Cuando se pulsa el botón ENTER, la pantalla LED cambia a SrUn y la unidad entra en el modo de
sonido activado.
MODO ESCLAVO
Se pueden conectar hasta 32 unidades en cascada, actuando una unidad como maestra y cualquier
otra unidad conectada como esclava.
Las unidades esclavas funcionarán sincronizadas con la unidad maestra sin necesidad de un
controlador adicional. Las conexiones pueden realizarse utilizando cables de control DMX estándar
con la unidad maestra en modo activo y colocada al principio de la cadena.
Selección del modo esclavo
Para seleccionar, utilice el botón MODE / ESC y elija NSTS
Al pulsar el botón "ENTER", la pantalla LED cambiará a "SOUND" y la luminaria será esclava de la
señal de control de una unidad maestra.
Rápido Funcionamiento automático rápido
Lento Funcionamiento automático lento
Sonido Sonido activado

36 37
36 37
AVVISO DI SCOSSA ELETTRICA - NON APRIRE
CONTENUTO DEL PACCHETTO :
1 x Wash7
1 x Cavo di alimentazione
1 x supporto + viti
1 x Manuale d'uso
NOTA IMPORTANTE: I prodotti elettrici non devono essere smaltiti con i riuti domestici. Si prega di rici-
clarli dove esistono centri a questo scopo. Consultate le autorità locali o il vostro rivenditore su come rici-
clarli.
Installare l'unità ad una distanza minima di 0,1 metri da tutti gli altri oggetti, compresi
quelli inammabili.
IT
!
Apparecchiature di classe I :
il dispositivo ha un isolamento di base e un isolamento aggiuntivo (morsetto di terra).
Questa apparecchiatura dispone di una presa di terra alla quale sono collegate le parti metalliche.
LINEE GUIDA DI SICUREZZA
Leggere attentamente questo manuale, che contiene informazioni
importanti sull'installazione e l'utilizzo del dispositivo.
- Conservare il manuale per riferimento futuro. Se l'unità cambia proprietà il giorno del cambio di proprietà,
assicurarsi che il nuovo utente sia in il possesso del manuale.
- Assicurarsi che la tensione di rete sia adatta a questo apparecchio e non superi la tensione di alimenta-
zione indicata sulla targhetta.'identicazione dell'unita'.
- Per ridurre il rischio di incendio o di scossa elettrica, non esporre questa unità alla pioggia o all'umidità.
Assicuratevi che non ci siano Nessun oggetto inammabile si trova nelle vicinanze dell'apparecchio durante
il funzionamento.
- L'apparecchio non deve essere esposto a sgocciolamenti o spruzzi d'acqua. Sull'apparecchio non devono
essere collocati oggetti pieni di liquidi, come i vasi. deve essere posizionato sull'unità.
- Non collocare sull'apparecchio sorgenti di amme libere, come ad esempio candele accese.
- Per garantire una suciente ventilazione, installare l'apparecchio in un luogo ben ventilato con una distan-
za minima intorno all'apparecchio di 50 cm.
La ventilazione non deve essere impedita ostruendo le aperture di ventilazione con oggetti come giornali,
tovaglie, tende, ecc...
- Scollegare l'unità dalla presa di corrente prima di eseguire qualsiasi operazione di manutenzione o assis-
tenza. Quando si sostituisce il fusibile, utilizzare solo un fusibile che sia adatto all'uso nell'area in cui è ins-
tallata l'unità.
che ha esattamente le stesse caratteristiche di quella vecchia.
- L'unità è destinata all'uso in un clima temperato. La temperatura ambiente non deve superare i 40°C. Non
operare
l'unità a temperature più elevate.
- In caso di malfunzionamento, spegnere immediatamente l'apparecchio. Non tentare mai di riparare l'unità
da soli. Riparazioni Se fatto in modo improprio può causare danni e malfunzionamenti. Contattare un centro
di assistenza autorizzato. Utilizzare solo parti approvate. pezzi di ricambio identici a quelli originali.
- Non collegare l'unità ad un dimmer.
- Assicurarsi che il cavo di alimentazione non venga mai schiacciato o danneggiato.
- Non scollegare mai l'unità tirando il cavo.
- La spina di alimentazione deve rimanere facilmente accessibile.
- Non esporre gli occhi alla fonte di luce per troppo tempo.
AC220-240V / AC50-60Hz / 2A
MODO AVANZADO
Canal Valor Función
Pan
Pan no
Inclinación
Inclinación na
Velocidad XY O
Master Master
Efecto estroboscópico de
lento a rápido
Apertura
Variación roja
Variación verde
Variación azul
Variación roja
Selección de color
Macro de color
Animación de color
Velocidad de animación del color
Control personalizado
Funcionamiento automático rápido
Funcionamiento automático lento
Sonido 1
Sonido 12
Reiniciar

38 39
ISTRUZIONI PER L'USO :
Questo prodotto è un'illuminazione dotata di lampade a LED. Ideale per un'illuminazione potente e a
bassa potenza con una posizione che funziona a ritmo di musica.
L'apparecchio è destinato esclusivamente all'uso in ambienti interni. Prima dell'installazione, della
manutenzione e della riparazione, assicurarsi che l'unità sia spenta, scollegata e rareddata.
DISIMBALLAGGIO E CONTROLLO :
Prima dell'installazione e dell'uso, controllare che l'unità non sia danneggiata e che sia completa. Se
c'è un problema, restituirlo al rivenditore o al centro di assistenza.
Per evitare il rischio di incidenti, tenere tutto il materiale da imballaggio fuori dalla portata dei bambini.
SOSPENSIONE DELL'ILLUMINAZIONE :
Prima di installare l'unità, assicurarsi che il luogo di installazione sia stabile e solido.
Controllare la stabilità e la sicurezza dell'installazione. Un'installazione non corretta può generare
rischi. Il produttore non può essere ritenuto responsabile in caso di incidente se si è verificata
un'installazione errata.
L'apparecchio può essere installato in qualsiasi posizione, purché vi sia spazio sufficiente per
un'adeguata ventilazione.
È indispensabile che le aperture di ventilazione siano mantenute libere.
DATI TECNICI :
- 7 x 4in1 RGB + LED bianchi da 4 watt
- Modalità automatica / Modalità Master-Slave / Ritmo della musica
- In DMX-512 (9 o 14 canali)
- Funzione Pan (540°) e Tilt (200°)
- Funzione strobo
- Display di tipo LCD
ASSISTANCE
Se hai bisogno di supporto per questo prodotto, puoi contattare il reparto tecnico via e-mail a questo
indirizzo: assistancelytequest.churchill.world
DISPOSIZIONE
Non scartare gli apparecchi recanti questo simbolo con i riuti domestici.
Contribuire alla protezione dell'ambiente e la vostra sicurezza, riciclare i vostri prodotti
elettrici ed elettronici.
Il dispositivo e il suo imballaggio devono essere lasciati al punto di raccolta locale per il
riciclaggio. Contattare le autorità locali per informazioni sulla demolizione e il riciclaggio.
Alcuni centri di raccolta accettano prodotti gratuiti.
Riciclo: I nostri imballaggi possono essere smistati.
Per ulteriori informazioni : www.consigneetri.fr
PROTEZIONE DELL'AMBIENTE - DIRETTIVA 2012/19/EU
PANNELLO DI CONTROLLO
AVVIO DI WASH-7
1. Non c'è un pulsante di accensione/spegnimento.
2. Collegare la spina di alimentazione al retro dell'apparecchio e poi alla presa di corrente.
3. Il Wash-7 si avvierà e si resetterà da solo, il che richiede circa 10 secondi.
Orientate la macchina in modo che il pannello di controllo sia rivolto verso di voi.
All'avvio il display mostrerà l'ultima modalità in cui la macchina è stata utilizzata.
Per scorrere le modalità, premere il tasto "MODE/ESC" no al menu desiderato.
Una volta eettuata la scelta, premere "ENTER" per accedere al sottomenu.
MODALITÀ SEMPLIFICATA :
La tastiera è dotata della funzione di impostazione "pan/tilt", che viene utilizzata per l'impostazione di
fabbrica (valore suino). La procedura da seguire è la seguente: quando il menu visualizza "Addr",
premere il tasto "ENTER" per alcuni secondi, nché il display non visualizza "PAN" o"til", quindi premere
i tasti "UP" o"DOWN" per scegliere la funzione di regolazione di pan/tilt e premere il tasto "ENTER" per
regolare; una volta eettuata la scelta, premere "MENU" per uscire e salvare.
DMX/ Master Slave
Modalità automatica veloce
Modalità suono
Modalità stand-alone
Modalità master slave
Modalità automatica lenta
Inversione PAN
Inversione dell'inclinazione
Inversione del display
14 o 9 canali
Angolo di panoramica
Angolo di inclinazione
Reset
Impostazioni di fabbrica
Table of contents
Languages:
Other LYTEQUEST Lighting Equipment manuals
Popular Lighting Equipment manuals by other brands

Lightolier
Lightolier Baselyte-BSL12 datasheet

Regent Lighting Solutions
Regent Lighting Solutions Linux Pro installation instructions

Catellani & Smith
Catellani & Smith CicloItalia Flex F3 Assembly instructions

Stellar Lighting
Stellar Lighting SS-300 Shooting star user manual

TECshow
TECshow Powerbox user manual

American DJ
American DJ Mega Tri64 Profile User instructions