LZR OR-3 User manual

Or-3
User’sGUide 2
ManUel d’Utilisation 5

UK
IMPORTANT
Please read this manual carefully BEFORE using your
helmet for the first time.
Following the instructions will keep your helmet
effective and SAFE.
Remember to keep the manual in a safe place.
It contains instructions, which are EXTREMELY
IMPORTANT for your safety.
PLEASE REMEMBER!!! We have done our best to be as
clear and explicit as possible. However, should you
find the instructions unclear, or have any questions
or require further information, please do not hesitate
to contact us by post or e-mail.
INFORMATION FOR USERS
- To insure an adequate protection, this helmet must
fit closely and be securely attached
- Any helmet that has sustained a violent impact
should be replaced
- Warning! Do not apply paint, stickers, petrol or
other solvents to this helmet. Use only warm soapy
water to clean the helmet surface
ECE R22.05
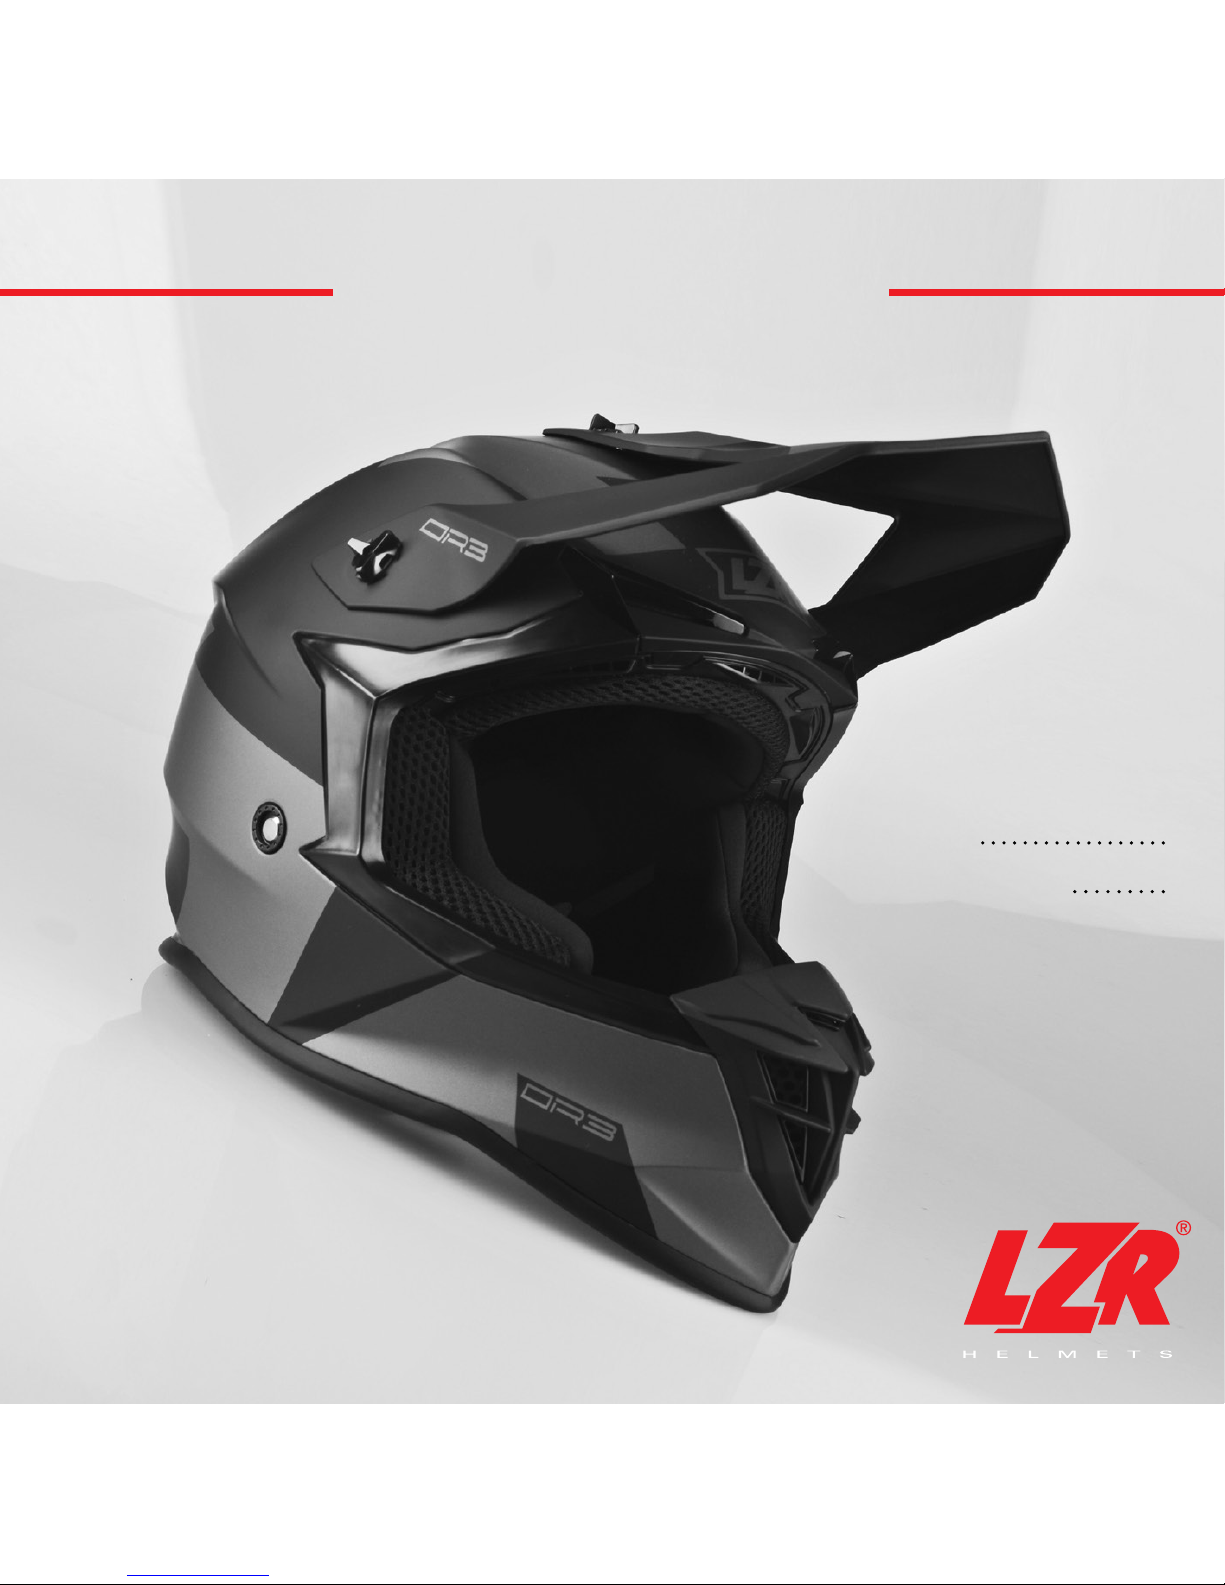
Congratulations for buying our LZR OR-3 helmet!
You can be sure that you have done an excellent
choice.
Enjoy it and have a happy ride, Lazer protects Your
Freedom...
ADVICES
FASTENING
Your helmet will be useless if it’s too big or not
properly fastened. Always buy a helmet to your
exact size and always fasten it properly.
MODIFICATIONS
Never modify your helmet in any way. Modifications
could result in lowering the effectiveness of your
helmet.
DAMAGED HELMET
When your helmet sustains a severe shock, part of
its structure and lining may have been deteriorated
by absorbing the energy of the impact. These
damages may not be visible to the eye. In this case,
do not hesitate to replace it.
CARE AND MAINTENANCE
Clean the outside and inside of your helmet
regularly. Use a soft cloth and warm or slightly
soapy water. NEVER USE GAS OIL, SOLVENTS, PETROL
OR OTHER AGGRESSIVE PRODUCTS.
The padding is removable to make it easy to clean.
Again, only use warm or slightly soapy water. Hand
wash and drip dry.
STORAGE
After washing your helmet, store it inside a bag, in a
dry temperate place. Avoid prolonged storage in a
very illuminate place.
- 2 -
or-3
DURABILITY
Over time, some wear marks can appear on
safety elements of your helmet, such as: wearing
or fraying of the strap, malfunction of the buckle,
cracking or crumbling of the inner liner, cracking
of the shell, … In this case, contact your dealer to
check or replace your helmet.
HANDLING
WILL IT STAY ON ? (FIG. 1)
You want to know If the helmet you bought will
stay firmly on your head in a crash. Make sure the
chinstrap is done up and tilt your head forward. Ask
someone to try and roll the helmet off your head by
carefully pushing up from the rear of the helmet at
its base. If you can roll it off in the showroom, then
it’s sure to come off in a crash.
INSTRUCTION - DOUBLE D BUCKLE:
TO FASTEN AND OPEN THE CHIN STRAP (FIG. 2)
1. Fasten the chin strap by passing the end of the
strap through the 2 rings as shown on picture A,
then pull it comfortably tight for a secure and
snug fit.
2. To remove the helmet pull the little red tab
outwards, the strap tension will be released as
shown on picture B. Then unthread the chin
strap.
Warning ! – The red snap placed at the end of the
chin strap must NOT be used instead of the Double
D buckle.It has been designed to avoid the chin
strap flapping in the wind at high speed.
ADJUSTING AND USING
THE MICROMETRIC BUCKLE (fig. 3)
1. First, adjust the length of the strap by rolling it
through the plastic adjustable strap (C)
2. To close the buckle, insert the ratcheted tongue
(D) into the casing (E). When you hear a “click”,
the buckle is closed. The multi-notching allows
for minute adjustments in order to obtain perfect
comfort and fit with the buckle
3. If necessary, go back and repeat Step 1
4. To open the buckle, pull on the red strap (F)
and draw back the ratcheted tongue using your
other hand
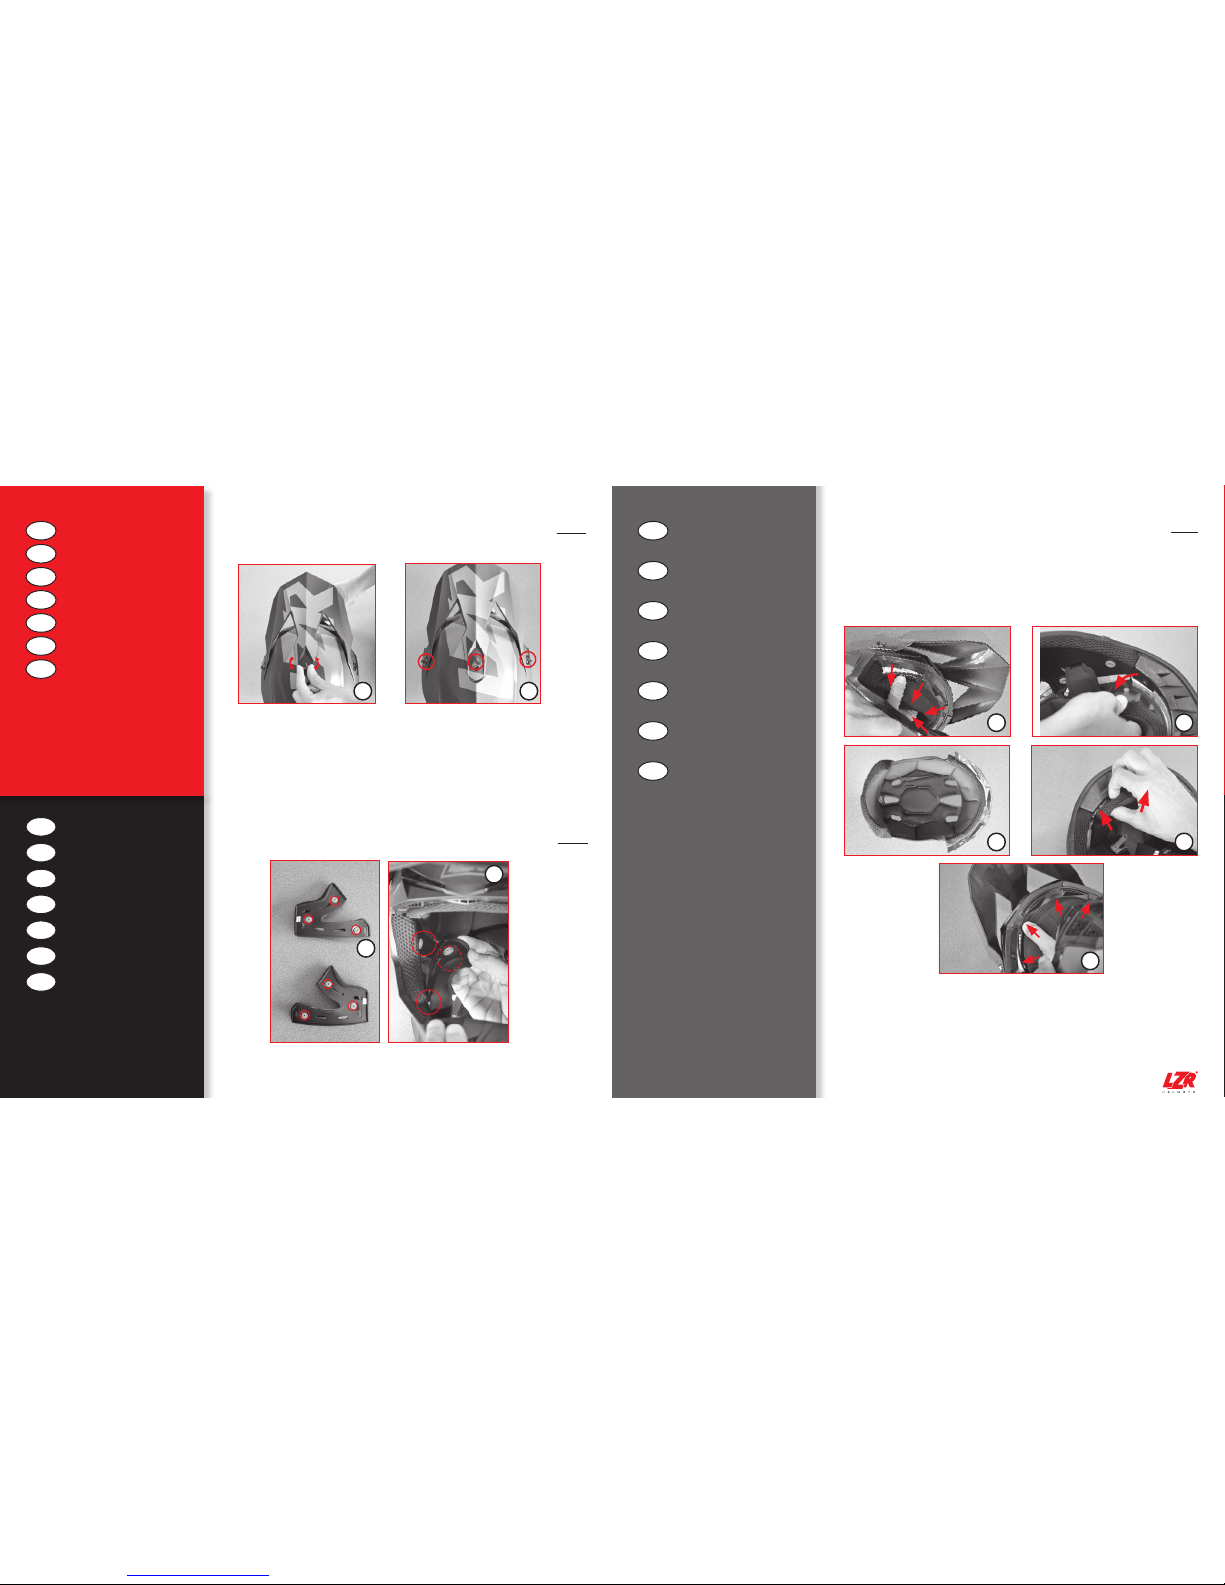
HOW TO ADJUST THE VISOR (FIG. 4)
• Nothing could be simpler. Unscrew the central
upper screw to unlock the central adjusting
device. (G)
• All you have to do next is move the visor to the
position desired.
• Tighten the central screw again by turning it to
lock the central adjusting device in place.
• You do not need to move the side screws to
adjust the visor.
HOW TO REMOVE THE VISOR (FIG. 4)
• Nothing could be simpler. Undo the three
fastening screws and take them out of their
casing (H).
• When removing and replacing the visor, take
care not to lose the different shims and check
their placement.
• When replacing the visor, do not over-tighten the
three screws
HOW TO REPLACE THE CHEEK PADS (FIG. 5)
• Unclip the 3 snap buttons beneath the cheek
pads (I, J)
• Do the same for the other side.
Verify that the part was assembled correclly by
checking that:
• the cheek pad is firmly locked in position;
- 3 -
or-3

• that the strap was not blocked under the cheek
pad during assembly.
HOW TO REMOVE AND REPLACE
THE HEAD PAD ON YOUR HELMET (fig. 6)
• Pull and tear the front head band to release the 4
snaps (K)
• Pull the neck cushion to unsnap the 2 press studs (L)
• Remove the entire pad from the helmet (M)
To put the head pad back on:
• Introduce the whole head pad inside the helmet
• Snap the 2 press studs of the neck cushion (N)
• Insert the front head band on its location and snap
the 4 fixing clips (O)
• The head pad sets itself easily on its own
WWW.LAZERHELMETS.COM
- 4 -
FR
IMPORTANT
Nous vous prions de lire avec attention ce manuel
AVANT d’utiliser votre casque pour la première fois.
Suivre les instructions maintiendra votre casque
dans un état lui assurant efficacité et SECURITE.
Prenez soin de conserver ce manuel dans un
endroit vous permettant de le retrouver facilement.
Il contient des instructions de sécurité EXTREMEMENT
IMPORTANTES.
SOUVENEZ VOUS-EN !!! Nous avons fait le maximum
pour être le plus clair et le plus explicite possible.
Cependant, si des instructions ne vous semblent
pas claires, si vous avez des questions ou besoin
d’informations, n’hésitez pas à nous contacter par
courrier ou par e-mail.
MISE EN GARDE
- Pour assurer une protection suffisante, ce casque
doit être bien ajusté et être solidement attaché
- Tout casque qui a été soumis à un choc violent
est à remplacer
- Attention: N’appliquer sur ce casque ni peinture,
ni autocollant (sauf obligation légale), ni essence,
ni aucun autre solvant. N’utilisez que de l’eau
chaude et savonneuse pour nettoyer le casque
ECE R22.05
Merci d'avoir acheté votre casque LZR OR-3.
Soyez-en certain, vous avez fait un excellent choix.
Profitez-en puisque LZR protège votre Liberté…..
et bonne route !
CONSEILS
FERMETURE
Votre casque sera inutile s’il est trop grand ou s’il
est mal attaché. Veillez donc à l’acheter à la bonne
taille et à toujours fixer sa jugulaire.
MODIFICATIONS
Il est formellement déconseillé d’apporter
quelque modification que ce soit à votre casque.
Cela pourrait impliquer des dégradations qui
diminueraient l’efficacité de votre casque.
CASQUE ENDOMMAGÉ
Lorsque votre casque subit un choc important, une
partie de sa structure et de son rembourrage se
détériore en absorbant l’énergie du choc; il se peut
que cette détérioration reste invisible à l’œil nu. Par
sécurité, veillez néanmoins à remplacer le casque.
SOIN ET ENTRETIEN
Nettoyez régulièrement l’extérieur et l’intérieur du
casque. Utilisez un chiffon doux et une solution
d’eau tiède pure ou légèrement savonnée.
N'UTILISEZ JAMAIS DE GASOIL, DILUANTS, ESSENCES
ET AUTRES PRODUITS AGRESSIFS.
Les garnitures de confort se démontent afin de
faciliter leur nettoyage. Là encore, n’utilisez que de
l’eau tiède pure ou légèrement savonnée. Lavez-les
à la main et faites-les ensuite sécher à l’air.
Après avoir correctement nettoyé les deux
ventilations arrière, il est conseillé de les lubrifier
de temps en temps avec une graisse blanche ou
- 5 -
or-3
or-3
or-3

graisse silicone. Ceci afin d’assurer leur longévité.
STOCKAGE
Après avoir nettoyé votre casque, stockez-le à
l’intérieur d’une housse, dans un endroit sec et
tempéré. Evitez un stockage prolongé exposé à la
lumière.
LONGÉVITÉ
Avec l’âge, certains signes d’usure peuvent
apparaître sur les éléments de sécurité de votre
casque, tels que: sangle usée ou effilochée,
disfonctionnement de la boucle, craquelures ou
effritement du rembourrage protecteur intérieur,
fissures de la calotte… Dans ce cas, contactez
votre revendeur pour inspection ou remplacez
votre casque.
EN PRATIQUE
EST-CE QU’IL TIENDRA SUR VOTRE TÊTE ? (FIG. 1)
Vous voulez savoir si le casque que vous achetez
restera sur votre tête en cas d’accident ? Assurez-
vous que les sangles sont attachées puis secouez
la tête en avant. Demandez à quelqu’un de vous
arrachez le casque de la tête en tirant prudemment
à la base de l’arrière vers l’avant. Si vous arrivez à
le retirer dans le magasin alors il est certain qu’il ne
tiendra pas en cas d’accident.
INSTRUCTIONS - BOUCLE DOUBLE D:
FERMETURE DE LA JUGULAIRE (FIG. 2)
1. Pour une fermeture correcte de la jugulaire,
passez la sangle entre les deux boucles comme
indiqué sur l’image A et ajustez la pour un confort
et une sécurité optimales.
2. Pour enlever le casque, tirez légèrement sur
le ruban rouge de la boucle double D afin de
dégager la sangle comme indiqué sur l’image B.
Avertissement ! – Le bouton pression rouge qui se
trouve au bout de la jugulaire ne peut en aucun
cas être utilisé pour remplacer la fermeture double
D. Il a été prévu pour éviter le flottement de la
jugulaire à grande vitesse.
AJUSTEMENT ET UTILISATION
DE LA BOUCLE MICROMÉTRIQUE (FIG. 3)
1. Ajustez d’abord la longueur de la sangle en la
faisant glisser autour de l’attache (C)
2. Pour fermer votre boucle, introduisez la languette
à cliquets (D) dans le boîtier (E). Lorsque vous
entendez «clic», votre boucle est fermée. Le multi
crantage vous permet un réglage plus fin et une
tension parfaite et confortable de la sangle
3. Au besoin, revenez au point 1
4. Pour ouvrir votre boucle, tirez sur la lanière rouge
(F) et retirez la languette à cliquets à l’aide de
l’autre main
COMMENT RÉGLER LA VISIÈRE (FIG. 4)
• Rien de plus simple. Desserrez la vis centrale
supérieure permettant ainsi le déblocage du
dispositif de réglage central (G).
• Ensuite il vous suffit de régler la visière dans la
position désirée.
• Resserrez la vis centrale afin de bloquer le dispositif
de réglage central.
• Il n’est pas nécessaire de modifier la position des
vis latérales pour régler la visière.
COMMENT DÉMONTER LA VISIERE (FIG. 4)
• Rien de plus simple. Desserrez complètement de
la même manière les trois vis de fixation et retirez-
lez de leur logement (H).
• Lors du démontage et remontage, veillez ne pas
perdre les différentes rondelles intercalaires et
vérifiez leur positionnement.
• Lors du remontage, resserrez les trois vis sans
excès
- 6 -
COMMENT REMPLACER
LES COUSSINETS DE JOUE (FIG. 5)
• Déboutonnez les 3 boutons pressions de fixation
se trouvant sous le coussinet de joue (I, J)
• Répétez l'opération de l'autre côté.
Vérifiez que l'ensemble a été monté correctement
en vous assurant que:
• le coussinet de joue est solidement fixé;
• la sangle n'est pas cachée sous le coussinet de
joue durant l'opération de montage.
COMMENT ENLEVER ET REMETTRE
LA COIFFE INTÉRIEURE (FIG.6)
• Tirez sur le bandeau frontal pour libérer les 4
attaches (K)
• Tirez la coiffe de la nuque pour détacher les 2
boutons-pression (L)
• Retirez la coiffe entière à partir du casque (M)
Pour remettre la coiffe:
• Mettez en place la coiffe à l'intérieur du casque
• Alignez et fermez les 2 boutons-pression de la
coiffe sur la nuque (N)
• Insérez le bandeau frontal sur son emplacement
et enclenchez les 4 clips de fixation (O)
• La coiffe se met en place facilement en lissant à
la main
WWW.LAZERHELMETS.COM
- 7 -
or-3

fig. 2
fi g.1
fi g.2
AB
DOUBLE D BUCKLE
BOUCLE DOUBLE D
DUBBELE D-SLUITING
DOPPEL-D-VERSCHLUSS
CIERRE D DOBLE
SISTEMA DOUBLE D
CHIUSURA A DOPPIA D
UK
FR
NL
DE
ES
PT
IT
UK
FR
NL
DE
ES
PT
MICROMETRIC BUCKLE
BOUCLE MICROMÉTRIQUE
MICROMETRISCHE GESP
MIKROMETRISCHE SCHNALLE
HEBILLA MICROMÉTRICA
FIVELA MICROMÉTRICA
CINTURINO
MICROMETRICO
fig. 3
C D E F
MEG OR-3 09-18
WILL IT STAY ON?
EST-CE QU’IL TIENDRA
SUR VOTRE TÊTE ?
BLIJFT DE HELM
OP UW HOOFD ZITTEN ?
SITZT ER FEST?
¿SE QUEDARÁ EN SU CABEZA?
SERA QUE ESTA FIRME?
RESTERÀ SULLA
VOSTRA TESTA?
UK
FR
NL
DE
ES
PT
IT
fi g.1
fi g.2
AB
fi g.1
fi g.2
AB
fi g.1
fi g.2
AB
or-3 - 8 - - 9 -

HOW TO REMOVE AND
REPLACE THE HEAD PADDING
ENLEVER ET REMETTRE
LA COIFFE INTÉRIEURE
HET INTERIEUR VERWIJDEREN
EN TERUG PLAASTEN
DAS ABNEHMEN UND
ERNEUTE ANBRINGEN
DES KOPFPOLSTERS
¿CÓMO RETIRAR Y COLOCAR
LA CALOTA INTERIOR?
COMO REMOVER E SUBSITUIR
O FORRO INTERNO
COME TOGLIERE E METTERE
LA CUFFIA INTERNA
UK
FR
NL
DE
ES
PT
IT
fig. 6
K
M
O
L
N
HOW TO REMOVE AND
REPLACE THE CHEEK PADS
ENLEVER ET REMETTRE
COUSSINETS DE JOUES
DE WANGSTUKKEN
VERWIJDEREN EN BEVESTIGEN
DAS ABNEHMEN UND
ERNEUTE ANBRINGEN
DER BACKENPOLSTER
¿CÓMO RETIRAR Y COLOCAR
LAS ALMOHADILLAS?
COMO REMOVER E SUBSITUIR
O FORRO DIANTEIRO
COME TOGLIERE E METTERE
I GUANCIALI
UK
FR
NL
DE
ES
PT
IT
fig. 5
J
I
fig. 4
HOW TO ADJUST THE VISOR
COMMENT RÉGLER LA VISIÈRE
HOE REGELT U HET SCHERM
DAS EINSTELLEN DES VISIERS
¿CÓMO AJUSTAR LA VISERA?
COMO AJUSTAR A SUA
VISEIRA
COME REGOLARE
IL FRONTINO
UK
FR
NL
DE
ES
PT
IT
GH
or-3 - 10 - - 11 -

www.lazerhelmets.com
LAZER Headquarters
Rue André Dumont 3
B-1435 Mont-Saint-Guibert - Belgium
Tel.: + 32 (0)10 300 300
Fax: + 32 (0)10 300 339
Mail : corporate@lazerhelmets.com
Table of contents
Languages:
Other LZR Motorcycle Accessories manuals