MAAX SaniNova Silver Series User manual

Silver and Blue Line version Feb2005
1
2

Silver and Blue Line version Feb2005
SILVER LINE :
4
Java 1900 Silver Stratos Duo de Luxe Silver
n
Stratos 1800 Silver
Arosa 1800 Silver
Gemini 1700 Silver
Apollo 1400 Silver
Regency 1400 Silver
Apollo 1400 Silver
BLUE LINE :
5
Arosa 1800 Blue
Stratos Duo de Luxe Blue
Neptune 1500 Blue
Stratos 1800 Blue
Gemini 1700 Blue
Gemini 1700 Blue
Apollo 1400 Blue
Saturn 1700 Blue
Alexis 1700 Blue

Silver and Blue Line version Feb2005
DEAR CUSTOMER,
6
Page 8-17
Congratulations on the purchase of your whirlpool. Your new whirlpool
has been manufactured and tested in accordance with the applicable
standards. Attached to this manual are a CE certificate and a test
certificate.
* Before installation, please check the instructions on the yellow
sticker on the whirlpool.
* Make sure you check your whirlpool on possible damage or
manufacturing faults and record the delivery note with any
problems.
* Transport/handling or collision damage cannot be claimed
afterwards. Should there be any problems, do not fit the
product as refitting costs cannot be entered to, once the product
is installed.
Please contact your dealer first in case of any inconvenience
BESTE KLANT,
Blz. 8-17
Van harte gefeliciteerd met de aankoop van uw whirlpool.
Deze gloednieuwe whirlpool is volledig geproduceerd en getest in
overeenkomst met de gehanteerde internationale standaarden.
Bijgesloten treft u zowel een CE-certicaat als een testcertificaat aan.
* Leest u vòòr installatie goed de instructies op de gele sticker op uw
whirlpool.
* Het is tevens van belang dat u vòòr installatie uw whirlpool goed
controleert op mogelijke schade en/of productiefouten.
* Transport-en verlaadschade kunnen niet achteraf worden
gereclameerd. Mochten er problemen zijn in dat opzicht, monteert u
dan de whirlpool niet, daar in-en uitbouwkosten niet kunnen worden
vergoed.
Neemt u in alle gevallen eerst contact op met uw verdeler/distributeur
CHER CLIENT,
7
Page 18-27
Nous vous félicitons avec l’achat de votre whirlpool. Ce produit a été
complètement fabriqué et testé selon les standards internationaux
valables. Ci-joint vous trouverez un certificat - CE, aussi qu’un certificat de
testage correspondant.
* Prière de lire avec attention les instructions sur l’autocollant jaune
sur votre whirlpool.
* Il est aussi important de contrôler avant l’installation votre whirlpool
sur dommage ou défauts de production.
* Dommage de transport de n’importe quelle nature ne peut pas être
réclamé après. En cas de difficultés éventuelles, arrêtez le montage
du produit. Les frais d’entourage ne peuvent pas être remboursé
après l’installation.
En cas de problèmes, veuillez d’abord contacter votre revendeur
LIEBER KUNDE,
Seite 18-27
herzlichen Glückwunsch zum Erwerb Ihres Whirlpools der Firma Saninova.
Ihr neuer Whirlpool wird in den Niederlanden unter strenger Aufsicht
gebaut und nach Bau einer umfangreichen Kontrolle unterzogen.
* Bitte beachten Sie vor dem Installieren die Hinweise auf dem gelben
Aufkleber auf Ihrem Whirlpool.
* Bitte kontrollieren Sie Ihren Whirlpool auf mögliche Schäden oder
Produktionsfehler und melden Sie jede Art von Problemen auf dem
Lieferschein.
Jeder Art von Schaden kann im Nachhinein nicht mehr reklamiert
werden. Bei Problemen aller Art sollten Sie das Produkt in keiner
Weise installieren, ansonsten kann keine Vergütung mehr
stattfinden.
Bitte kontaktieren Sie bei Problemen zuerst Ihren Verteiler

Silver and Blue Line version Feb2005
INSTALLATION
8
All components, such as the pump and the hydro-jets, are already fitted to
the bath. Consequently the installation of your whirlpool is virtually the
same as an ordinary bath.
Warning! Make sure that no construction refuse or
cement can come into contact with the jets or the
controls.
- Attach a combined overflow/ drain fitting to the bath. Use the adjustable
feet to level the rim of the whirlpool such that it is horizontal, and at the
required height.
- Fix a wooden batton to the wall to support the underneath edge of the
bath and support the weight.
- The floor of the bath should be inclined towards the waste outlet, such
that no water remains in the bath once it has been drained. Fit the trap to
the drainpipe, in the same manner as for a bath.
- The electrical connections are made in the assembled mains connection-
socket.
The electrical installation may only be carried out by an officially
certified electrician.
The installation regulations of the local energy utility company, as well as
DIN 57100 (section 701), must be strictly complied with. The supply must
be protected by a fuse switch (l_n = 30 mA) and by 13A (1.5mm
2
max
2700W) or 16A (2.5mm
2
max 3500W) fuses. Furthermore, this circuit must
contain a dual-pole circuit breaker (not supplied) with a contact aperture of
at least 3 mm. The potential equaliser (at least 4 mm
2
) is to be connected
to the motor plate.
INSTALLATIE
9
Alle onderdelen, zoals de pomp en de hydrojets, zijn al gemonteerd in het
bad. Daardoor wordt de installatie van uw whirlpool praktisch gelijk aan die
van een normaal bad.
Belangrijk ! Let u goed op dat er geen cement of
ander bouwmateriaal in contact kan komen met de
jets of de bedieningsknoppen.
- Bevestig de afvoer aan het bad. Gebruik de verstelbare poten om de
whirlpool op de juiste hoogte te zetten en te egaliseren.
- Bevestig een houten lat tegen de muur om de onderkant van de
badrand te ondersteunen.
- De bodem van het bad moet enigszins aflopen naar de afvoer,
zodanig dat er na leegloop geen water in het bad achterblijft.
Bevestig, zoals bij een gewoon bad, de zwanehals aan de afvoerpijp..
- De hoofdaansluiting wordt in de lasdoos gemaakt.
De electrische installatie kan alleen door een officieel gecertificeerd
electriciën worden gemaakt.
Het is noodzakelijk de installatiebepalingen te volgen van de
energieleverancier, evenals DIN 57100 (sectie 701). De voeding moet
beschermd worden door een zekering (l_n = 30 mA) en door 13A (1.5mm
2
max 2700W) of 16A (2.5mm
2
max 3500W) zekeringen. Hiernaast moet dit
circuit een dubbelpolige aardlekschakelaar (niet inbegrepen) met een
contactopening van tenminste 3 mm bevatten. De aardlekschakelaar
(tenminste 4 mm
2 )
moet verbonden worden met de motorplaat.

Silver and Blue Line version Feb2005
THE TEST PHASE
10
The whirlpool must be tested to make sure that all connections have
been made correctly, and that the bath operates in the correct
manner.
- Fill the bath with water to above the level of the jets. The temperature of
the bath water may never exceed 40°C.
- Check that the on/off switch and air control operate in the correct manner.
- Allow the whirlpool to circulate for a minimum of 15 minutes.
- After 15 minutes turn the whirlpool off, but allow the water to remain in
the bath.
- If you do not see any leaks or other irregularities after a further 15
minutes then you can proceed with the final assembly of the bath (leave
the water in the bath).
FINAL ASSEMBLY
- Enclose the open area under the bath by means of, for example, a frontal
hatch of acrylic.
- Make sure that the hatch is always removable for access, so that the
pump, control box and display panel can be accessed in the event of any
problems.
- Seal the crevices around the whirlpool with silicone sealant in the same
manner as for a bath. This does not include the front panel as it must be
accessible at all times.
- Allow the bath to drain once the mastic has set.
OPERATION/ACTION OF THE WHIRLPOOL
- The on/off switch must only be pressed once the level of water is above
the jets, at least 1 inch.
- Switching on the whirlpool whilst the level of water is below the jets will
greatly shorten the life of the pump.
- The air control can be used to adjust the intensity of the water from the
hydro jets (the strength of the jets of water).
- Turning the control to the left results in powerful jets of water; turning the
control to the right results in gentle jets of water.
DE TESTFASE
11
De whirlpool moet getest worden om er zeker van te zijn dat alle
aansluitingen op een correcte manier zijn verricht en dat het bad op
een juiste manier functioneert.
- Vul het bad met water tot boven het niveau van de jets. De temperatuur
van het water mag niet boven de 40°C uitkomen.
- Controleer of de aan/uit knop en luchtregelaar op een juiste manier
functioneren.
- Laat de whirlpool minstens 15 minuten draaien.
- Zet de whirlpool na 15 minuten af, maar laat het water in het bad staan.
- Indien u geen lekkages of andere onvolkomendheden aantreft na ca. 15
minuten, kunt u overgaan tot de defintieve installering (laat ook nu weer
het water in het bad staan).
DEFINITIEVE ASSEMBLAGE
- Sluit het open gedeelte onder het bad af door middel van bijvoorbeeld
een inspectieluikje van acryl.
- Let u bij de installatie erop dat het luik te allen tijde verwijderd kan
worden, zodat de pomp, electronische bediening en display bij eventuele
problemen bereikbaar zijn voor reparatie.
- Sluit de randen van de whirlpool af met siliconenkit zoals bij een gewoon
bad. Dit geldt niet voor het frontpaneel, omdat dit te allen tijde bereikbaar
moet zijn.
- Laat het bad leeglopen als de kit is aangebracht.
WERKING VAN DE WHIRLPOOL
- De aan/uitknop kan worden ingedrukt als het waterniveau tenminste 2
cm boven de jets staat.
- Het inschakelen van de whirlpool wanneer het water niet het vereiste
niveau heeft kan de levensduur van de pomp aanzienlijk bekorten.
- De luchtregelaar kan gebruikt worden om de waterkracht van de
hydrojets te regelen.
- Draai de knop naar links voor krachtige stralen, draai de knop naar
rechts voor milde stralen.

Silver and Blue Line version Feb2005
JETS
12
Silver Line:
* 2 directional MAC jets with
flower (hydro jets) for your feet
(article number X9163)
* 2 richtbare MAC jets met flower
(hydro jets) voor uw voeten
(artikelnummer X9163)
* 4 adjustable and directional
Power MAAX jets with flower
(hydro jets) for the sides
(article number X9223)
* 4 richtbare en regelbare Power
MAAX jets met flower (hydro
Jets) voor uw zijkanten
(artikelnummer X9223)
* 5 MICRO jets with eye balls
(hydro jets) for your back
(article number X9135)
* 5 MICRO jets met eye balls
(hydro jets) voor uw rug
(artikelnummer X9135)
Blue Line:
* 6 or 8 directional MAC jets without
flower (hydro jets) for the sides
(article number X9163)
* 6 of 8 richtbare MAC jets zonder
flower (hydro jets) voor de zijkanten
(artikelnummer X9163)
CLEANING
13
Cleaning and maintenance of acrylic products is very simple, since virtually
no dirt remains on the surface. Everyday maintenance involves nothing
more than the use of a sponge or a soft cloth with, if necessary, a few
drops of an antistatic product. This will restore your whirlpool’s original
gloss, and impart it with a dirt-repellent finish. Greater amounts of dirt can
be removed with liquid domestic cleaners such as washing-up liquid. Never
use any cleaners containing sand or other abrasive materials.
LIME SCALE
The easiest way to remove lime deposits is to use soap, or a product
containing household vinegar. Never use products designed to remove
lime from boiling-water appliances; these contain chemical substances that
may cause permanent damage to and discoloration of the surface. You
should also avoid organic solvents coming into contact with the bath
(solvents such as nail-varnish remover, methylated spirit, etc.).
SCHOONMAKEN
De schoonmaak en onderhoud van acrylproducten is erg eenvoudig,
omdat er praktisch geen vuil achterblijft op het materiaal. Dagelijks
onderhoud houdt weinig meer in dan het met een spons of een zachte
doek (en eventueel enkele druppels antistatisch middel) schoonpoetsen
van het oppervlak. Dit herstelt de natuurlijke glans en houdt het materiaal
vuilafstotend. Grotere vlekken kunnen met vloeibare schoonmaakmiddelen
zoals afwasmiddel worden verwijderd. Gebruikt u nooit reinigingsmiddelen
met zand of andere krassende materialen.
KALKAANSLAG
De gemakkelijkste manier om kalkaanslag te verwijderen is met behulp
van zeep of een product dat schoonmaakazijn bevat. Gebruikt u geen
chemische middelen die zijn bedoeld voor reiniging van waterkokers e.d.
Deze bevatten substanties die blijvende schade aan en ontkleuring van uw
bad kunnen veroorzaken. Tevens moet u oppassen dat er geen
organische oplosmiddelen, zoals nagellakverwijderaar, in contact komen
met uw bad.

Silver and Blue Line version Feb2005
DAMAGE
14
Any damage to or scratches in the acrylic surface caused as a result of
carelessnes, such as the use of an unappropriate cleaner, will not be
covered as a warranty claim. The damage to or scratches in the acrylic,
can be fairly easily remedied by the use of a polishing compound. Scorch
marks or deep scratches should first be completely ground away (although
you must be careful to make sure that you do not grind through the wall of
the bath), after which the cavity can be filled with special “liquid’ acryl filler.
DISINFECTION OF THE HYDRO SYSTEM
We recommend to clean the whirlpool with a whirlpool cleaner at least
every 4-6 weeks in order to keep the whirlpool free of unwanted oils, this
will maintain a nice clean whirlpool to use.
The procedure is as follows:
- First, fill the bath with water to above the level of the hydro jets.
- Then pour whirlpool cleaner into the middle of the bath (read the
manufacturer’s instructions before you use the cleaner).
- Switch on the hydro pump and allow the water to circulate for
about 10 minutes.
- Finally, allow the bath to empty, and rinse the bath thoroughly.
This procedure is necessary as well if the whirlpool has not been
used for a long period of time.
Make sure that the bathroom is well ventilated whilst you clean this
bath in this manner.
Ensure the air control is set to a minimum.
In general, whirlpool cleaners are irritating and toxic
disinfection products. Please keep them tightly closed
and out of the reach of children.
It is recommended not to leave children unattended in
the whirlpool.
SCHADE
15
Claims met betrekking tot schade of krassen in het acryl die zijn
veroorzaakt door onoplettendheid, zoals het gebruik van een ongeschikt
schoonmaakmiddel, worden niet gehonoreerd. De schade of krassen
kunnen eenvoudig worden verholpen door middel van het gebruik van een
polijstsubstantie. Krassen moeten allereerst grondig worden geschuurd (let
u goed op niet door het materiaal heen te schuren), hierna kan de holte
worden opgevuld met een speciaal ‘vloeibaar’ acrylvulmiddel.
DESINFECTIE VAN HET HYDROSYSTEEM
Wij raden aan eens in de 4-6 weken uw whirlpool schoon te maken met
een whirlpool cleaner om de whirlpool olievrij te houden. Hierdoor blijft uw
whirlpool aangenaam schoon voor gebruik.
De werkwijze is als volgt:
- Vul allereerst uw bad met water tot boven de jets.
- Giet uw whirlpoolcleaner in het midden van het bad (s.v.p. tevoren goed
de instructies op de verpakking van uw whirlpoolcleaner lezen).
- Zet de waterpomp aan en laat het water circa 10 minuten circuleren.
- Laat vervolgens het bad leeglopen en spoel het bad grondig na.
Deze werkwijze is tevens noodzakelijk indien uw whirlpool lange tijd niet
is gebruikt.
Zorgt u ervoor dat uw badkamer goed geventileerd is als u uw bad op
een dergelijke wijze desinfecteert.
Zet de luchtschakelaar op zijn laagste stand
.
Over het algemeen zijn whirlpoolcleaners are
irriterende en toxische desinfectieproducten. Berg
deze middelen veilig en buiten het bereik van kinderen
op. Het is aan te raden kinderen niet zonder toezicht in
uw whirlpool te laten.

Silver and Blue Line version Feb2005
GUARANTEE
16
- Saninova offers a guarantee on manufacturing faults of 2 years on
the whirlpool technique and 5 years on the bath itself.
The guarantee period starts on the purchase date of your whirlpool.
- In order to be able to accept a guarantee claim, we require a copy of
your purchase invoice and the specific test certificate.
- Material damage caused by transportation or collision is not
included.
- Re-installation costs for replacing damaged baths will not be
reimbursed.
- We can only be held liable for the cost of the product involved.
Enjoy. Every day.
GARANTIE
17
- Saninova biedt een garantieperiode op productiefouten: 2 jaar
op de whirlpooltechniek en 5 jaar op het bad zelf.
De garantieperiode gaat in op de aankoopdatum van uw
whirlpool.
- Om een garantieclaim te kunnen honoreren, hebben wij een kopie
nodig van uw aankoopbon en het specifieke testcertificaat.
- Materiaalschade veroorzaakt door transport of inbreuk wordt niet
gedekt.
- Herplaatsingskosten ten behoeve van het vervangen van een bad
worden niet vergoed.
- Wij kunnen alleen aansprakelijk gesteld worden voor de kosten van
het specifieke product.
www.saninova.nl
Due to the process of continuous development, we reserve the right to adapt the
specifications without notice.
Our general terms and conditions are available on request at your dealer.
Should you require assistance, you can contact our
After Sales Service: +44 (0)1452 721 440
Door voortdurende producttechnische ontwikkelingen, behouden wij ons het
recht voor specificaties te wijzigen zonder voorafgaand bericht.
Onze algemene voorwaarden zijn op aanvraag beschikbaar bij uw verdeler.
Indien uw vragen of opmerkingen heeft, kunt u contact opnemen met onze
After Sales afdeling: +31(0)186 607 300

Silver and Blue Line version Feb2005
INSTALLATION
18
Toutes les pièces, comme la pompe et les injecteurs d’eau, sont déja
monté dans le bain. Par conséquence, l’installation de votre whirlpool sera
pratiquement pareille à celle d’un bain normal.
Prière d’éviter le contact entre le ciment ou autre
matière de construction avec les injecteurs ou les
boutons d’opération.
- Attachez le drainage. Utilissez les pieds réglables pour mettre le
whirlpool à hauteur et égale.
- Attachez une barre de bois contre le mur pour supporter la partie
inférieure du bain.
- Le fond du bain doit descendre un peu pour qu’il ne reste plus d’eau dans
le bain après drainage. Veuillez rattacher la valve au tuyau de drainage.
- Les connections électriques sont faites dans une cosse de connection
centrale.
L’installation électrique ne peut pas être fait que par un electricien
officiellement certifié.
Les régulations de l’installation du fournisseur d’energie local, ainsi que le
DIN 57100 (section 701), doivent être maintenu strictement.
L’alimentation doit être protégé par un fiche (l_n = 30 mA) et par 13A
(1.5mm
2
max 2700W) ou 16A (2.5mm
2
max 3500W). En plus, ce circuit
devrait comprimer un interrupteur de fuite à 2 pôles (pas livré) avec une
aperture du contact de 3 mm au moins. L’interrupteur (au moins 4 mm
2
)
doit être lié au tôle du moteur.
INSTALLATION
19
Alle Komponente, wie die Pumpe und die Hydro-Jets, sind bereits
installiert. Dies erleichtert den Einbau für Sie sehr und ist nicht viel
schwieriger wie der Einbau einer einfachen Badewanne.
Bitte sichern Sie sich dass kein Bauschmutz oder
Zement in die Düsen oder Steuerung gelangen kann.
- Schließen Sie eine kombinierte Ab- und Überlaufgarnitur passend zum
Bad an. Benützen Sie die beiliegenden Füße um die Höhe einzustellen
und waagrecht aufzustellen.
- An der Wand sollten Sie einen Träger (Holzlatten) in der gewünschten
Höhe anbringen.
- damit kein Wasser in der Wanne stehen bleibt, sollte der Wannenboden
ein wenig diagonal zum Ablauf neigen. Befestigen Sie die Klemme an
den Ablauf, in gleicher Weise wie bei einer einfachen Badewanne.
Die elektrische Installation sollte nur durch einen registrierten
Elektriker durchgeführt werden.
Die lnstallationsvorschriften der örtlichen Energieversorgungs-
unternehmen, sowie die Bestimmungen der DIN 57100 Teil 701 bzw. VDE
0100 Teil 701 sind strengstens zu beachten. Die Zuleitung muß über einen
Fehlerstromschutzschalter (I _ n = 30 mA) geführt werden und mit 13A (1.5
mm2 max. 2700W) oder 16A (2.5 mm2 max. 3500W) abgesichert sein.
Ebenso muß dieser Stromkreis mit einem allpoligen Schalter mit
mindestens 3 mm Kontaktöffnungsweite abschaltbar sein. Die
Potentialausgleichsleitung (mindestens 4 mm2) ist an dafür vorgesehenen
Stelle (mittels ,,PE“ Aufkleber gekennzeichnet) anzuschließen.

Silver and Blue Line version Feb2005
LE TESTAGE
20
Le whirlpool doit être testé pour être sûr que toutes les connections
ont été effectuée correctement et que le bain fonctionne sans faute.
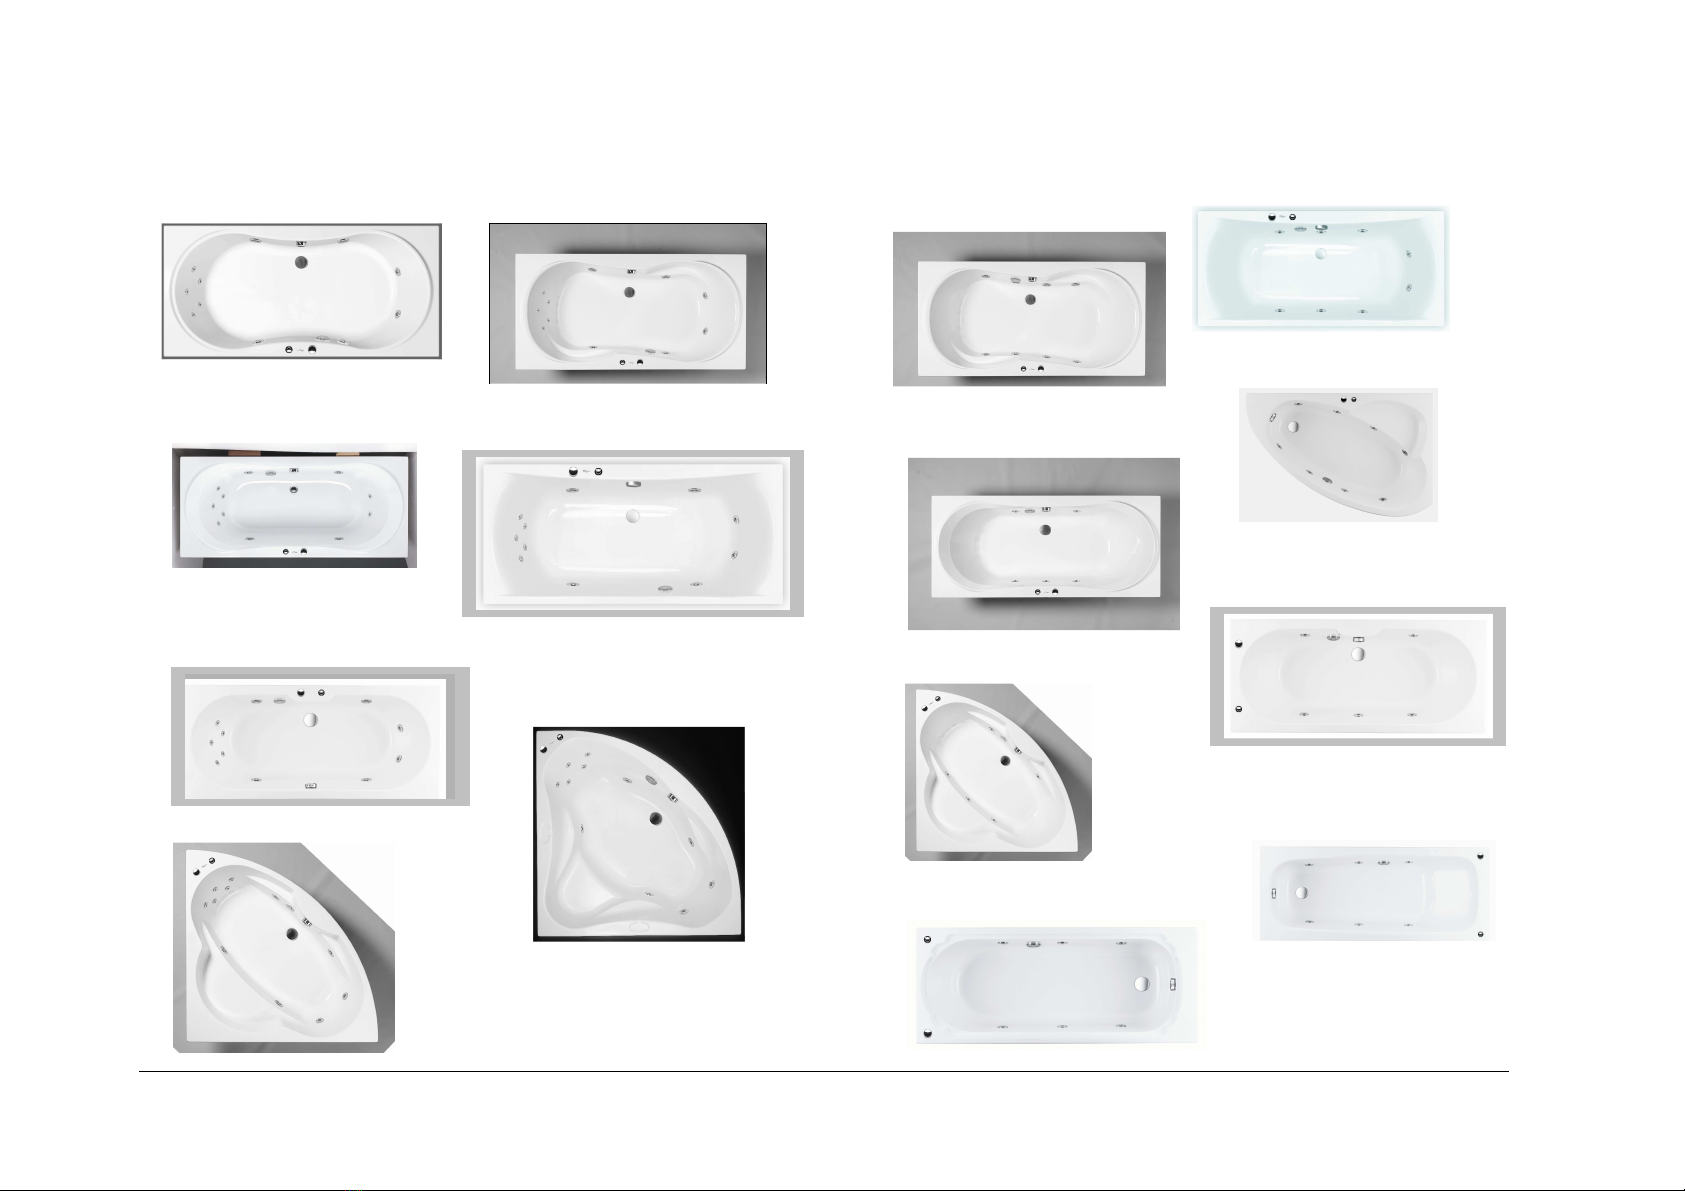
- Remplissez le bain avec l’eau jusqu’en dessus du niveau des injecteurs.
Le température de l’eau ne doit pas excéder les 40°C.
- Veuillez vérifier que les boutons de l’interrupteur et du régulateur
fonctionnent sans erreur.
- Laisser circuler le whirlpool pour au moins 15 minutes.
- Débranchez le whirlpool après environ 15 minutes, mais laissez l’eau
dans le bain.
- Si vous ne trouvez pas pas de fuites ou autres défauts après ca. 15
minutes, vous pouvez avancer avec l’installation définitive (laissez
toujours l’eau dans le bain).
ASSEMBLAGE DEFINITIVE
- Couvrez la partie ouverte en dessous du bain avec par exemple un
panneau acrylique.
- Faites attention pendant l’installation que le panneau pourrait-être enlevé
si nécessaire, pour que la pompe et les touches de commande soient
accessible pour réparation éventuelle.
- Mastiquez les bords du whirlpool avec du mastique (comme le montage
d’un bain normal). Ceci ne compte pas pour un panneau de front, parce
que celui-ci doit être toujours accessible.
- Remplissez le bain quand le mastic est fait.
FONCTIONNEMENT DU WHIRLPOOL
- Le bouton de l’interrupteur peut-être uniquement pressé si l ‘eau se
trouve au moins 2 cm en dessus du niveau des injecteurs.
- Si vous mettez votre whirlpool en marche quand l’eau n’a pas le niveau
demandé, ceci pourrait abréger considérabement la durée de vie de la
pompe.
- Le régulateur d’air peut-être utilisé pour régler la force d’eau des
injecteurs.
-Tournez le bouton à gauche pour obenir des filets forts. Tournez le
bouton à droite pour obtenir des filets doux.
DIE KONTROLLPHASE
21
Sicherheitshalber sollte kontrolliert werden ob die Anschlüsse richtig
angeschlossen sind und ob die Funktionen richtig arbeiten.
- Der Wasserstand sollte sich oberhalb der Hydrodüsen befinden. Die
Temperatur des Wassers sollte nicht höher sein als 40 °C.
- Prüfen Sie ob der Ein-/Ausschalter und Luftregler richtig funktionieren.
- Schalten Sie ihren Whirlpool ein und lassen Sie es ca. 15 Minuten laufen.
- Schalten Sie den Whirlpool nach 15 Minuten aus, aber lassen Sie das
Wasser noch in der Wanne stehen.
- Wenn Sie danach keine z.B. leckenden Stellen finden, können Sie den
letzten Montagen anfangen.(Bitte lassen Sie das Wasser im Bad stehen).
LETZTEN MONTAGEN
- Wir empfehlen für die Abdeckung der Seiten eine Schürze zu benützen.
Falls Sie jedoch eine Mauer bauen, sollten Sie einen Revisionsschacht
von mindestens 40 x 40 cm einbauen.
- Bitte beachten Sie dass die Abdeckung jederzeit entfernt werden kann,
sodass die Pumpe, Steuerung und Bedienung immer erreichbar sind.
- Kitten Sie die Ränder des Whirlpools ab in der gleichen Weise wie bei
einer Wanne. Kitten Sie nicht die Schürze ein, wegen die Zugänglichkeit.
- Lassen Sie das Wasser abfließen wenn das Bad völlig eingekittet ist.
BEDIENUNG UND FUNKTIONEN
- Der Ein- und Ausschalter sollte nur dann benützt werden wenn die
Wasserhöhe überhalb der Jets ist.
- Sichern Sie sich dass der Wasserstand mindestens 2,5 cm oberhalb der
Düsen ist.
- Wenn Sie das Whirlpool einschalten während der Wasserstand unterhalb
der Düsen ist, kann es passieren dass dadurch die Lebensdauer der
Pumpe verkürzt wird.
- Die Luftregelung kann benützt werden um die Intensität des Wasser von
den Düsen zu regeln (Die Stärke der Luft von den Hydrojets).
- Wenn Sie die Steuerung nach Links drehen wird die Leistung der
Wasserstrahlen verstärkt, wenn Sie es nach Rechts drehen wird die
Leistung der Wasserstrahlen gemildert.

Silver and Blue Line version Feb2005
INJECTEURS/JETS
22
Silver Line:
* 2 injecteurs hydro type MAC
réglables avec rosette pour les
pieds (article no. X9163)
* 2 richtbare MAC jets mit Rosette
(Hydro Jets) im Fussbereich
(Artikelnr. X9163)
* 4 injecteurs hydro réglables et
dirigeables, type Power MAAX,
avec rosette (article no. X9223),
pour les côtés.
* 4 regelbare und richtbare Power
MAAX Jets mit Rosette (Hydro Jets)
im Seitenbereich (Artikelnr. X9223)
* 5 injecteurs hydro type MICRO
dirigeables avec bal d’oeuil pour
le dos (article no. X9135)
* 5 richtbare MICRO Jets mit
Brausenauge (Hydro Jets) für den
Rückenbereich (Artikelnr. X9135)
Blue Line:
* 6 ou 8 injecteurs hydro type ‘MAC’
réglables sans rosette pour les
côtés (article no. X9163)
* 6 oder 8 richtbare MAC Jets ohne
Rosette (Hydro Jets) für den
Seitenbereich (Artikelnr.. X9163)
NETTOYAGE
23
Le nettoyage et entretien des produits acryliques est très facile, vu que il
ne reste pratiquement pas de tâches à la surface. L’entretien journalier ne
comprise que l’usage d’un éponge ou un torchon doux avec, si nécessaire,
quelques gouttes d’un produit antistatique. Dans cette manière, votre
whirlpool maintiendra son éclat naturel et son couche de protection. Si le
bain est plus sale, l’usage d’un produit de nettoyage, comme un détergent,
est recommandable. N’utilisez jamais des produits qui contiennent du
sable ou autres matériaux rayants.
TARTRE CALCAIRE
La meilleure façon pour enlever le tartre calcaire est par l’utilisation du
savon normal ou un produit qui contient le vinaigre.N’utilisez pas de
produits chimiques pour e.a. les bouilloires. Ces produits contiennent des
substances chimiques qui pourraient causer du dommage permanent et
décolorisation de la surface. En plus, il est important d’éviter le contact des
dissolvants organiques avec la surface de votre bain.
OBERFLÄCHENREINIGUNG
Die Reinigung und Pflege von Acryl ist sehr leicht, da auf der Oberfläche
kaum Schmutzreste zurückbleiben. Für die tägliche Pflege nehmen Sie
einfach einen Schwamm oder ein weiches Tuch und eventuell einige
Tropfen eines antistatischen Mittels. Damit geben Sie ihrem Whirlpool
wieder frischen Glanz und erneuern seine Schmutzprotektion. Stärkere
Verschmutzungen können Sie mit einem flüssigen Haushaltsreiniger (z.B.
Spülmittel) entfernen. Keinesfalls dürfen scharfe, sand- oder säurehaltige
Reinigungs- oder Scheuermittel verwendet werden!
KALKFLECKEN
Kalkablagerungen entfernen Sie am schnellsten mit Seifen oder mit einem
haushaltsessighaltigen Reinigungsmittel. Niemals Kalklöser verwenden,
die für Kochgeräte geeignet sind! Diese enthalten Chemikalien die die
Oberfläche der Wanne dauerhaft verfärben oder beschädigen können.
Ebenso keine organischen Lösungsmittel (z.B. Verdünner,
Nagellackentferner, Spiritus, etc.) verwenden.

Silver and Blue Line version Feb2005
DOMMAGE
24
Des réclamations sur n’importe quel dommage ou raies sur la surface
acrylique causé par négligence, comme l’utilisation d’un liquide nettoyant
impropre, ne seront pas considérées comme des réclamations justifiées.
Le dommage ou les raies dans l’acrylique, peuvent être facilement résolu
par l’usage d’un polissoir. Les raies plus profondes doivent être grinçé
entièrement (faites attention de ne pas grinçer à travers de l’acryl), ensuite
le trou pourrait-être rempli avec une masse de remplissage acylique
liquide.
DESINFECTION DU SYSTEME HYDRO
Nous vous recommandons de nettoyer le système de votre whirlpool avec
un liquide nettoyant au moins une fois par 4-6 semaines pour le défaire de
huiles.
La procédure est comme suite:
- D’abord, remplissez votre bain avec de l‘eau jusqu’en dessus du niveau
des injecteurs.
- Ensuite versez le liquide au le milieu du bain (prière de lire les
instructions du fabricant avant que vous utilisez le liquide).
- Mettez la pompe en marche et laissez l’eau circuler pour plus ou moins
10 minutes.
- Finalement, videz le bain et laissez le rincer intensément.
Cette procédure est aussi nécessaire si votre whirlpool n’a pas été utilisé
pendant une longue période.
Arrangez une bonne ventilation de la salle de bain pendant que vous
desinfectez la salle de bain dans cette façon.
Mettez le régulateur d’air au minimum.
En général, les liquides desinfectants sont des
produits irritants et toxiques. Veuillez les ranger en
lieu sûr et hors de la portée des enfants.
Il est recommandé de ne pas laisser les enfants au
whirlpool sans surveillance.
BESCHÄDIGUNGEN
25
Durch Beschädigungen oder Kratzer in der Acryloberfläche, resultierend
aus Nachlässigkeit und/oder Gebrauch eines nicht angebrachten
Reinigungsmittels, enfällt jeglicher Garantieanspruch. Die Beschädigung
oder die Kratzer im Acryl, können durch den Gebrauch eines Poliermittels
ziemlich leicht behoben werden. Brandflecken oder tiefe Kratzer sollten
zuerst vollständig abgeschliffen werden (bitte achten Sie darauf dass Sie
nicht zu Tief schleifen), bevor es mit speziellem Flüssig - Acryl aufgefüllt
werden kann.
REINIGUNG DES HYDROSYSTEMS
Wir empfehlen Sie um Ihren Whirlpool mindestens alle 4-6 Wochen mit
einem Whirlpoolreinigungsmittel zu reinigen. Damit halten Sie Ihren
Whirlpool frei von unerwünschten Verschmutzungen.
Das Verfahren ist wie folgt:
- Zuerst, füllen Sie das Bad mit Wasser. Sichern Sie sich dass der
Wasserstand mindestens 2,5 cm oberhalb der Düsen ist.
- Dann geben Sie das Whirlpoolreinigungsmittel in die Mitte des Bades
(lesen Sie die Anweisungen des Fabrikanten, bevor Sie das
Reinigungsmittel benutzen).
- Schalten Sie die Hydropumpe ein und lassen Sie das Wasser für
ungefähr 10 Minuten zirkulieren.
- Schließlich, lassen Sie das Wasser ablaufen, und spülen Sie das Bad
gänzlich nach. Dieses Verfahren ist außerdem notwendig, wenn Ihr
Whirlpool während eines längeren Zeitabschnittes nicht mehr benützt
worden ist.
Überprüfen Sie während diesen Vorgang das Ihr Badezimmer gut
ventiliert wird. Sichern Sie sich dass die Luftsteuerung auf ein
Minimum eingestellt ist.
Im Allgemeinen sind Whirlpoorlreinigungsmittel
irritierende und giftige Desinfektionsprodukte. Bitte
unter Verschluss und für Kinder unzugänglich
aufbewahren. Es wird dringend empfohlen um Kinder
nicht unbeaufsichtigt im Whirlpool zu lassen.

Silver and Blue Line version Feb2005
GARANTIE
26
- Saninova vous offre une garantie sur erreurs de production de 2 ans
sur la technique du whirlpool et 5 ans sur le matériel bain même.
La garantie commence à partir du jour d’achat de votre whirlpool.
- Pour accepter votre réclamation de garantie, il nous est nécessaire
de recevoir une photocopie de votre facture d’achat et le cerficat de
testage spécifique.
- Le dommage du matériel causé par le transportation ou la collision
n’est pas inclus.
- Des frais de remplacement ne peuvent pas être remboursé.
- Nous pouvons seulement être responsable pour le coût du produit
correspondant.
Enjoy. Every day.
GARANTIE
27
-Saninova bietet eine Garantie auf Herstellungsfehler von 2 Jahren
auf die Technik und 5 Jahren auf das Acrylbad.
Die Garantieperiode beginnt ab Kaufdatum.
-Um in der Lage zu sein um Ihren eventuellen Garantieanspruch
anzunehmen, benötigen wir eine Kopie Ihrer Rechnung und des
spezifischen beiliegenden Testzertifikats.
-Ein Sachschaden, der durch Transport oder Kollision verursacht
wird, ist nicht darin enthalten.
-Wiedereinbau- und Folgekosten für das Ersetzen des
beschädigten Bades werden nicht zurückerstattet.
-Saninova haftet bei berechtigten Reklamationsfällen nur für die
Reparaturkosten des betroffenen Produktes oder deren Ersatz.
www.saninova.nl
Suite aux développements permanents, nous nous réservons le droit de modifier
les spécifications sans avis précédent.
Nos conditions générales de vente sont disponible sur demande chez votre
distributeur.
Contactez notre service après-vente en cas de questions ou difficultés:
+31 (0)186 607300
Technische Änderungen, Änderungen der Ausstattung oder des Service bleiben
vorbehalten.
Unsere Allgemeinen Bedingungen und Konditionen sind auf Anfrage bei Ihrem
Händler zu bekommen.
Kontaktieren Sie bitte unsere Serviceabteilung bei Fragen oder Probleme:
+31 (0)186 607300

Silver and Blue Line version Feb2005
28
Saninova B.V.
Boonsweg 81
3274 LH Heinenoord
The Netherlands
Tel.: +31 (0)186 607373
Fax: +31 (0)186 603838
Internet : www.saninova.nl
Saninova – Maax U.K.
Avionics House
Quedgeley Enterprise Park
Naas Lane
Quedgeley – Gloucestershire GL2 2SN
Tel.: +44 (0) 1452 721440
Fax: +44 (0) 1452 721187
Email: sales@saninova.net
This manual suits for next models
15
Table of contents
Other MAAX Bathtub manuals
Popular Bathtub manuals by other brands

OVE
OVE LOUNGER installation manual

Fleurco
Fleurco ALTO BAL5831 Installation and user guide

Crosswater
Crosswater Batello Grande US-N10CS installation instructions

American Standard
American Standard Ellisse Oval Whirlpool and Bathing Pool... Specification sheet

Kingkraft
Kingkraft Contour Instructions for use

RAVAK
RAVAK 160 quick start guide